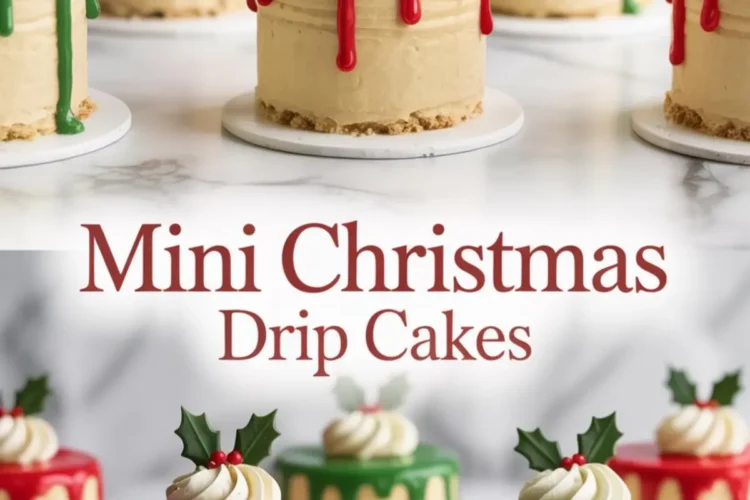
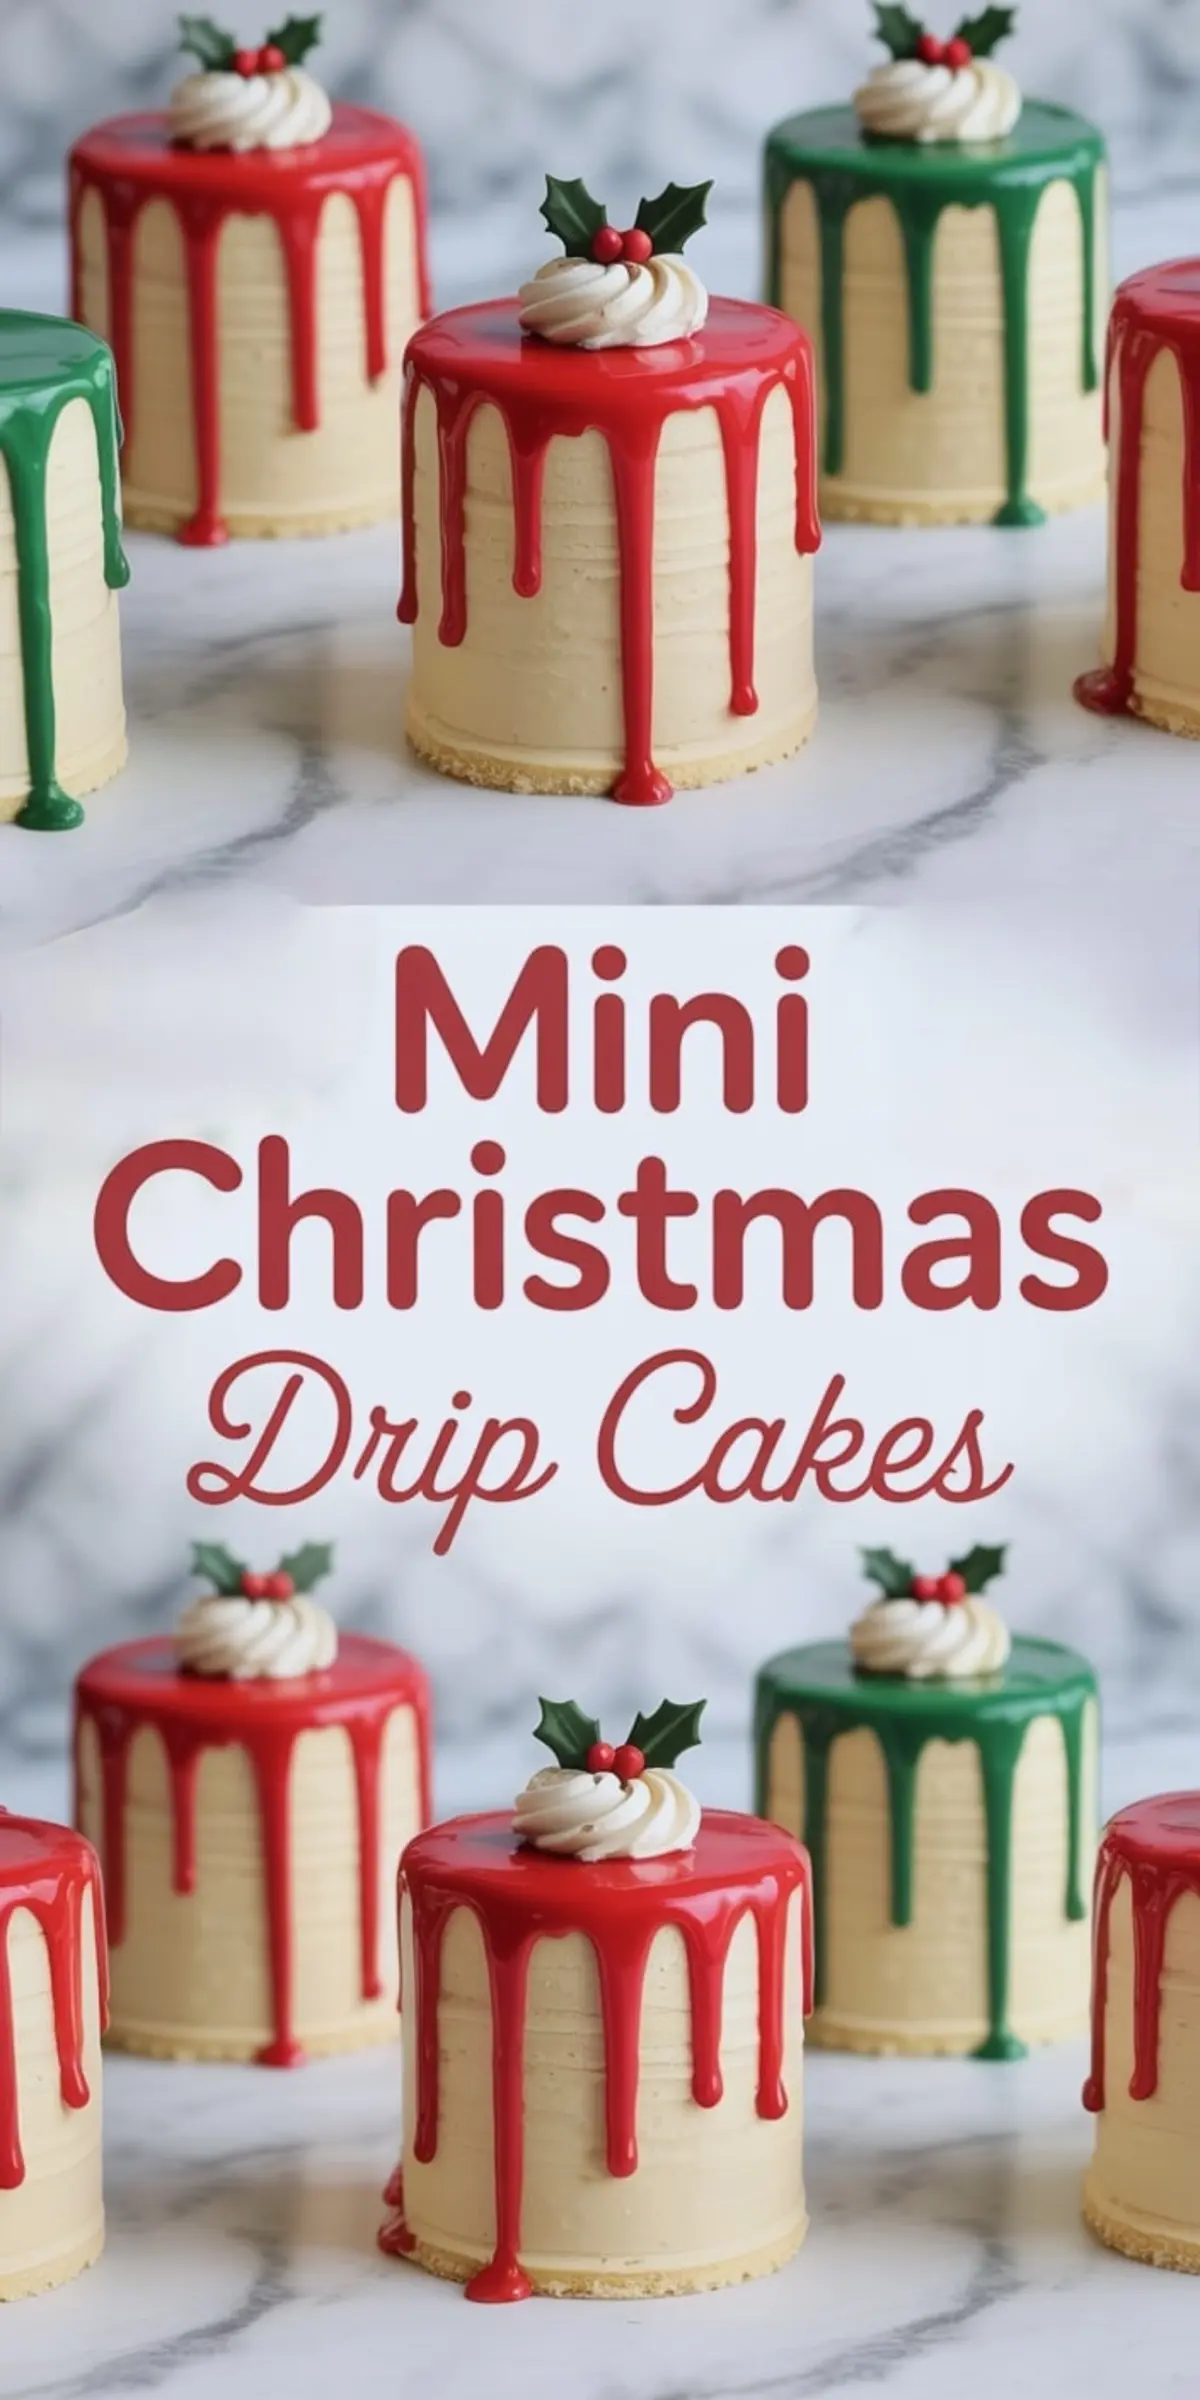
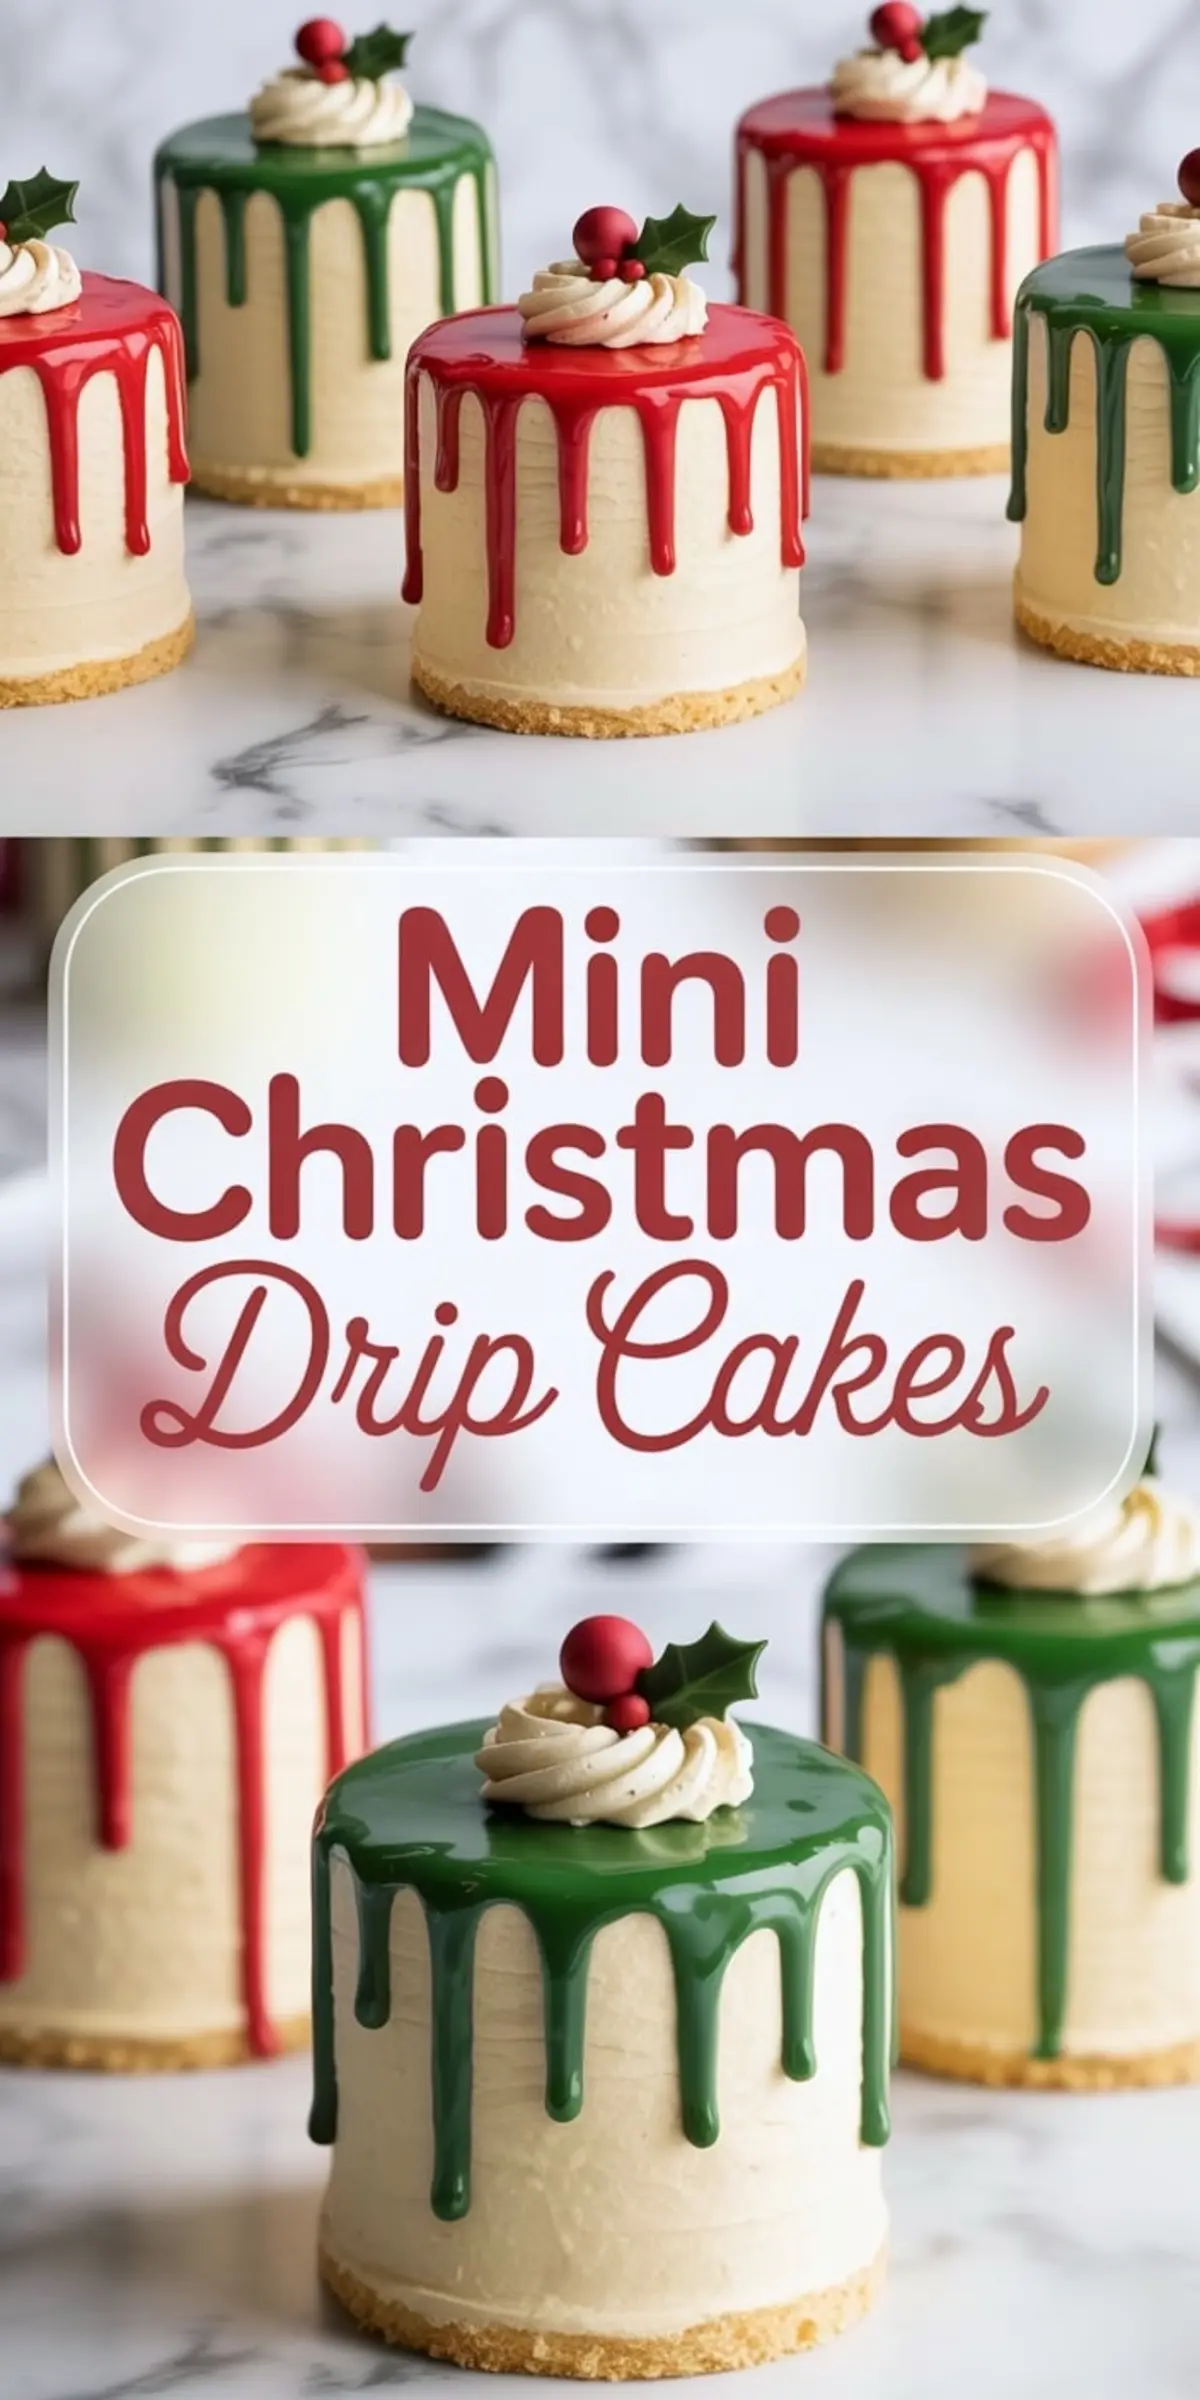
These Mini Christmas Drip Cakes combine buttery vanilla sponge, creamy white chocolate mascarpone filling, and a cookie base, all topped with bright red and green ganache drips and a buttercream swirl.
This recipe works well for Christmas cake designs, party dessert tables, or December baking projects where holiday cakes need strong presentation and clear flavor. You can use them for a Christmas themed cake platter, holiday gifts, or mini Christmas desserts that highlight your Christmas cupcakes recipes lineup.
The Sponge and Structure Work Together
The recipe begins with a baked cookie crumb base that acts as a firm foundation for the vanilla sponge. That layer helps keep the cake from sticking or crumbling when slicing, especially when working with mini molds or short cakes. For these, I use three-inch mini cake tins.

Each sponge layer uses a 1:1:2 fat-sugar-flour ratio, which creates a moist but sturdy crumb. That balance holds the filling well and supports the buttercream without sagging. Compared to genoise or oil-based cake batters, this one has enough lift for height but enough weight to feel substantial.
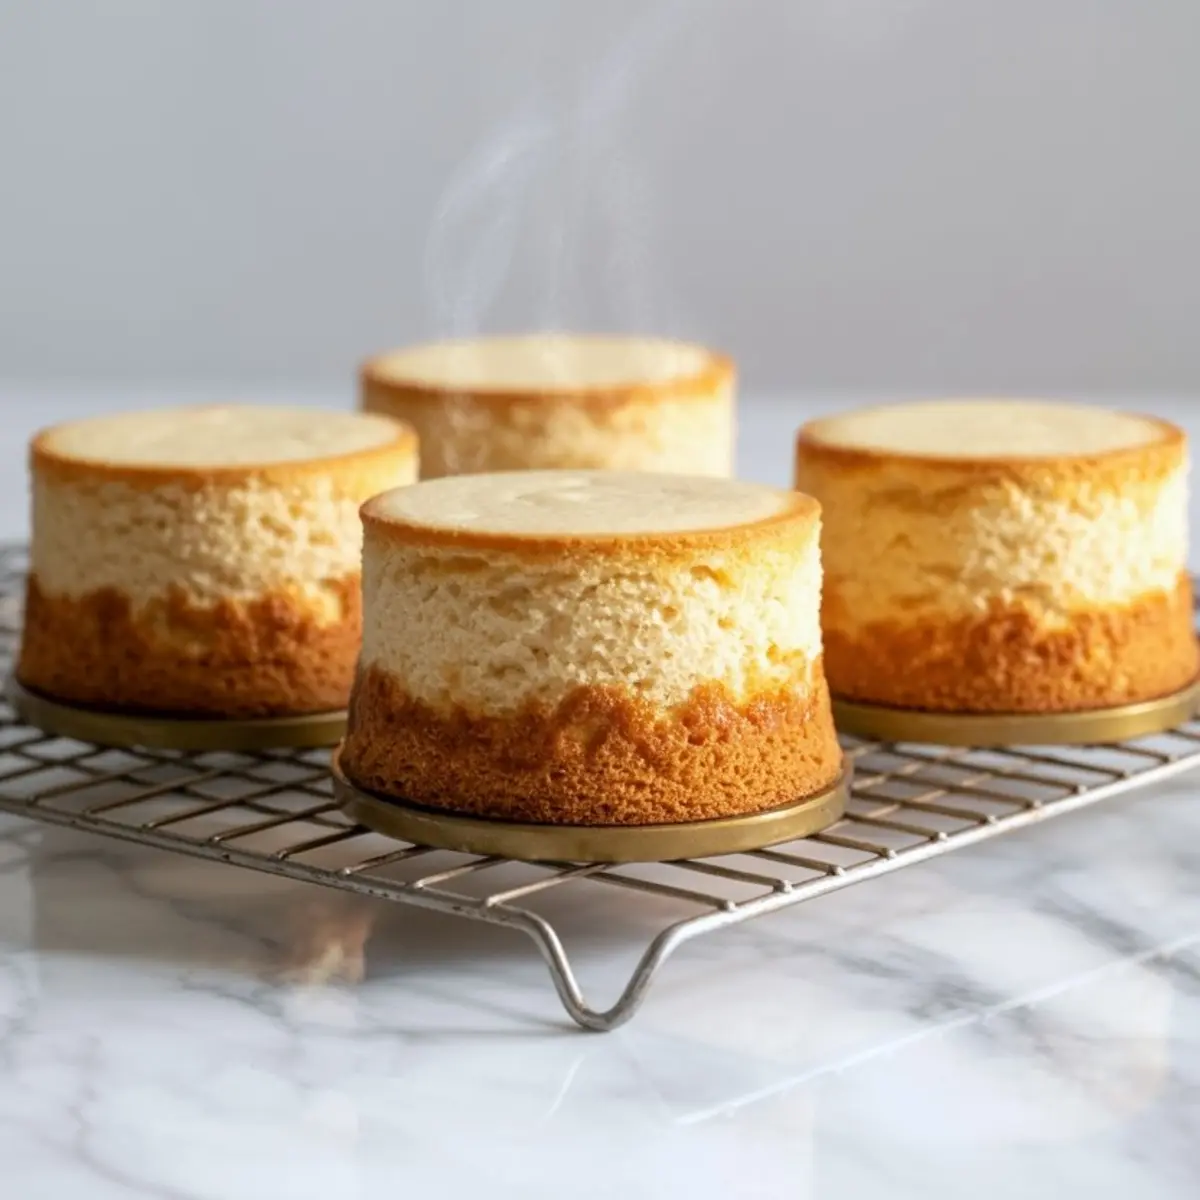
I bake the sponge directly on the cookie base to avoid any shifting. That also gives each slice a crisp edge when chilled and cut. It’s a small step, but it holds everything in place once the drip and swirl go on.
Creamy Filling with White Chocolate and Mascarpone
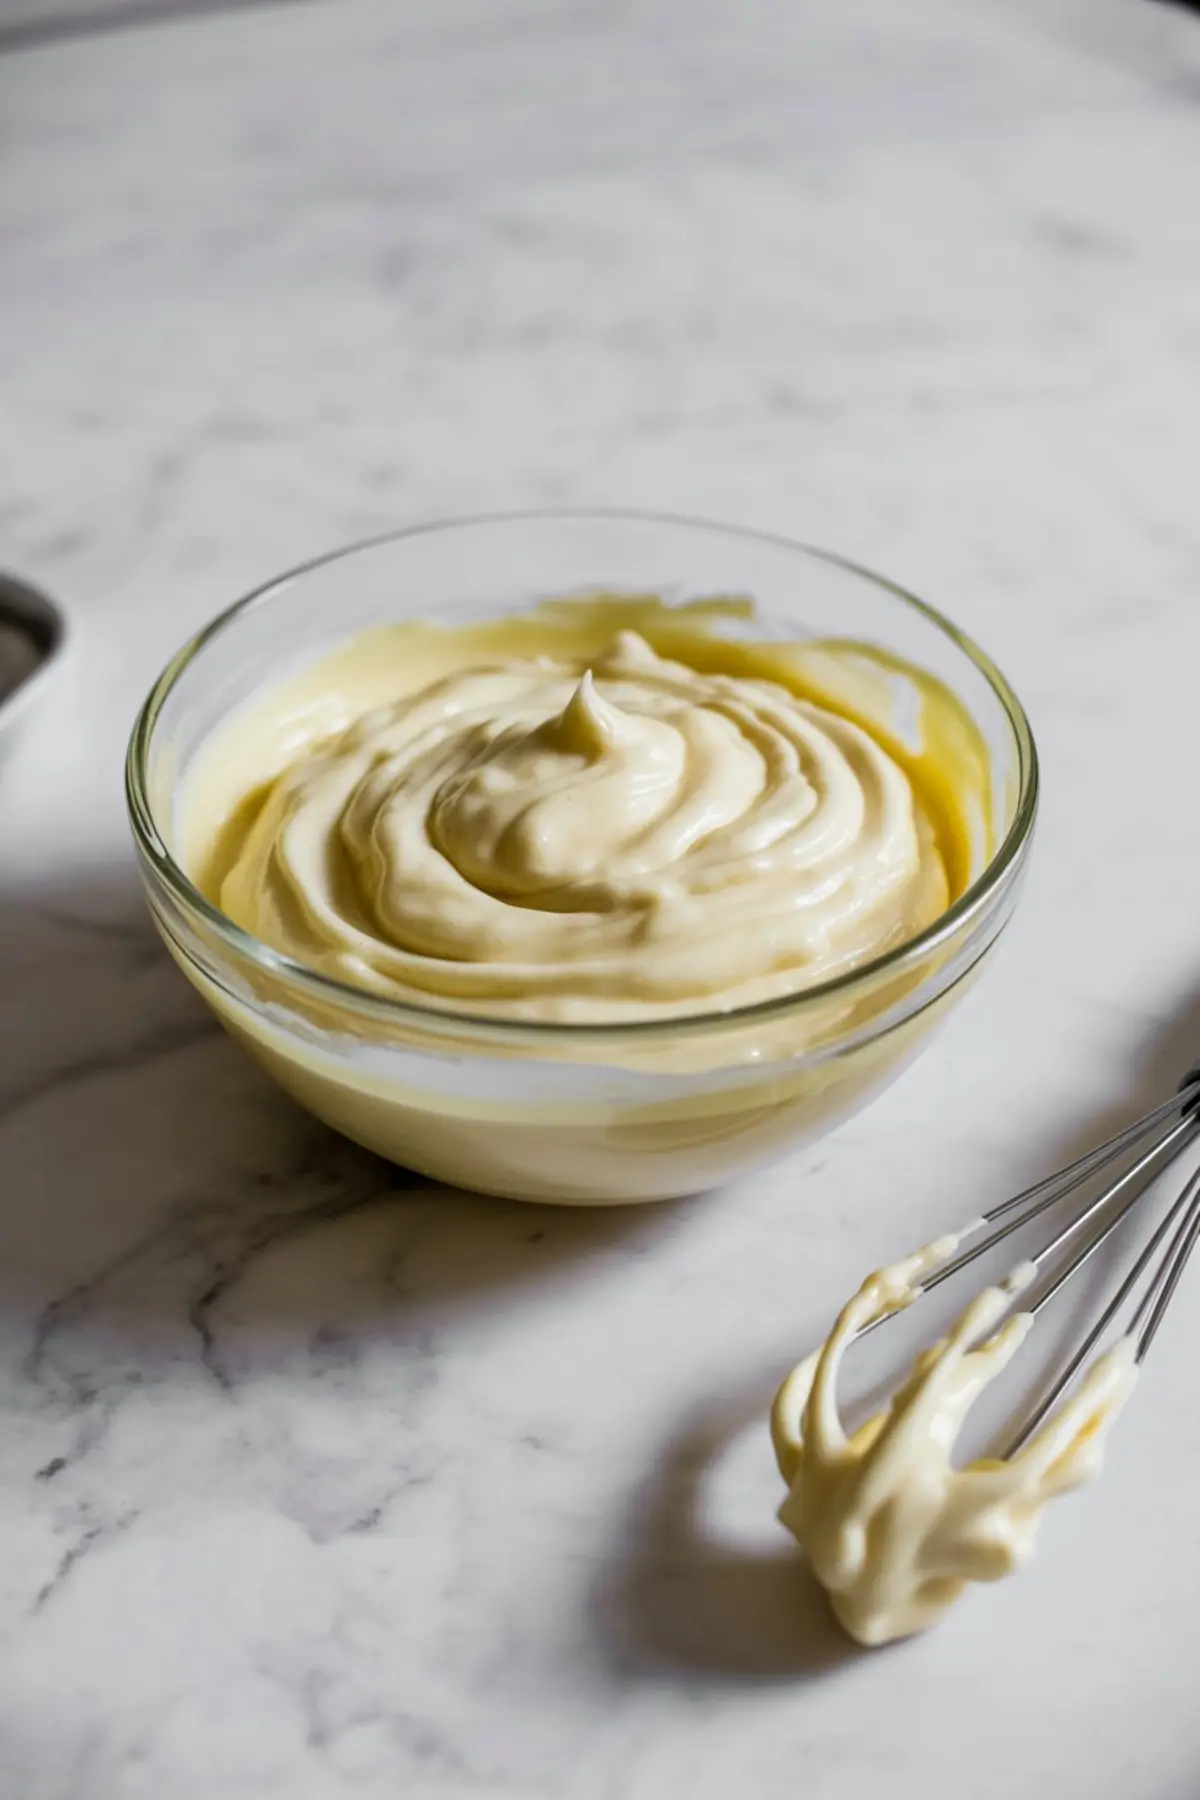
The white chocolate filling adds structure between the layers without being heavy. I use chopped white chocolate melted into warm cream, cooled, then folded into room-temperature mascarpone with a touch of vanilla.
Mascarpone brings a mellow sweetness and smoother finish than cream cheese, but either works. If your mascarpone ever seems watery, beat it briefly with a cold whisk before folding in the chocolate. It should look thick, glossy, and soft enough to spread, but not runny. A spoon stood in it should slowly lean, not fall.
This filling also works as a base for other festive desserts. I’ve used it in my Gingerbread Cake Truffles and sometimes thin it slightly for layering inside my Christmas Cake Idea.
Ingredient Choices and Substitutions
For the cookie base, either digestive biscuits or graham crackers work well. I prefer digestives when I want a less sweet foundation. I grind them fine and mix with just enough butter to bind. The added sugar isn’t necessary if the biscuits are already sweet, so I reduce it slightly.
The vanilla sponge gets its flavor from real vanilla extract and richness from whole milk and softened butter. Avoid margarine or skim milk here. The structure will collapse and the crumb will dry out. If you need to make the cake dairy-free, use plant butter with similar fat content and oat milk. Texture will be lighter, but it still bakes through cleanly.
The buttercream uses a high-fat ratio, with just a splash of cream to loosen it. I always sift the powdered sugar. That step might feel skippable, but it prevents clumps and gives the frosting a smooth texture you can actually pipe.
Drip Technique and Assembly Tips
I apply a thin crumb coat to each cake, chill it, then add the final smooth buttercream shell before chilling again. This helps control the drip. If the cake is room temperature or soft, the ganache will melt and bleed.
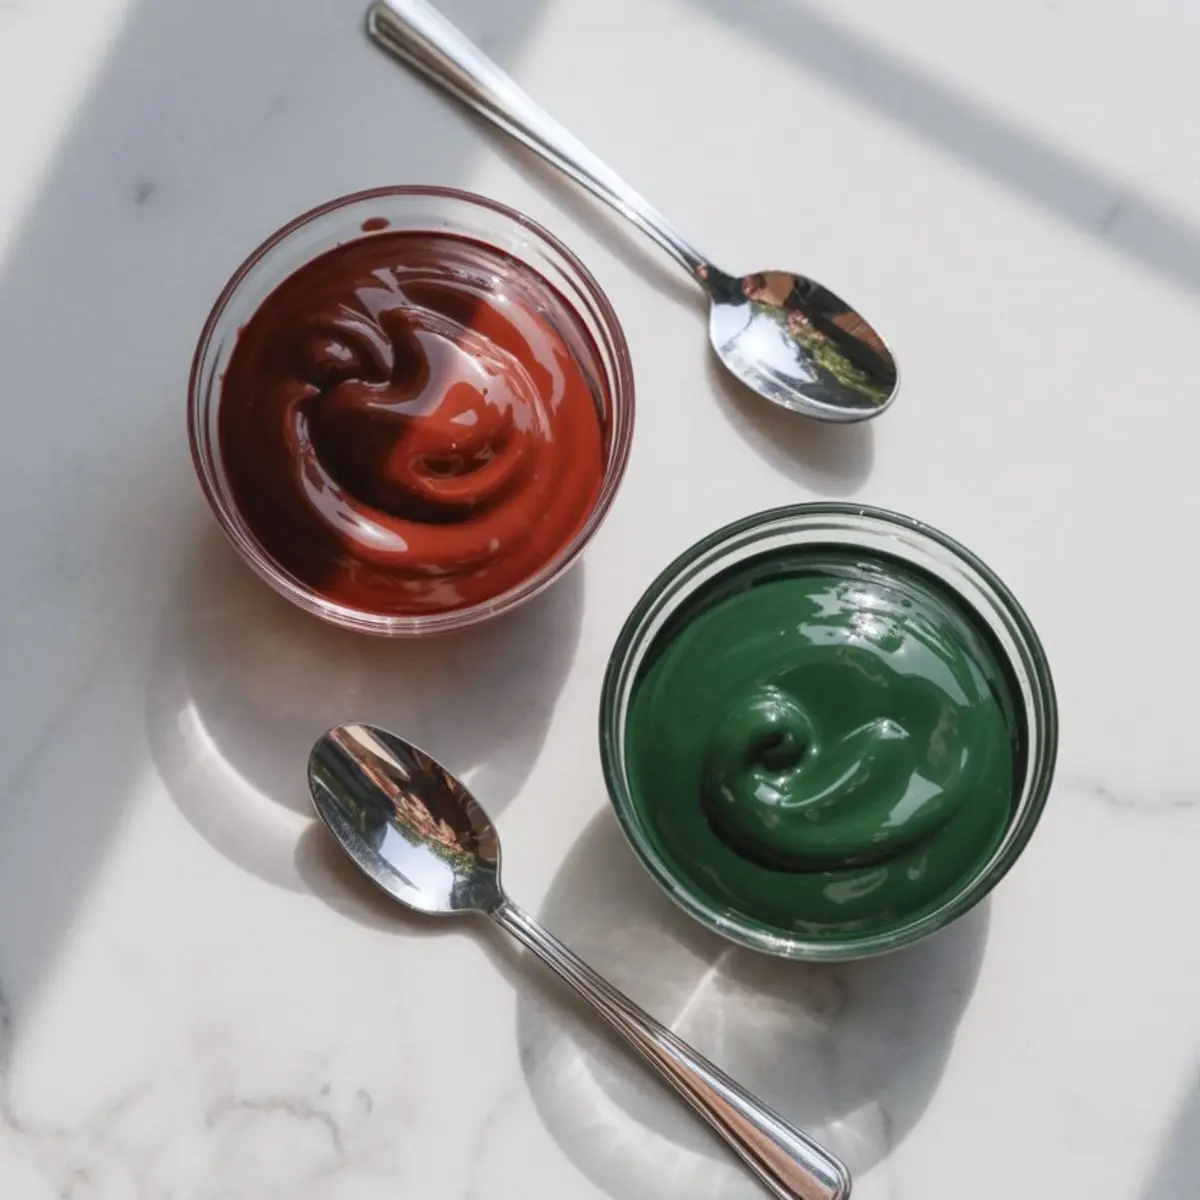
Use oil-based food coloring for the red and green drip, not water-based. Water can seize the chocolate. I always test the ganache on a small plate first. If it moves too fast, it’s too warm. Let it sit for 3 to 5 minutes before starting.
I’ve also used this drip on my Christmas Ice Cream and adapted the colors for Valentine’s or Easter bakes. It’s flexible if you keep the texture right.
Decorations and Holiday Presentation
Once the drip sets, I pipe a single star-tip swirl of buttercream on top. This balances the bold ganache without overwhelming the flavor. A few edible holly sprinkles or small chocolate shapes finish it cleanly.
If you’re setting up a dessert board or cake table, you can pair these with Cinnamon Maple Pecan Roulades for a soft-spice contrast or add one to each plate as a plated mini Christmas dessert.
Each cake stands about 2.5 inches tall once assembled. I refrigerate them on a tray and bring them to room temperature 30 minutes before serving.
Save This Recipe and Join the Conversation
Save this mini cake idea to your holiday Pinterest board now so you have it when you need something bright, bold, and completely portioned.
Tried it or added your own twist? Leave a comment with how it went or share your favorite way to decorate these cakes. I read every note and love hearing how you use the recipes.
Mini Christmas Drip Cakes Recipe
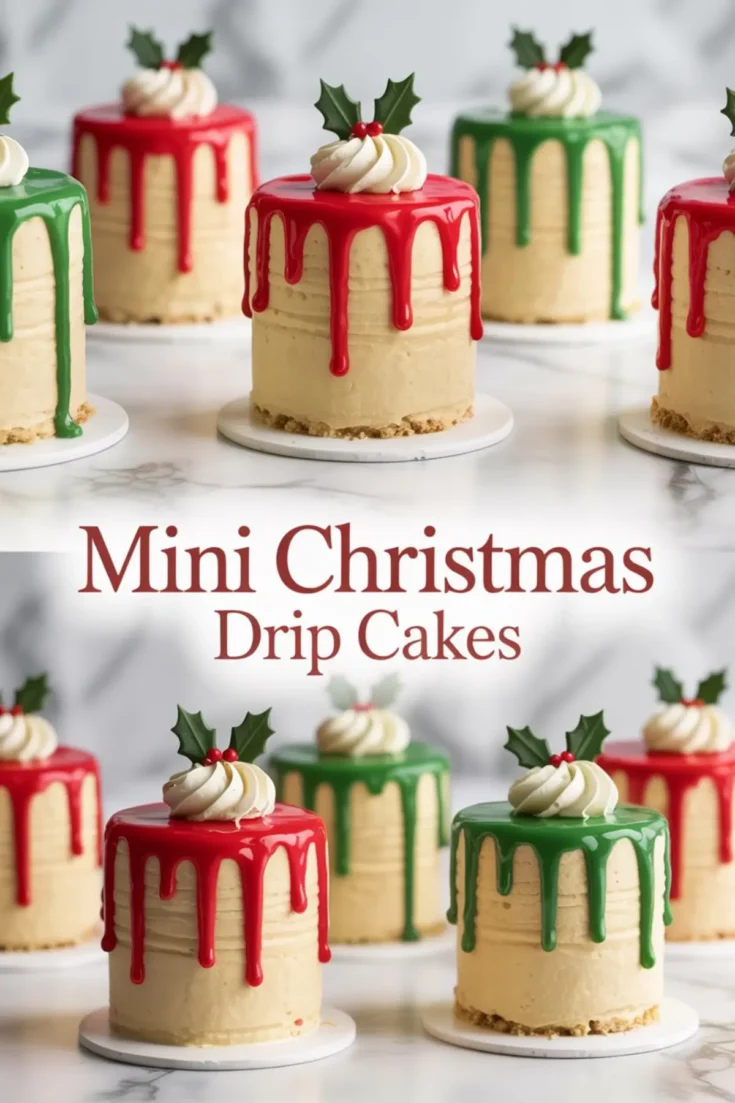
These Mini Christmas Drip Cakes bring bold color and festive flair to your holiday cakes lineup. Each individual cake is decorated with rich frosting, festive toppings, and signature drip detail, perfect for Christmas cake designs or creative Christmas themed cake tables. Whether you’re baking for a party, gifting, or adding sparkle to your December baking, these mini Christmas desserts pack seasonal flavor and style in every bite. Ideal for Christmas cooking, Christmas cupcakes recipes, or your next Xmas cake idea.
Ingredients
- FOR THE COOKIE BASE
- 1 ¼ cups (150g) digestive or graham cracker crumbs
- 5 tbsp (70g) unsalted butter, melted
- 1 tbsp granulated sugar
- FOR THE VANILLA SPONGE CAKES
- 1 ½ cups (180g) all-purpose flour
- 1 ½ tsp baking powder
- ¼ tsp salt
- ½ cup (113g) unsalted butter, softened
- ¾ cup (150g) granulated sugar
- 2 large eggs
- 2 tsp vanilla extract
- ½ cup (120ml) whole milk
- FOR THE CREAMY WHITE CHOCOLATE FILLING
- 100g white chocolate, chopped
- ½ cup (120ml) heavy cream
- 125g mascarpone cheese or cream cheese, room temperature
- 1 tsp vanilla extract
- FOR THE VANILLA BUTTERCREAM
- 1 cup (226g) unsalted butter, softened
- 3 cups (360g) powdered sugar, sifted
- 2 tbsp heavy cream or milk
- 1 ½ tsp vanilla extract
- Pinch of salt
- FOR THE DRIP
- ¾ cup white chocolate chips
- 3 tbsp heavy cream
- Red and green oil-based food coloring
- DECORATIONS
- Buttercream swirl (from above)
- Edible holly leaves or sprinkles
Instructions
- MAKE THE COOKIE BASE: Preheat the oven to 350°F (175°C). Combine the crushed cookies, melted butter, and sugar in a bowl and stir until the crumbs are evenly moistened. Press a thin, compact layer into the bottom of each greased mini cake tin (about 3 inches wide). Bake for 7–8 minutes until lightly golden. Let the bases cool completely before adding the sponge batter.
- BAKE THE SPONGE LAYERS: In one bowl, whisk together the flour, baking powder, and salt. In a separate mixing bowl, beat the butter and sugar until light and fluffy. Add the eggs one at a time, mixing well after each, then stir in the vanilla. Add the dry ingredients and milk in alternating portions, starting and ending with the dry mix. Stir just until combined. Spoon the batter over the cooled cookie base, filling each tin about two-thirds full. Bake for 20–25 minutes, or until a toothpick inserted into the center comes out clean. Cool the cakes in the tins for 10 minutes, then remove and transfer to a wire rack to cool completely.
- PREPARE THE CREAMY FILLING: Heat the cream until hot but not boiling, then pour it over the chopped white chocolate. Let it sit for 2 minutes, then stir until completely smooth. Allow the mixture to cool to room temperature. In another bowl, beat the mascarpone or cream cheese until soft and smooth. Fold in the cooled chocolate mixture and vanilla extract until the filling is creamy. Refrigerate for 15–20 minutes until slightly thickened but still spreadable.
- MAKE THE BUTTERCREAM: Beat the softened butter until pale and airy. Gradually mix in the sifted powdered sugar, then add the cream, vanilla extract, and a pinch of salt. Beat until the buttercream is smooth and pipeable. Set aside until ready to use.
- ASSEMBLE THE MINI CAKES: Slice each cooled cake in half horizontally using a serrated knife. Spread or pipe a layer of the chilled white chocolate filling on the bottom half, then place the top half back on and press gently. Cover each cake with a thin crumb coat of buttercream and refrigerate for 10–15 minutes to set. Once chilled, apply a smooth outer layer of buttercream and return to the fridge while preparing the drip.
- MAKE AND APPLY THE DRIP: Heat the cream until hot, then pour it over the white chocolate chips. Let it sit for a minute, then stir until the chocolate is melted and smooth. Divide the ganache into two bowls and color one red and the other green using oil-based food coloring. Let the colored ganache cool slightly until it thickens to a pourable consistency. Use a spoon or squeeze bottle to carefully drip the ganache around the top edges of each cake.
- DECORATE: Pipe a swirl of buttercream on the top of each mini cake using a star tip. Finish with holly-shaped decorations or festive sprinkles to complete the holiday look.
Notes
Letting the ganache cool slightly before dripping helps control the flow so it doesn’t run too far down the sides. If making ahead, store the cakes in the refrigerator and bring to room temperature before serving.
Nutrition Information
Yield
6Serving Size
1Amount Per Serving Calories 1755Total Fat 95gSaturated Fat 59gUnsaturated Fat 36gCholesterol 306mgSodium 1081mgCarbohydrates 206gFiber 2gSugar 185gProtein 20g