
I often find myself longing for something sweet that warms my mood and fills my kitchen with a sense of calm. Chocolate dump cake does that for me. It sits among my favorite desserts because it offers a deep, fudgy flavor without demanding fancy steps. I like to keep things uncomplicated in my baking adventures, and this cake has become a trusted companion. Each spoonful reminds me that baking can bring pleasure without fuss.
Following a special diet?
Every recipe on this site can be converted to gluten-free, vegan, dairy-free, keto, nut-free or egg-free with adjusted ratios so nothing falls flat.
Try the Recipe Converter →My First Encounter with This Chocolate Gem
I remember a quiet weekend afternoon when I first attempted a chocolate dump cake. My pantry revealed a handful of items: boxed cake mix, evaporated milk, and chocolate chips. My mind was tired, so I wanted something that wouldn’t demand too much of me. I arranged those ingredients in a baking dish, feeling uncertain about the outcome. My oven produced a fragrant breeze that filled my kitchen with a cozy aroma. That first bite felt like an embrace from a treasured friend. The cake turned soft in the center and slightly crisp around the edges. It convinced me that simple desserts can still feel luxurious.
I revisited that recipe more times than I can count. I still smile when I recall how my family crowded around the table, forks raised, ready to dig in. My younger self worried about lumps, lumps that never mattered in the end because everything melted into a luscious pool of chocolate. That memory remains etched in my mind. I trust that you’ll find the same sense of ease when you bake this cake.
Essential Ingredients and Straightforward Baking Steps
My version calls for a standard box of chocolate cake mix, though I sometimes pick a dark chocolate mix for a deeper taste. I pour a can of evaporated milk to ensure moisture, and it blends beautifully with the cake mix. I scatter chocolate chips on top, then let the oven perform the magic. The dish often looks a bit messy before it goes into the heat, but that messy layer transforms into a smooth, velvety treat.

I have shifted certain ingredients over time. A friend once suggested adding a few tablespoons of melted butter for a richer texture, and I found that it gives the cake a slightly denser crumb. Another friend offered the idea of adding a small drizzle of vanilla extract for a hint of extra sweetness. My personal choice depends on what I have on my shelf. The base recipe stays the same, which keeps things straightforward.
Texture and Extra Flavors
Some days, I toss chopped pecans or walnuts into the top layer for a pleasing crunch. My aunt, who loves coconut, sprinkles shredded coconut before baking. That variation creates a chewy surface that pairs well with the gooey interior. My sister goes for chocolate shavings or dark chocolate chunks instead of chocolate chips, which heightens that cocoa essence. I prefer whichever chocolate I have on hand, since the core flavor remains irresistible.
I once experimented with salted caramel drizzle after baking. That small addition balanced the sweetness with a gentle hint of saltiness. My close friend tried peanut butter chips, and the outcome surprised us both. Peanut butter chips melted right into the cake, revealing sweet pockets with a creamy twist. I imagine you could try similar ideas with candies or leftover holiday treats. The possibilities remain open to your taste.
Serving the Cake with Comforting Toppings
I usually serve chocolate dump cake straight from the oven. The top looks slightly cracked, and the center holds a soft layer that almost resembles pudding. A cool scoop of ice cream, often vanilla or mint chocolate chip, pairs nicely with that warmth. My nephew loves whipped cream swirled in a small bowl on the side. He dips each bite of cake into the cream, grinning like he’s discovered a secret.
I enjoy fresh fruit with this dessert if I have strawberries or raspberries. They give a bright note that contrasts with the deep chocolate. A drizzle of strong coffee, especially espresso, provides an extra jolt if you crave that mocha twist. A friend of mine once paired it with crushed candy canes at a holiday gathering, and that choice made the cake feel festive. You might discover your own perfect match.
Storage and Simple Reheating
Chocolate dump cake stays delicious for a couple of days if stored in an airtight container. I find that it maintains a moist texture, which I love. My morning routine sometimes involves sneaking a spoonful from the fridge, though I admit it tastes best when warmed. A quick trip to the microwave revives that melt-in-your-mouth feel. Leftovers never last long in my home because this cake goes quickly once everyone notices it on the counter.
I have brought this dessert to potlucks, leaving it covered in foil. It travels well, though I might reheat it upon arrival to restore some of that gooey center. My friends gather around, forks in hand, ready to serve themselves. People appreciate how unpretentious it is. You can slice it, spoon it, or scoop it any way you like, and no one minds if your slice looks a bit messy. That is part of its charm.
A Personal Chat About Baking Joy
I believe in recipes that bring comfort to the table. My mother taught me that time spent fretting over perfect edges can sometimes drain the fun out of baking. This chocolate dump cake stays close to my heart because it reminds me of the laughter and shared moments that come with a warm dessert. You might feel a little uncertain the first time you mix everything, but trust me, the oven rarely disappoints with this recipe.
I enjoy hearing feedback from those who try it. Some folks swirl marshmallow fluff across the top for a gooey crust. Others experiment with different cake mixes, like devil’s food or Swiss chocolate. I appreciate the creativity that emerges when people discover a dessert that doesn’t tie them down with complicated steps.

Variations for Chocolate Lovers: Banana, Cherry or Peanut Butter
Curiosity prompted me to explore versions that add subtle layers of flavor. I discovered these three twists that excite my taste buds and satisfy search queries for folks looking to expand their dump cake collection:
Chocolate Banana Dump Cake
Chocolate Banana Dump Cake showcases the sweet partnership of cocoa and banana. My cousin adores the light banana aroma mixed into the chocolate base.
Chocolate Cherry Dump Cake
Chocolate Cherry Dump Cake highlights the tang of cherries blended with rich chocolate. I sometimes add extra fruit for a jammy swirl that feels elegant.
Peanut Butter Chocolate Dump Cake
Peanut Butter Chocolate Dump Cake appeals to those who crave a mix of salty and sweet. I find that peanut butter swirled into a chocolate cake sets off a comforting nostalgia that reminds me of childhood treats.
These variations follow the same simple approach: layer ingredients, put the pan in the oven, then enjoy the decadent results. Each creation stands on its own, yet carries that familiar comfort that defines dump cakes.
Why This Cake Matters to Me
I grew up in a home where chocolate often spoke louder than words. My mother liked to whip up quick brownies or batch cookies when we needed a boost. I learned that desserts can soothe and bring people together. This chocolate dump cake, with its minimal steps, offers a sense of inclusion for those who might feel nervous about baking. I admire a dessert that doesn’t rely on advanced skills or equipment, because we all deserve something sweet with ease.
I sometimes reflect on how this cake feels like the dessert version of a warm hug. I have prepared it for birthdays, potlucks, and slow Sunday afternoons. My best friend once requested it for a movie night, then joked that we should have baked two pans, since the slices vanished so quickly. I appreciate the small community that forms around a table when we share a chocolate dessert.
Final Thoughts and an Invitation
I would love to hear your stories about trying this recipe or adapting it to fit your taste. My own experiments began with just a few pantry staples, and I have never stopped finding ways to personalize this cake. Think about swirling in your favorite additions or switching up the topping. Let me know which approach makes you happiest.
I hope you embrace the sweet simplicity of chocolate dump cake. It feels satisfying to watch the top bubble and know you’ve created a dessert that rewards you with every bite. My family keeps returning to this recipe because it’s dependable and comforting. I suspect you might discover the same cozy feeling in your own kitchen. Let your senses guide you, and enjoy each moment of baking and sharing this treat.
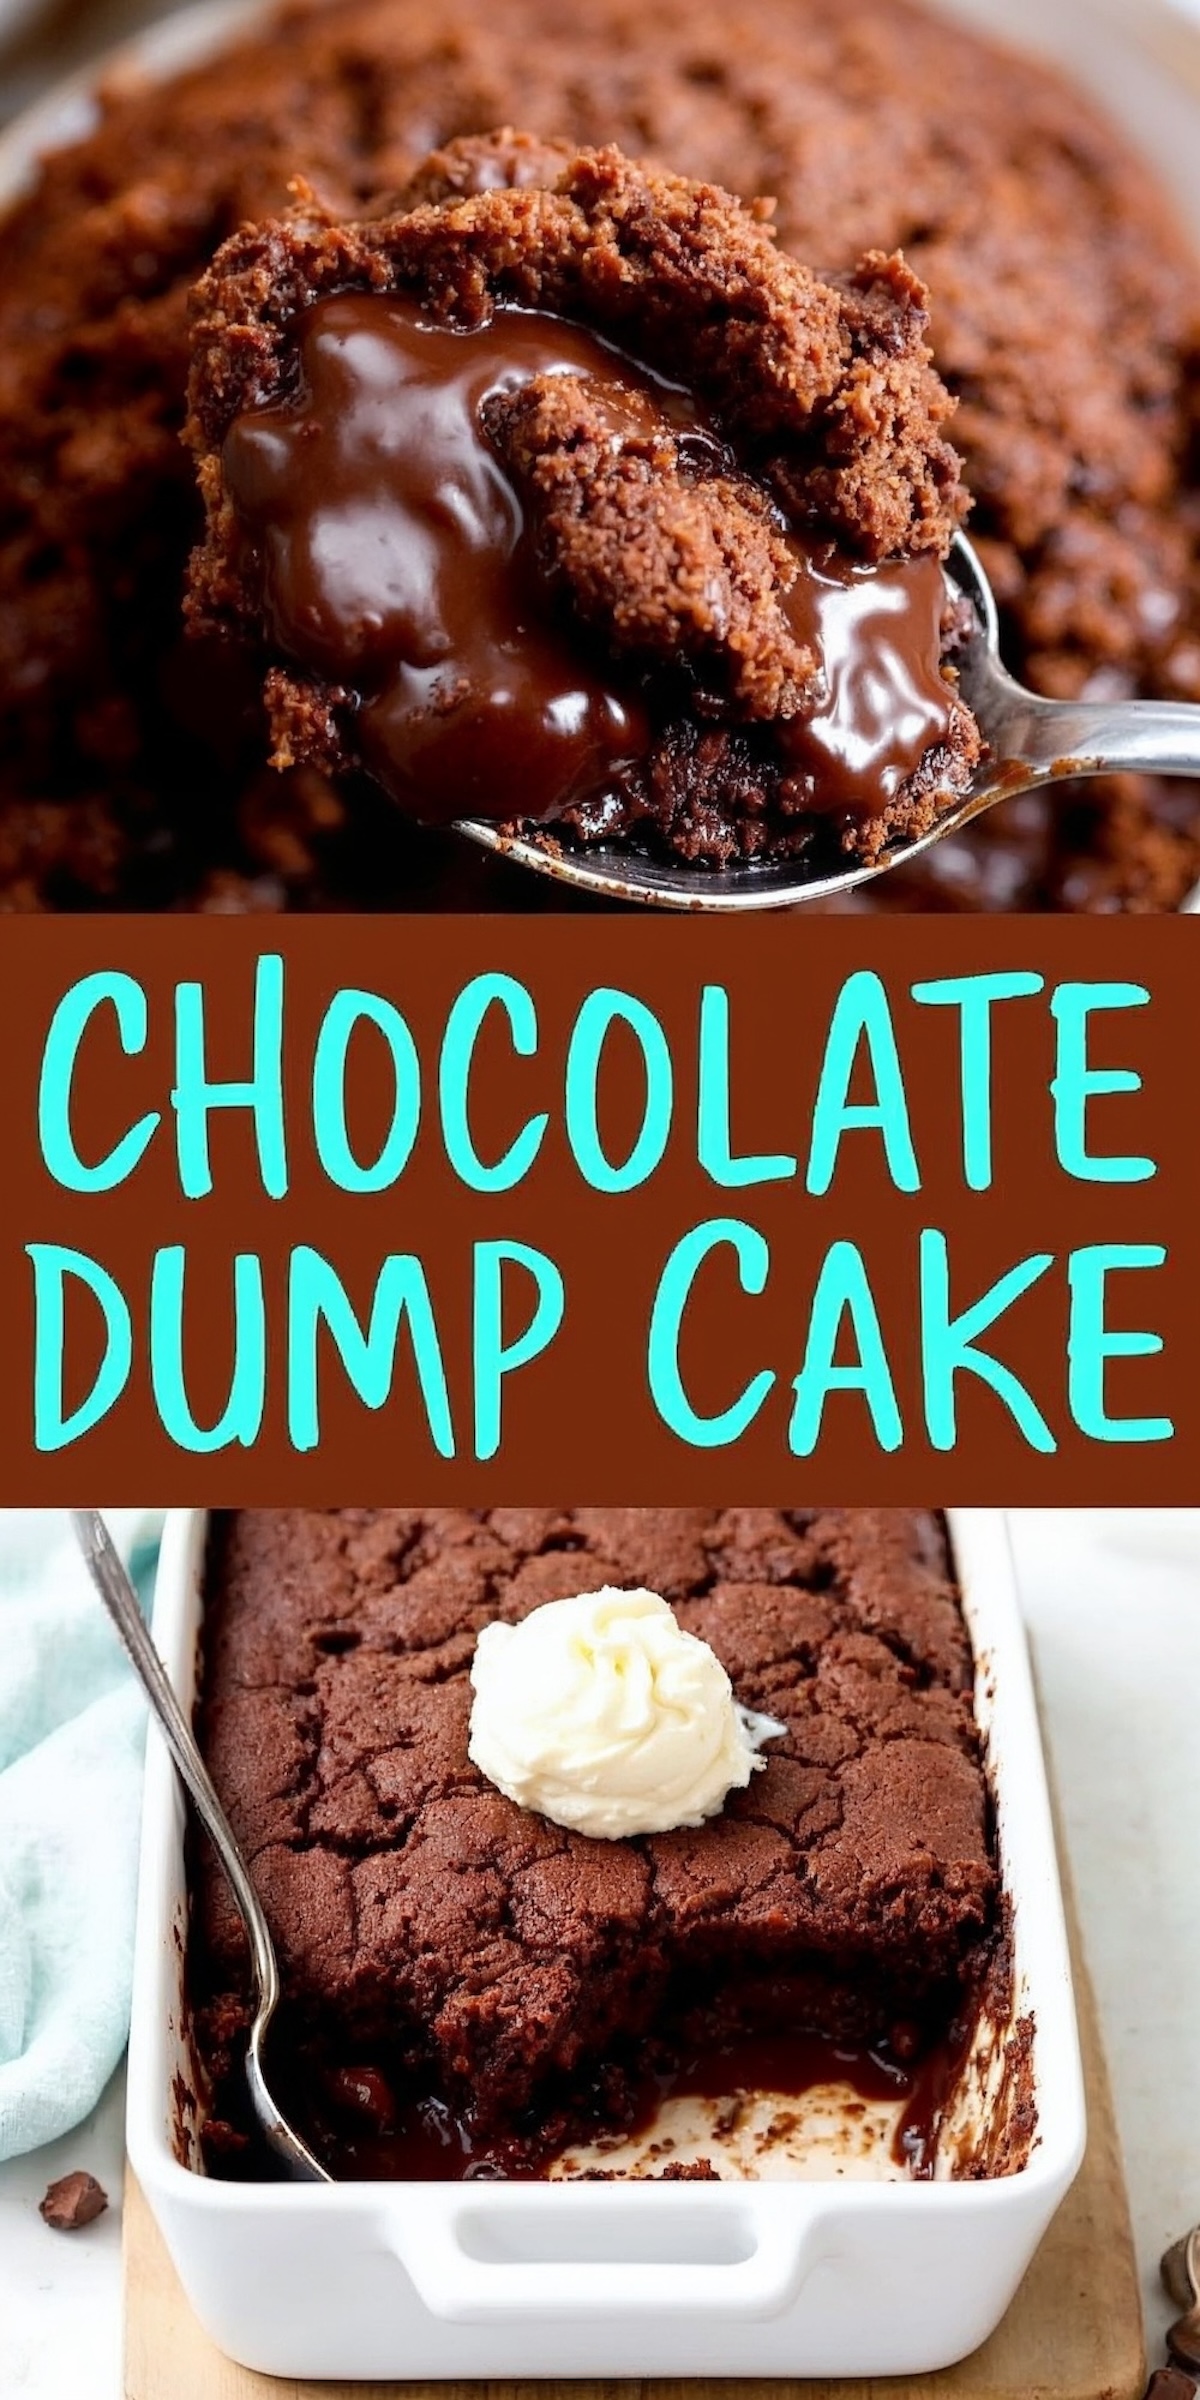
Chocolate Dump Cake Recipe

This chocolate dump cake combines layers of rich chocolate flavors with a molten, pudding-like center. It’s easy to assemble and bakes into a dessert that’s both satisfying and simple to prepare.
Ingredients
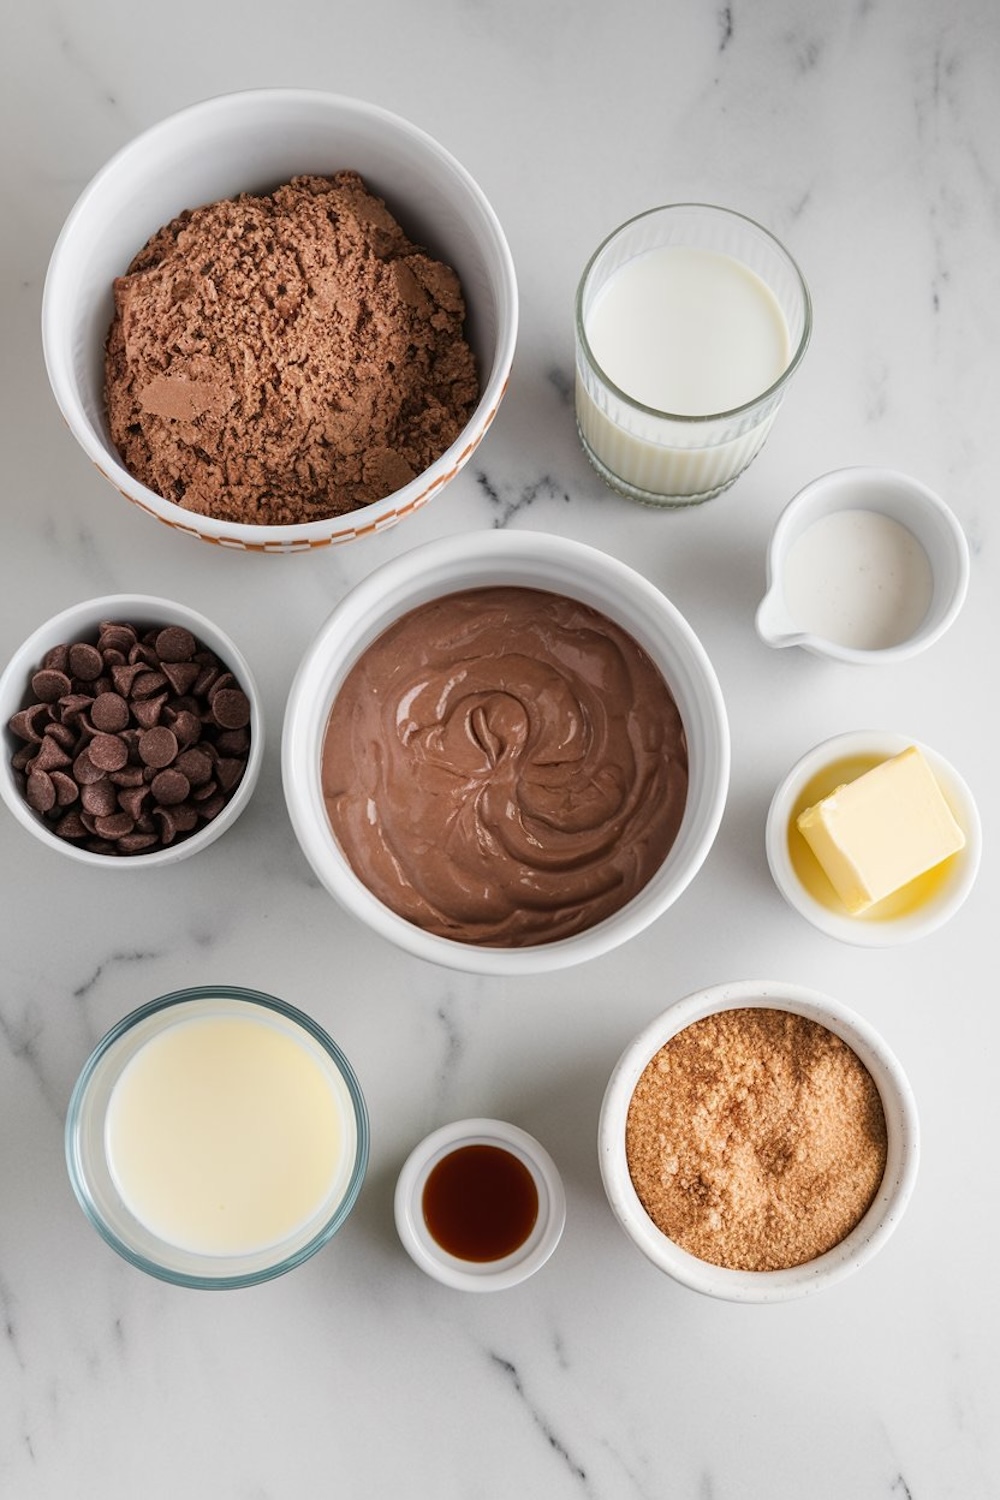
- 1 box chocolate cake mix
- 1 box (3.9 oz) instant chocolate pudding mix
- 2 cups whole milk
- 1 cup semi-sweet chocolate chips
- ½ cup butter, melted
- 1 can (12 oz) evaporated milk
- ½ cup brown sugar
- 1 teaspoon vanilla extract
- Optional: Whipped cream or vanilla ice cream for serving
Instructions
- PREHEAT THE OVEN: Preheat your oven to 350°F (175°C). Lightly grease a 9x13-inch baking dish with non-stick spray or butter.
- PREPARE THE PUDDING: In a medium-sized bowl, whisk together the instant chocolate pudding mix with 2 cups of milk until thickened. Let it rest for 5 minutes.
- MIX THE CAKE BASE: In a separate bowl, combine the dry chocolate cake mix with 1 cup of the evaporated milk and ¼ cup of the melted butter. Stir until the mixture forms a thick, wet batter. Spread this batter evenly across the bottom of the greased baking dish.
- ADD THE PUDDING LAYER: Carefully spread the prepared pudding over the wet cake base. Use a spatula to distribute it evenly, covering the entire surface.
- SPRINKLE THE CHOCOLATE CHIPS: Sprinkle the semi-sweet chocolate chips evenly over the pudding layer.
- CREATE THE LIQUID TOPPING: In a small bowl, whisk together the remaining evaporated milk, brown sugar, vanilla extract, and the remaining melted butter. Slowly pour this mixture over the layers in the dish. Drizzle it evenly to ensure every part of the cake is saturated.
- BAKE: Place the baking dish in the preheated oven and bake for 45-50 minutes. The top should be puffed and set, and the center should remain soft. If the top browns too quickly, cover it lightly with foil during the last 10 minutes of baking.
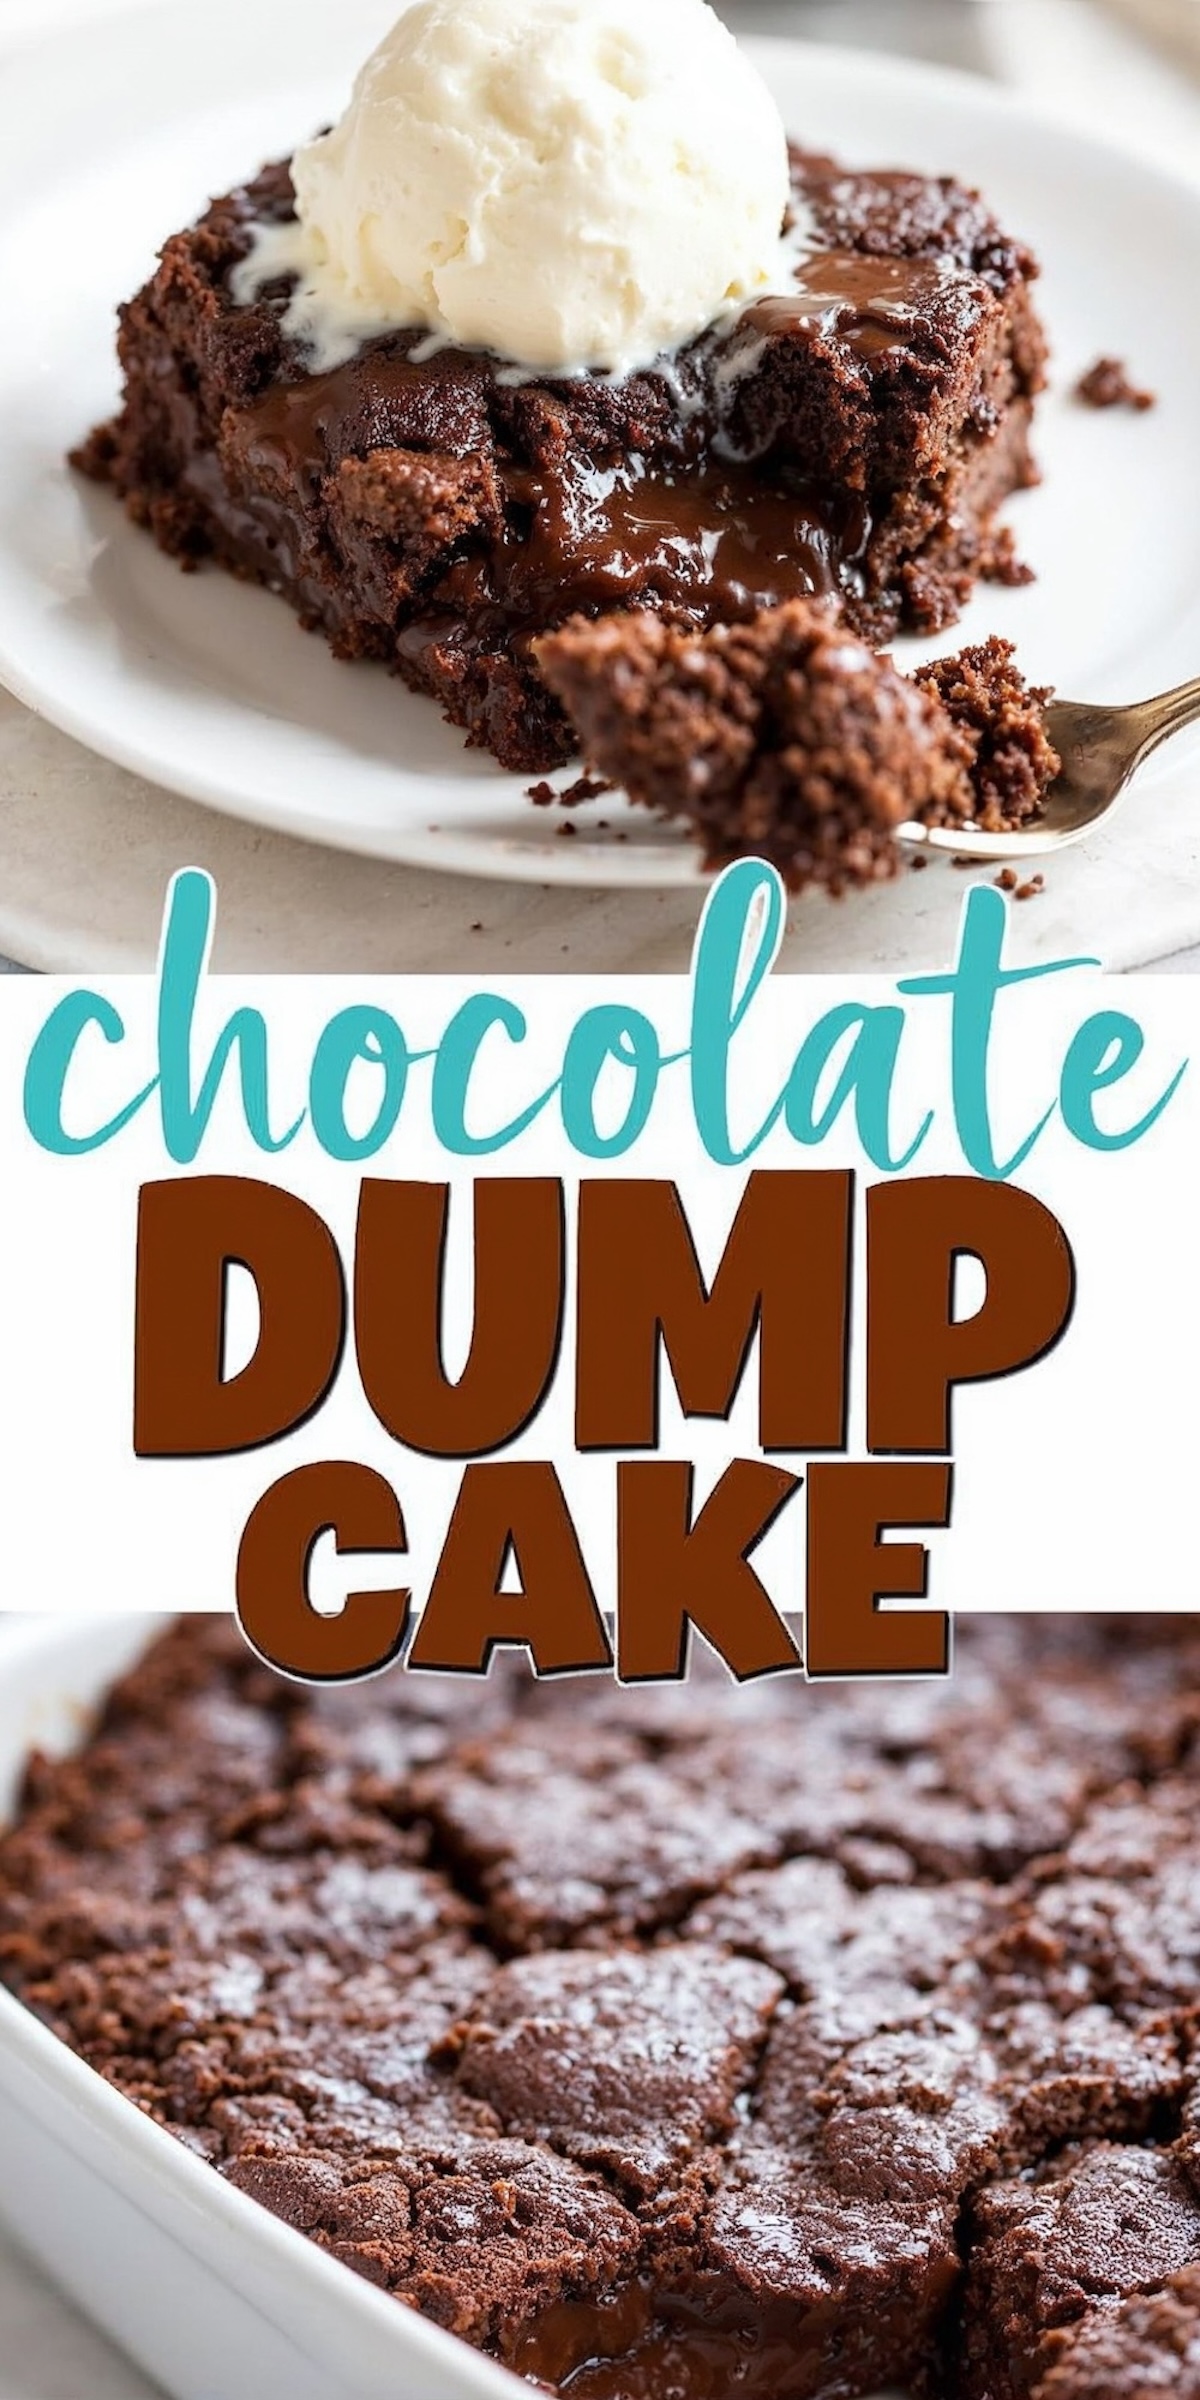
- COOL AND SERVE: Let the cake cool for about 10 minutes before serving. Serve warm with a dollop of whipped cream or a scoop of vanilla ice cream if desired.
Nutrition Information
Yield
8Serving Size
1Amount Per Serving Calories 394Total Fat 22gSaturated Fat 14gTrans Fat 1gUnsaturated Fat 7gCholesterol 46mgSodium 399mgCarbohydrates 47gFiber 2gSugar 41gProtein 5g
HOLY YUMMY 😋
Thanks so much, Karen! 😊 I’m very happy the recipe caught your eye. It’s one of those desserts that’s as fun to make as it is to eat. Let me know if you end up trying it—I’d love to hear how it turns out for you! 🍫❤️
I’m going to make the chocolate dump cake, but do I grease the cake pan? The recipe does not include that step.
Great question, Stella! Yes, it’s a good idea to lightly grease the cake pan before adding the ingredients. A quick spray of non-stick cooking spray or a thin coating of butter should do the trick. This helps ensure the cake comes out easily without sticking, especially around the edges. I’ll update the recipe to include that note—thank you for catching it! Let me know how it turns out for you! 🍫😊
I think the calories listed at the top of the recipe must be incorrect. The cake mix alone has 300 calories, as is, if you divide it into 4 servings from the 8 or 9 it is supposed to be from the back of the box.
The recipe sounds devine!
Hi Rose, thank you for pointing that out! You’re absolutely right, and I’ve updated the calorie information to reflect a more accurate calculation—each serving is about 394 calories now. I really appreciate you catching that! Glad the recipe caught your eye, and I’d love to hear how it turns out if you give it a try. 😊
Hello!
Do I prepare the cake mix as usual or am I just using the dry ingredients as they are?
Hi Heather! Great question! For this recipe, you’ll actually use the dry cake mix as is—there’s no need to prepare it according to the box instructions. Instead, you’ll layer it directly into the baking dish as described in the steps, and the other ingredients (like the pudding, evaporated milk, and melted butter) will come together to create that rich, gooey texture. Let me know if you need any more tips or clarification—I’m here to help. 😊 Happy baking!
This sounds phenomenal, gearing up to try it! You mentioned adding cherries to the cake, which immediately grabbed my attention, as I have a lonely can of cherry pie filling begging to be used–would that work? If so, is it added pre-bake and would it alter the baking time?
Hi Phoenix! Adding cherry pie filling sounds amazing—it’s actually a delicious variation similar to my Cherry Chocolate Dump Cake.
For this recipe, you can spoon the pie filling over the pudding layer before adding the chocolate chips and butter. No need to stir—just spread it evenly. The baking time might increase by 5-10 minutes due to the added moisture, so watch for the top to be puffed and set while the center stays molten.
I’d love to hear how it turns out with that fruity twist!
I made this but I swapped out everything chocolate and used vanilla pudding and a yellow cake mix or butter cake mix and it was delicious my grandson isn’t a fan of chocolate but the vanilla worked just as well thank you for the idea ( when my G- baby left we tried the chocolate version and it was just as good as I thought it would be)
Hi Tiffany! I love your vanilla twist—it’s such a thoughtful adjustment for your grandson! It’s great to hear it turned out just as delicious, and I love that you still gave the chocolate version a try.
Thanks for sharing your swaps; it’s fun to see how versatile this recipe can be. 😊
What degrees of Faeharehiet do I need to preheat?
Hi Christina! You’ll need to preheat your oven to 350°F (175°C) for this recipe. Let me know if you have any other questions—happy baking! 😊
I tried this layering exactly as it says. The wet ingredients did not get down to the dry cake mix. When it was baked, the dry cake mix is still in the bottom of the pan exactly as it was when I added it. What did I do wrong?
Hi Glenda! Thanks for your comment—let’s troubleshoot this together!
Based on the recipe steps, it sounds like the liquid layers didn’t seep through the dry cake mix as intended. Here are a few things that might help:
1. Pudding Layer: Make sure the pudding is thickened before you spread it, and try to cover as much of the dry cake mix as possible. This step is key to ensuring the moisture starts soaking into the base.
2. Even Distribution of Liquid: When you pour the evaporated milk, brown sugar, and vanilla mixture, drizzle it evenly across the top. If it pools in one area, it may not reach the bottom layer effectively.
3. Cake Mix Placement: Double-check that the dry cake mix is evenly spread across the bottom of the pan before layering. Any clumps could prevent the liquids from saturating properly.
Let me know if any of these steps feel unclear or if you try again—I want to make suer it turns out perfectly for you!
I can not wait to try this using a white or yellow cake mix, vanilla or cheesecake pudding and WHITE CHOCOLATE CHIPS!! Almost any fruit would be good that tastes good dipped in chocolate. Imagine lemon cake mix and lemon pudding add blueberries or strawberries! Something with coffee, yellow cake with vanilla pudding, crushed drained pi eapple, coconut and nuts in/on the batter! The combinations are truly endless!
Jan, I absolutely love how creative you’re getting with this! White chocolate chips, lemon cake with berries, or even a tropical pineapple-coconut twist—all of these ideas sound incredible. You’re so right, the possibilities really are endless, and I can’t wait to hear which version you try first!
Hi Emma. Thank you for responding. I feel like your instructions couldn’t be more clear. For whatever reason, my second try turned out the same as the first. I feel like the pudding seals off the liquids from the dry batter. I was excited to try this but it’s apparently big meant to be.
Hi Glenda, I’m so sorry to hear it didn’t work out again—I know how frustrating that can be! You might be onto something with the pudding layer creating a seal. One trick that could help is using the back of a spoon to gently press the pudding into the dry cake mix after layering, just enough to encourage some absorption without mixing.
If you’re willing to give it one more try, another option is to lightly sprinkle the cake mix with a couple of tablespoons of milk before adding the pudding—this can help it start to absorb and prevent dry patches. I’d love for this recipe to work for you, so let me know if you’re open to experimenting further!
Hello, tried this and same, the dry cake mix still on bottom….
Hi Tracie, I’m so sorry to hear that happened! The dry cake mix can sometimes stay at the bottom if the liquids don’t fully seep through. To fix this, try spreading the pudding as evenly as possible over the cake mix and gently pressing it down with the back of a spoon. Also, make sure to drizzle the evaporated milk mixture across the entire surface so it covers everything evenly.
If you’re up for trying again, another tip is to lightly sprinkle the dry mix with 1-2 tablespoons of milk before layering—it can help the liquids absorb better. Let me know how it goes!
I’m not sure what I did wrong. It looked good when I took the dish out of the oven. However, when I sliced into it, the cake mix was still sitting in the bottom as powder. I did the layers exactly as listed.
Was my pudding too thick? Maybe I needed to stir it up?
I completely understand, and I want to thank you for your patience! The new version of this recipe addresses that issue by mixing the cake mix with the liquids upfront, so it bakes perfectly moist and cohesive every time. I’d love for you to try it again and see the difference!
Hi everyone! First, I just want to say how much I appreciate all the feedback you’ve shared—it’s been a huge help in reworking this recipe.
I know the original had its frustrations, and I’ve poured a lot of thought into making sure this new version is reliable and easy for everyone.
By mixing the cake base first, there’s no risk of dry spots anymore, and I’m confident this will bake up exactly how you’ve been hoping.
Thank you for sticking with me—I can’t wait for you to try it and let me know how it turns out!