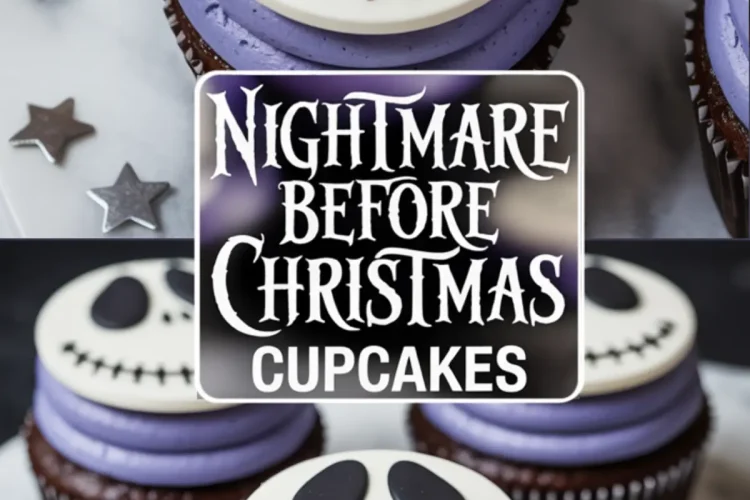
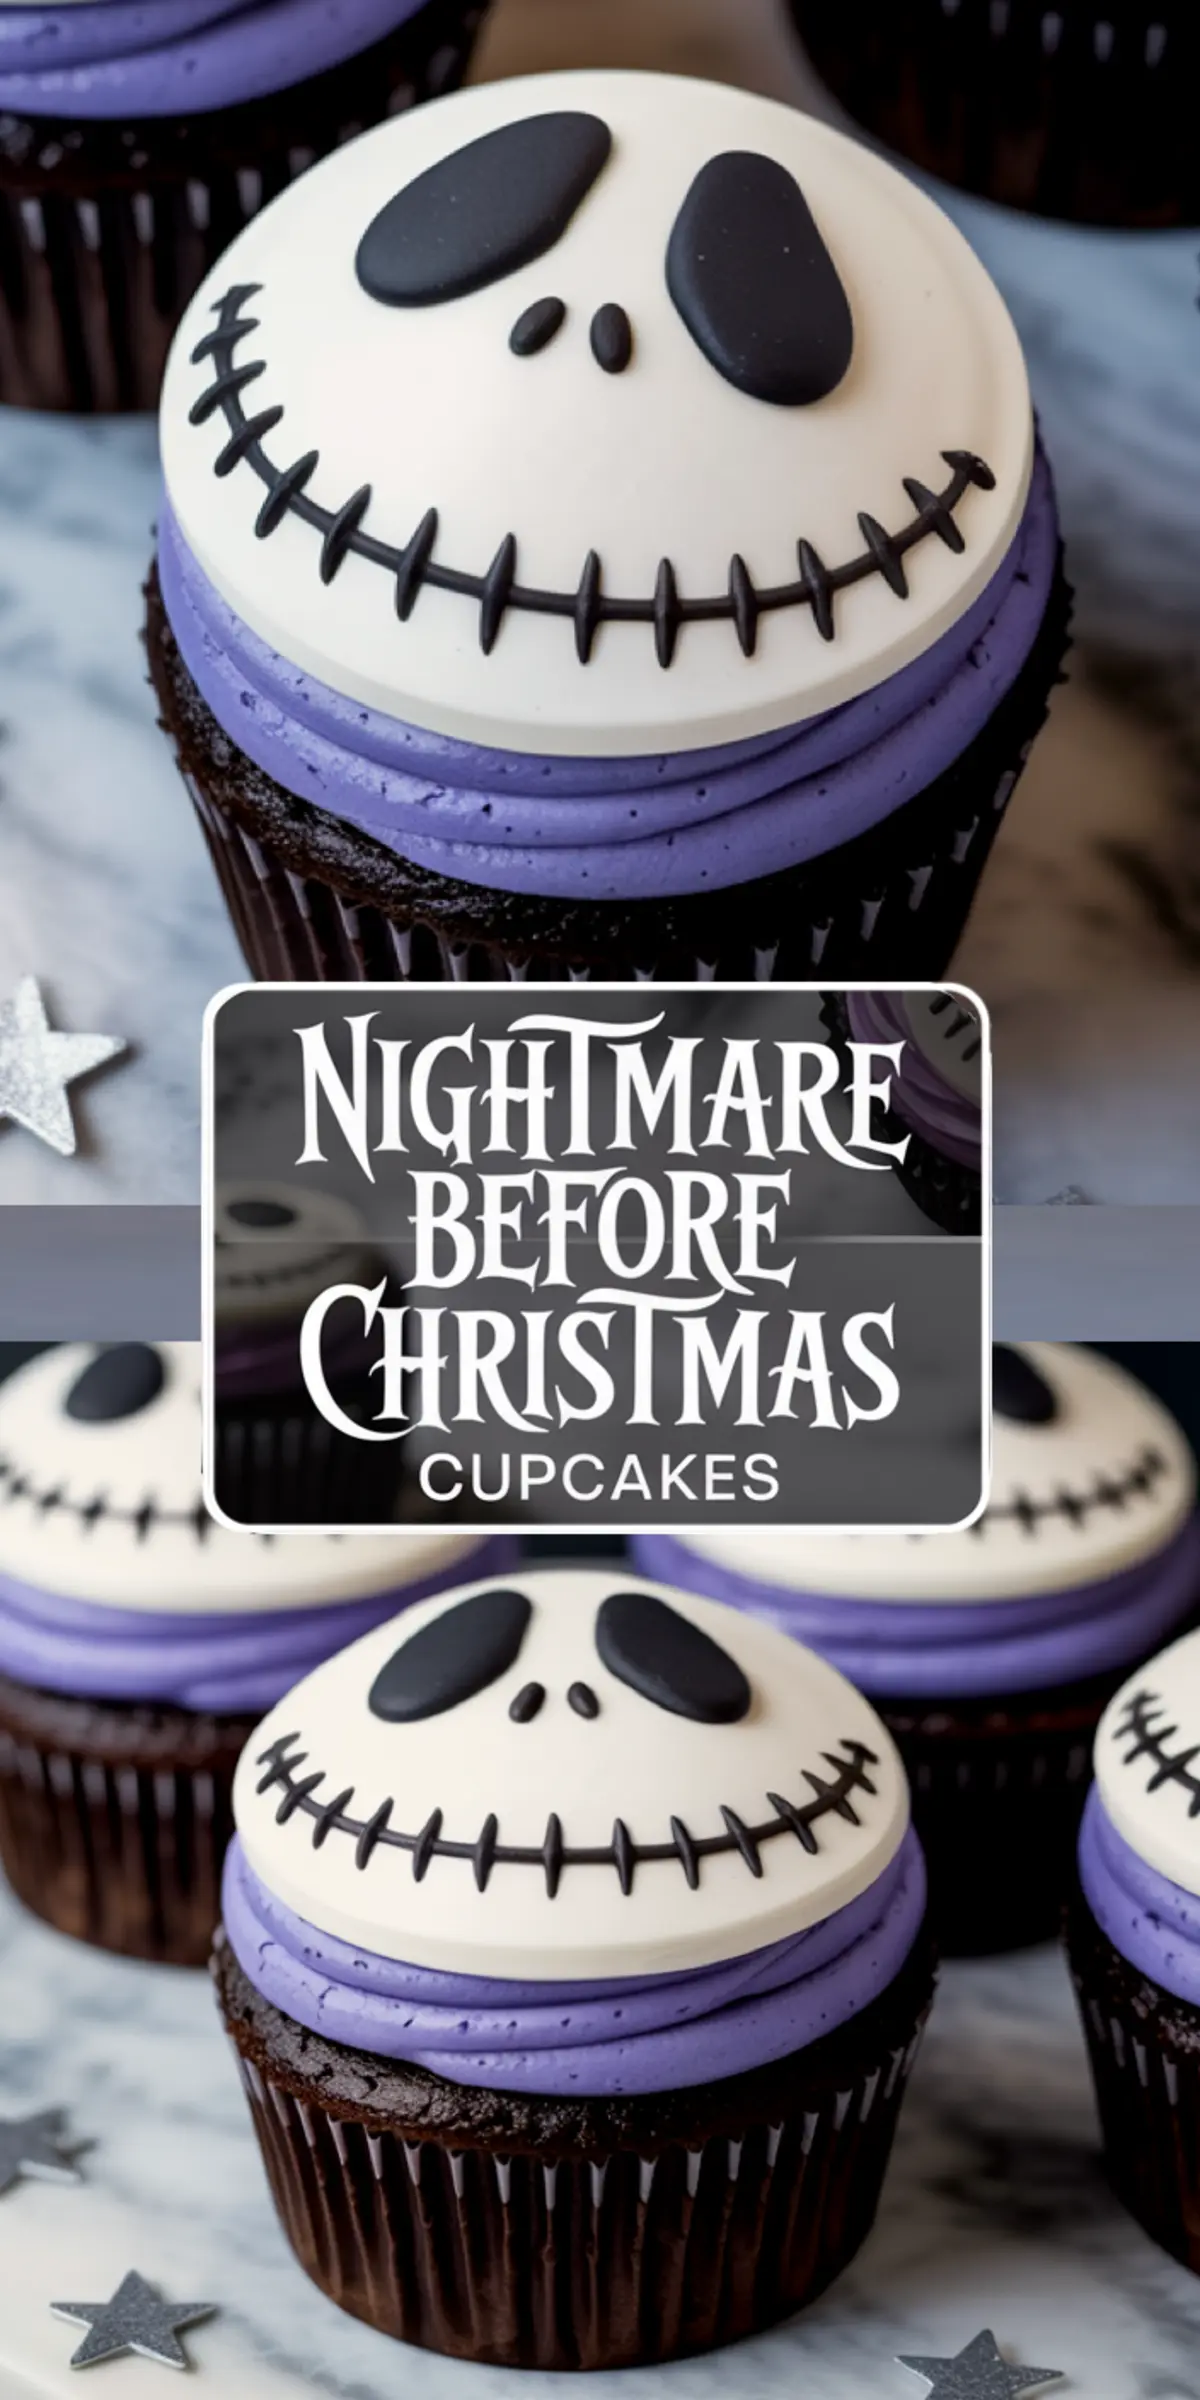
There’s a special charm in desserts that blur the line between seasons. These Nightmare Before Christmas Cupcakes do exactly that. Half Halloween mischief, half Christmas magic, every bite feels like a playful crossover between Jack Skellington’s eerie grin and a cozy December evening.
You’ll learn how to make chocolate cupcakes so tender they practically melt, pipe rich purple buttercream with confidence, and craft fondant toppers that bring Tim Burton’s classic to life on your dessert table.
Whether you’re baking Jack Skellington Cupcakes, planning a Nightmare Before Christmas Halloween party, or searching for Christmas Cupcakes with character, this recipe teaches the full process with structure, ease, and clarity.
Every step matters, and with the right rhythm, you’ll produce cupcakes that stay moist, buttercream that holds beautifully, and fondant toppers that actually look like the Pumpkin King himself.

Following a special diet?
Every recipe on this site can be converted to gluten-free, vegan, dairy-free, keto, nut-free or egg-free with adjusted ratios so nothing falls flat.
Try the Recipe Converter →A Story Behind These Cupcakes
I first made these Nightmare Before Christmas Cupcakes for a small movie marathon in late October. The lights were low, the oven was warm, and I remember how my niece leaned over the counter, watching the cupcakes rise.
She had just discovered the film, and her fascination with Jack and Sally turned the kitchen into a miniature Halloween town. That night taught me something simple: themed desserts invite imagination to the table. They create connection before anyone even takes a bite.
Try my Spooky Cake recipe for another Halloween crowd favorite that shares this playful spirit.
Deep Chocolate Cupcake Base That Holds Its Shape
The cupcake itself begins with cocoa powder, buttermilk, and hot water—a combination that guarantees softness without heaviness. The cocoa I use is Dutch-processed for smoother bitterness. Buttermilk adds mild tang and tenderness, balancing the sweetness so the flavor stays mature rather than sugary.
Granulated sugar blends evenly here, while vegetable oil locks in moisture. Some bakers prefer butter, yet oil consistently produces a softer crumb that doesn’t dry overnight. I’ve tried both, and for cupcakes meant to last through a long evening party, oil wins. The texture stays light even under thick buttercream.
The hot water step surprises many beginners. It thins the batter intentionally, allowing the cocoa to bloom. This reaction deepens flavor and creates that velvety texture every Jack Skellington Cake deserves.
You can see a similar soft crumb method used in my Ghost Cookie Cake recipe, where moisture and crumb balance are essential for visual desserts.
Why Buttermilk Makes a Difference
Every baker eventually faces the buttermilk question: substitute or not? I’ve tested regular milk with vinegar and plain yogurt versions. They work in a pinch, but the structure shifts. Real buttermilk creates an acidity level that interacts perfectly with baking soda and cocoa. The result is lift, not weight.
It’s subtle science wrapped in comfort food, yet you’ll taste the difference. Cupcakes baked with actual buttermilk develop fine pores and a smoother dome—details that matter once you start decorating.
Purple Buttercream That Commands Attention
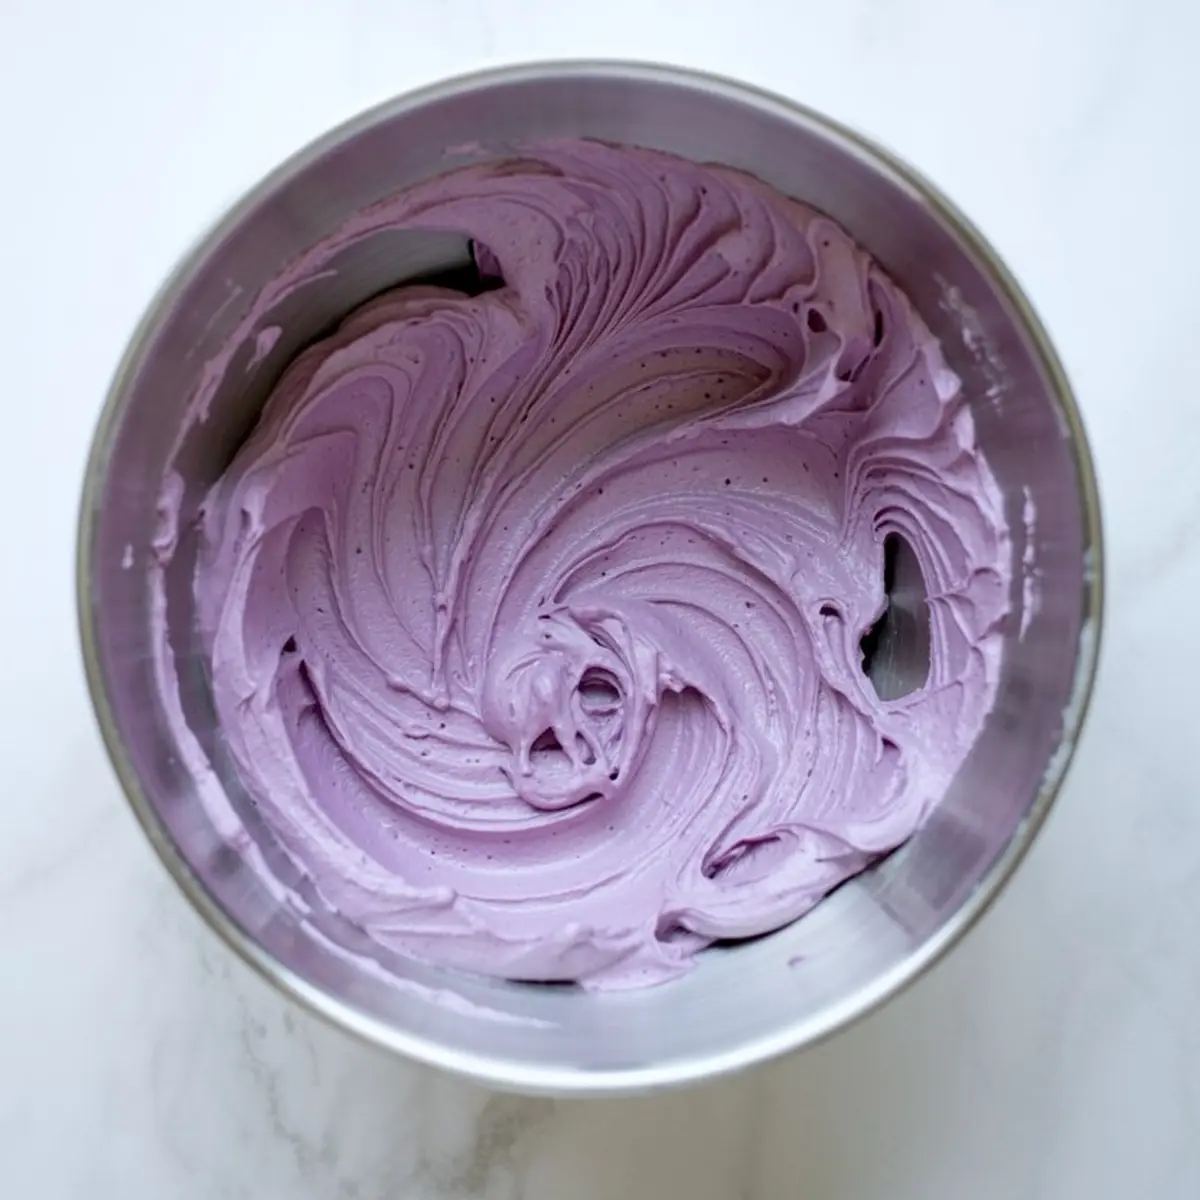
The buttercream color sets the tone. A deep violet hue feels both spooky and elegant. I use AmeriColor or Wilton gel food coloring because they blend without dulling the frosting’s texture. Liquid dyes thin it out, leaving streaks and uneven tones.
Butter forms the base, beaten until airy and pale. Powdered sugar builds body, while cream gives flexibility so you can pipe swirls that stay tall. Always start with room-temperature butter—it’s a small step that separates smooth frosting from grainy frustration.
If you’re experimenting, swap vanilla for almond extract for a faintly mysterious aroma. It pairs beautifully with dark chocolate.
For a winter-themed variation, you could tint the frosting icy blue and top it with tiny snowflakes like I do in my Snowman Cupcakes.
The Fondant Faces That Bring Jack Skellington to Life
White fondant sets the blank canvas for Jack’s face. Roll it thin, about an eighth of an inch, so the topper sits lightly on the frosting. A round cutter helps keep size consistent, and cornstarch dusting prevents sticking.
Black fondant shapes the details. The eyes should curve slightly upward to keep his familiar expression, while the stitched smile works best when pressed gently rather than drawn. It’s easy to overdo the lines, but restraint gives realism.
If you’ve never used fondant before, treat it like soft clay. It rewards patience. Roll, press, lift, adjust. The process itself becomes part of the fun, especially if you’re baking with children.
For more character-driven decorating, visit my Santa Hat Cupcakes guide, which uses a similar assembly flow for themed toppers.
Cooling, Piping, and Assembly Notes
Cupcakes need to cool fully before frosting. Warm cakes cause buttercream to slide, so take your time. A wire rack helps air circulate evenly. Once cooled, pipe tall swirls in slow circles from center to edge. The first swirl sets structure; the second adds lift.
Place each fondant topper only after the frosting settles slightly. A soft set prevents sliding but still allows the fondant to adhere naturally. I’ve found that 15 to 20 minutes is the sweet spot.
Store decorated cupcakes uncovered for 30 minutes, then loosely tent with foil or place them in a container with enough room above the decorations. Avoid the fridge, since condensation softens fondant details.
Serving, Storing, and Presentation
These Nightmare Before Christmas Cupcakes look best under soft light, perhaps alongside candles or string lights. Their contrast of deep purple, white, and black pops beautifully on dark trays or slate boards.
Leftovers stay moist at room temperature for up to two days, though I prefer baking them a day ahead and finishing the decorations the morning of serving. The fondant pieces can dry on parchment overnight. They’ll firm enough to handle easily without losing shape.
If you enjoy balancing spooky and sweet, these cupcakes pair beautifully with Halloween Food Treats like candy-coated apples or small chocolate truffles. It ties the whole table together while keeping the theme consistent.
A Dessert That Connects Two Seasons
There’s something comforting about how these cupcakes bridge Halloween and Christmas. They celebrate contrast—dark cocoa against pale fondant, spooky faces beside cheerful gatherings. Baking them reminds me that creativity in desserts comes from playfulness, not perfection.
Make them once, and you’ll see why they stay memorable long after the movie credits roll. Pin this recipe to keep it handy for your next themed bake, and if you try it, share your results in the comments. I always enjoy seeing how others bring Jack and Sally to life in their kitchens.
Nightmare Before Christmas Cupcakes
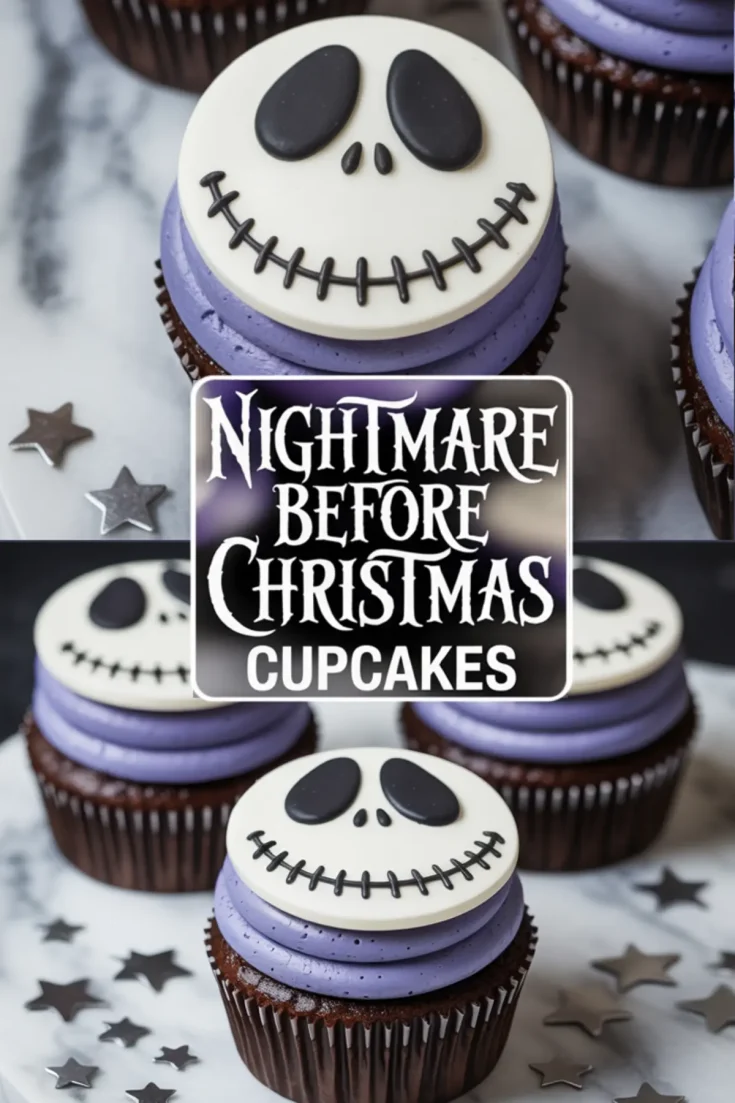
These Nightmare Before Christmas cupcakes are a fun and spooky-sweet treat perfect for Halloween parties or Christmas movie nights. Featuring Jack Skellington cupcake designs and even Jack and Sally cupcake inspo, they blend creepy and cute in the best way. Whether you’re planning Nightmare Before Christmas Halloween treats or festive Christmas cupcakes with a Tim Burton twist, these themed bakes are sure to stand out. Great for fans of The Nightmare Before Christmas, these creative cupcakes bring iconic characters like Jack Skellington to your dessert table. Try them for your next Halloween food spread or Christmas cupcake idea!
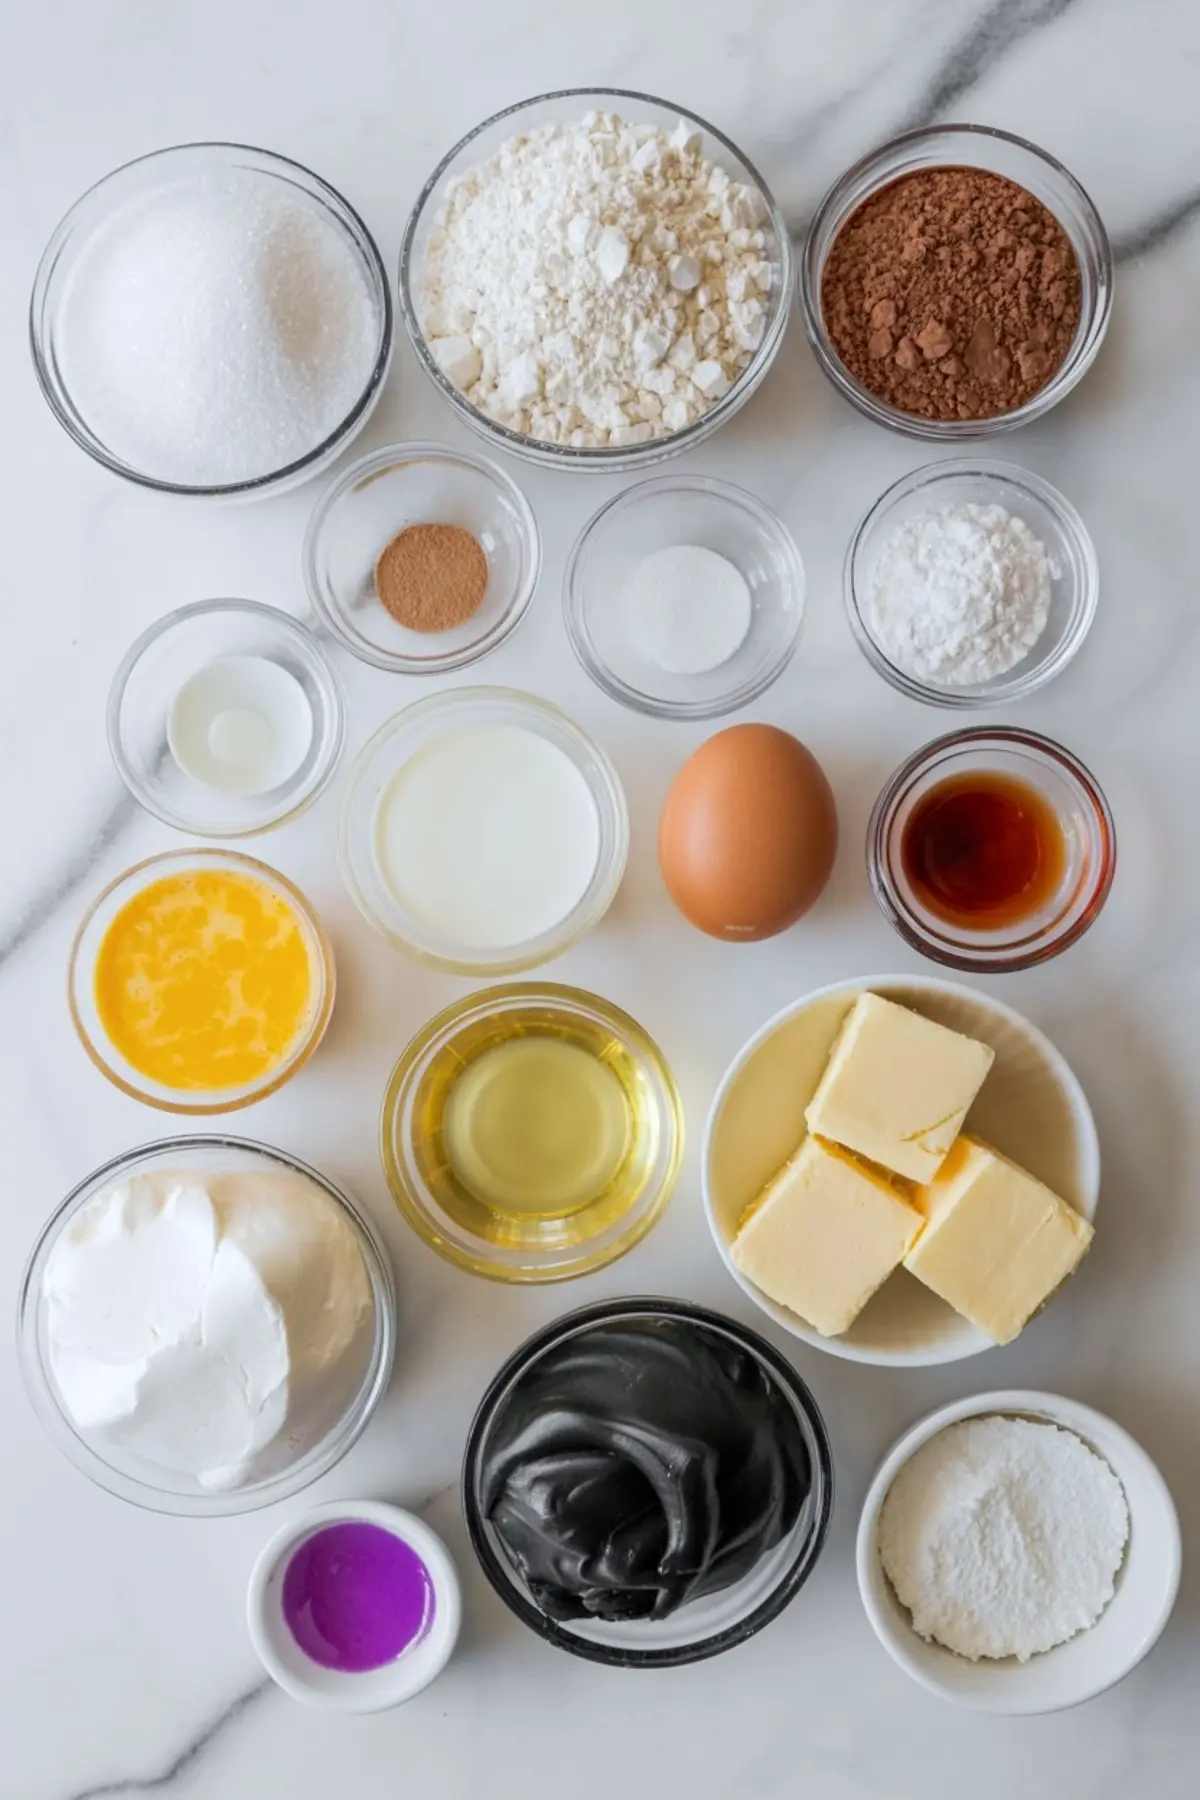
Ingredients
- FOR THE CHOCOLATE CUPCAKES
- 1 cup (200g) granulated sugar
- 3/4 cup (95g) all-purpose flour
- 1/2 cup (45g) unsweetened cocoa powder
- 3/4 tsp baking powder
- 3/4 tsp baking soda
- 1/2 tsp salt
- 1/2 cup (120ml) buttermilk, room temperature
- 1/4 cup (60ml) vegetable oil
- 1 large egg, room temperature
- 1 tsp vanilla extract
- 1/2 cup (120ml) hot water
- FOR THE PURPLE BUTTERCREAM
- 1 cup (226g) unsalted butter, softened
- 3 1/2 cups (440g) powdered sugar, sifted
- 2–3 tbsp heavy cream or milk
- 1 tsp vanilla extract
- Gel food coloring: Purple (AmeriColor or Wilton recommended)
- Pinch of salt
- FOR THE JACK SKELLINGTON TOPPERS
- White fondant (about 7 oz)
- Black fondant (about 2 oz)
- Round cookie cutter (2.5" wide or sized to match cupcakes)
- Small piping tip or sharp tool for detail work
- Cornstarch for dusting
Instructions
- PREHEAT AND PREPARE: Preheat the oven to 350°F (175°C) and line a 12-cup muffin tin with paper cupcake liners.
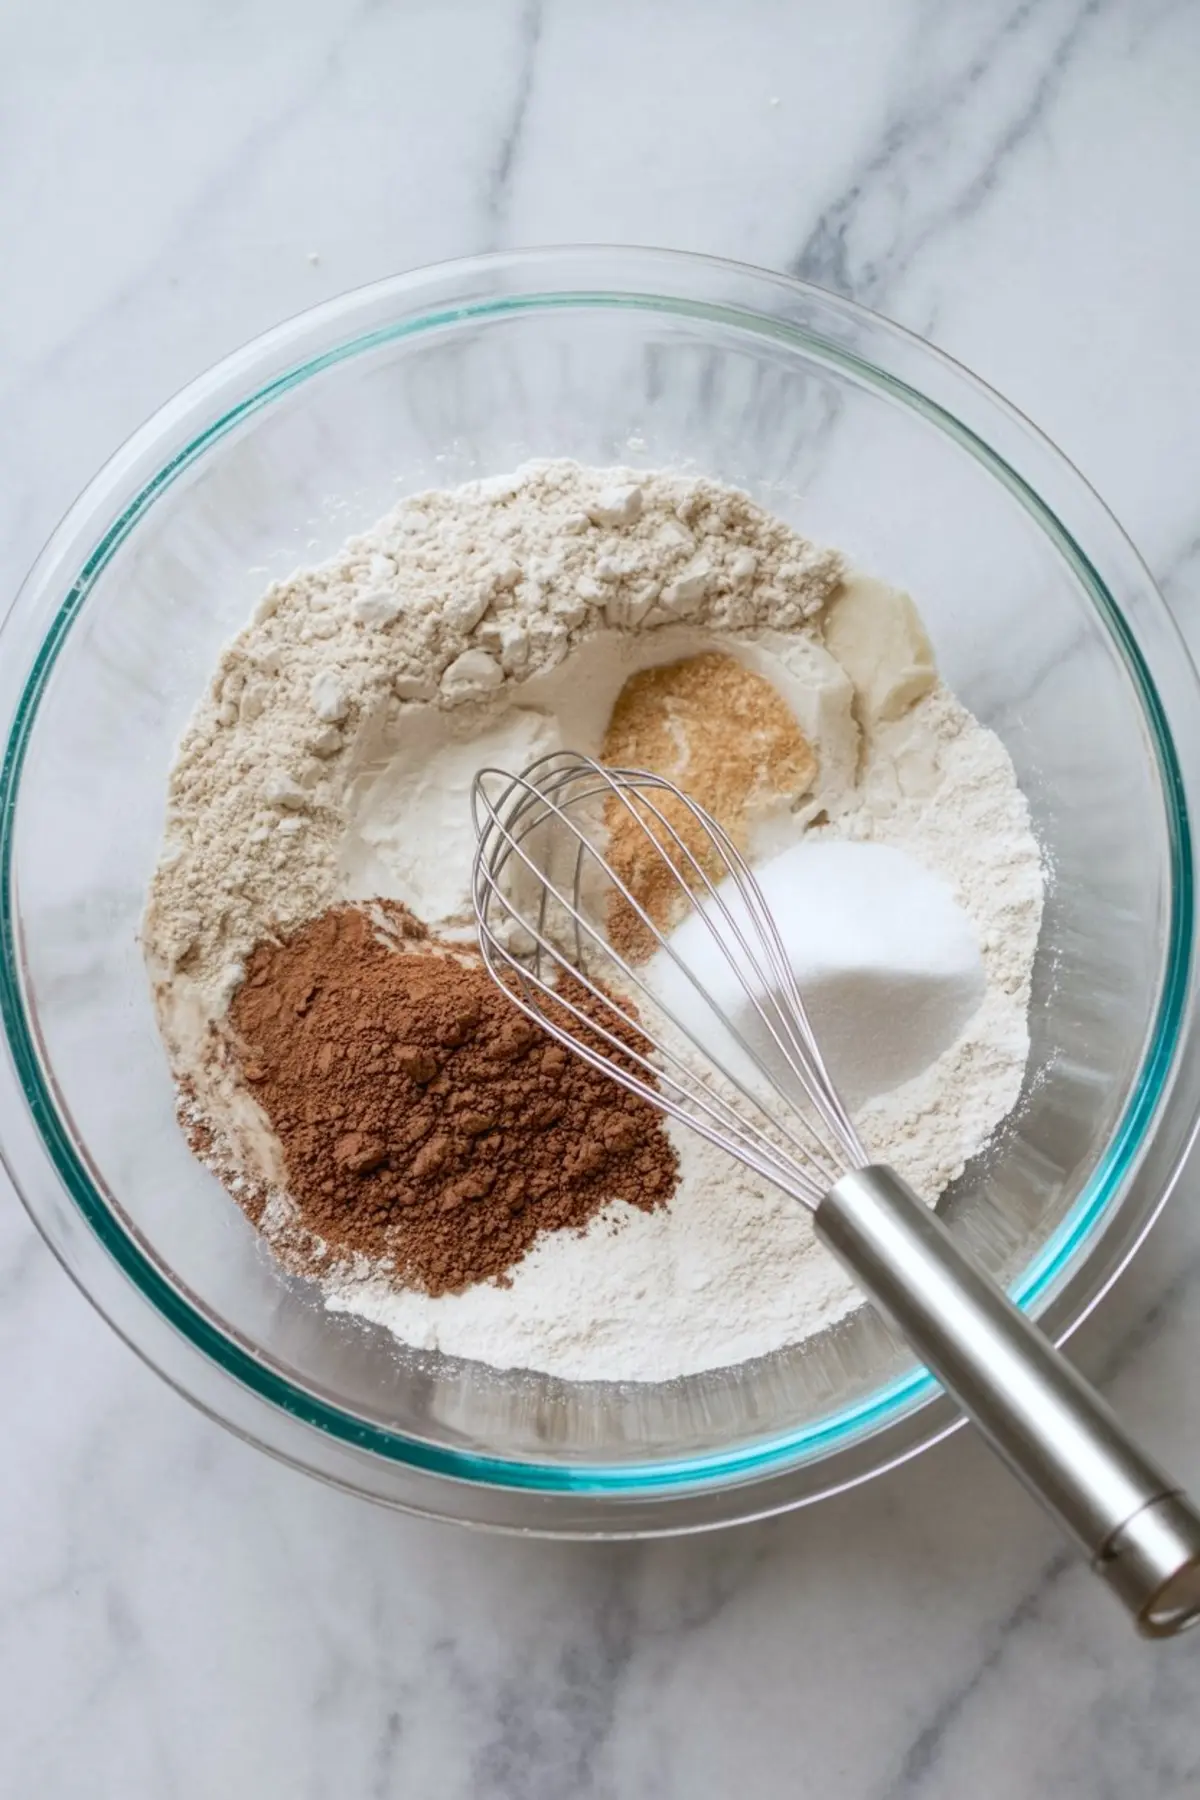
- MIX DRY INGREDIENTS: In a large mixing bowl, whisk together the granulated sugar, flour, cocoa powder, baking powder, baking soda, and salt until fully combined.
- ADD WET INGREDIENTS: Add the buttermilk, vegetable oil, egg, and vanilla extract to the bowl. Mix until the batter is smooth and no dry spots remain.
- ADD HOT WATER: Slowly stir in the hot water. The batter will be thin—this helps create a moist texture.
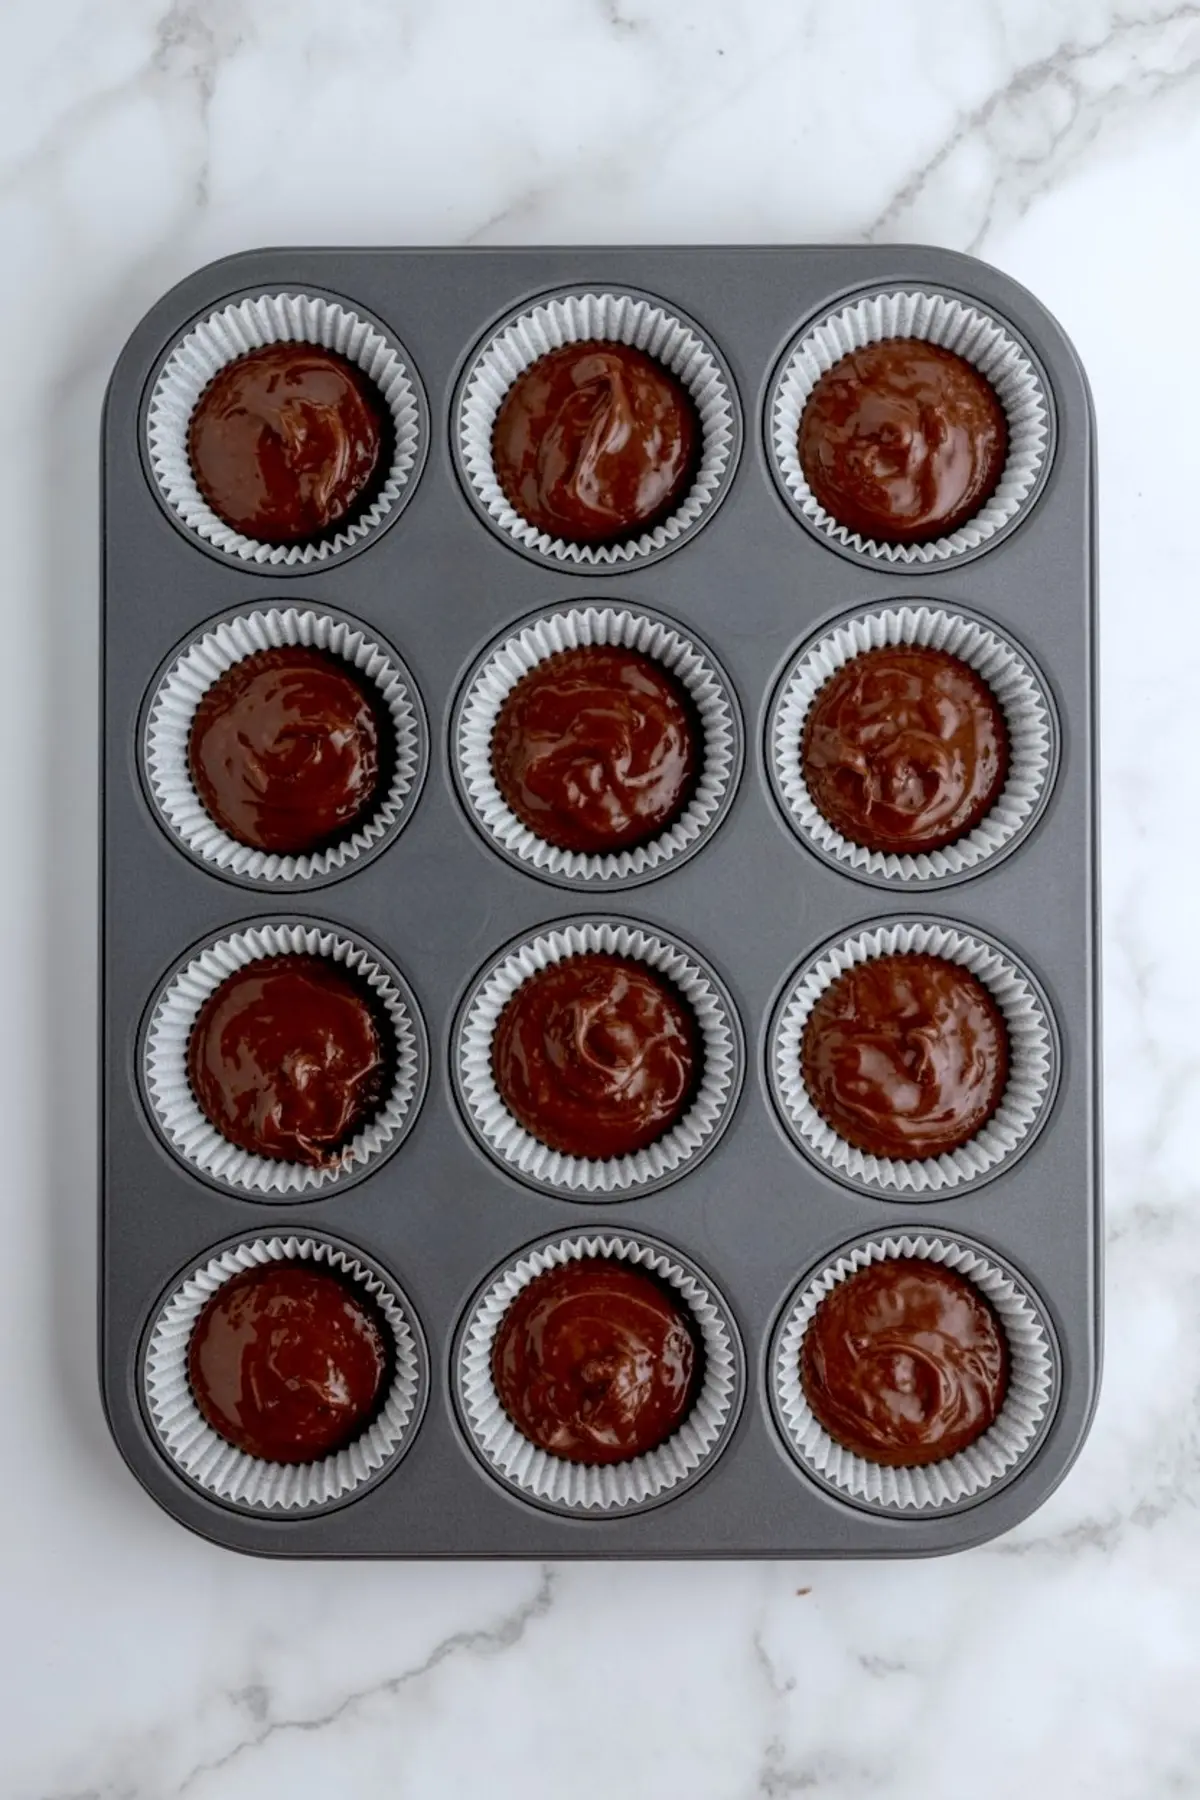
- BAKE CUPCAKES: Divide the batter evenly among the prepared cupcake liners, filling each about 2/3 full. Bake for 18–20 minutes or until a toothpick inserted in the center comes out clean.
- COOL COMPLETELY: Let the cupcakes cool in the pan for 5 minutes, then transfer them to a wire rack to cool completely before frosting.
- MAKE BUTTERCREAM: In a stand mixer fitted with a paddle attachment, beat the softened butter for 2–3 minutes until pale and fluffy. Gradually add sifted powdered sugar, mixing well between additions. Add vanilla, a pinch of salt, and cream 1 tablespoon at a time until the texture is smooth and pipeable.
- COLOR BUTTERCREAM: Add a few drops of purple gel food coloring and beat until the color is evenly distributed.
- PIPE FROSTING: Fit a piping bag with a large round or open star tip. Fill the bag with purple buttercream and pipe a tall swirl onto each cooled cupcake.
- PREP FONDANT BASE: Roll out white fondant on a cornstarch-dusted surface to about 1/8-inch thickness. Use a round cookie cutter to cut out 12 circles the size of your cupcakes.
- CREATE JACK'S FACE: Roll small amounts of black fondant to shape Jack Skellington’s eyes, nose, and stitched smile. Use a small piping tip or sharp tool for detail work. Gently press the facial features onto the white fondant circles, using a tiny dab of water or edible glue to adhere them if needed.
- DRY AND DECORATE: Let the toppers dry for 15–20 minutes so they’re easier to handle. Once firm, gently place one on top of each frosted cupcake.
Notes
To save time, the fondant toppers can be made 1–2 days in advance and stored in a cool, dry place. Avoid refrigerating decorated cupcakes, as condensation may cause the fondant to soften or melt.
Nutrition Information
Yield
12Serving Size
1Amount Per Serving Calories 599Total Fat 34gSaturated Fat 18gTrans Fat 1gUnsaturated Fat 13gCholesterol 94mgSodium 294mgCarbohydrates 71gFiber 1gSugar 60gProtein 4g