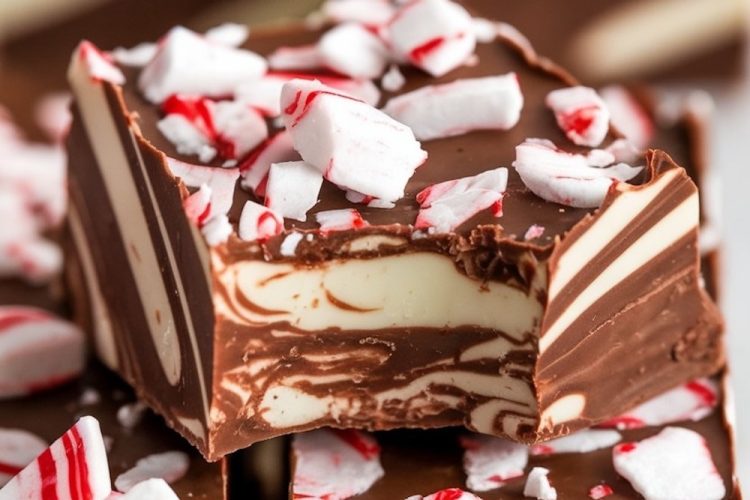
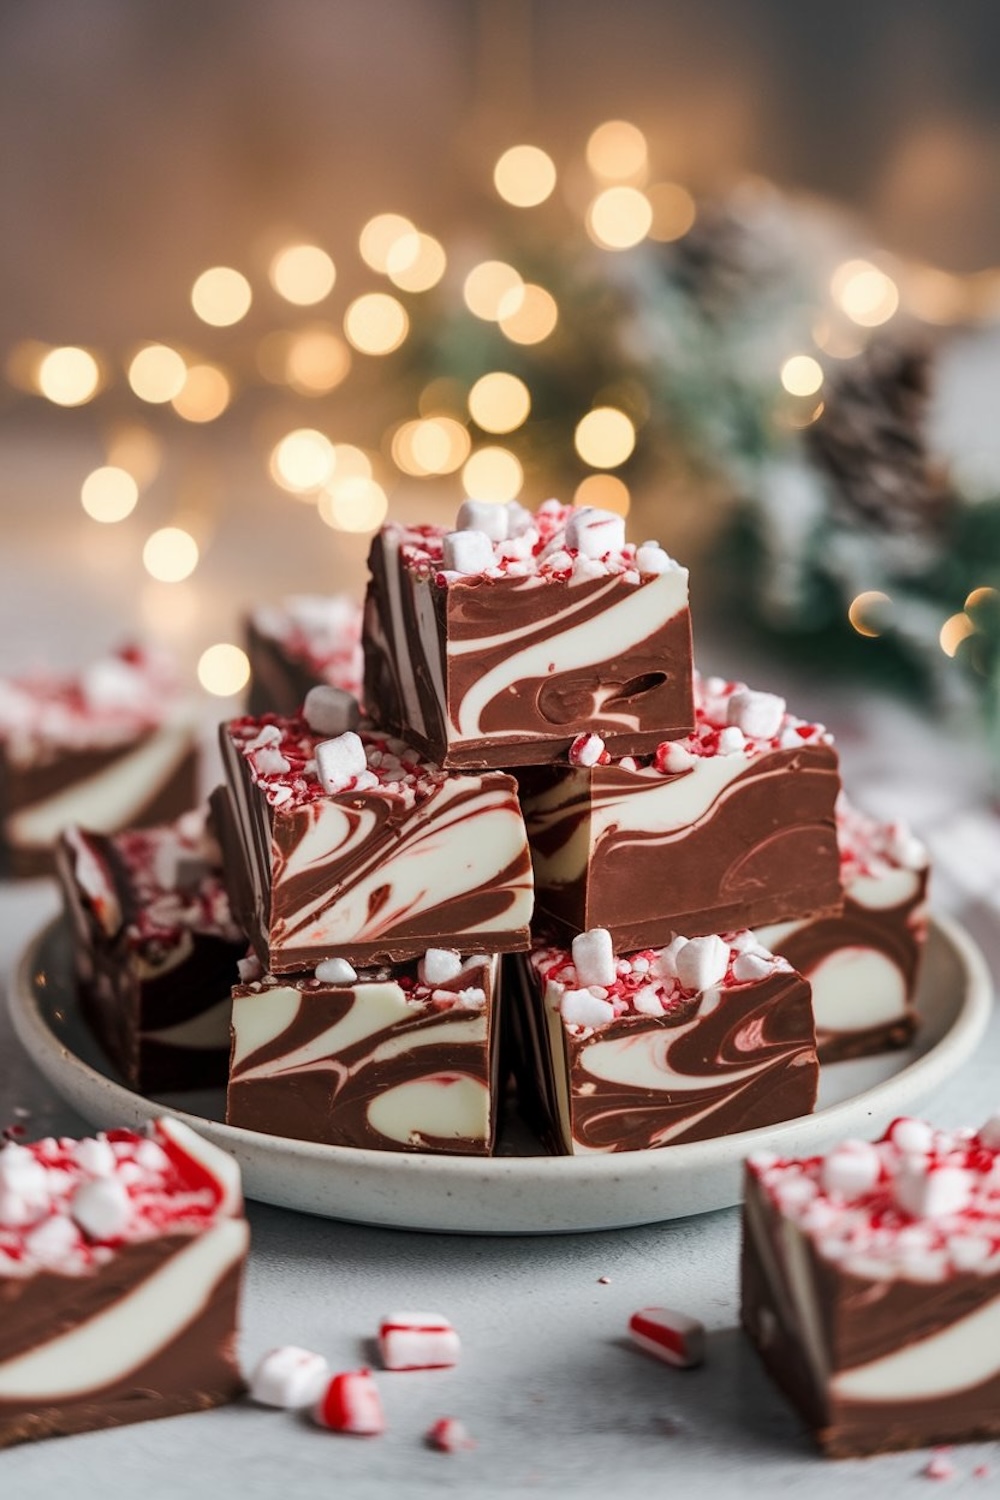
Some desserts are festive. Some are delicious. And some, like this Peppermint Swirl Fudge, are both. With its candy-cane red and creamy white swirls layered through silky chocolate, this fudge is the kind of treat that looks professionally made but comes together with simple ingredients and no stress.
This recipe uses real white chocolate, dark or semi-sweet chips, peppermint extract, and crushed peppermint candy. It avoids common fudge pitfalls like clumping, thick paste, or grainy texture.
That matters most during the busy baking season. You want fudge recipes that work, stay smooth, and cut clean. This one does.
I changed my fudge method after years of seized chocolate. The key was switching fully to the double boiler and leaving the microwave out. Chocolate and condensed milk melt better over gentle steam. It’s more forgiving.
In the base layer, the 2 cups of chocolate chips with 1 tablespoon of butter and a full 14 oz can of room temperature sweetened condensed milk give just the right consistency. The peppermint extract adds flavor without excess liquid. That’s a balance that took testing.
The swirl layer has a smaller volume, about 1½ cups white chocolate and ⅓ cup condensed milk. That’s enough to give contrast but not overwhelm the base. If the peppermint layer had more milk or butter, it would run and ruin the swirl.
Spotlight: Real White Chocolate
White chips can cause real problems if they aren’t high quality. I always use white chocolate with cocoa butter listed in the ingredients. Almond bark doesn’t swirl the same way, and melts oddly.
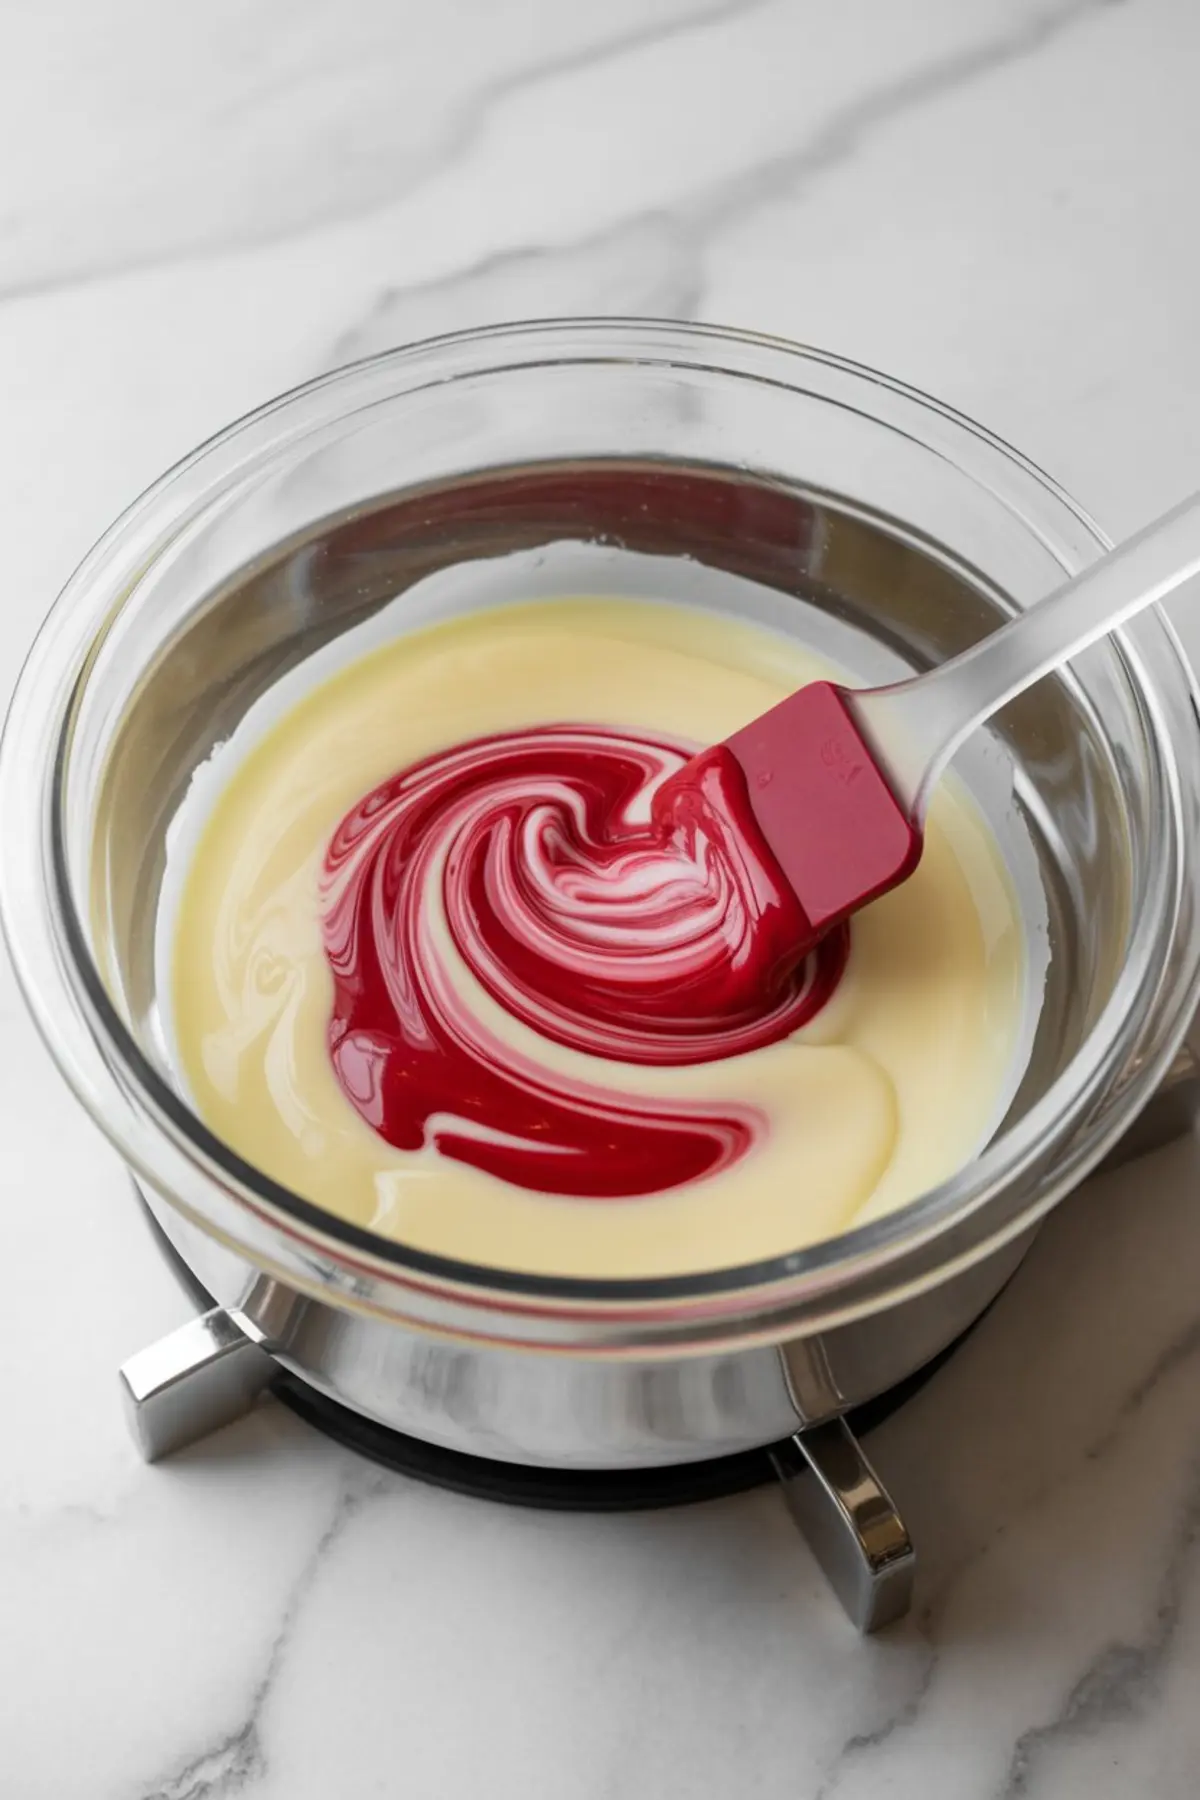
Melt this layer gently. Once the chocolate and milk are smooth, stir in the red gel food coloring with care. One or two drops go a long way. It should streak through the white like ribbons, not turn fully pink.
You’ll know it’s right when you can drag a spoon through and see both red and white clearly, still separated. That’s the stage to stop. Stirring too much here will ruin the effect.
If you need a swap, Lindt or Ghirardelli baking bars melt better than chips.
Choosing Every Ingredient on Purpose
Following a special diet?
Every recipe on this site can be converted to gluten-free, vegan, dairy-free, keto, nut-free or egg-free with adjusted ratios so nothing falls flat.
Try the Recipe Converter →The chocolate layer works best with semi-sweet chips if you like contrast. Go for dark if you want a deeper cocoa bite. Don’t use milk chocolate here. It softens the structure and gets overwhelmed by the mint.
Sweetened condensed milk must be room temperature. Cold milk shocks the melted chocolate and can cause seizing. I leave the can out on the counter an hour before.
Peppermint extract is more concentrated than vanilla. I measure carefully, just ½ teaspoon in each layer. Too much turns harsh fast.
The crushed peppermint topping finishes it. I prefer candy canes over hard candies. They’re easier to crush, and the finer dust sticks better.
You can see similar success in this White Chocolate Peppermint Fudge version too.
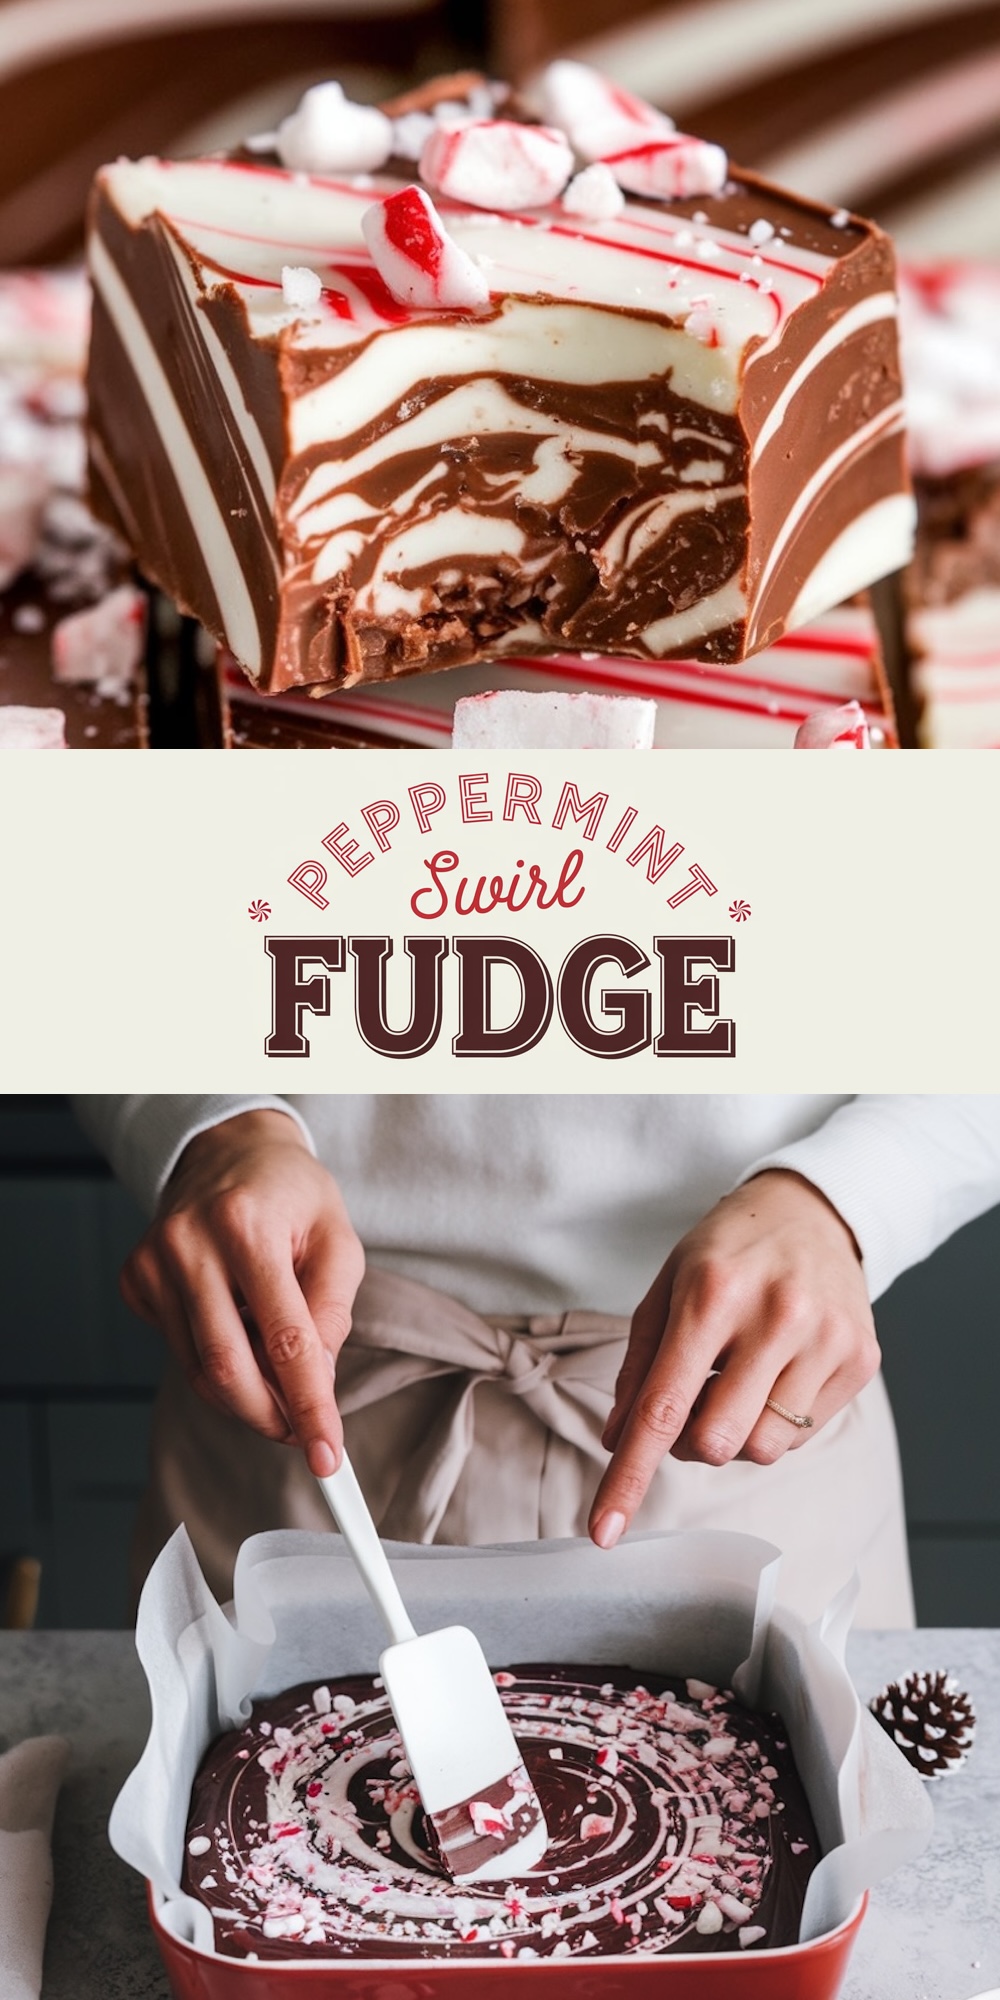
Pour, Swirl, Chill
After both mixtures are ready, pour ¾ of the chocolate into the pan first. It should spread easily but hold its shape. Then drop spoonfuls of the peppermint layer across the surface. Don’t pour.
Use a skewer or butter knife to drag through in wide figure-eights. The motion matters. Too tight a swirl blends the layers. Too little leaves them separate.
Add the rest of the chocolate between the red drops, then swirl again. Finish with crushed peppermint on top. Press gently so they sink into the warm surface.
Refrigerate uncovered for 3 hours or longer. It needs to firm up before cutting.
How to Know It’s Set
The surface turns matte when it’s ready. If it still looks glossy or soft, it needs more time. It should lift cleanly out of the pan when cold and cut without sticking to the knife.
If it breaks or crumbles, it sat too long in the fridge or was overheated at the start. Let it sit at room temp a few minutes before cutting.
Fixing Common Issues
If the chocolate layer seizes after adding milk, the milk was too cold or the bowl got direct heat. Always melt gently over simmering water.
If the peppermint layer turns chalky, the white chocolate wasn’t real. Switch brands next time.
If your swirl looks muddy, you stirred too much or let the layers cool before swirling. Swirl fast and chill right after.
If it’s too firm to bite, reduce the chilling time next batch by 30 minutes. This fudge stays softest when cut and served same day.
You can also try a softer spin with Peppermint Cheesecake Mousse Cups for a creamier feel.
Flavor Variations That Work
You can swap the peppermint extract with orange or almond for a twist. Almond with dark chocolate gives a marzipan-style richness. Use ½ teaspoon of the new extract, no more.
Add chopped toasted nuts to the base layer for texture. Pistachios look lovely against the swirl.
Try using green gel color instead of red. Or both, swirled separately. Add them to halves of the white layer, then swirl side by side.
You can also play with base chocolate. Half dark, half milk creates a layered taste. I wouldn’t mix them in the same bowl though. Keep their melt points separate.
For another soft peppermint dessert, the Peppermint Mocha Mousse also hits that cold-weather flavor note.
Small Details That Help

Use a straight-edged 8×8 pan. Rounded corners blur the swirl.
Always grease your parchment lightly. Fudge sticks more than you think.
Cut with a hot knife. I run mine under hot water, dry it, then slice. Clean between cuts for sharp squares.
Gel food coloring works better than liquid. A little goes far and won’t change texture.
Try these Peppermint Chocolate Chip Blondies next if you want a chewy contrast to this soft-set fudge.
Save This Recipe
Pin this fudge so it’s ready when the next cookie swap or gift box comes around.
If you try a variation or have a question, share it in the comments. I’d love to hear how it turns out.
Peppermint Swirl Fudge

Creamy, sweet, and festive, this Peppermint Swirl Fudge is a must-make for your holiday treat list. The smooth texture and bright peppermint flavor make it a standout among holiday candy recipes. With simple ingredients and minimal effort, this is one of the most crowd-pleasing fudge recipes easy enough for any skill level. Serve it as part of your Christmas candy tray or wrap pieces as homemade holiday treats. Ideal for gifting or entertaining during the season.
Ingredients
- FOR THE CHOCOLATE LAYER
- 2 cups semi-sweet or dark chocolate chips
- 1 tablespoon unsalted butter
- 1 (14 oz) can sweetened condensed milk, room temperature
- ½ teaspoon peppermint extract
- Pinch of salt
- FOR THE PEPPERMINT SWIRL LAYER
- 1 ½ cups white chocolate chips (use real white chocolate, not almond bark)
- ½ tablespoon unsalted butter
- ⅓ cup sweetened condensed milk, room temperature
- ½ teaspoon peppermint extract
- 1–2 drops red gel food coloring
- FOR THE TOPPING
- ½ cup crushed peppermint candies or candy canes
Instructions
- PREP THE PAN: Line an 8x8-inch square pan with parchment paper, leaving overhang on two sides to lift the fudge easily. Lightly coat with nonstick spray and place on a flat surface.
- MAKE THE CHOCOLATE FUDGE BASE: In a heatproof bowl, combine chocolate chips, butter, and room temperature sweetened condensed milk. Set the bowl over a pot of simmering water and stir constantly until melted and smooth. Remove from heat and stir in peppermint extract and a pinch of salt.
- MAKE THE PEPPERMINT SWIRL LAYER: In a separate heatproof bowl, combine white chocolate chips, butter, and condensed milk. Melt gently over a double boiler, stirring until fully smooth. Stir in peppermint extract and 1–2 drops of red gel food coloring. Swirl gently with a spoon to create streaks without blending the color completely.
- LAYER AND SWIRL: Pour about three-quarters of the chocolate mixture into the prepared pan and spread it evenly. Drop spoonfuls of the red peppermint mixture across the surface, then add the remaining chocolate mixture in the gaps. Use a knife or skewer to gently swirl the two mixtures together, creating figure-eight patterns without overmixing.
- ADD THE TOPPING: Sprinkle the crushed peppermint candies evenly over the surface of the swirled fudge. Press gently to help them adhere to the top layer.
- CHILL AND SET: Place the pan in the refrigerator and chill for at least 3 hours, or until fully set and firm. Once chilled, lift the fudge out of the pan using the parchment overhang and cut into 25 squares with a sharp knife.
Notes
Use gel food coloring for best color intensity without thinning the chocolate. Avoid using the microwave to melt chocolate; direct heat or overheating may cause it to seize. Store fudge in an airtight container in the refrigerator for up to 1 week or freeze for longer storage.
Nutrition Information
Yield
25Serving Size
1Amount Per Serving Calories 135Total Fat 7gSaturated Fat 4gUnsaturated Fat 3gCholesterol 7mgSodium 29mgCarbohydrates 16gFiber 2gSugar 10gProtein 3g
My fudge was too thick to pour so I couldn’t swirl it
Hi Ashley! It sounds frustrating when the fudge didn’t come out as expected. To achieve a more pourable consistency for swirling next time, you might want to reduce the heating time slightly or add a bit more condensed milk to keep the chocolate mixture smoother. Also, ensure that the mixture is warm when you start to swirl. I hope this helps, and your next batch turns out perfectly swirled!
mine also turned out too thick and immediately seized after I put the sweetened condensed milk in 🙁 I know it wasn’t too hot because I warmed it just enough to have enough residual heat to melt the remaining chips. Super disappointed.
I’m really sorry to hear about your experience, Amanda. 🙁
It sounds frustrating, especially when you’re following the steps closely. Sometimes, chocolate can seize if any moisture is introduced, which can occasionally happen with ingredients like sweetened condensed milk. Here’s a tip: next time, you might try heating the condensed milk with the chocolate over low heat, stirring gently just until the chocolate melts completely and mixes smoothly. This method will help manage the temperature and consistency better. Hope this helps for your next attempt!
This was an absolute disaster. Once I added the sweetened condensed milk it turned into a solid mess that could not be pored or swirled. Extremely disappointed as this was to be my dessert for Thanksgiving and I don’t have time to go to the store to buy anything else. I wish I had read the other two reviews saying the exact same thing. I followed the recipe exactly as written. No extra heat, no additional moisture.
I’m sorry this happened during your holiday prep. When white chocolate mixes with sweetened condensed milk, it can seize if the chocolate is even a little too hot or if it isn’t fully melted before the milk goes in. I’m going to re-test the recipe to make sure the ratios and temperatures are as clear as they need to be. I appreciate you sharing what happened because it helps me make the instructions more dependable for everyone.
I used a half can of condensed milk (approx. 7oz.) and that helped my white chocolate. It doesn’t look as beautiful as the pictures here, but it’s my first time making it. It smells great and tastes pretty good off the swirling knife.
Hi, Rachel! That sounds like a great firsr try, and using half a can of condensed milk is a smart adjustment if the white chocolate was giving you trouble. The first batch is always a bit of an experiment, but it’s a win if it smells good and tastes great right off the knife 😊
Don’t worry if the swirl didn’t turn out exactly like the photos—mine didn’t either the first time. It really just takes a light hand and a little practice. If you decide to make it again, try swirling just once or twice with the tip of a butter knife and then leaving it be. It helps keep the colors clean without muddying the pattern. But honestly, if it tastes good, you’re already most of the way there.