
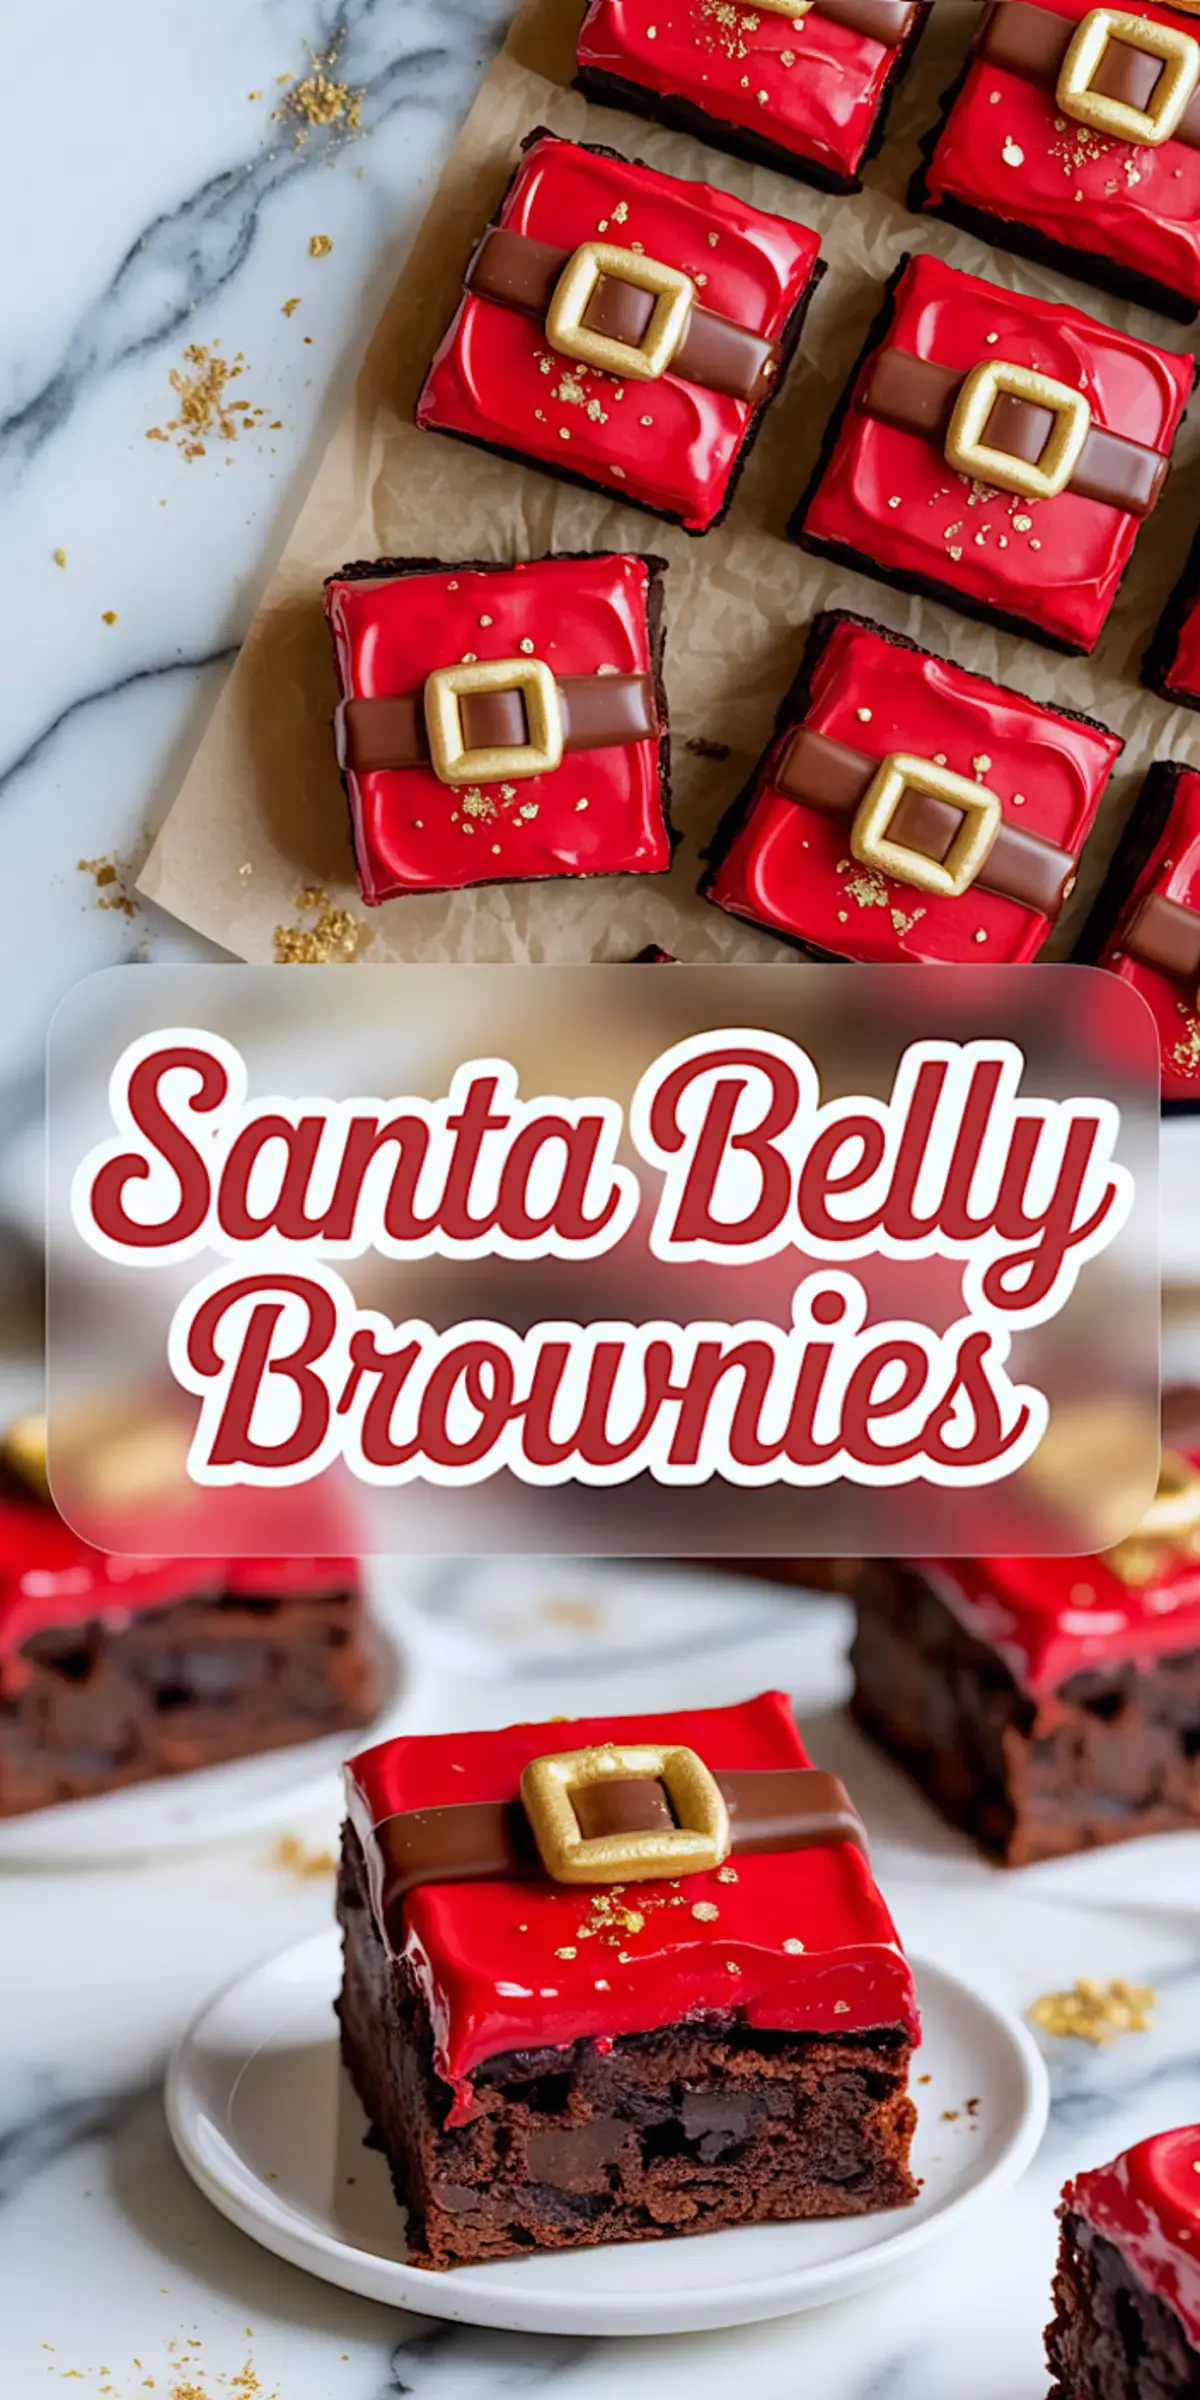
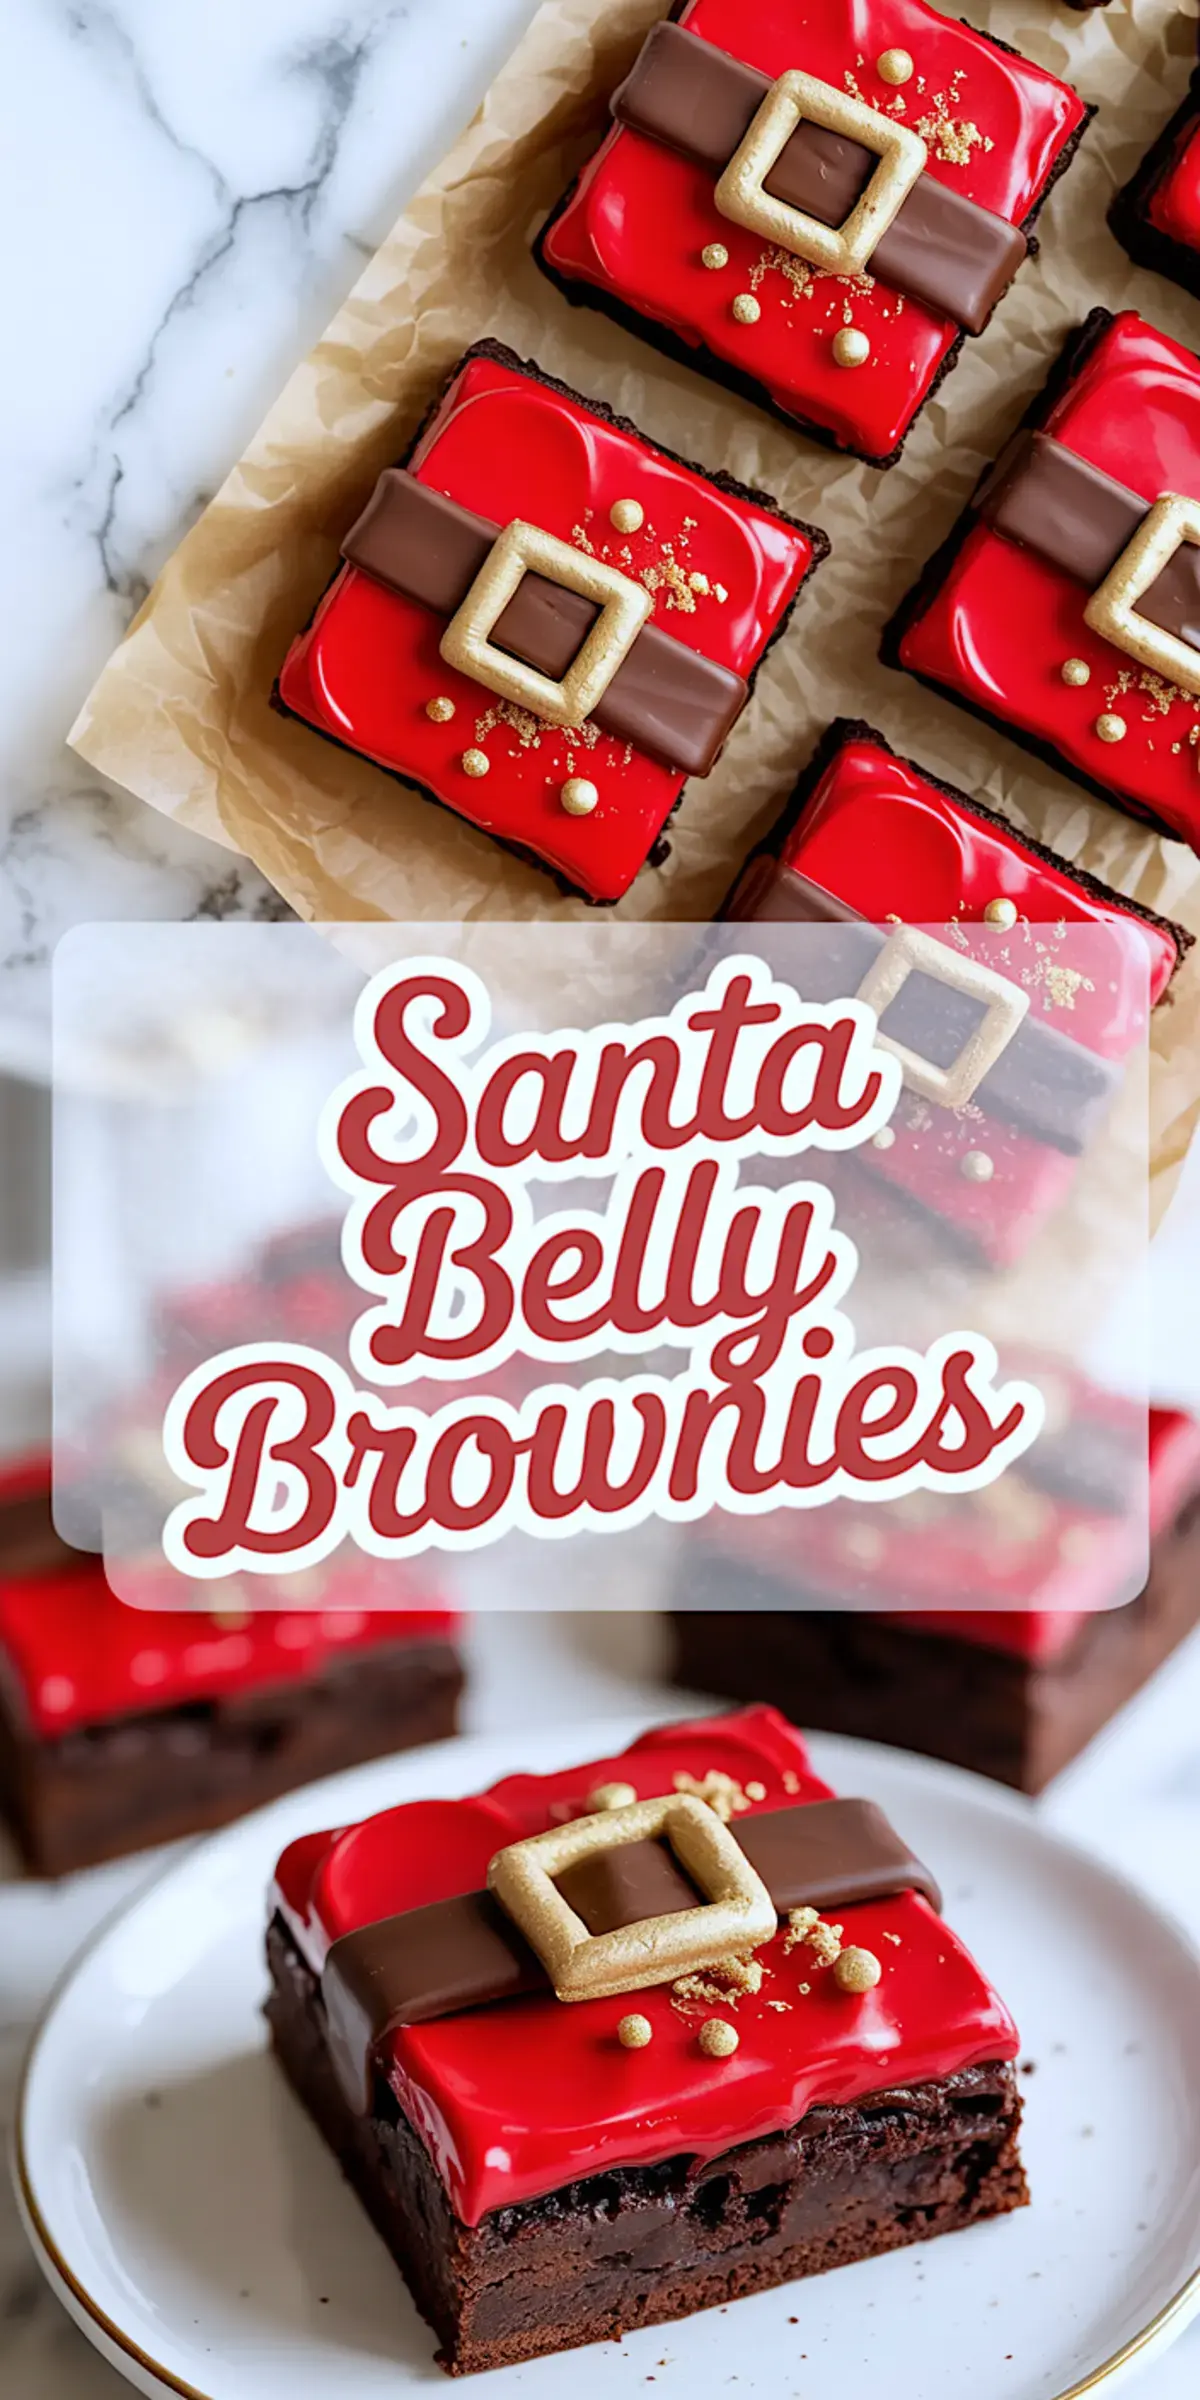
Christmas desserts have a way of leaving an impression. These Santa Belly Brownies take that idea and dress it up, literally. Rich, fudgy chocolate brownies form the base. Each square is topped with red ganache and fondant decorations that turn the treat into a miniature Santa suit.
You’ll learn exactly how to bake, decorate, and store them for any holiday event. Whether you’re bringing something to a classroom party, baking for a gift box, or lining up Christmas brownie options for your own dessert board, this recipe brings visual charm and bold chocolate flavor.
It’s not a complicated recipe. But it relies on smart ingredient choices and good prep timing. The decorating step is where the magic happens. I’ve made these for family and neighbors more times than I can count. Each time, the same thing happens. People smile before they even taste them. And once they do, they ask for another.
Following a special diet?
Every recipe on this site can be converted to gluten-free, vegan, dairy-free, keto, nut-free or egg-free with adjusted ratios so nothing falls flat.
Try the Recipe Converter →Deep, Fudgy Flavor Without Overcomplication
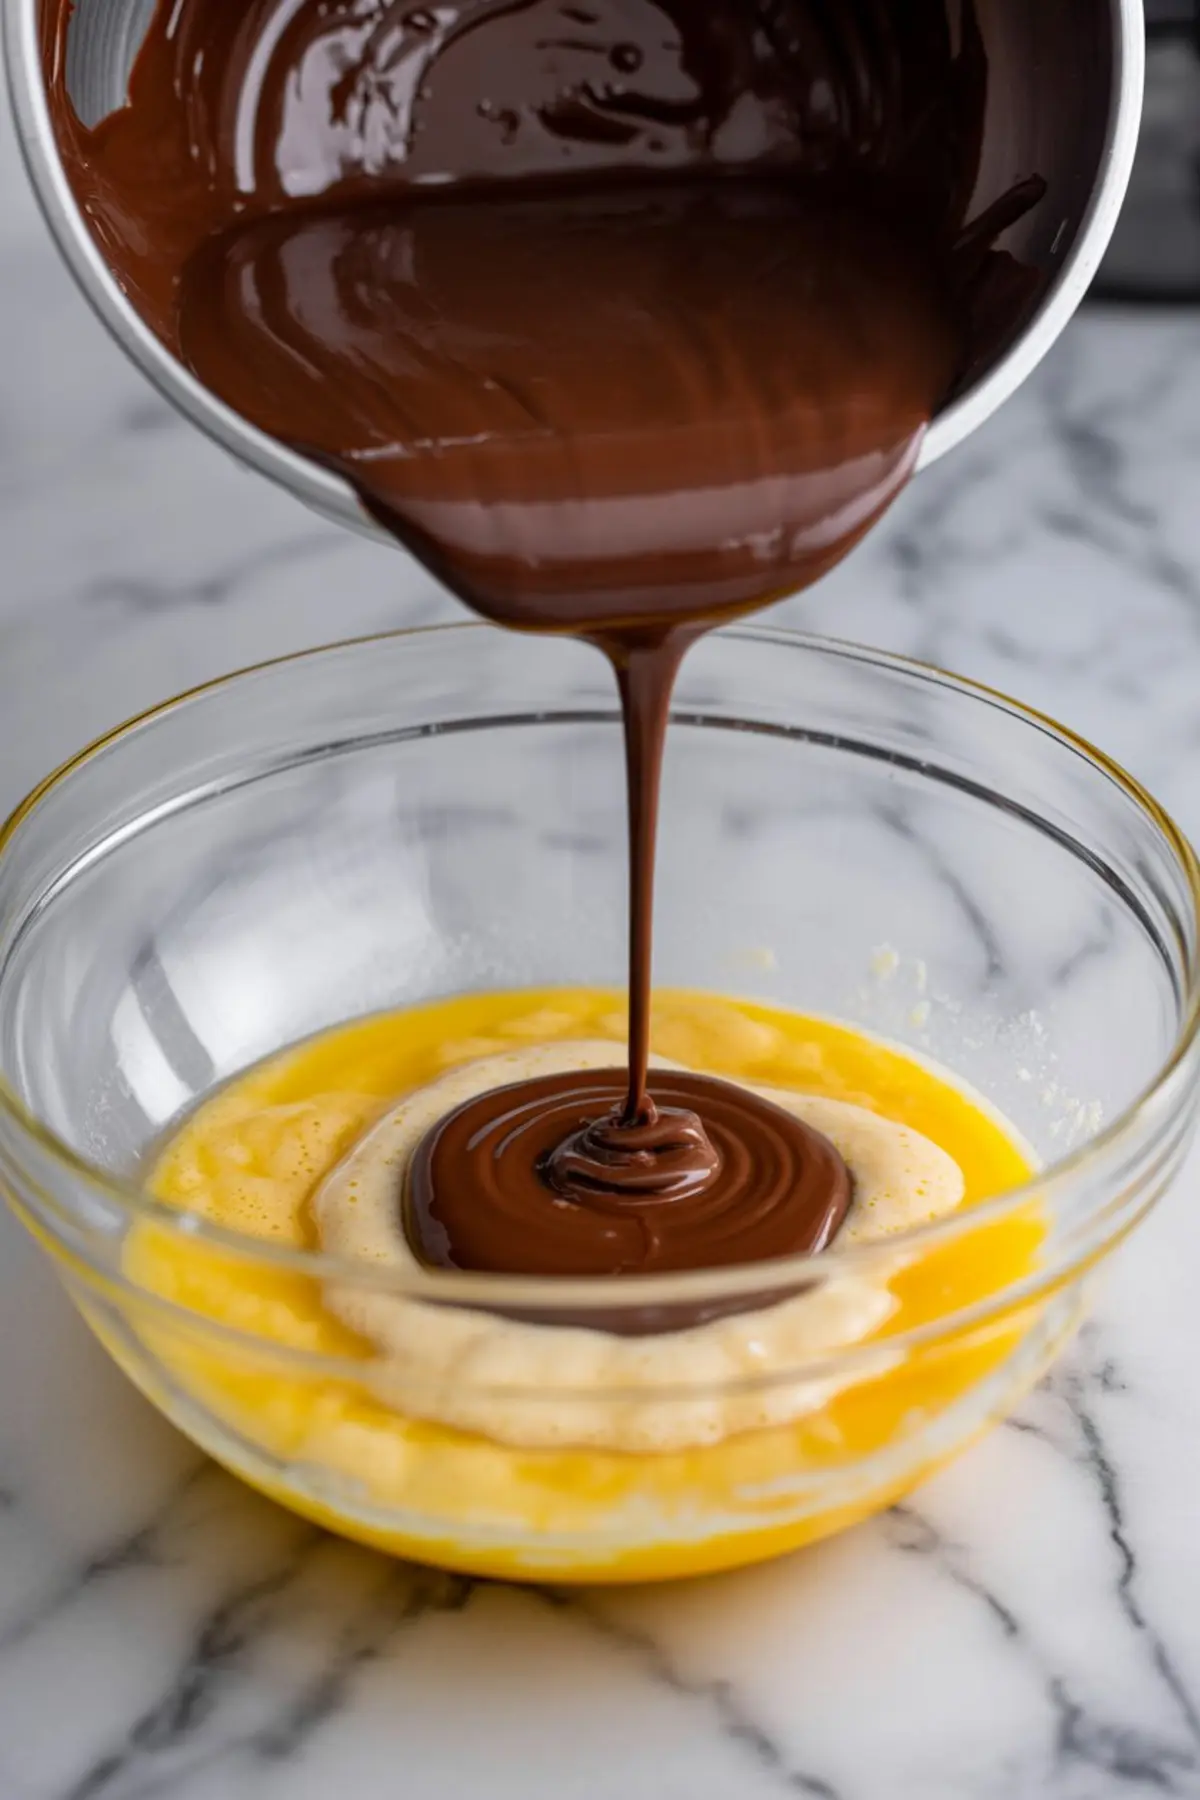
The brownies are built on dark chocolate and real butter. This is the backbone of the flavor. I’ve used chocolate chips and unsalted butter for convenience, but chopping a good-quality bar adds depth that doesn’t come from a bag.
Adding both granulated sugar and brown sugar gives the brownies a denser chew and richer taste. That slight hint of molasses from the brown sugar rounds out the cocoa beautifully. You’ll notice it right away when they cool.
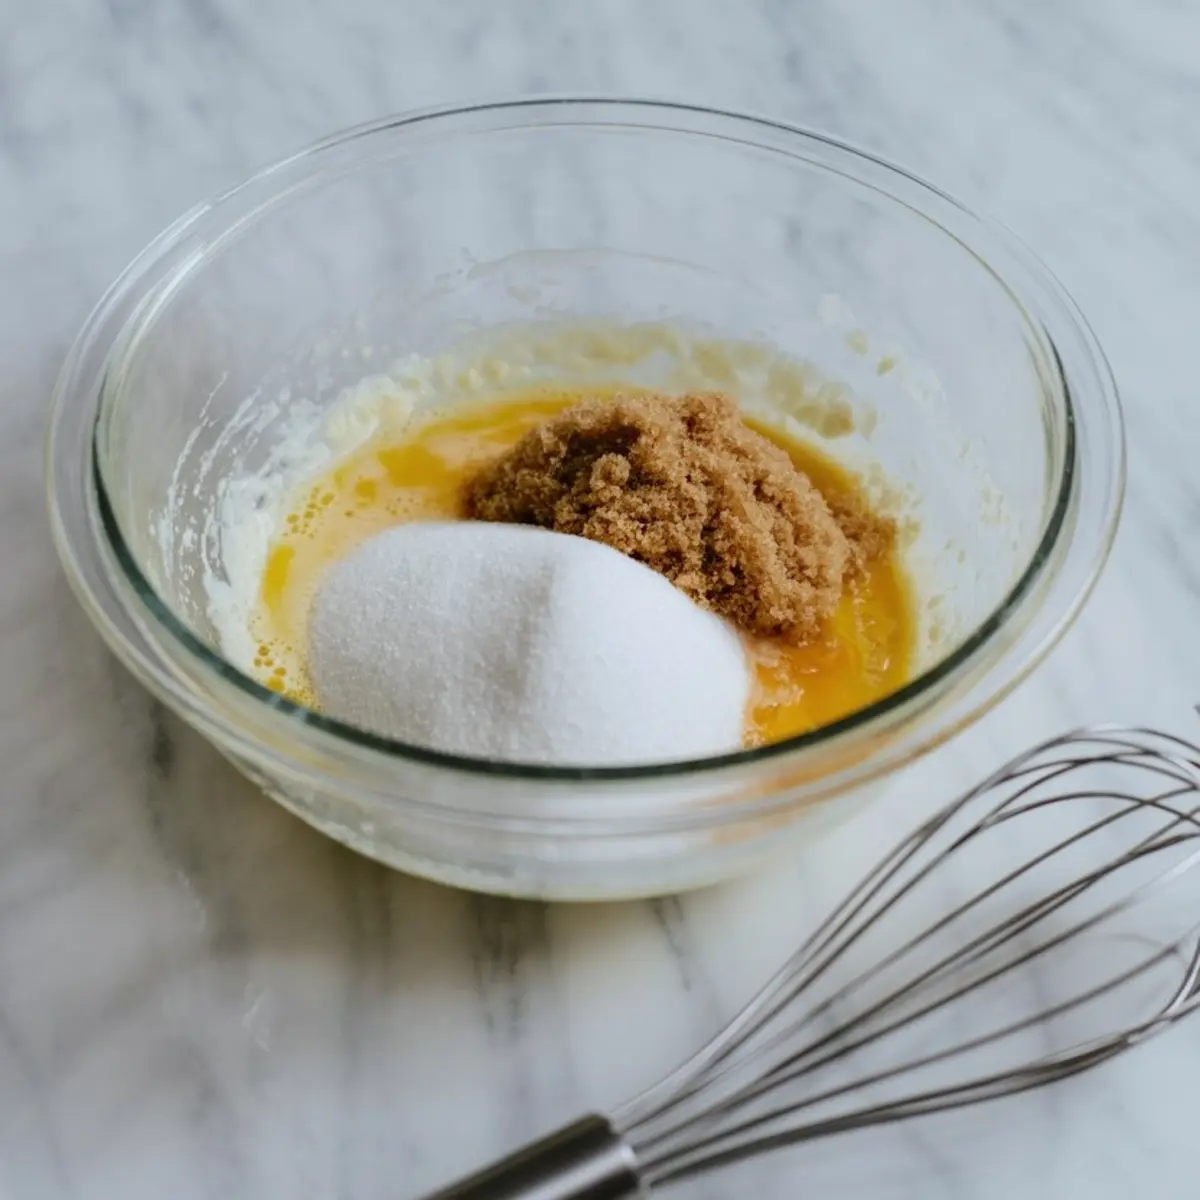
Vanilla plays a quiet but important role. It doesn’t shout. But without it, the flavor feels flat. One teaspoon is enough. You don’t need more.
Comparing Cocoa Powders: Dutch vs. Natural
I’ve tested both Dutch-processed and natural cocoa powder for these brownies. Dutch cocoa gives a smoother, deeper result, while natural cocoa leans sharper and more acidic. For this recipe, I recommend Dutch cocoa. It balances the sweetness from the ganache later on. In my notes, every batch made with Dutch cocoa tasted more polished. The ganache didn’t overpower the base.
If you only have natural cocoa, it’ll still work. Just expect a slightly bolder, less mellow chocolate finish.
How the Ganache Becomes the Suit
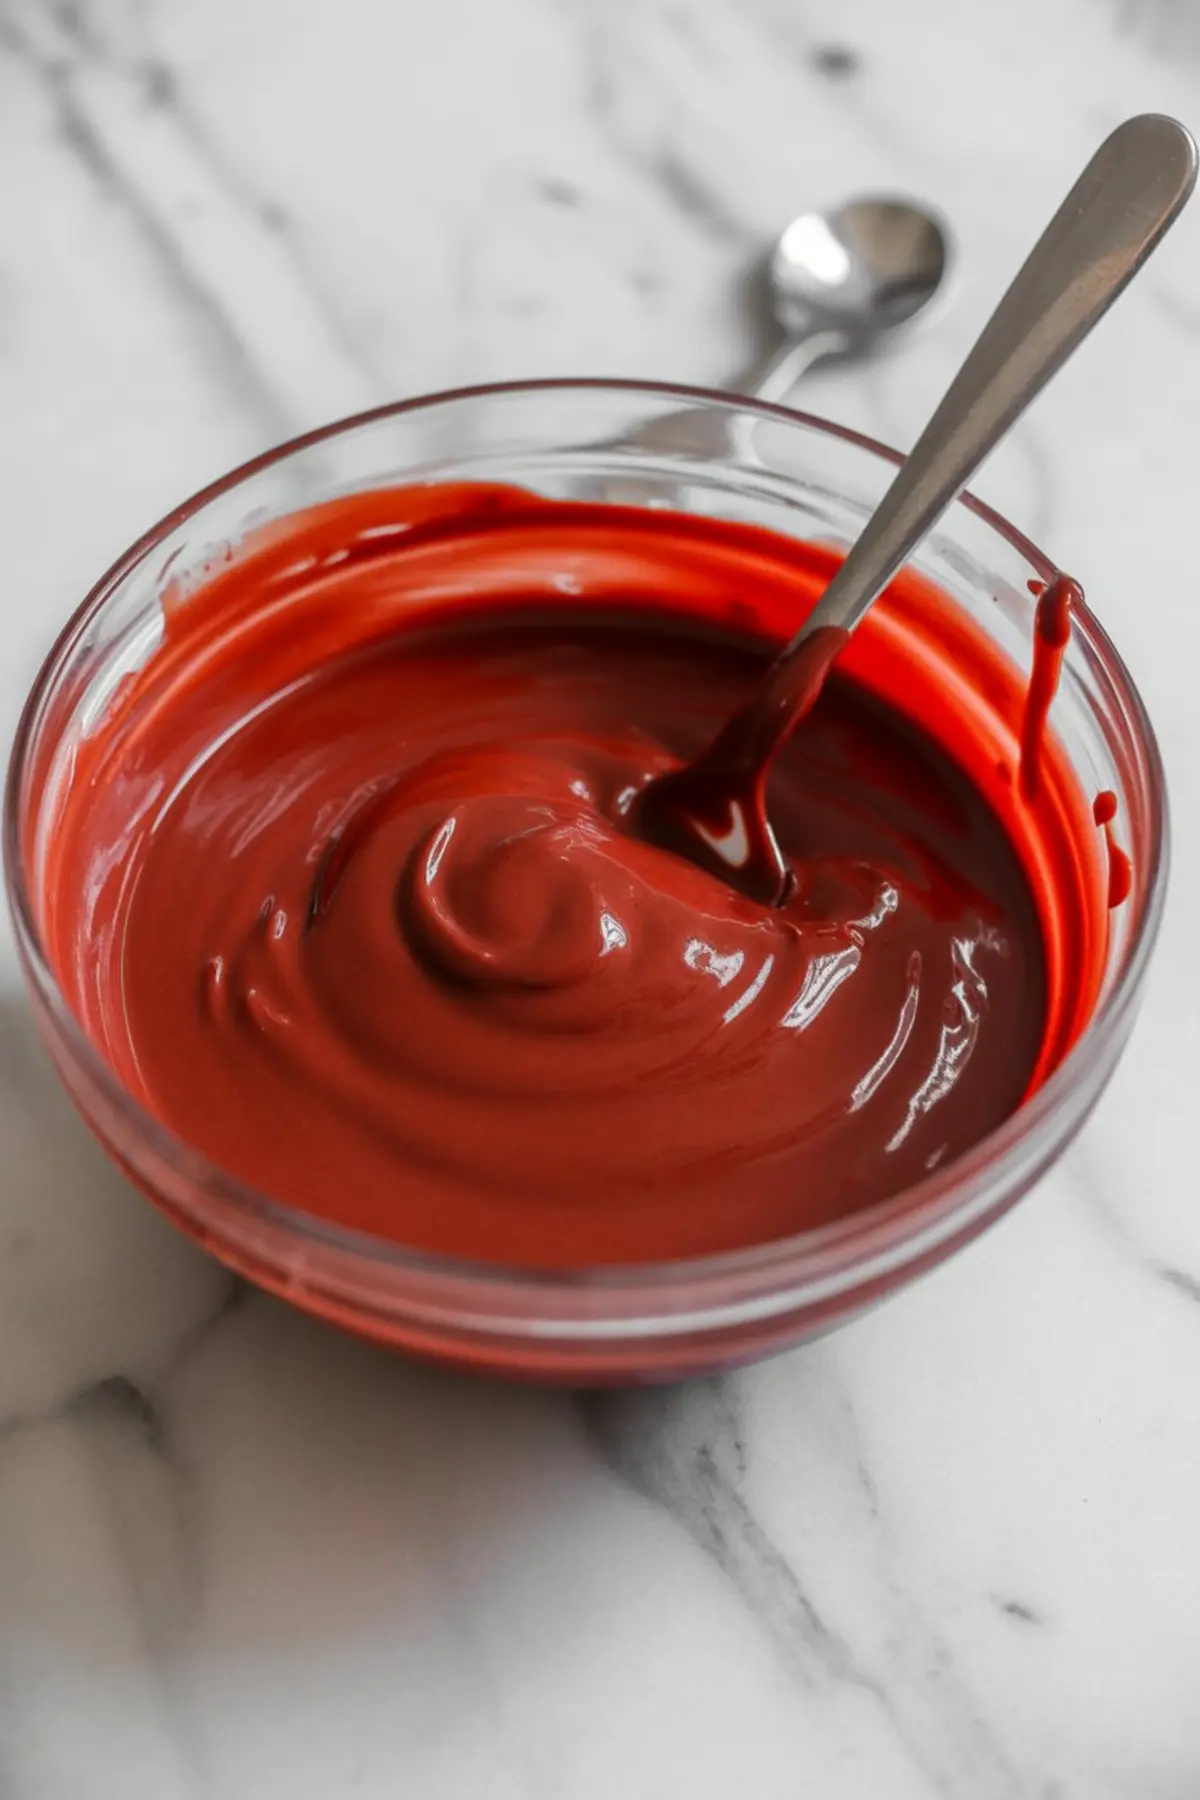
The red ganache is a white chocolate and cream mixture dyed with gel food coloring. It’s not just decorative. It adds sweetness, shine, and a clean layer to build on. I use gel food coloring instead of liquid so the texture stays smooth and set. Liquid dyes can cause the ganache to break or thin out.
You’ll want to chill the ganache before slicing, so plan ahead. I usually make the brownies in the morning and decorate later in the day. That gives the ganache time to set without rushing it.
For another festive option with bold red tones, these Santa Hat Cheesecake Bites use fresh strawberries and cream cheese to play on the same theme.
Decorating with Fondant – Why It Works So Well
Fondant gets a bad reputation in some circles. But here, it’s the right choice. The belts and buckles need structure. Buttercream won’t hold the shape, and candy melts can get messy. Rolled fondant strips stay in place, and they don’t melt at room temperature.
Black fondant gives the clean belt shape. Yellow fondant cut into tiny squares becomes the buckle. You can leave them plain, but I like to brush mine with edible gold dust. It gives that soft metallic sheen that feels polished without being fussy.
If you’ve worked with fondant before, you know it can get sticky. A little cornstarch on the rolling surface helps. For cutting the belts, I use a small ruler and paring knife. It’s simple, and it works.
Want more ideas for cute Santa-themed bakes? Try these Santa Hat Cupcakes next. They use the same red and white styling but go in a completely different direction with flavor.
How to Store and Serve Santa Belly Brownies
Once decorated, these brownies hold well. I keep mine in an airtight container at room temperature for two to three days. If I’m making them in advance, I store them in the fridge and let them come to room temperature before serving. The texture improves that way. Cold ganache doesn’t bite the same way soft ganache does.
When serving, I cut the edges clean and square. A sharp knife helps, especially if the brownies have been chilled. You’ll want to press the fondant belt on just before serving if you’re worried about softening in a warm room.
These pair well with simple drinks like milk or hot cocoa. I’ve also put them on trays with fudge brownies and Santa Belt Macarons for variety. That combination is always a hit.
Related Recipes for Christmas Dessert Boards
- Santa Claus Cookies: Soft, shaped sugar cookies with red and white detail.
- Santa Hat Cheesecake Bites: Creamy and festive, perfect for no-bake lovers.
- Santa Belt Macarons: A classy twist on the same design idea.
- Santa Hat Cupcakes: Rich chocolate cupcakes topped with whipped frosting and strawberries.
Each one brings a different texture, flavor, and look to the table. You can pick one or mix several into a holiday dessert board. That’s what I do when I want it to feel special without overcomplicating the baking.
Pin This for Christmas and Share Your Baking Wins
This recipe blends simple baking with standout holiday styling. It’s a dessert that catches eyes and keeps hands reaching for more. If you make them, I’d love to hear how it went. Did the fondant give you trouble? Did someone eat the ganache before it cooled? Let me know in the comments.
Save this post to your Christmas baking board so it’s ready when the season starts rolling. These Santa Belly Brownies are always worth the repeat.
Santa Belly Brownies Recipe

These adorable Santa Belly Brownies are the ultimate festive desserts for your holiday baking lineup. Start with rich, fudgy chocolate brownies or your favorite brownie batter, then decorate each square to look like Santa’s iconic red suit—belt and all! Whether you’re prepping for a cookie exchange, class party, or just need some Xmas recipes to impress, these decorated brownies are simple to make and big on holiday cheer. Use a classic brownie recipe or boxed mix for a shortcut—either way, they’ll turn out deliciously gooey and fun. These Christmas brownie treats are perfect for gifting, entertaining, or leaving out for Santa himself!
Ingredients
- FOR THE BROWNIES
- 1 cup (2 sticks) unsalted butter
- 8 oz dark chocolate, chopped
- 1½ cups granulated sugar
- ½ cup brown sugar
- 4 large eggs
- 1 tsp vanilla extract
- 1 cup all-purpose flour
- ½ cup unsweetened cocoa powder
- ½ tsp salt
- FOR THE RED GANACHE
- ¾ cup heavy cream
- 8 oz white chocolate, chopped
- Red gel food coloring
- FOR DECORATING
- Black fondant (for the belts)
- Yellow fondant (for the buckles)
- Edible gold dust or gold luster spray
Instructions
- PREHEAT AND PREP PAN: Preheat the oven to 350°F (175°C) and line a 9x13-inch baking pan with parchment paper, leaving a bit of overhang for easy removal.
- MELT BUTTER AND CHOCOLATE: In a saucepan over low heat, melt the butter and chopped dark chocolate together, stirring occasionally until smooth. Remove from heat and let it cool for 5–10 minutes.
- WHISK SUGARS AND EGGS: In a large mixing bowl, whisk together granulated sugar, brown sugar, and eggs until the mixture is pale and fluffy, about 2–3 minutes. Stir in the vanilla extract.
- COMBINE WET AND DRY INGREDIENTS: Slowly pour the cooled chocolate mixture into the egg mixture, stirring until combined. Sift in the flour, cocoa powder, and salt, and gently fold the batter just until no dry streaks remain.
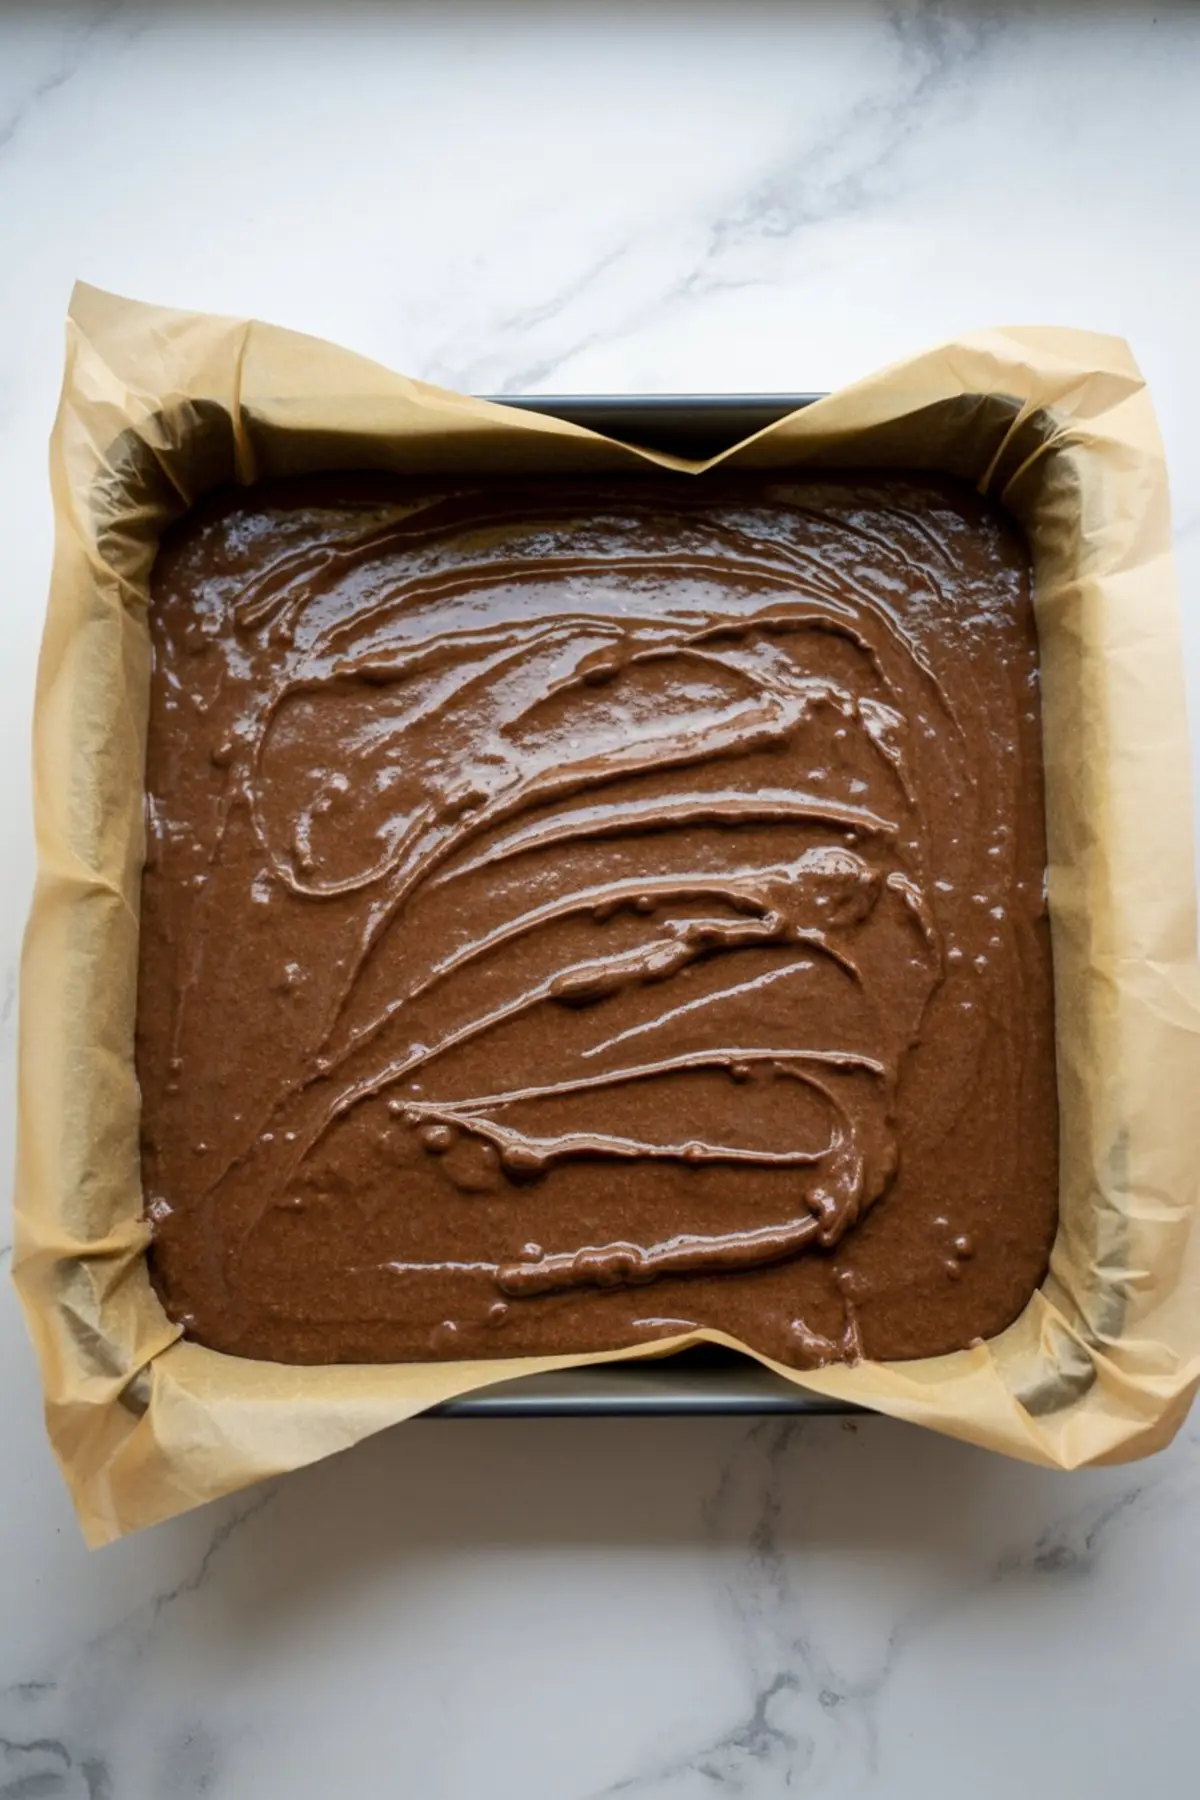
- BAKE THE BROWNIES: Pour the batter into the prepared pan and smooth the top. Bake for 30–35 minutes or until a toothpick inserted near the center comes out with a few moist crumbs. Let the brownies cool completely in the pan.
- MAKE THE GANACHE: Heat the heavy cream in a small saucepan until it just starts to simmer. Pour it over the white chocolate in a heatproof bowl and let it sit for 2 minutes. Stir until the ganache is completely smooth, then add red gel food coloring a little at a time until the desired Santa-suit red is reached.
- SPREAD THE GANACHE: Pour the red ganache over the cooled brownies and use an offset spatula to spread it evenly. Refrigerate the pan until the ganache is firm, about 45 minutes to 1 hour.
- PREP THE FONDANT DECORATIONS: Roll black fondant into thin strips about ½ inch wide to resemble belts. Cut small squares from yellow fondant and create a center hole in each to mimic a belt buckle. Brush or spray the buckles with edible gold dust for a metallic effect.
- ASSEMBLE THE BROWNIES: Slice the chilled brownies into 12 squares. Lay one black fondant strip across each brownie and press a gold buckle in the center of each belt. Lightly press to secure the decorations in place.
- SERVE OR STORE: Serve immediately or store in an airtight container at room temperature for up to 3 days. For longer storage, refrigerate and bring to room temperature before serving.
Notes
To make belt and buckle cutting easier, use a small ruler and sharp paring knife. If fondant becomes sticky, dust lightly with cornstarch before rolling.
Nutrition Information
Yield
12Serving Size
1Amount Per Serving Calories 630Total Fat 36gSaturated Fat 21gTrans Fat 0gUnsaturated Fat 12gCholesterol 128mgSodium 166mgCarbohydrates 72gFiber 2gSugar 57gProtein 7g