I remember my experience woth these Bunny Oreo Pops like it was a joyful secret my older cousin shared with me in her place. She prepared a batch in pastel hues, and the cheerful sight alone made me smile. I tried one and felt the sweet crunch of an Oreo followed by a candy melt coating that melted in my mouth. That treat stayed in my memory. These days, I make them every spring, and I still feel the same excitement.
I spoke with a close friend last year who had never seen an Oreo pop before. She was amazed by the cute bunny ears and tiny whiskers. I felt proud sharing the technique because it let me relive the moment I first saw these whimsical confections. My nephews get equally excited. Their grins match the playful mood of each bunny face.
Following a special diet?
Every recipe on this site can be converted to gluten-free, vegan, dairy-free, keto, nut-free or egg-free with adjusted ratios so nothing falls flat.
Try the Recipe Converter →That experience showed me the power of a fun dessert. It turns any gathering into a lively moment. I find it lovely for a Sunday brunch or a lighthearted movie night. Easter brings out pastel colors, so these bunny designs help brighten a table and make your family happy.
My Personal Connection with Bunny Oreo Pops
I visited my grandma’s kitchen as a child and helped her decorate cookies for special occasions. She gave me a sense of warmth and love that I now carry whenever I craft these Easter treats. My approach is simple, but I enjoy the ritual of melting candy, securing those Oreo halves, and deciding on decorations.
You will need Oreo cookies, which hold up well on a lollipop stick. Candy melts in white or pretty pastel shades bring color to the finished pops. Fondant or mini marshmallows form the adorable ears, and small candy eyes bring each bunny face to life. The process can involve kids, friends, or anyone who likes a fun kitchen project.
I share these pops with neighbors, and they usually ask how the ears stay in place or how the candy melts stay smooth. My usual answer is to add a little coconut oil if the mixture seems thick. That tip helps create a coating that glides right over the cookies.
Basic Ingredient Insights
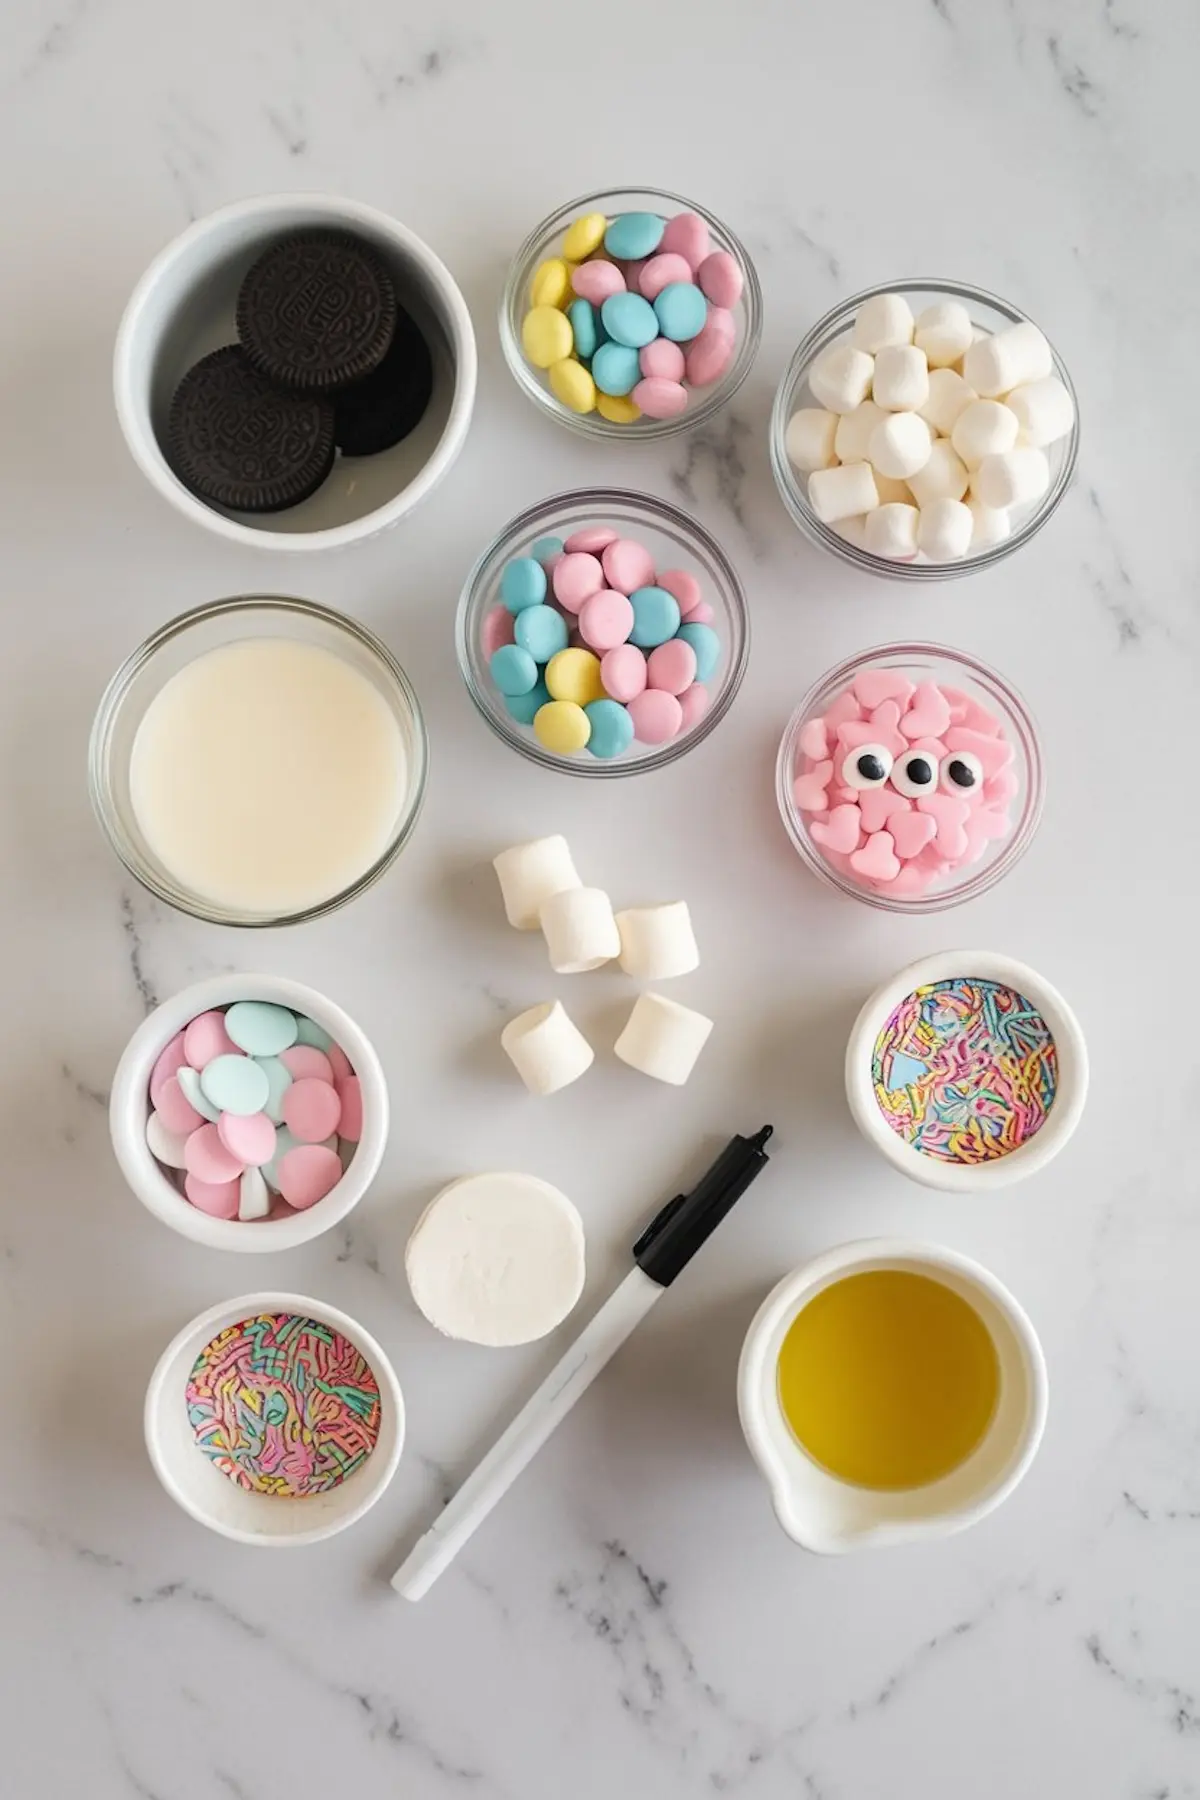
Double Stuf Oreos hold the lollipop stick securely between the cookie halves. White candy melts are a classic choice, but pastel pink or lavender also look pleasing. Coconut oil can thin the melted candy so it flows well.
Mini marshmallows can work for ears if you cut them at an angle. Fondant is another option for shaping ear details. Candy eyes add a playful expression, and pink sprinkles or edible hearts serve as bunny noses. I have used black edible markers to draw whiskers because it keeps the details neat.
That combination of flavors and textures makes each bite crisp, creamy, and sweet. The pastel candy shell provides a soft contrast to the dark cookie beneath. The entire experience creates a playful balance that children and grown-ups enjoy.
Preparing the Oreo Sticks
I gently twist each Oreo open. I melt some of the candy melts in a small bowl. I dip one end of the lollipop stick in that melted candy, then nestle the stick in the cookie’s cream center. Pressing the other half of the Oreo on top secures the setup.
That brief rest period allows the candy to firm up and hold the cookie together. Friends have asked how to prevent breakage. I advise a gentle touch. My best outcome happens when I avoid pressing too hard on the cookie sandwich.
Those few minutes give me time to set up a parchment-lined tray for easy cleanup. I also take a moment to heat more candy melts in the microwave in 20-second bursts.
Melting and Coating Techniques

You can melt the candy at half power, stirring frequently. That steady approach prevents lumps. Adding a spoonful of coconut oil can transform thick candy melts into a smooth texture.
I hold each Oreo pop by the stick and dip it fully in the melted candy. I tap off the extra coating gently. That motion keeps the final layer even and prevents big drips. After that, I place each coated pop on the parchment-lined tray. A short wait of 10 to 15 minutes lets them firm up.
I always keep a close eye on the time. Warm rooms can slow down the setting process, so I sometimes move the tray to the fridge for a quick chill.
Adding Bunny Ears and Face Details
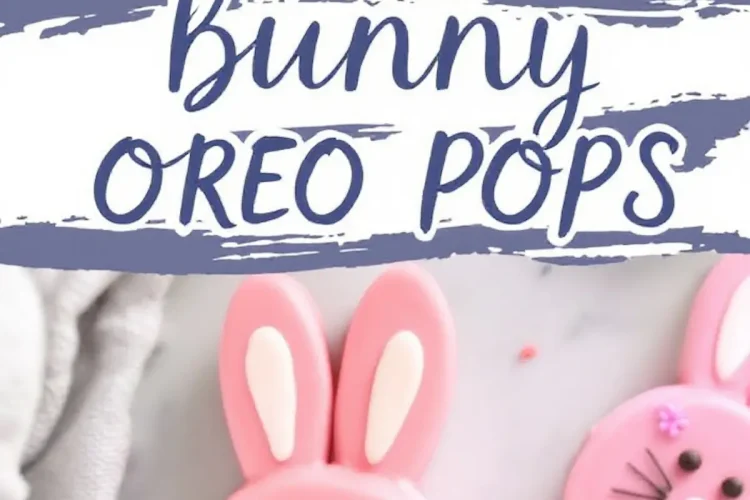
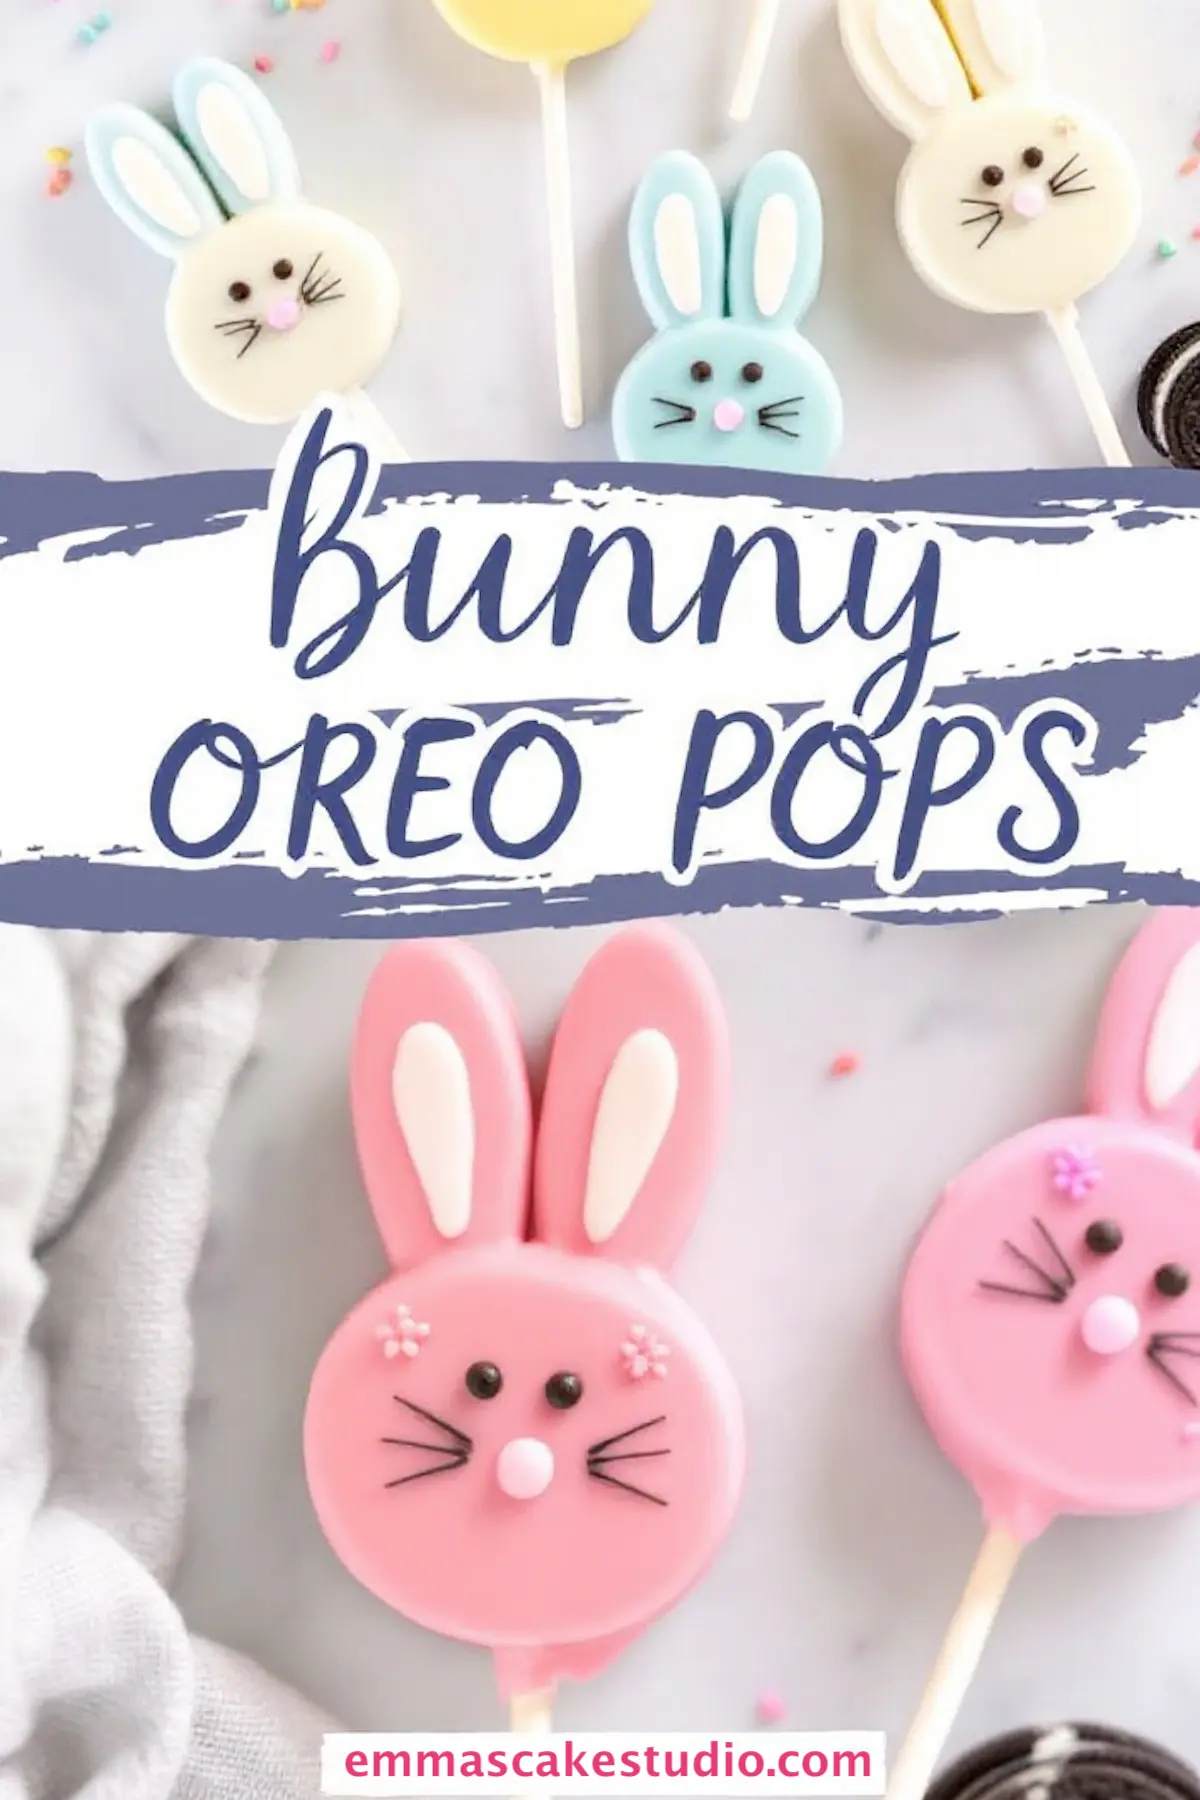
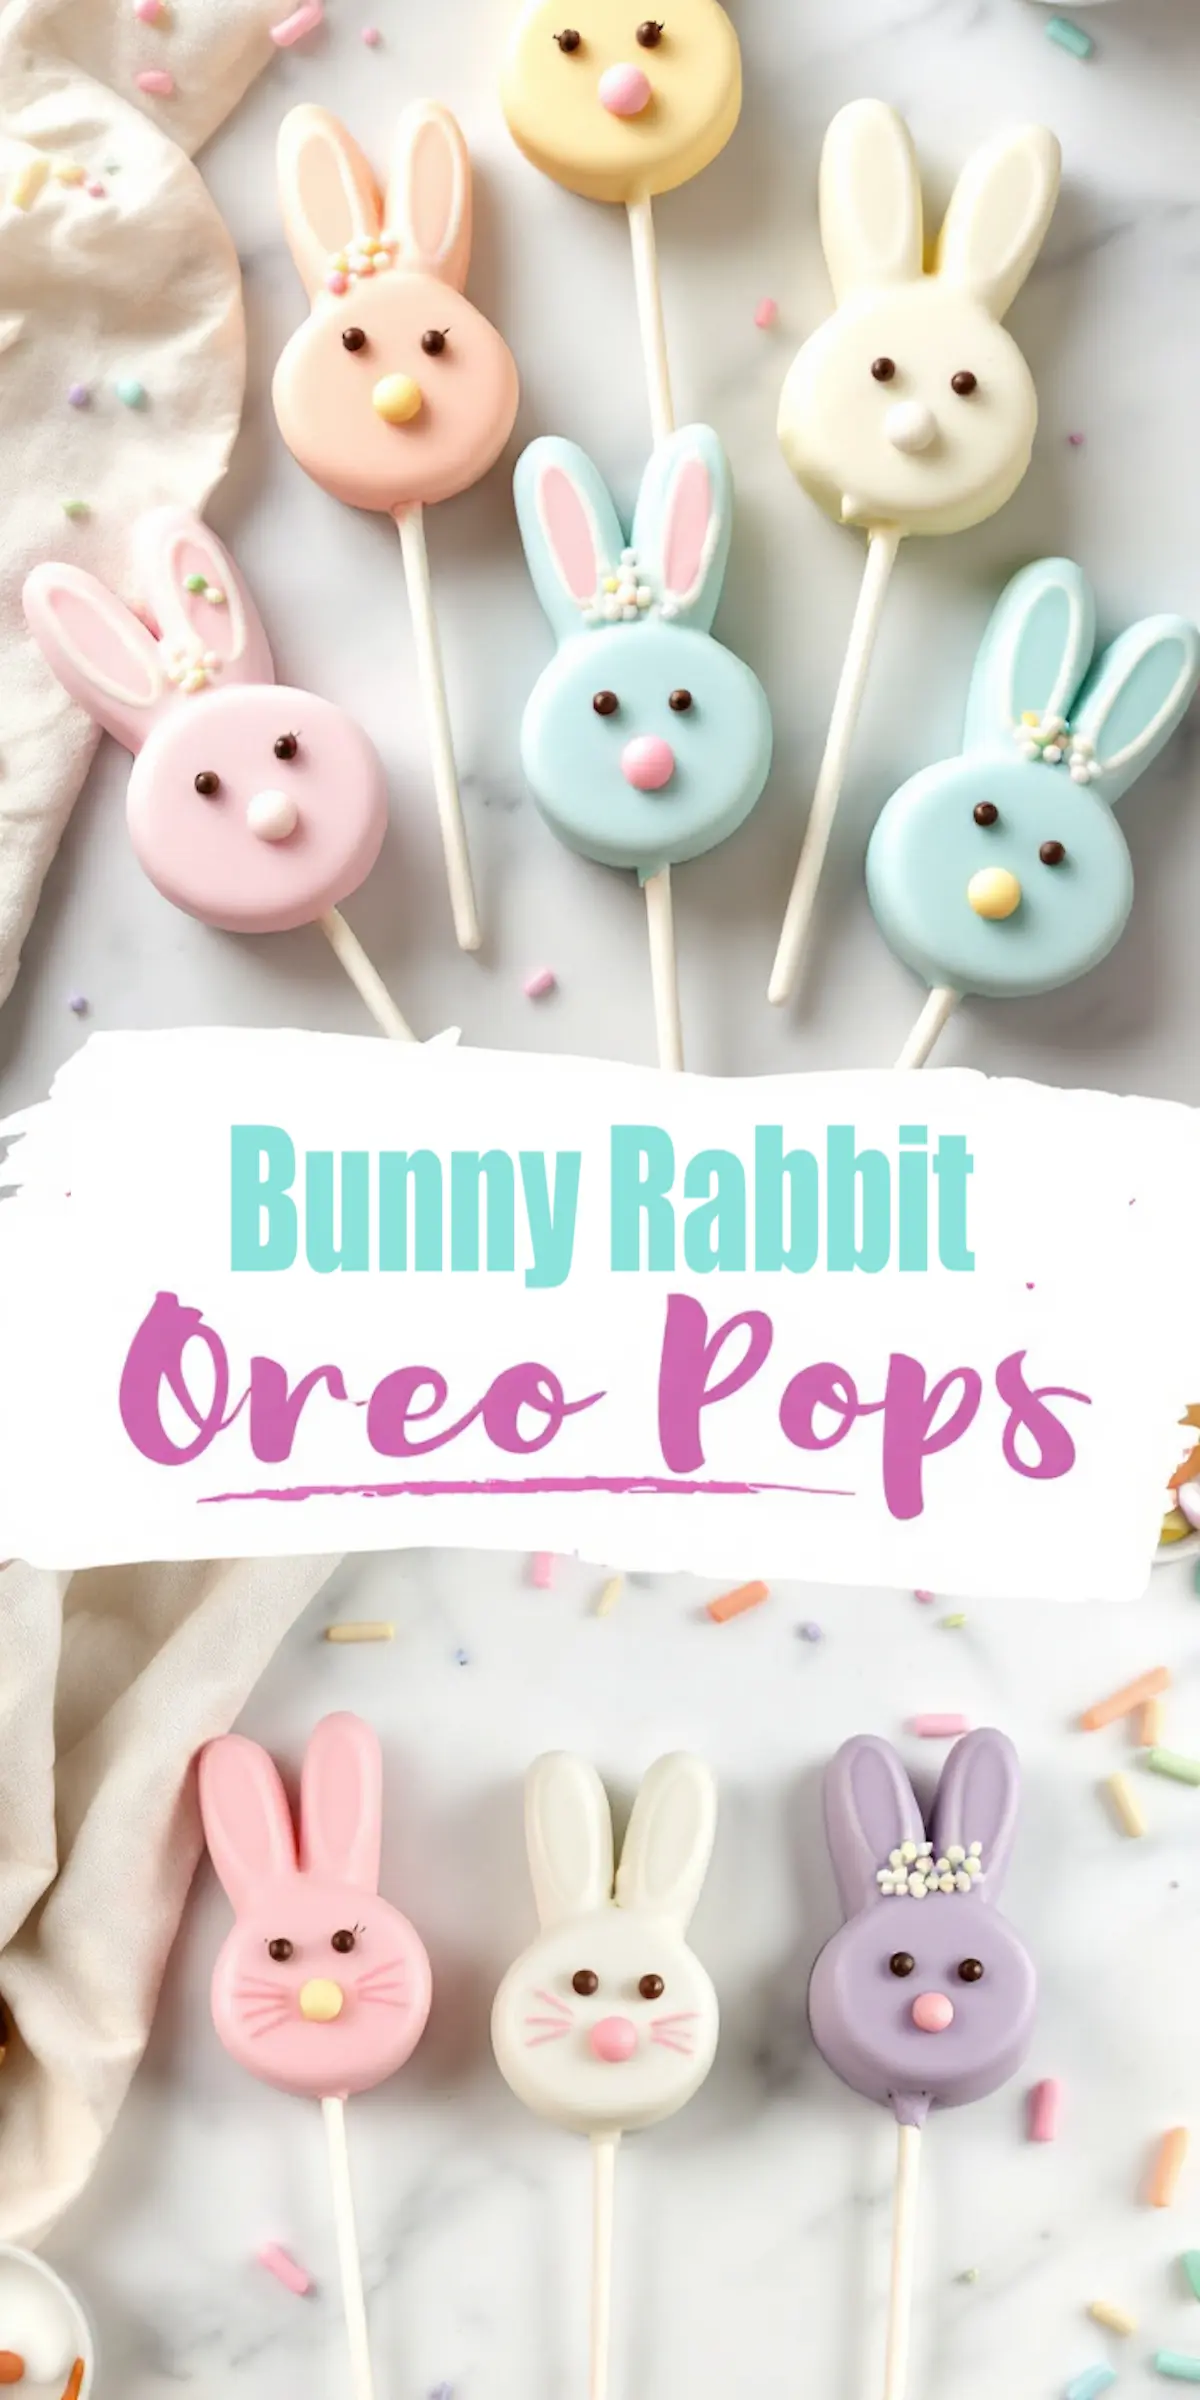
The bunny ears can come from mini marshmallows, pink fondant, or piped candy melts. Marshmallows require a simple angled cut. Fondant can be rolled and shaped into ear forms, with a pink interior piece placed onto a white layer. Candy melts can be piped on parchment, then stuck onto the pops once they set.
You can attach the ears with a small dab of melted candy or chocolate. I find that method reliable because it works like edible glue. Candy eyes go below the ears, and a pink heart or round sprinkle forms the nose. A black edible marker or melted chocolate is handy for whiskers.
The final touches can include pastel sprinkles around the bunny face. My nieces love to add little sugar flowers that look charming. I sometimes vary the ear shape, so some bunnies have longer ears, while others have short, perky ones.
Linking Easter Treats from Emma’s Cake Studio
I have explored other fun Easter treats that pair well with these Bunny Oreo Pops. I often mention Easter Chick Cake Pops to friends. That cute idea features bright yellows and tiny chick beaks. My neighbor recently tried Easter Egg Strawberries and loved the pastel patterns.
If you want a refreshing drink, you might look at this Easy Easter Punch Recipe. I tried it last year, and the fruity flavor highlighted the sweetness of each bunny pop.
These links offer a complete set of Easter-themed ideas for a party spread. I enjoy mixing these items on a dessert table, so visitors can pick from an array of shapes, colors, and flavors.
Serving Suggestions
My personal preference is to arrange these Bunny Oreo Pops in a small jar or glass filled with decorative pebbles. That display keeps them upright and makes them easy to grab. Some people like to wrap each pop in clear cellophane and tie a ribbon around the stick.
You can pack them in a box if you plan to give them away. A friend who enjoys bright photos uses shredded pastel paper at the bottom of her gift boxes. That small detail cushions each pop and looks festive.
I store leftovers in an airtight container at room temperature for a few days. They keep fresh, and the candy coating prevents the cookie from going stale too quickly. Refrigeration extends their life by several more days, but the candy shell might pick up slight condensation.
Closing Thoughts on Bunny Oreo Pops
I hope you feel inspired by these sweet bunnies. I enjoy the process of crafting them. My younger relatives claim they could eat a dozen. Feel free to share your own experience in the comments. Ask questions, or let me know if you tried a different decoration approach.
I invite you to pin this recipe for later on your boards if you want to keep these instructions handy. A simple save today can spark creativity next Easter season or whenever you want a fun cookie treat. I look forward to reading about your results, so let’s build a friendly community of home bakers who learn from each other.
Bunny Oreo Pops Recipe

Bunny Oreo Pops are a simple Easter treat made with Oreo cookies, candy melts, and cute decorations. A lollipop stick holds each cookie together, while a smooth candy coating creates the base for adorable bunny faces. Mini marshmallows, fondant, or piped candy melts form the ears, and candy eyes, sprinkles, and edible markers complete the look.
Ingredients
- FOR THE OREO POPS:
- 12 Oreo cookies (Double Stuf works best)
- 12 lollipop sticks
- 12 oz white or pastel-colored candy melts (pink, blue, yellow, purple, etc.)
- 1 tbsp coconut oil (optional, to thin candy melts)
- FOR DECORATION:
- Mini marshmallows (for ears)
- Pink and white fondant (for ear details)
- Mini candy eyes
- Pink heart or round sprinkles (for noses)
- Black edible marker or melted chocolate (for whiskers)
- Pastel sprinkles for added decoration
Instructions
- PREP THE OREOS: Gently twist each Oreo open. Dip the tip of a lollipop stick in melted candy melts and place it in the cream center of one half of the Oreo. Carefully press the other half of the Oreo back on top and let it set for a few minutes so the stick stays in place.
- MELT THE CANDY COATING: Melt the candy melts in a microwave-safe bowl in 20-second intervals, stirring in between, until smooth. If the mixture is too thick, stir up to 1 tablespoon of coconut oil to make it more fluid.
- DIP THE OREOS: Hold each Oreo pop by the stick and dip it fully into the melted candy coating. Gently tap off excess coating and place the pop on a parchment-lined baking sheet. Let the coating set completely before decorating, about 10-15 minutes.
- CREATE BUNNY EARS: Choose one of three methods:
- DECORATE THE FACES: Attach candy eyes and a pink sprinkle nose using a small dab of melted chocolate. Draw whiskers using an edible marker or melted chocolate. Carefully press the bunny ears onto the top of each Oreo pop. Sprinkle pastel decorations or add small sugar flowers for an extra cute touch.
- LET THEM SET: Allow the decorated Oreo pops to set at room temperature, or refrigerate for 5 minutes to speed up the process.
• Mini Marshmallows: Cut a mini marshmallow in half diagonally to form two ears. The sticky side makes it easy to attach. Add pink details with fondant or edible marker.
• Fondant: Cut ear shapes from white fondant and layer with smaller pink fondant pieces. Use a dab of melted candy to stick them on top of the Oreo.
• Piped Candy Melts: Pipe ear shapes onto parchment using melted candy melts. Let them harden fully before attaching to the Oreo with extra candy melts.
Notes
- Double Stuf Oreos work best to hold the stick firmly in place.
- If candy melts are too thick, thin with coconut oil for a smoother coating.
- Work in small batches when decorating to avoid candy melts hardening before you’re finished.
- Store in an airtight container at room temp for up to 5 days or refrigerate for up to a week.
Nutrition Information
Yield
12Serving Size
1Amount Per Serving Calories 171Total Fat 7gSaturated Fat 3gTrans Fat 0gUnsaturated Fat 4gCholesterol 5mgSodium 126mgCarbohydrates 26gFiber 2gSugar 15gProtein 2g
I am going to make these but you left off the 3 methods of making the ears. You have the semi colon and then …… nothing. lol
please advise as I am a beginner and want them to turn out like as close to your picture as possible
Hi Kathy! Great catch — you’re absolutely right, I totally missed finishing that part about the bunny ears. Thanks for pointing that out! Let me walk you through the three easy ways to make them, especially since you’re just starting out — I want yours to turn out beautifully too 🐰✨
1. Mini Marshmallows: Cut a mini marshmallow in half diagonally to make two ear shapes. The sticky inside helps them hold to the Oreo pop easily, and you can add a little pink detail inside with edible marker or fondant.
2. Fondant: Roll out white fondant and cut ear shapes using a small oval cutter or just a knife. Add a smaller pink piece on top for the inner ear. You can gently press them onto the Oreo using a dab of melted candy melts as glue.
3. Piped Candy Melts: Melt a bit of extra candy coating, pipe ear shapes onto parchment paper, and let them harden. Once set, just attach them to the pops with a little extra melted candy.
I hope this helps. You’re going to do great — I remember how nerve-wracking these little details can be when you’re starting out, but once you get one done, the rest feel easier! 💕 Let me know if you need more guidance!