
One Easter, back in the day, we wanted something that captured the colors of spring and showcased a bright design. My friend suggested shaped sugar cookies, and I couldn’t stop admiring how vibrant and inviting they turned out.
I found myself drawn to these egg-shaped confections for every future gathering. My younger cousin called them “the art cookies,” and her excitement sparked my own enthusiasm. I learned that anyone can achieve this look without spending hours on detailed piping.
Following a special diet?
Every recipe on this site can be converted to gluten-free, vegan, dairy-free, keto, nut-free or egg-free with adjusted ratios so nothing falls flat.
Try the Recipe Converter →Gathering the Essentials for Sugar Cookie Magic
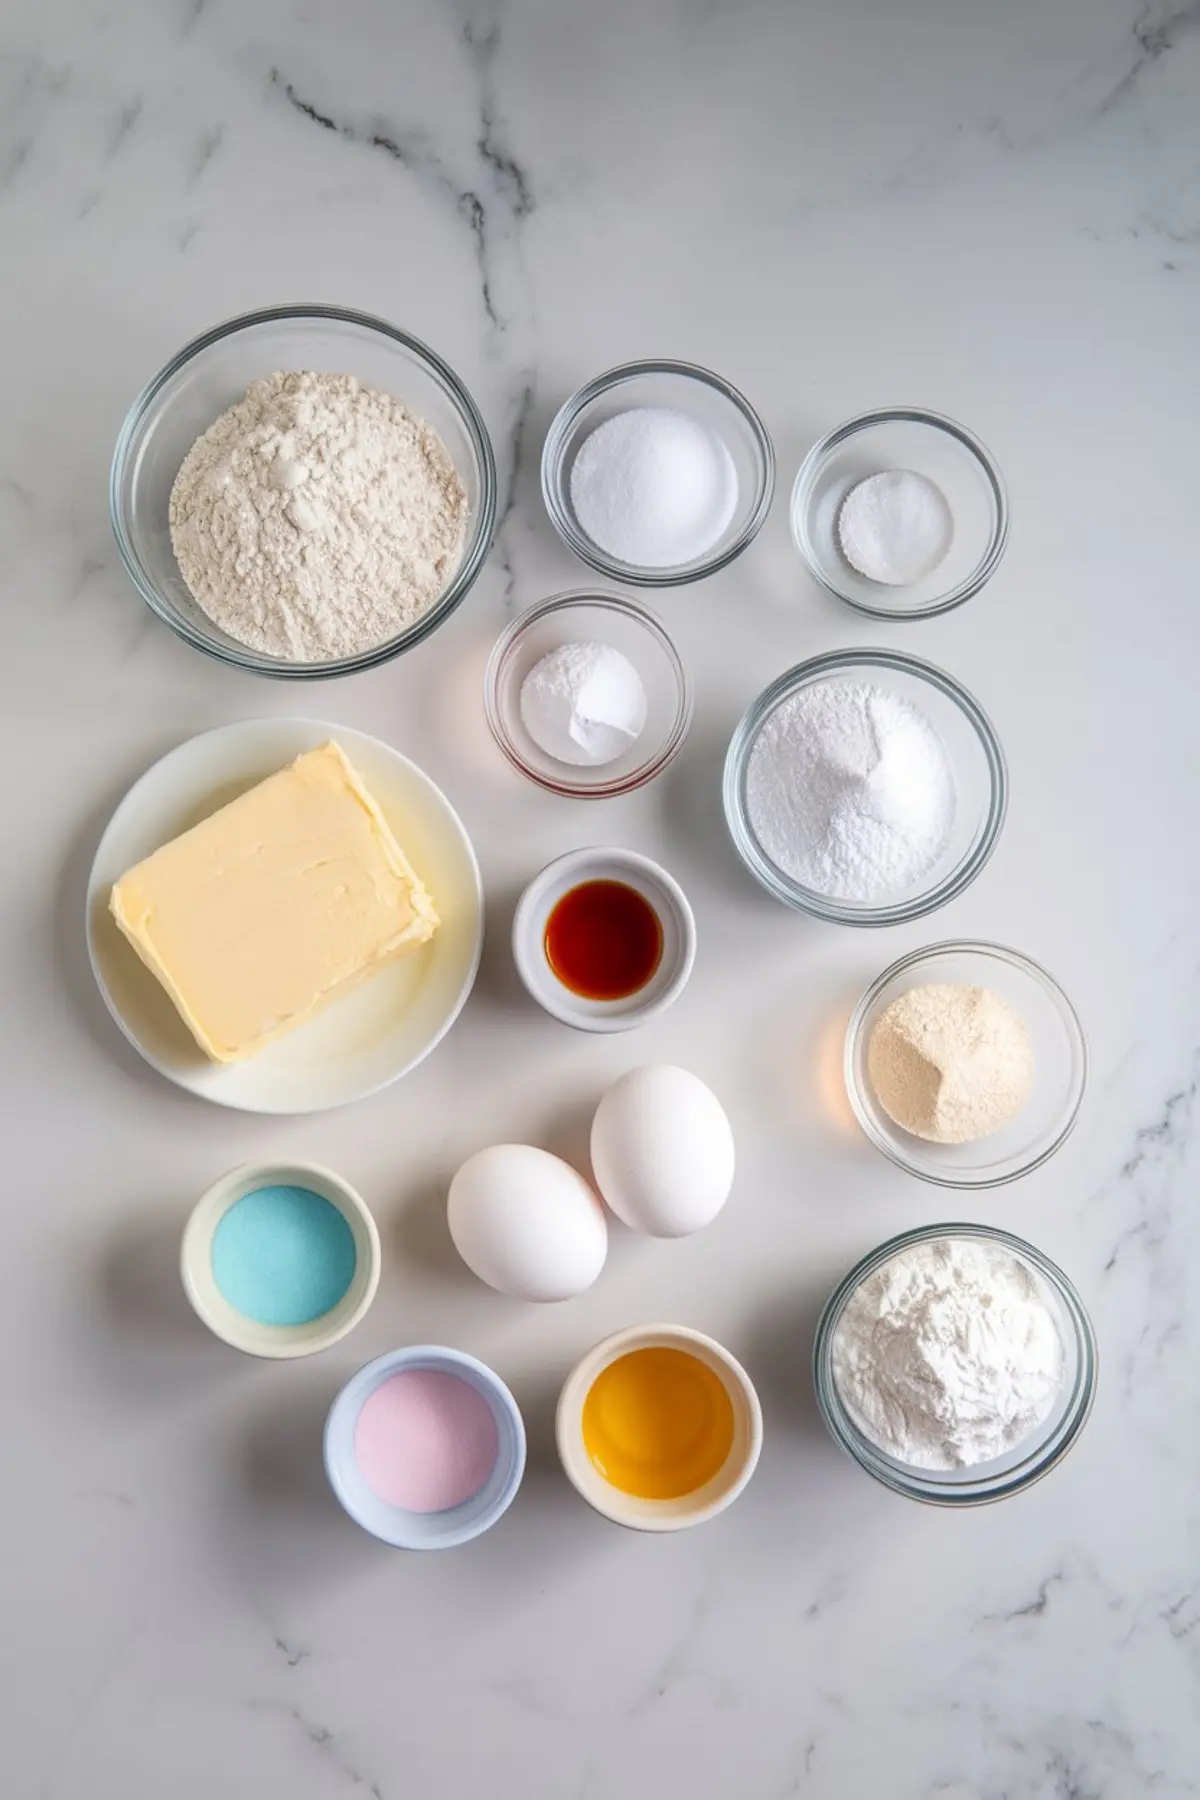
I keep standard pantry staples on my countertop whenever I plan to bake. You’ll need flour, sugar, butter, an egg, baking powder, salt, and a touch of flavoring. A bit of almond extract can add a sweet boost, though it’s optional if you prefer a pure vanilla taste.
Some people skip the chilling step, but I have discovered that it helps the cookies hold their shape. I set aside at least an hour for that rest period. It reduces the risk of misshapen edges and ensures the dough rolls out smoothly.
Preparing the Dough with Ease
I start by mixing softened butter and granulated sugar. This step helps the mixture become fluffy, and the aroma can be strangely comforting on a quiet afternoon. That’s when I crack in an egg, blending it with the extracts to build a sweet and creamy base.
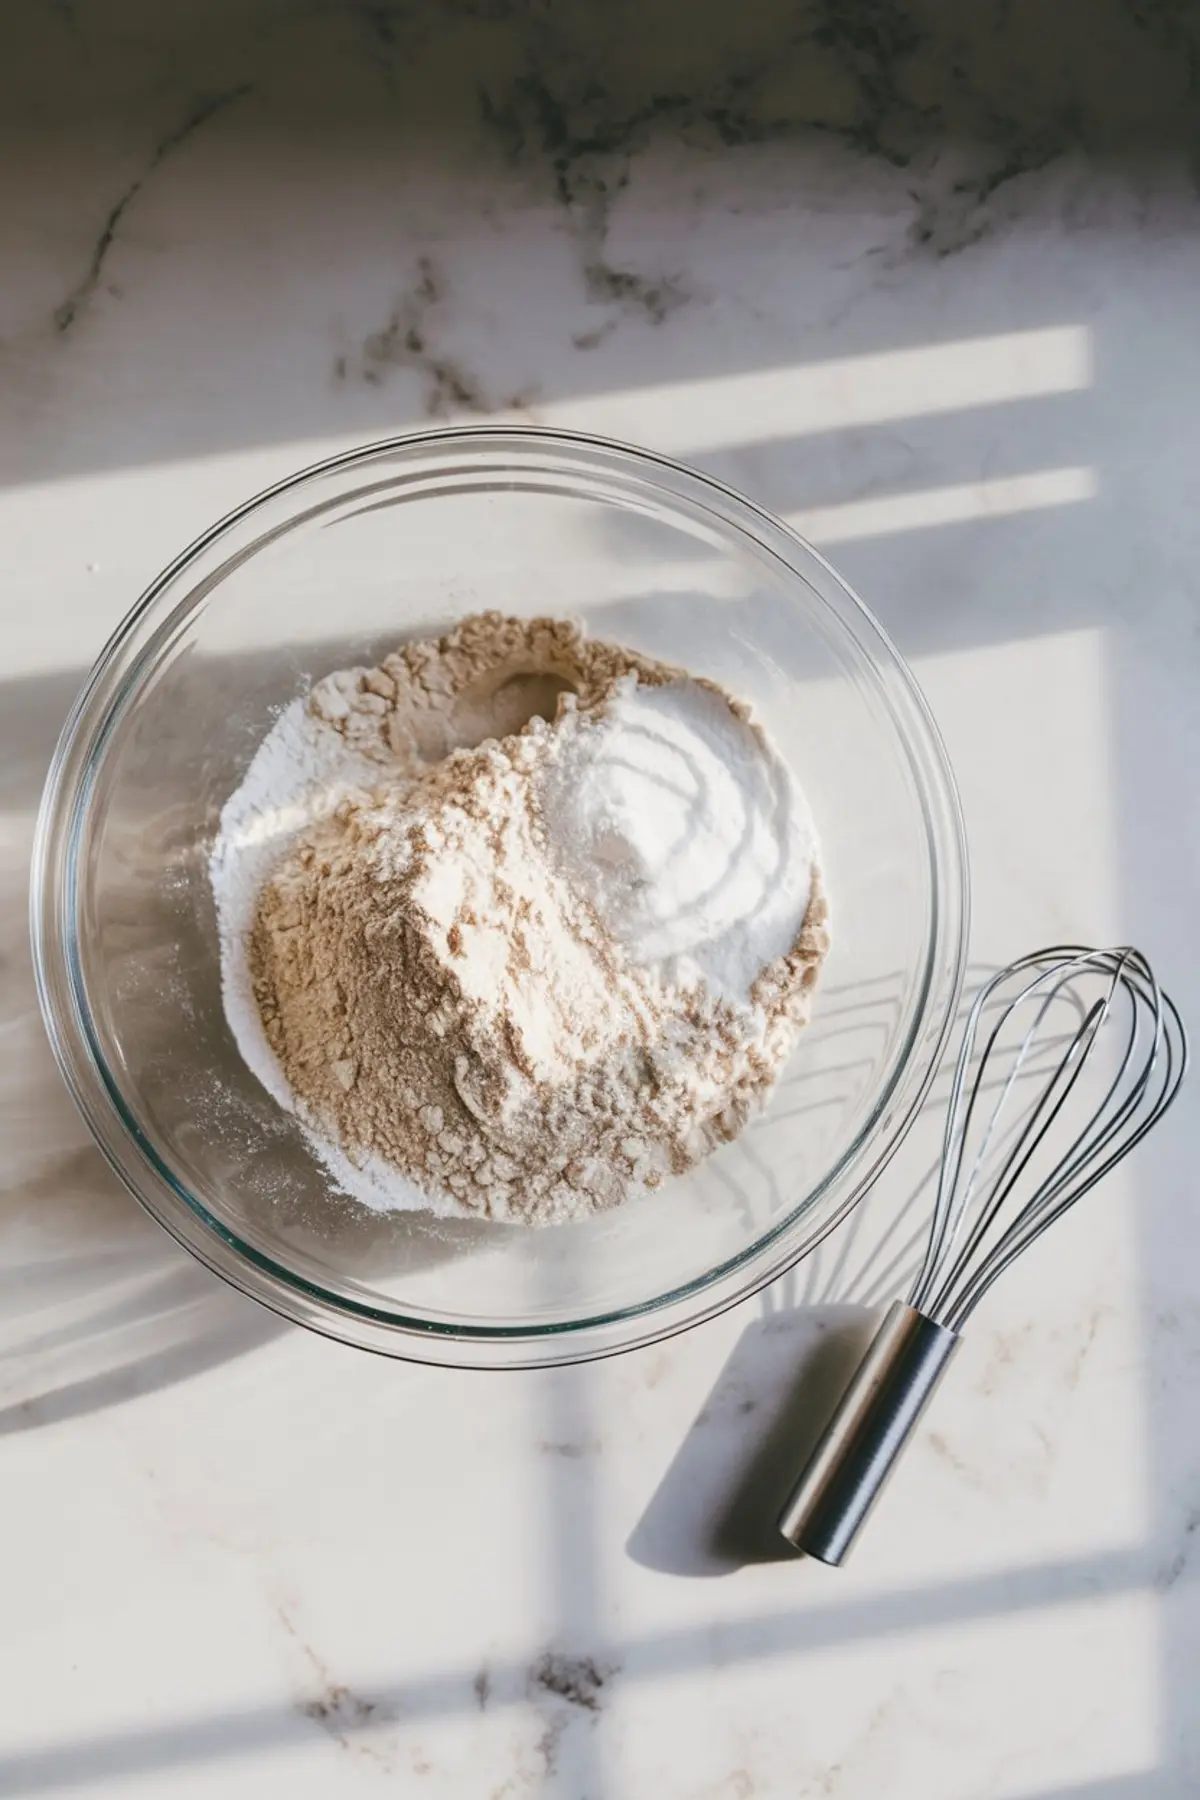
I gradually fold in the dry ingredients. The dough forms quickly, and I rely on its pliable texture to confirm it’s ready. Then I divide it into discs, wrap them, and keep them cold until I’m prepared to cut out those neat egg shapes.
Baking the Shaped Cookies
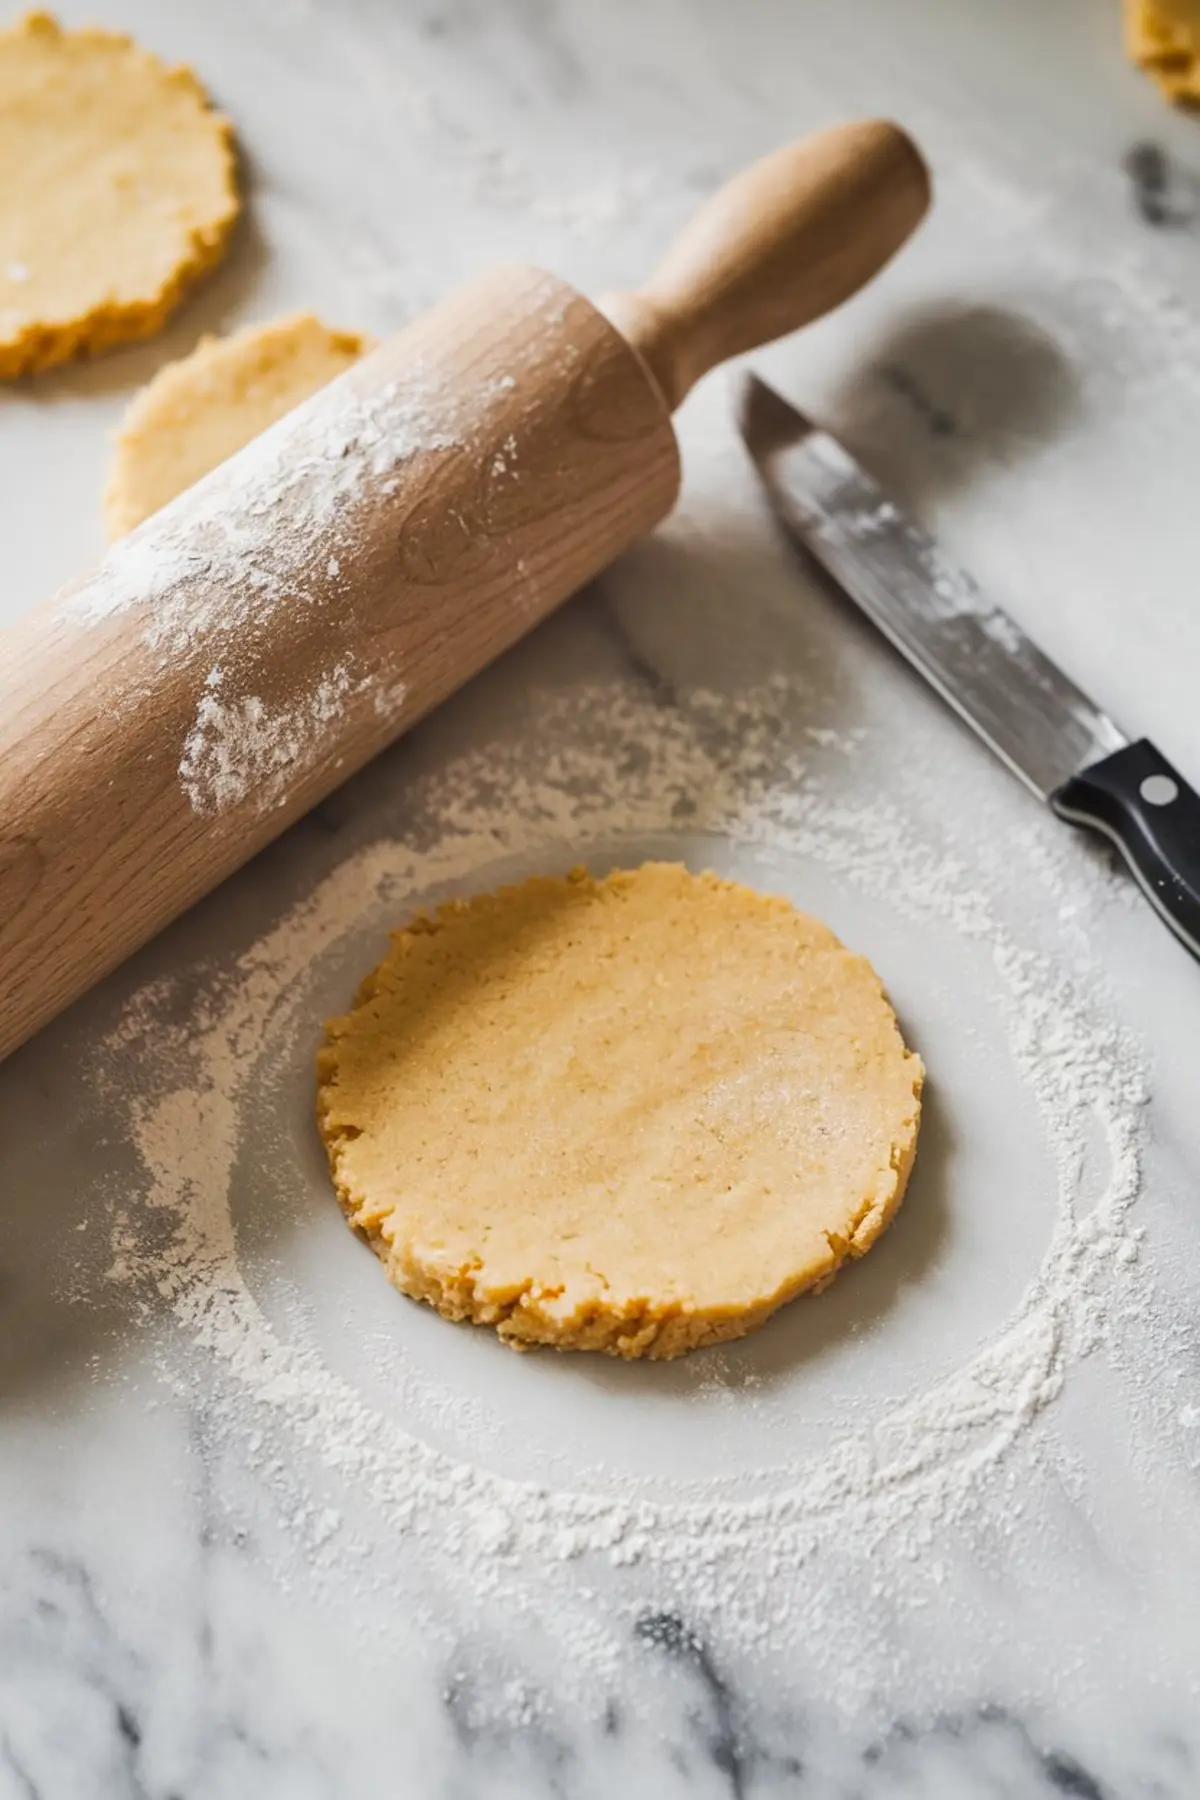
I set my oven to 350°F and line baking sheets with parchment. The dough rolls out smoothly once it has chilled long enough, though a little dusting of flour prevents any sticky surprises. An egg-shaped cutter gives a consistent look, and the design suits the spirit of spring.
Baking takes around 10 to 12 minutes, and you’ll see the edges turn gently golden. I remove them from the oven and let them rest on the sheet for a brief moment. After a bit of cooling, they move to a rack and wait for the decorating adventure.
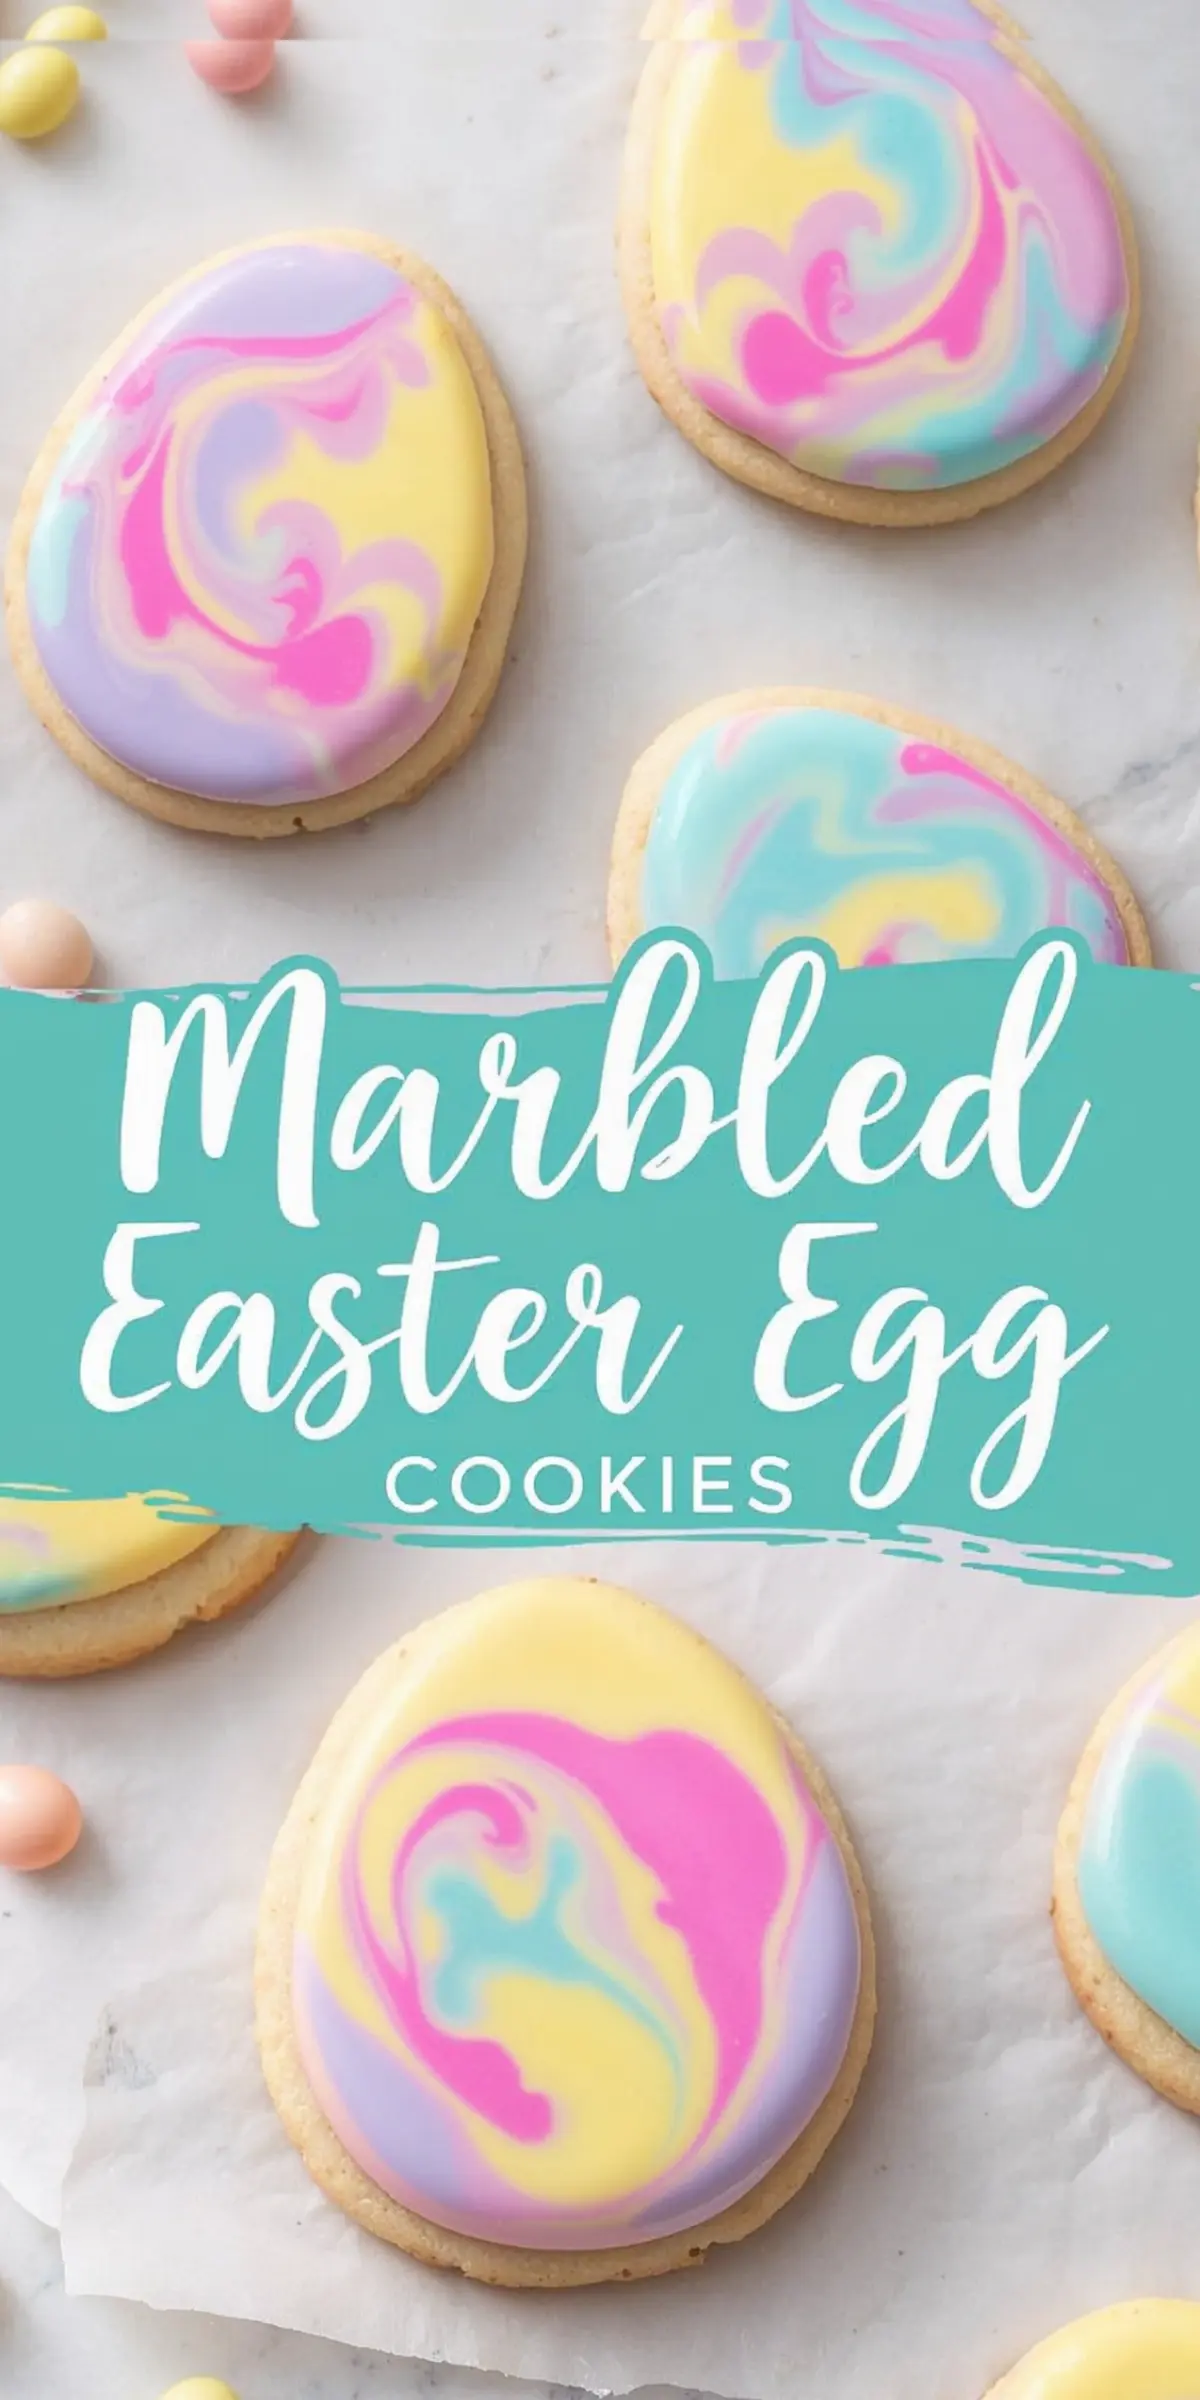
Crafting the Marbled Royal Icing Base
I like to prepare the icing by combining powdered sugar, meringue powder, and warm water. A dash of vanilla extract complements that sweet flavor. The consistency should be thick but still pipeable, and you can fine-tune it by adding a tablespoon of water at a time.
I split the icing into smaller bowls and add gentle drops of gel color. Pastel hues work well for Easter, so I rotate through pink, yellow, blue, and purple. My advice is to keep one bowl white, giving you a neutral background for swirling the colors together.
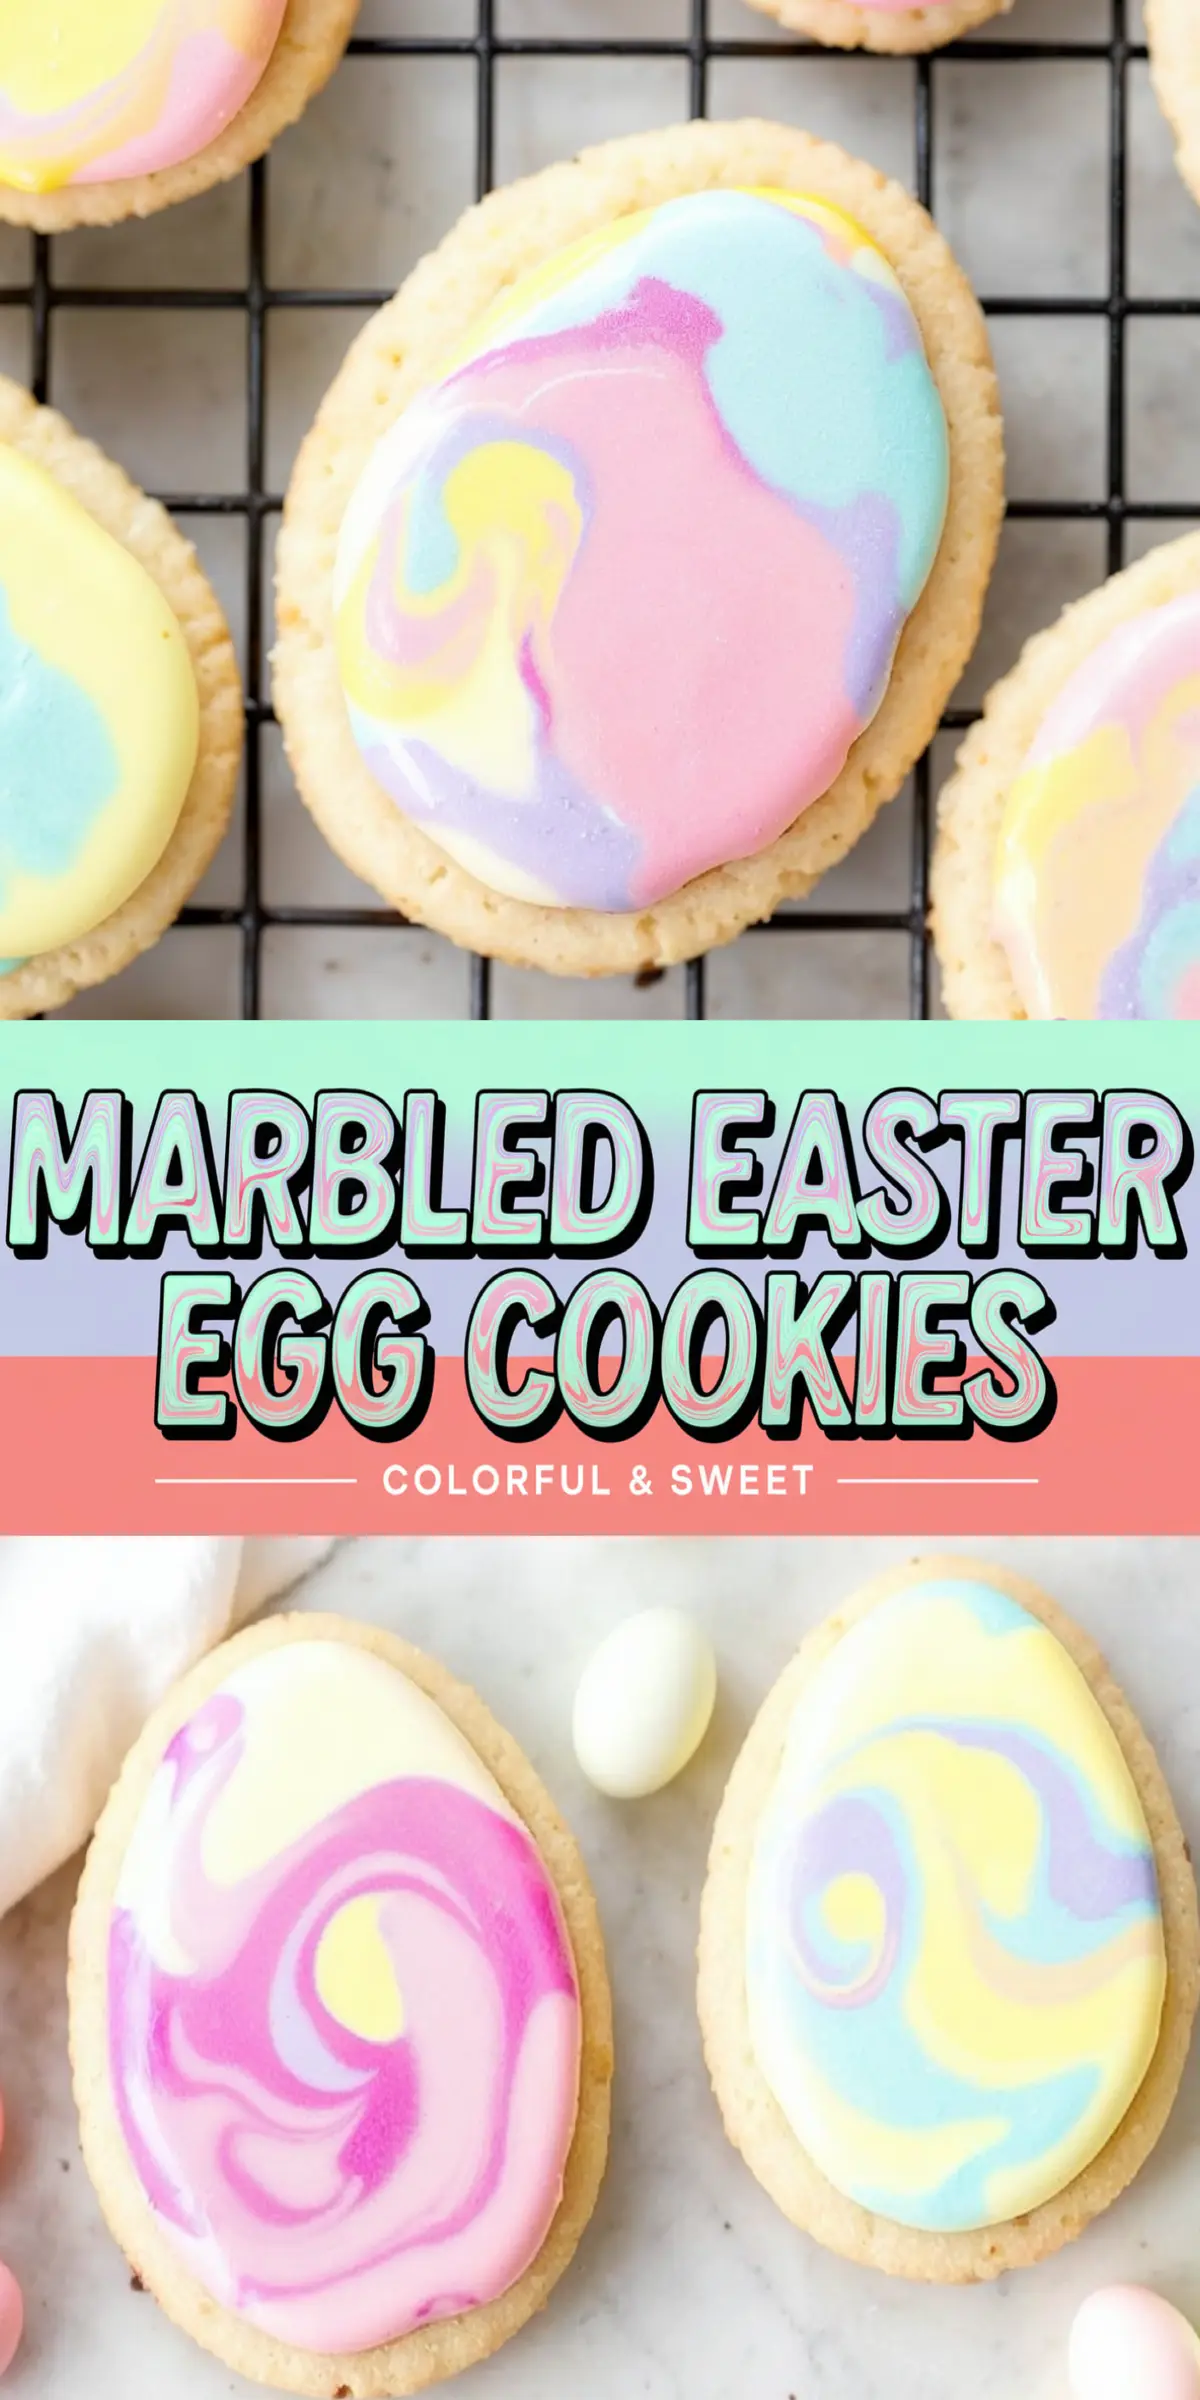
Adding Colorful Swirls for That Artistic Finish
I place a thin coat of white icing on the cookie surface. This base acts like a blank canvas, and I’m free to dot small amounts of each color on top. A toothpick or a skewer is enough to swirl those drops into a marbled blend.
This process is soothing, and I often end up making some cookies more abstract than others. The important step is allowing the icing to set for several hours. I learned to keep them untouched on a tray, which preserves those pretty patterns until they harden completely.
Easter Dessert Inspiration and More
I find that these cookies fit right into a festive dessert table. My family enjoys them alongside Easter Egg Cookie Dough Bites, which add a no-bake treat to the spread. Some friends prefer a classic baked item, so I suggest Hot Cross Buns for that traditional taste with a sweet glaze.
If you need another creative option, Bunny Oreo Pops deliver fun shapes on a stick. These simple treats complement the pastel cookies while adding a playful feel to your table. I like mixing them all on one display for a real spring celebration.
Reasons This Recipe Connects with Millennials
Friends my age appreciate fast and reliable methods. The dough can chill overnight, which fits a busy schedule. You can prepare it after work, let it rest until morning, and decorate in your spare moments.
That convenience is something I value, and it helped me bond with my sisters. We once set out mixing bowls on Friday, and by Saturday, we had colorful cookies for an Easter potluck. The entire process felt straightforward, yet the results made us look like pros.
Personal Tips for Best Results
I rarely skip the step of sifting the powdered sugar. It keeps the icing smooth and saves you from lumps that can clog a piping tip. Gel food coloring also prevents the icing from thinning out.
Let them dry without stacking, because the designs might smudge if they touch each other. I have learned to place parchment paper between layers if I must stack them later. This little measure keeps them looking pristine.
Thinking About Presentation
I like to arrange the cookies on a white platter or a pastel tablecloth. This contrast draws focus to the swirled designs. Some people sprinkle edible glitter on top for extra shine, though I prefer the simple marble effect.
Packaging them in a clear gift box with a ribbon can turn these cookies into a thoughtful holiday surprise. My cousin once sent me photos of how she displayed them in Easter baskets, and I plan to do the same.
Storing and Keeping Them Fresh
I store my marbled Easter egg cookies at room temperature in a sealed container. That keeps them soft for around five days. If they last that long in my kitchen, they tend to stay just as vibrant as the day I iced them.
A slip of parchment between layers stops the icing from any messy contact. This small trick spares me from heartbreak if a cookie’s swirl becomes smeared. I’ve brought these to gatherings several days later, and everyone still enjoyed them.
Save for Later and Share Your Experience
I like to invite you to pin this recipe on your Pinterest board for quick reference. Pinning allows you to revisit the method anytime you crave a spring-themed sweet. Comments also help create a warm sense of friendship in our baking community.
Feel free to share how your marbled Easter egg cookies turned out. I love reading about the colors you chose or the decorations you added. Questions are welcome too, and we can troubleshoot any cookie concerns together.
Marbled Easter Egg Cookies Recipe

Soft sugar cookies shaped like Easter eggs are decorated with a marbled royal icing effect using pastel colors. The dough is easy to work with, and the icing creates a smooth, artistic finish.
Ingredients
- FOR THE SUGAR COOKIES:
- 2 ¾ cups (350g) all-purpose flour
- 1 teaspoon baking powder
- ½ teaspoon salt
- 1 cup (226g) unsalted butter, softened
- 1 cup (200g) granulated sugar
- 1 large egg
- 2 teaspoons vanilla extract
- ½ teaspoon almond extract (optional)
- FOR THE MARBLED ROYAL ICING:
- 3 cups (360g) powdered sugar, sifted
- 2 tablespoons meringue powder
- 5–6 tablespoons warm water
- ½ teaspoon vanilla extract
- Gel food coloring (pastel shades: pink, yellow, blue, purple)
Instructions
- MAKE THE SUGAR COOKIE DOUGH: In a medium bowl, whisk together the flour, baking powder, and salt. Set aside. In a large mixing bowl, beat the softened butter and sugar together until light and fluffy, about 2–3 minutes. Add the egg, vanilla extract, and almond extract (if using), then mix until fully incorporated. Gradually add the dry ingredients to the wet ingredients, mixing just until the dough comes together. Divide the dough into two discs, wrap them in plastic wrap, and refrigerate for at least 1 hour or up to overnight.
- CUT AND BAKE THE COOKIES: Preheat the oven to 350°F (175°C). Line baking sheets with parchment paper. Roll out the chilled dough to about ¼ inch thick on a lightly floured surface. Using an egg-shaped cookie cutter, cut out cookies and place them 1 inch apart on the prepared baking sheets. Bake for 10–12 minutes, or until the edges are lightly golden. Let the cookies cool on the baking sheet for 5 minutes, then transfer them to a wire rack to cool completely.
- PREPARE THE ROYAL ICING: In a mixing bowl, whisk together the powdered sugar and meringue powder. Add warm water, one tablespoon at a time, mixing until you reach a smooth consistency that is thick but pipeable. Stir in the vanilla extract. Divide the icing into separate bowls and tint each with different gel food coloring. Keep one bowl of icing white for the base.
- CREATE THE MARBLED EFFECT: Spoon or pipe a thin layer of white icing onto a cookie, spreading it evenly. Add a few drops of different colored icing on top of the wet white icing. Use a toothpick or skewer to gently swirl the colors together in a random pattern. Let the cookies sit at room temperature for 4–6 hours until the icing is completely dry.
Notes
For best results, use gel food coloring instead of liquid food coloring to maintain the proper icing consistency. If the dough becomes too soft while rolling, refrigerate it for 10–15 minutes before continuing. Store decorated cookies in an airtight container at room temperature for up to 5 days. If stacking, place parchment paper between layers to prevent smudging.
Nutrition Information
Yield
24Serving Size
1Amount Per Serving Calories 68Total Fat 1gSaturated Fat 0gTrans Fat 0gUnsaturated Fat 0gCholesterol 9mgSodium 74mgCarbohydrates 13gFiber 0gSugar 2gProtein 2g