
I tasted my first speckled egg cake during a bright spring day at my grandma’s house. I remember the pastel frosting, the mini chocolate eggs nestled on top, and the gentle hint of sweetness in every bite. I loved how that slice called to me, and I carried that memory until I started making my own version at home.
I tested different vanilla cake recipes, hoping to preserve that soft crumb and subtle flavor. I experimented with varying colors to recreate the light-and-dark swirl effect that fascinated me years ago. I finally settled on a simple approach that yields reliable results, and I share that with you today.
Following a special diet?
Every recipe on this site can be converted to gluten-free, vegan, dairy-free, keto, nut-free or egg-free with adjusted ratios so nothing falls flat.
Try the Recipe Converter →I cherish this dessert because it draws friends and family around the kitchen table. I see smiles when I bring it out, as if the pastel blue frosting and speckled finish signal a joyful moment. I appreciate how it complements other spring recipes, like my Easter sugar cookies and Easter basket cake.
How to Prepare the Cake Base
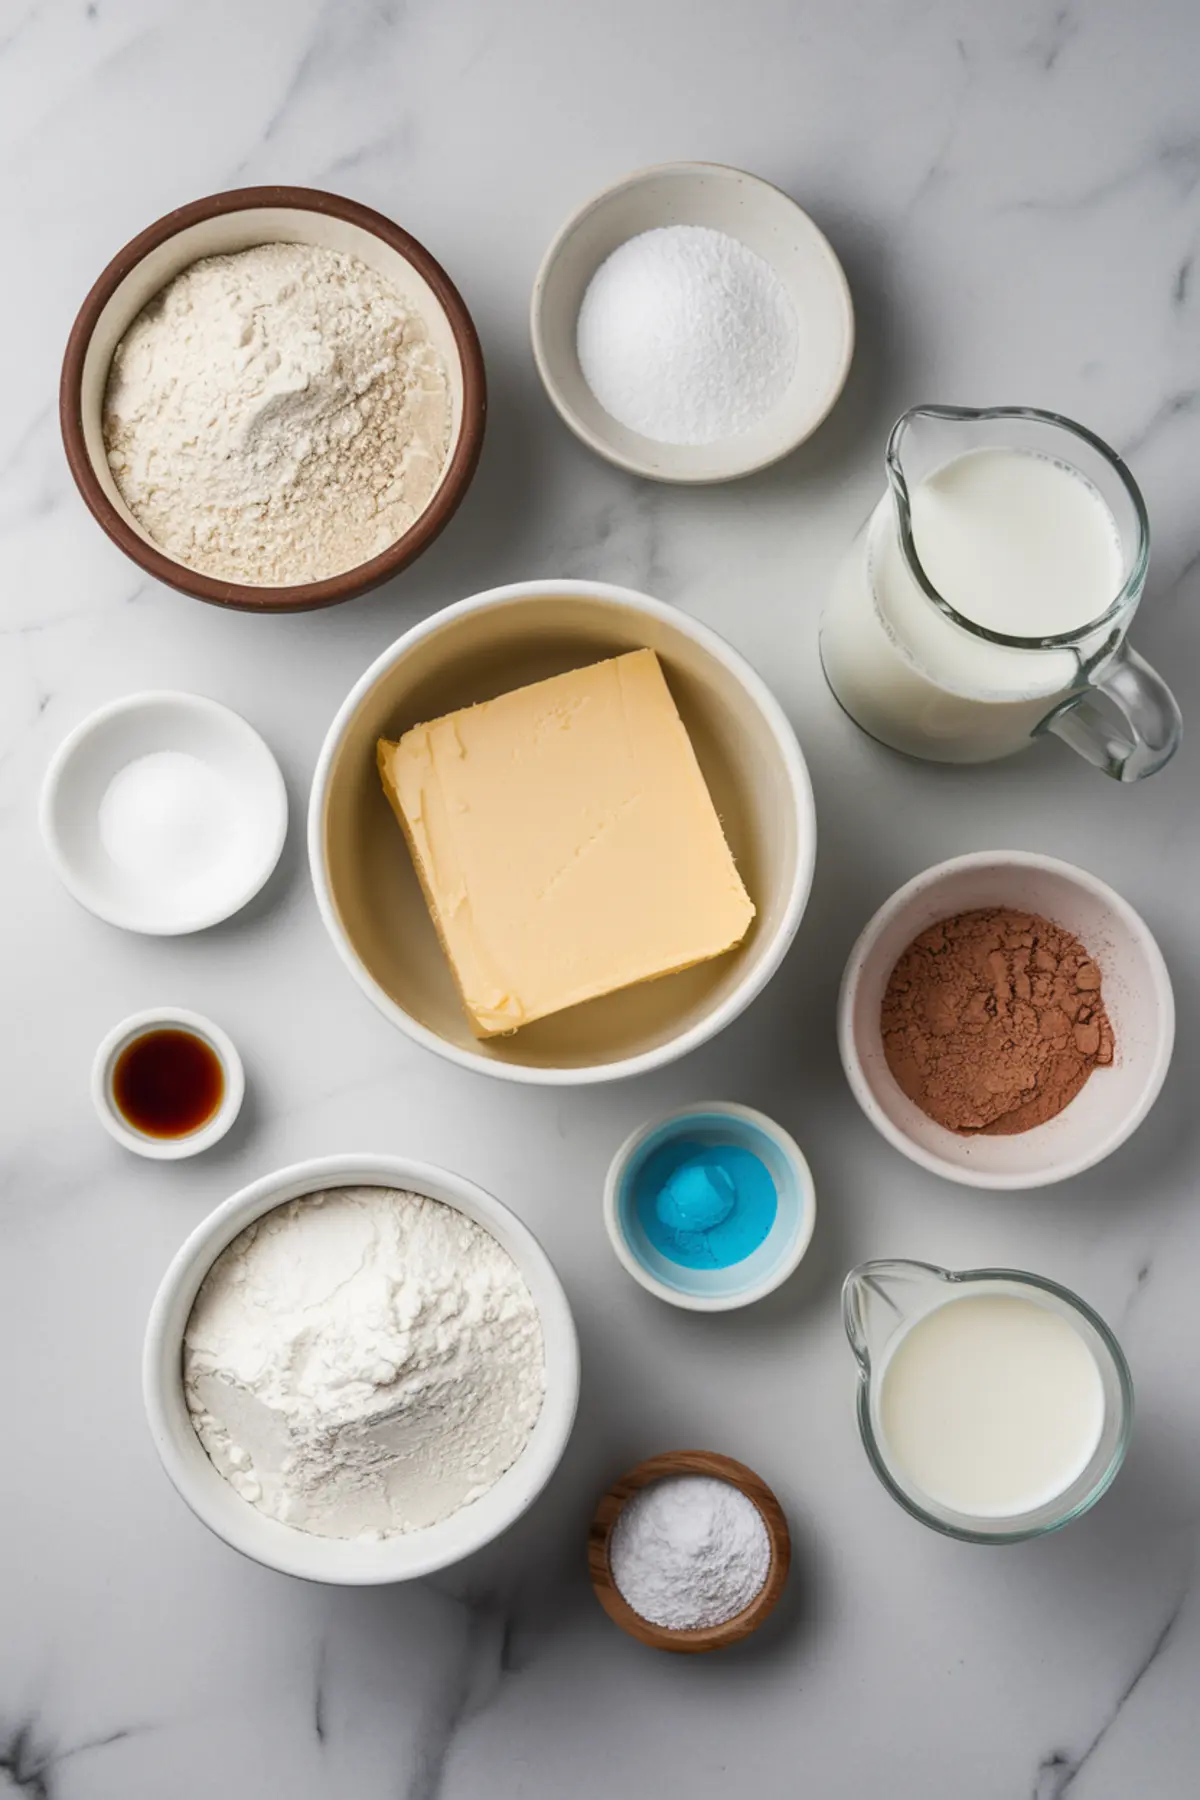
I rely on all-purpose flour, baking powder, and a hint of salt to create a gentle foundation. I beat softened butter and sugar until they feel airy, then I add eggs one by one. I pour in milk and vanilla extract, alternating with my dry blend. This method prevents lumps and encourages a tender result.
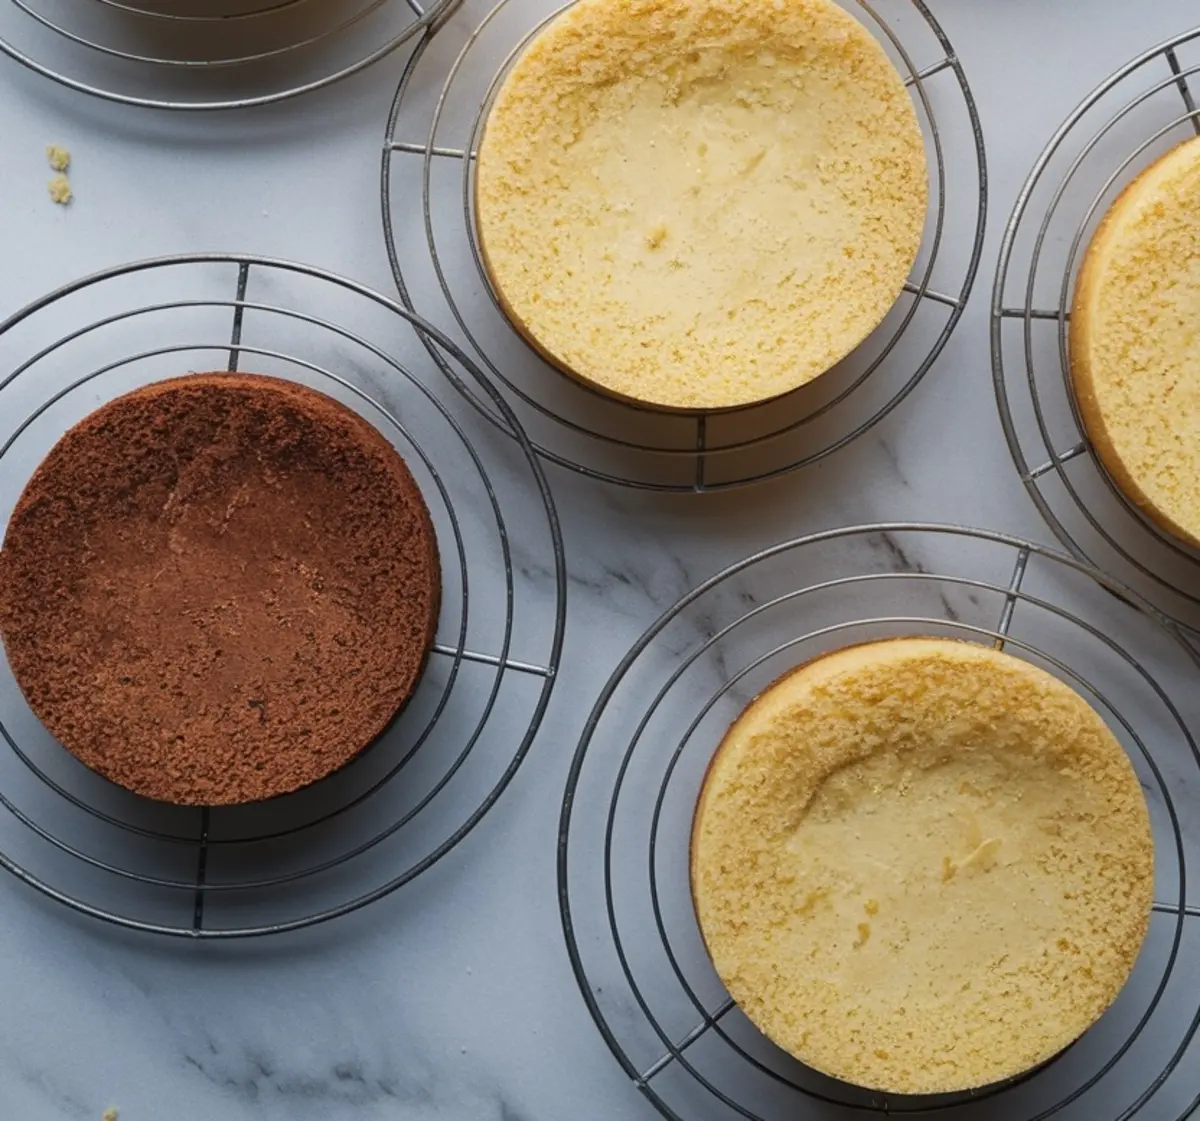
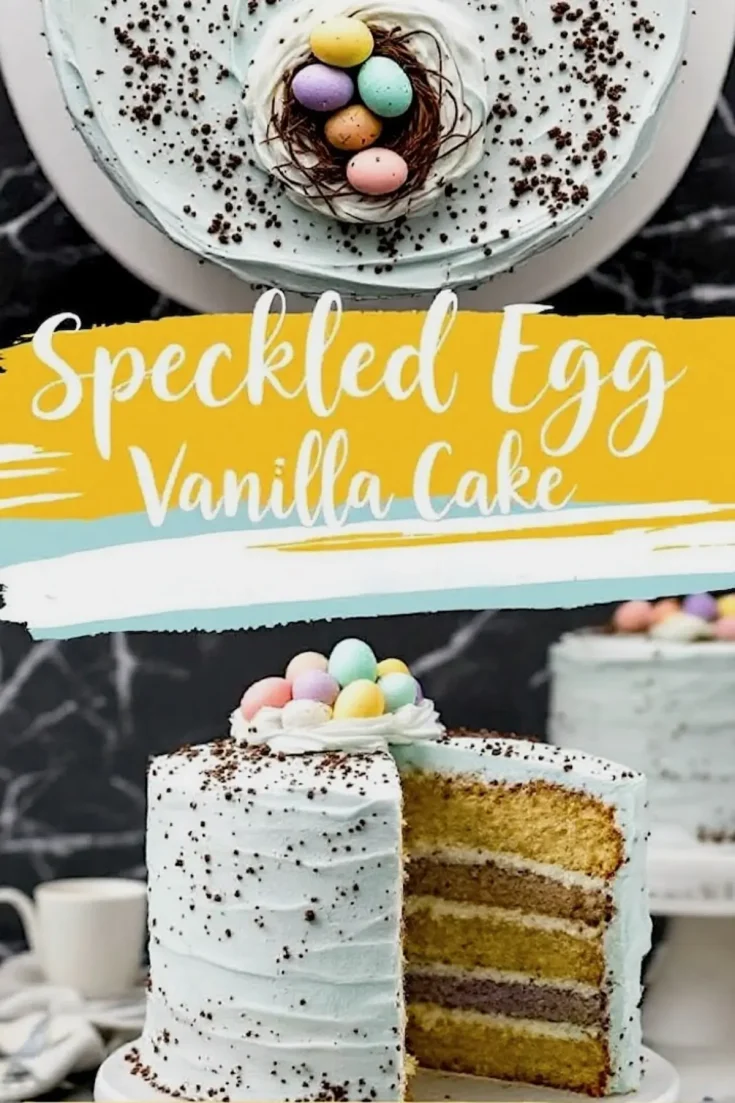
I split the batter into two bowls, leaving one plain and adding a bit of cocoa powder or a drop of gel color to the other. I bake in five 6-inch pans for that tall, dramatic appearance. I cool each layer thoroughly before I move on, to keep the frosting from sliding or melting.
I enjoy seeing the contrast between the light layers and the deeper ones. I picked brown gel because it provides a richer color, but cocoa powder still does the job if you want a mild chocolate taste. I find that these small choices personalize the dessert.
Crafting the Pastel Blue Buttercream and Building Your Layers

I use a hand mixer or stand mixer to beat softened butter until it looks creamy. I then add powdered sugar gradually, cup by cup, to achieve a soft texture. A splash of vanilla extract and a small amount of heavy cream keep it smooth and spreadable.
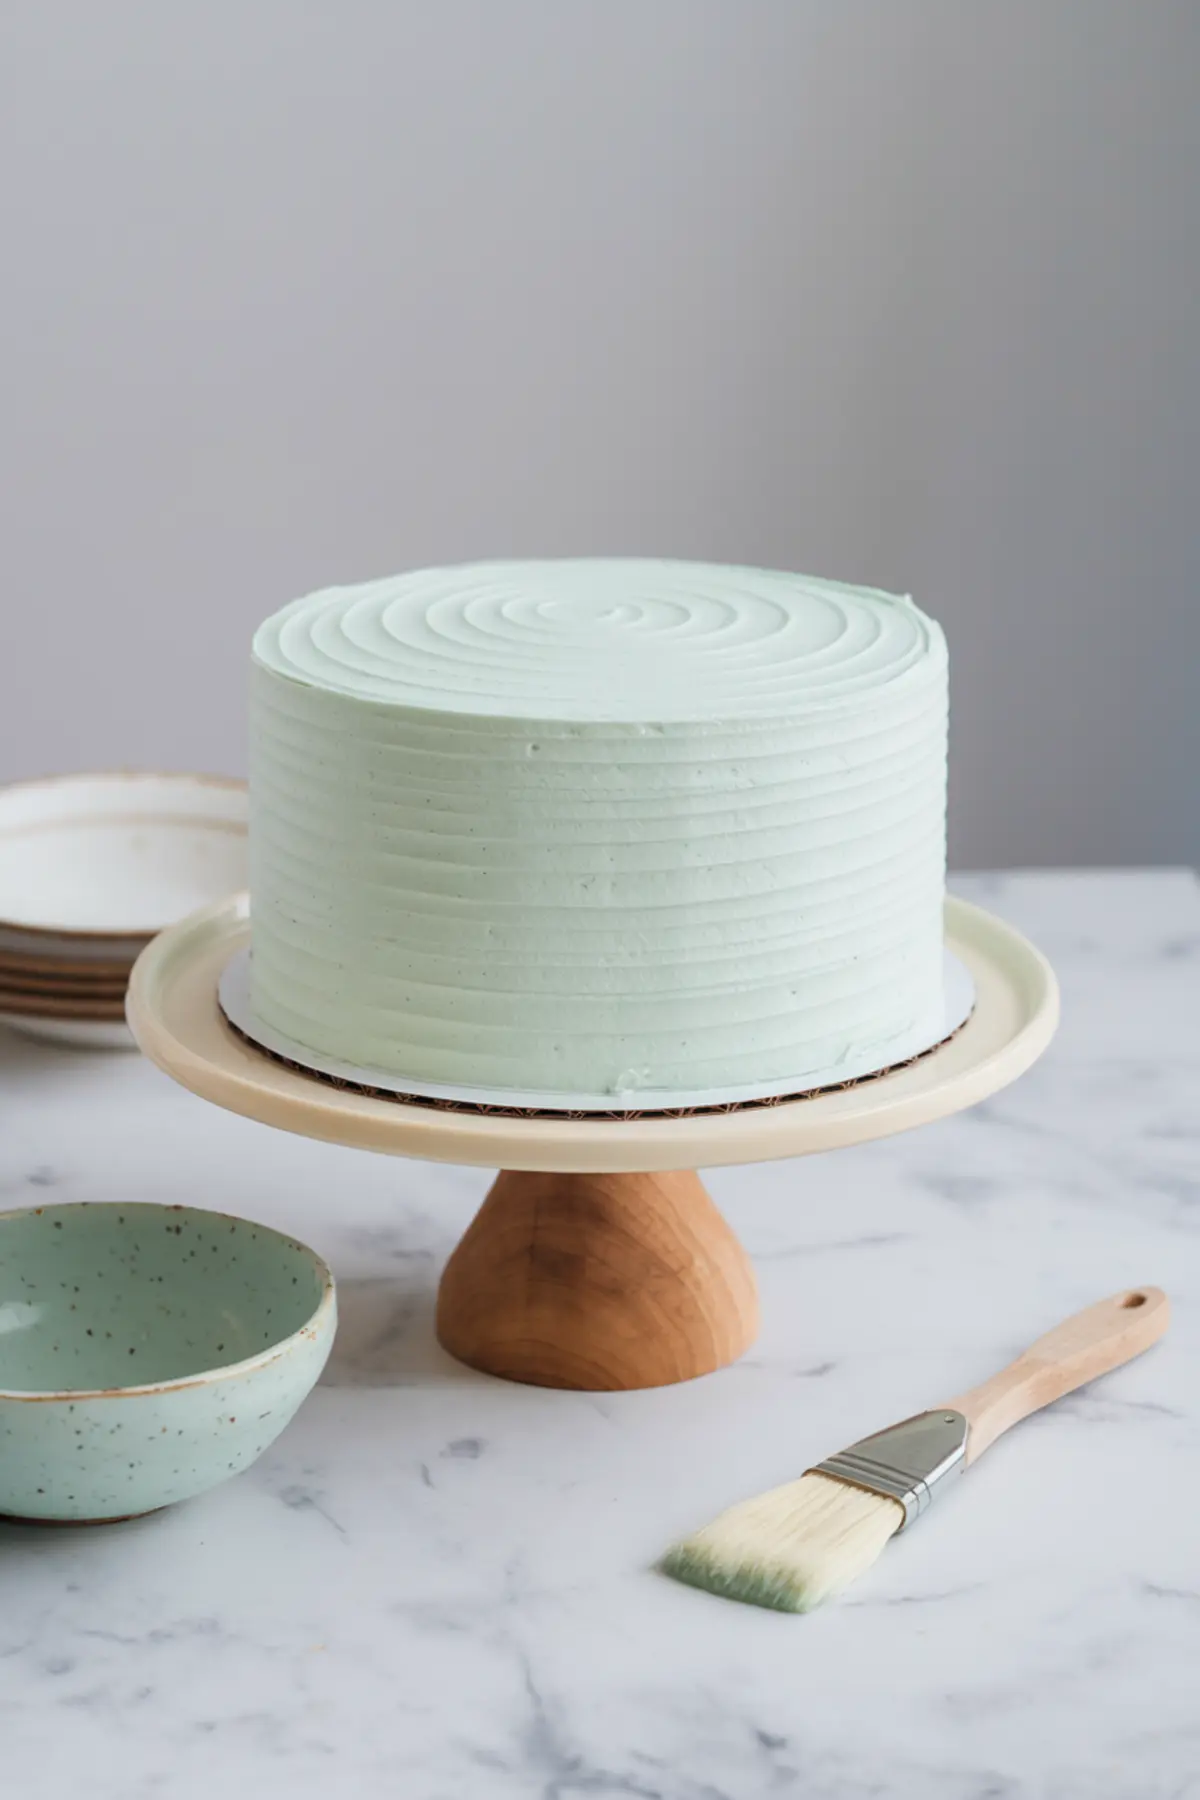
I swirl in drops of blue gel color until I see a soothing pastel shade. I place a light layer of cake on my serving plate, top it with a thin layer of buttercream, then add a dark layer. I repeat until I stack all five, finishing with a final smooth layer of frosting around the sides.
I tend to chill the cake briefly after the crumb coat because that helps everything firm up. I learned this technique the hard way when a warm kitchen once left my cake sliding around the platter. A few minutes in the refrigerator solves that problem.
Flicking the Speckled Effect and Adding Decorative Touches
I prepare a small blend of cocoa powder, water, and a dash of vanilla extract. I use a clean pastry brush or an old toothbrush reserved for baking, and I flick tiny droplets across the surface of the frosted cake. I rotate the cake so all angles catch those chocolate freckles.
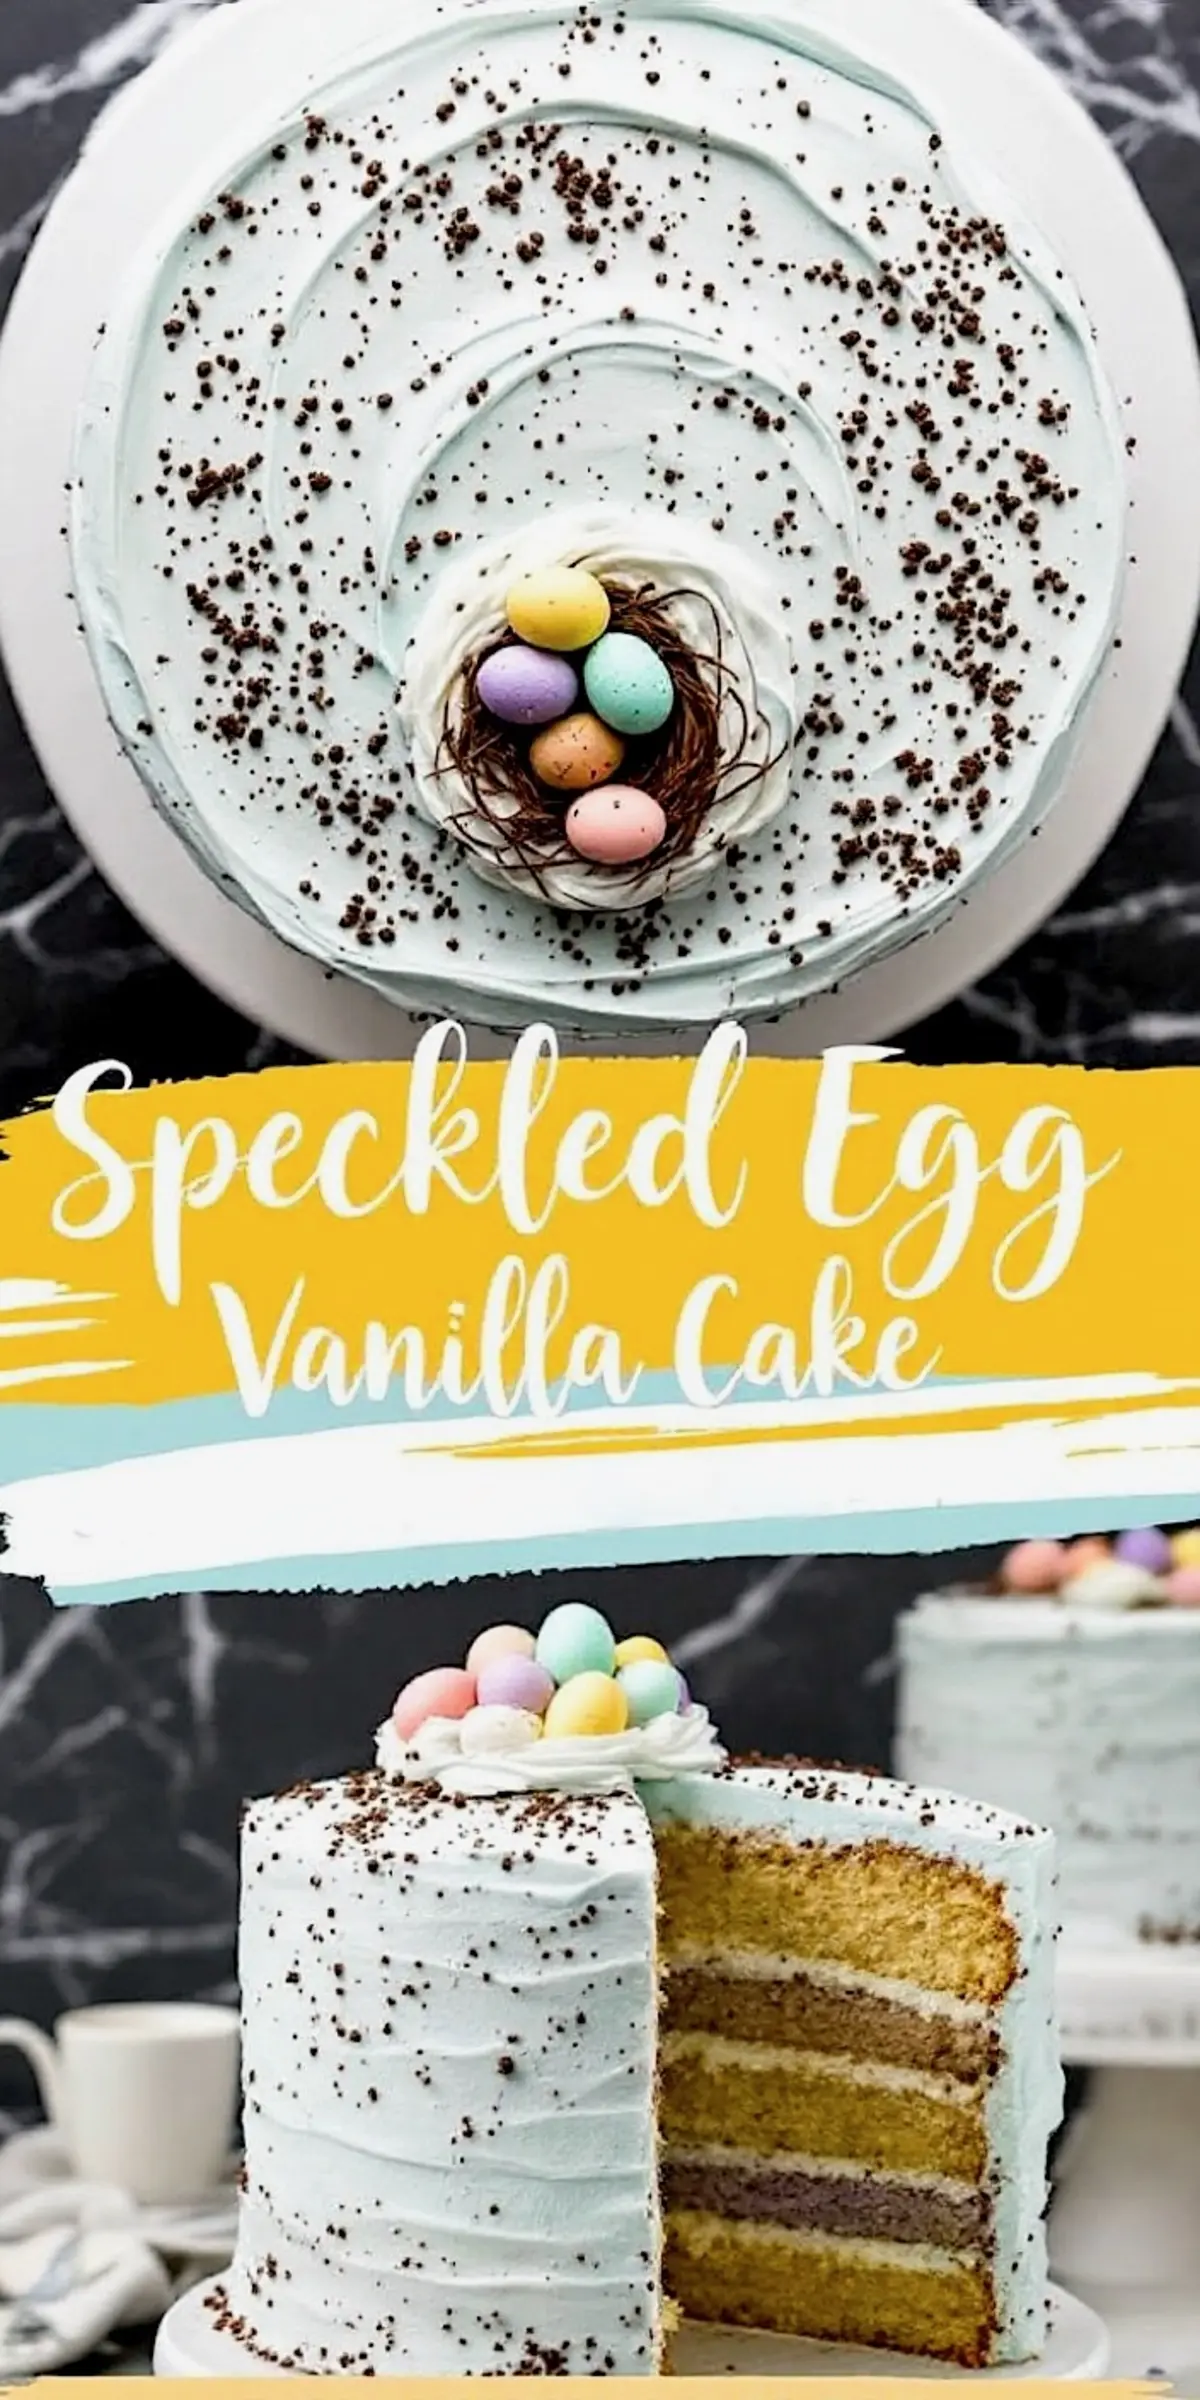
I top the cake with mini chocolate eggs for an Easter vibe. I like to pipe a small buttercream nest on top, then tuck my colorful eggs inside. I also enjoy sprinkling chocolate shavings around the bottom for extra texture and an elegant look. I sometimes add a small nest of chocolate twigs or coconut for a natural touch.
I wait until the speckled pattern sets, then I bring it out for everyone to see. My sister jokes that it looks too fancy to cut, but I find that the first slice is always the best moment. A quick glance at those light and dark stripes inside never fails to bring me joy.
Storing and Serving This Springtime Cake
I wrap leftover slices in an airtight container if there are any left. I usually keep it on the counter for two days, unless the kitchen gets warm, in which case I move it to the refrigerator. I let chilled slices come closer to room temperature before serving them again.
I serve it with a tall glass of milk or a side of whipped cream. I once added a drizzle of melted chocolate on top, and my nephews loved it. You can adapt the decorations with pastel candies or colorful sprinkles if you prefer. I encourage you to play around with your own creative finishing ideas.
I sometimes accompany this cake with my Easter bunny cake for a table filled with sweet surprises. Guests appreciate having different themes to admire, and it sparks conversation about which design looks the most cheerful.
Why This Speckled Egg Cake Has a Special Place in My Collection
I see this Easter dessert as a sign of spring. I remember searching for mini eggs at the store, bringing them home, and watching my nephew nibble on them before I could decorate anything. I also recall stirring the cocoa mixture for the speckles, ready to flick it across the frosting like an art project.
I enjoy how this simple cake flour blend and straightforward frosting routine leads to an eye-catching display. I believe that easy steps encourage more people to explore baking. I once thought a tall layer cake seemed too involved, but practice smoothed out my technique.
I appreciate how it complements seasonal gatherings, offering both classic vanilla flavor and a playful design. I notice how children light up at the sight of bright colors, and adults admire the layered appearance.
I Invite You to Pin and Share Your Experience
I hope you feel motivated to try this recipe at home. I suggest pinning this post on your Easter dessert board, so you can return to it year after year. I welcome your questions or comments about how your speckled egg cake turned out, because I enjoy hearing about your baking stories.
I believe our kitchen adventures become more fun with shared tips and surprises. I sometimes pick up fresh ideas from comment sections, and I like exchanging methods for better baking. I hope you join in the conversation and share pictures of your finished cake as well.
I see food as a communal bond that links us through recipes and special moments. I hope you keep exploring your creative side, whether with pastel frostings, chocolate sprinkles, or extra cocoa in the batter.
Speckled Egg Cake Recipe
A soft vanilla cake with light and dark layers, coated in pastel blue buttercream and finished with a speckled effect. Mini chocolate eggs and optional chocolate shavings complete this Easter-inspired dessert.
Ingredients
- FOR THE LAYERED VANILLA CAKE (5 LAYERS, TWO DIFFERENT COLORS):
- 3 cups (375g) all-purpose flour
- 2 ½ teaspoons baking powder
- ½ teaspoon salt
- 1 cup (226g) unsalted butter, softened
- 2 ¼ cups (450g) granulated sugar
- 5 large eggs
- 1 tablespoon vanilla extract
- 1 cup (240ml) whole milk
- Gel food coloring (brown or cocoa powder for darker layers)
- FOR THE BUTTERCREAM FROSTING:
- 1 ½ cups (340g) unsalted butter, softened
- 4 ½ cups (540g) powdered sugar
- 3 tablespoons heavy cream or milk
- 1 tablespoon vanilla extract
- A few drops of blue gel food coloring
- FOR THE SPECKLED EFFECT:
- 2 tablespoons cocoa powder
- 2 tablespoons water
- ½ teaspoon vanilla extract
- FOR DECORATION:
- 1 cup mini chocolate eggs
- Chocolate shavings or a small chocolate nest (optional)
Instructions
- PREPARE THE CAKE BATTER: Preheat the oven to 350°F (175°C). Grease and line five 6-inch round cake pans. If using fewer pans, bake in batches. In a medium bowl, whisk together the flour, baking powder, and salt. In a large mixing bowl, beat the butter and sugar until light and fluffy, about 3 minutes. Add the eggs one at a time, mixing well after each addition. Stir in the vanilla extract. Alternate adding the flour mixture and milk, beginning and ending with the flour, and mix until just combined.
- DIVIDE AND COLOR THE BATTER: Split the batter evenly into two bowls. Leave one bowl plain for the three lighter layers. In the second bowl, add ½ tablespoon cocoa powder or a drop of brown gel food coloring and mix for the two darker layers. Pour each batter into the prepared cake pans, ensuring three light layers and two dark layers. Bake for 22–26 minutes or until a toothpick inserted in the center comes out clean. Let the cakes cool in the pans for 10 minutes, then transfer them to a wire rack to cool completely.
- MAKE THE BUTTERCREAM: In a large bowl, beat the butter until smooth and creamy, about 2 minutes. Gradually add the powdered sugar, one cup at a time, mixing well after each addition. Pour in the vanilla extract and heavy cream, then beat until fluffy. Add a few drops of blue gel food coloring and mix until the frosting reaches a soft pastel blue.
- ASSEMBLE THE CAKE: Place one light-colored cake layer on a serving plate and spread a thin layer of buttercream on top. Add a darker-colored cake layer and spread another thin layer of frosting. Continue alternating layers, ending with a light-colored layer on top. Cover the entire cake with a thin crumb coat of buttercream and chill for 15 minutes. Apply a final smooth layer of frosting over the cake.
- CREATE THE SPECKLED EFFECT: In a small bowl, mix the cocoa powder, water, and vanilla until smooth. Dip a pastry brush or toothbrush into the mixture, then lightly flick the brush over the cake to create speckles. Let dry for a few minutes before decorating further.
- DECORATE THE CAKE: Pipe a small buttercream nest on top of the cake and fill it with mini chocolate eggs. Sprinkle extra chocolate eggs or chocolate shavings around the base for decoration.
Notes
Cake Pan Options: This recipe uses five 6-inch round cake pans for a tall, dramatic presentation. If using 8-inch or 9-inch pans, reduce the number of layers and adjust the baking time accordingly. Cakes in larger pans may bake faster, so start checking for doneness around 18–20 minutes.
Coloring the Layers: The contrast between light and dark layers enhances the speckled egg look. Brown gel food coloring gives a more vibrant color than cocoa powder, but cocoa powder adds a mild chocolate flavor. If using cocoa powder, sift it first to prevent lumps in the batter.
Buttercream Tips: Beating the butter until smooth before adding sugar helps create a light, fluffy frosting. If the buttercream feels too stiff, add an extra teaspoon of heavy cream or milk until the desired consistency is reached. Chilling the cake between the crumb coat and final layer of frosting makes it easier to achieve a smooth finish.
Speckled Effect Technique: A clean pastry brush or food-safe toothbrush works best for flicking the cocoa mixture onto the cake. Hold the brush a few inches from the cake and use your finger to gently flick the bristles. For an even pattern, rotate the cake as you work. A deeper brown color can be achieved by using less water in the cocoa mixture.
Decoration Ideas: A piped buttercream nest adds a decorative touch, but a small chocolate nest or spun sugar nest can also be used. If using a chocolate nest, place it on the cake just before serving to prevent it from softening. Chocolate shavings or crushed chocolate cookies sprinkled around the base enhance the presentation.
Storage: Store the assembled cake in an airtight container at room temperature for up to 2 days or in the refrigerator for up to 5 days. Let refrigerated cake sit at room temperature for 30 minutes before serving for the best texture. Unfrosted cake layers can be wrapped tightly in plastic wrap and stored at room temperature for up to 2 days or frozen for up to 3 months. Thaw frozen layers in the refrigerator overnight before frosting.
Make-Ahead Tips: The cake layers can be baked a day ahead and stored wrapped at room temperature. Buttercream can also be made in advance and refrigerated for up to 3 days. Before using, let the buttercream sit at room temperature and re-whip for a smooth consistency. The speckled effect is best applied on the day of serving to maintain a fresh appearance.
Serving Suggestions: This cake slices cleanly with a sharp knife warmed under hot water and dried between cuts. For extra flavor, serve with a drizzle of melted chocolate or a side of whipped cream. The pastel blue buttercream and speckled finish pair well with springtime decorations like edible flowers or a dusting of powdered sugar for a softer look.
Nutrition Information
Yield
12Serving Size
1Amount Per Serving Calories 325Total Fat 11gSaturated Fat 6gTrans Fat 0gUnsaturated Fat 4gCholesterol 95mgSodium 272mgCarbohydrates 47gFiber 1gSugar 18gProtein 8g