
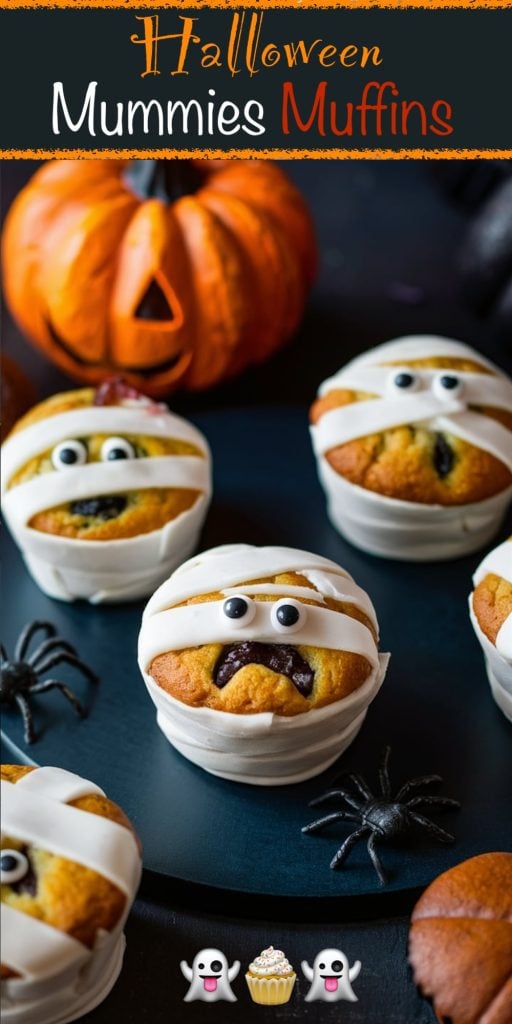
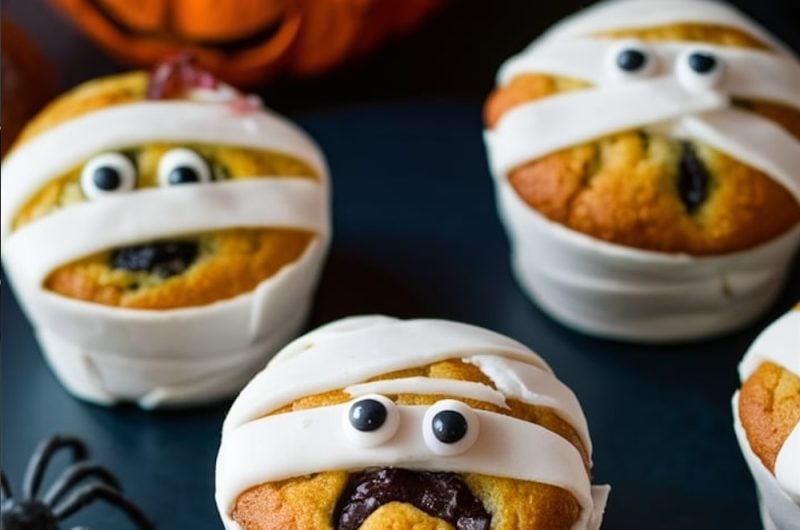
With Halloween just around the corner, there’s no better time to bake up a batch of these charming Mummy Halloween Muffins. These treats are the perfect blend of spooky and adorable, making them a must-have at any Halloween gathering. Wrapped in fondant bandages with candy eyes peeking out, these muffins not only look festive but are also incredibly fun to make. Whether you’re baking with kids or surprising your friends with a creative treat, these mummy muffins are sure to steal the show.
Following a special diet?
Every recipe on this site can be converted to gluten-free, vegan, dairy-free, keto, nut-free or egg-free with adjusted ratios so nothing falls flat.
Try the Recipe Converter →The Magic Behind Mummy Muffins: My Halloween Baking Tradition
The idea for these Mummy Halloween Muffins came about when I was looking for a festive treat that was both easy to make and packed with Halloween spirit. I’ve always loved the classic mummy costume, with its playful balance of spooky and silly, and I wanted to capture that essence in a baked good. The first time I made these muffins, I was thrilled with how simple it was to create the mummy effect using just a few strips of fondant and some candy eyes. They were an instant hit with my family, and now, they’ve become a Halloween tradition in our house. There’s something magical about watching these little mummies come to life, and the best part is, they taste just as good as they look!
Emma’s Recipe Tips
Working with fondant can be a bit tricky if you’re not used to it, but a few simple tricks can make the process much smoother. If your fondant is stiff, knead in a small amount of shortening, or soften it in the microwave for a few seconds. When decorating, play around with the placement of the candy eyes—this is your chance to give each muffin its own personality! Also, remember that overmixing the batter can lead to tough muffins, so mix until just combined for the best results.
Serving Suggestions
These Mummy Halloween Muffins are sure to be the highlight of any Halloween gathering. They pair perfectly with a glass of cold milk or a warm mug of spiced apple cider. For an extra spooky touch, serve them on a platter surrounded by plastic spiders, cobwebs, or even some dry ice for a foggy effect. These muffins are not only delicious but also make for an eye-catching display that will impress all your guests.
Nutritional Information (per muffin)
- Calories: 290
- Total Fat: 13g
- Saturated Fat: 8g
- Cholesterol: 60mg
- Sodium: 160mg
- Total Carbohydrate: 39g
- Sugars: 24g
- Protein: 4g
Getting excited for the holidays? Make each day leading up to Christmas even more special with exclusive treats from my ‘24 Days of Christmas Desserts‘ eBook, featuring a delightful new recipe for every day of the season.
Halloween Mummy Muffins: A Spooky and Delightful Treat
Course: halloween12
servings15
minutes18
minutes290
kcalIngredients
- For the Muffins:
1 1/2 cups all-purpose flour
1 cup granulated sugar
1/2 cup unsalted butter, softened
Substitution: Use margarine or a dairy-free butter alternative for a dairy-free version.2 large eggs
1/2 cup milk
1/2 cup sour cream or yogurt
Tip: Greek yogurt works great for a richer texture.1 tsp vanilla extract
1 1/2 tsp baking powder
1/4 tsp salt
Steps
- Preheat and Prepare
Preheat your oven to 350°F (175°C) and line a 12-cup muffin tin with your favorite festive liners. This step sets the stage for your Halloween magic!
In a large mixing bowl, cream together the softened butter and sugar until light and fluffy—this should take about 2-3 minutes. Add the eggs one at a time, beating well after each addition. Stir in the vanilla extract for that delicious, fragrant touch.
Tip: Beat the butter and sugar until the mixture turns pale for extra light and fluffy muffins. - Mix and Bake 3. In a separate bowl, whisk together the flour, baking powder, and salt. Gradually add the dry ingredients to the wet mixture, alternating with the milk and sour cream. Mix until just combined, being careful not to overmix.
Tip: To avoid dense muffins, mix the batter until just combined—lumps are okay!
Spoon the batter into the prepared muffin tin, filling each cup about two-thirds full. Bake for 18-20 minutes, or until a toothpick inserted into the center comes out clean. Let the muffins cool in the tin for 5 minutes before transferring them to a wire rack to cool completely.
Tip: Use a cookie scoop to evenly portion the batter into the muffin cups. - Prepare the Fondant Bandages 5. While the muffins cool, prepare your fondant bandages. Dust your work surface lightly with cornstarch or powdered sugar, and roll out the white fondant to about 1/8-inch thickness. Use a sharp knife or pizza cutter to slice the fondant into thin, 1/4-inch wide strips.
Tip: If the fondant is too stiff, knead it with a small amount of shortening or soften it briefly in the microwave. - Decorate the Muffins 6. Once the muffins are completely cooled, it’s time to turn them into mummies. Carefully drape the fondant strips across each muffin, crisscrossing them to create a bandaged look. Leave small gaps for the candy eyes to peek through. Gently press the candy eyes into place in the gaps between the fondant strips.
Tip: Vary the placement of the eyes to give each mummy its own unique expression. - Finishing Touches 7. Arrange your newly wrapped mummies on a spooky Halloween platter, adding some fun elements like cobwebs or plastic spiders for extra flair. These muffins are not only a treat for the taste buds but also a delightful centerpiece for your Halloween table.
Tip: For added fun, sprinkle some edible glitter or dust around the mummies for a touch of Halloween magic.
Frequently Asked Questions (FAQ)
Can I make these muffins ahead of time?
Yes! You can bake the muffins a day in advance and store them in an airtight container. Add the fondant bandages and candy eyes just before serving for the freshest look.
What if I don’t have fondant?
No worries! You can use white chocolate strips or even buttercream to create the mummy bandages.
How do I store the decorated muffins?
Store the decorated muffins in an airtight container at room temperature for up to two days, or in the refrigerator for up to five days. Let them come to room temperature before serving for the best texture.
Can I make these muffins gluten-free?
Absolutely! Simply substitute the all-purpose flour with a gluten-free flour blend.
Can I use different flavors for the muffins?
Yes, you can easily swap out the vanilla extract for other flavors like almond or orange, or add in some cocoa powder for a chocolate version.
How can I soften stiff fondant?
If your fondant is too stiff, knead it with a small amount of shortening or soften it briefly in the microwave.
My dear reader
Have you tried these Mummy Halloween Muffins? I’d love to see how they turned out! Share your experience in the comments below, and don’t forget to rate the recipe. If you’ve added your own twist, let me know—tag me on social media so I can see your spooky creations!
Halloween is the perfect time to get creative in the kitchen, and these Mummy Halloween Muffins are a fun and festive way to celebrate the season. They’re not only easy to make but also a great way to add some spooky charm to your Halloween festivities.
Loved this recipe? Pin it for later and be sure to explore my other Halloween treats to keep the spooky spirit alive all season long!