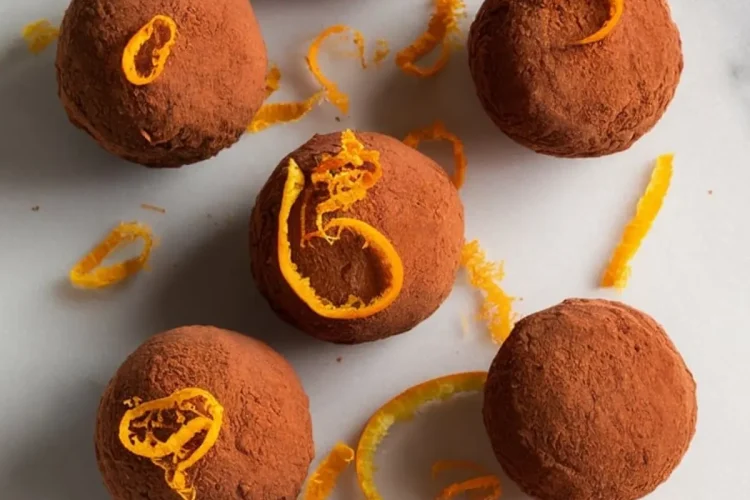
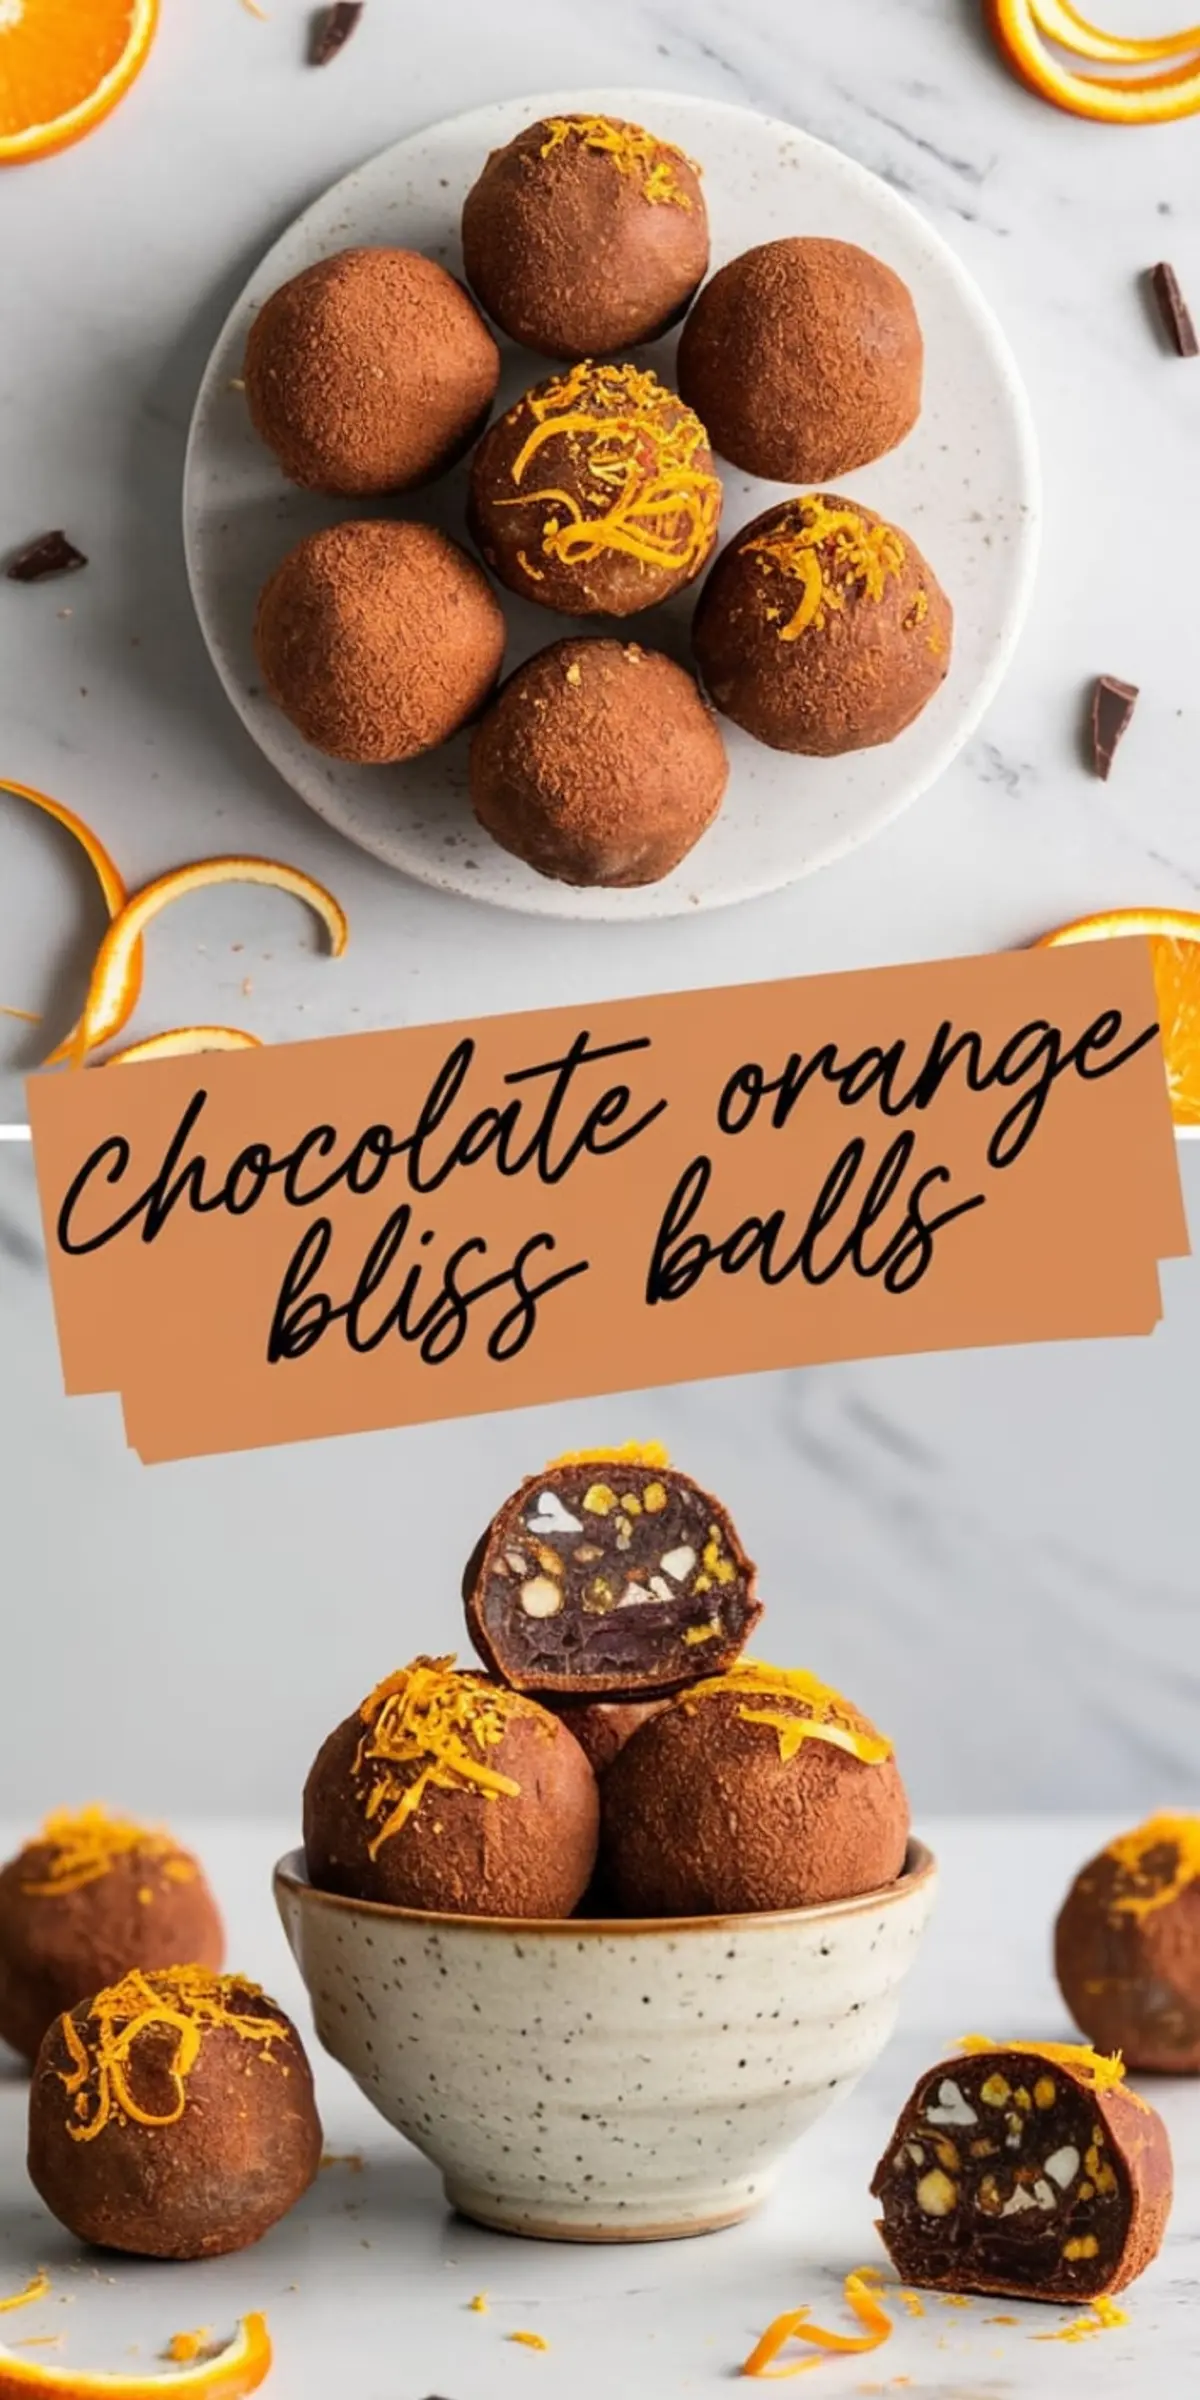
These chocolate orange balls are soft, chewy, and speckled with dark chocolate chunks that don’t apologize for being there. This recipe is built around Medjool dates, almonds, orange zest, and cocoa. No ovens. No stress. No surprises.
What makes this version stand out? It isn’t just a list of clean ingredients. It’s how they behave together—how the citrus oils from a fresh orange lift the deep, earthy flavor of cocoa, how almonds lend bite, and how a pinch of salt sharpens everything without calling attention to itself.
I’ve made these on Sunday afternoons when I want something sweet but can’t be bothered to bake. I’ve packed them for long car rides. I’ve served them with espresso when a full dessert felt too much. They show up every time. No fuss. No failures.
Following a special diet?
Every recipe on this site can be converted to gluten-free, vegan, dairy-free, keto, nut-free or egg-free with adjusted ratios so nothing falls flat.
Try the Recipe Converter →Ingredients That Do the Work for You
Start with soft, sticky Medjool dates. They act as the glue. If they’re dry, soak them. That step alone makes the difference between something that crumbles and something that holds its shape in your hands.
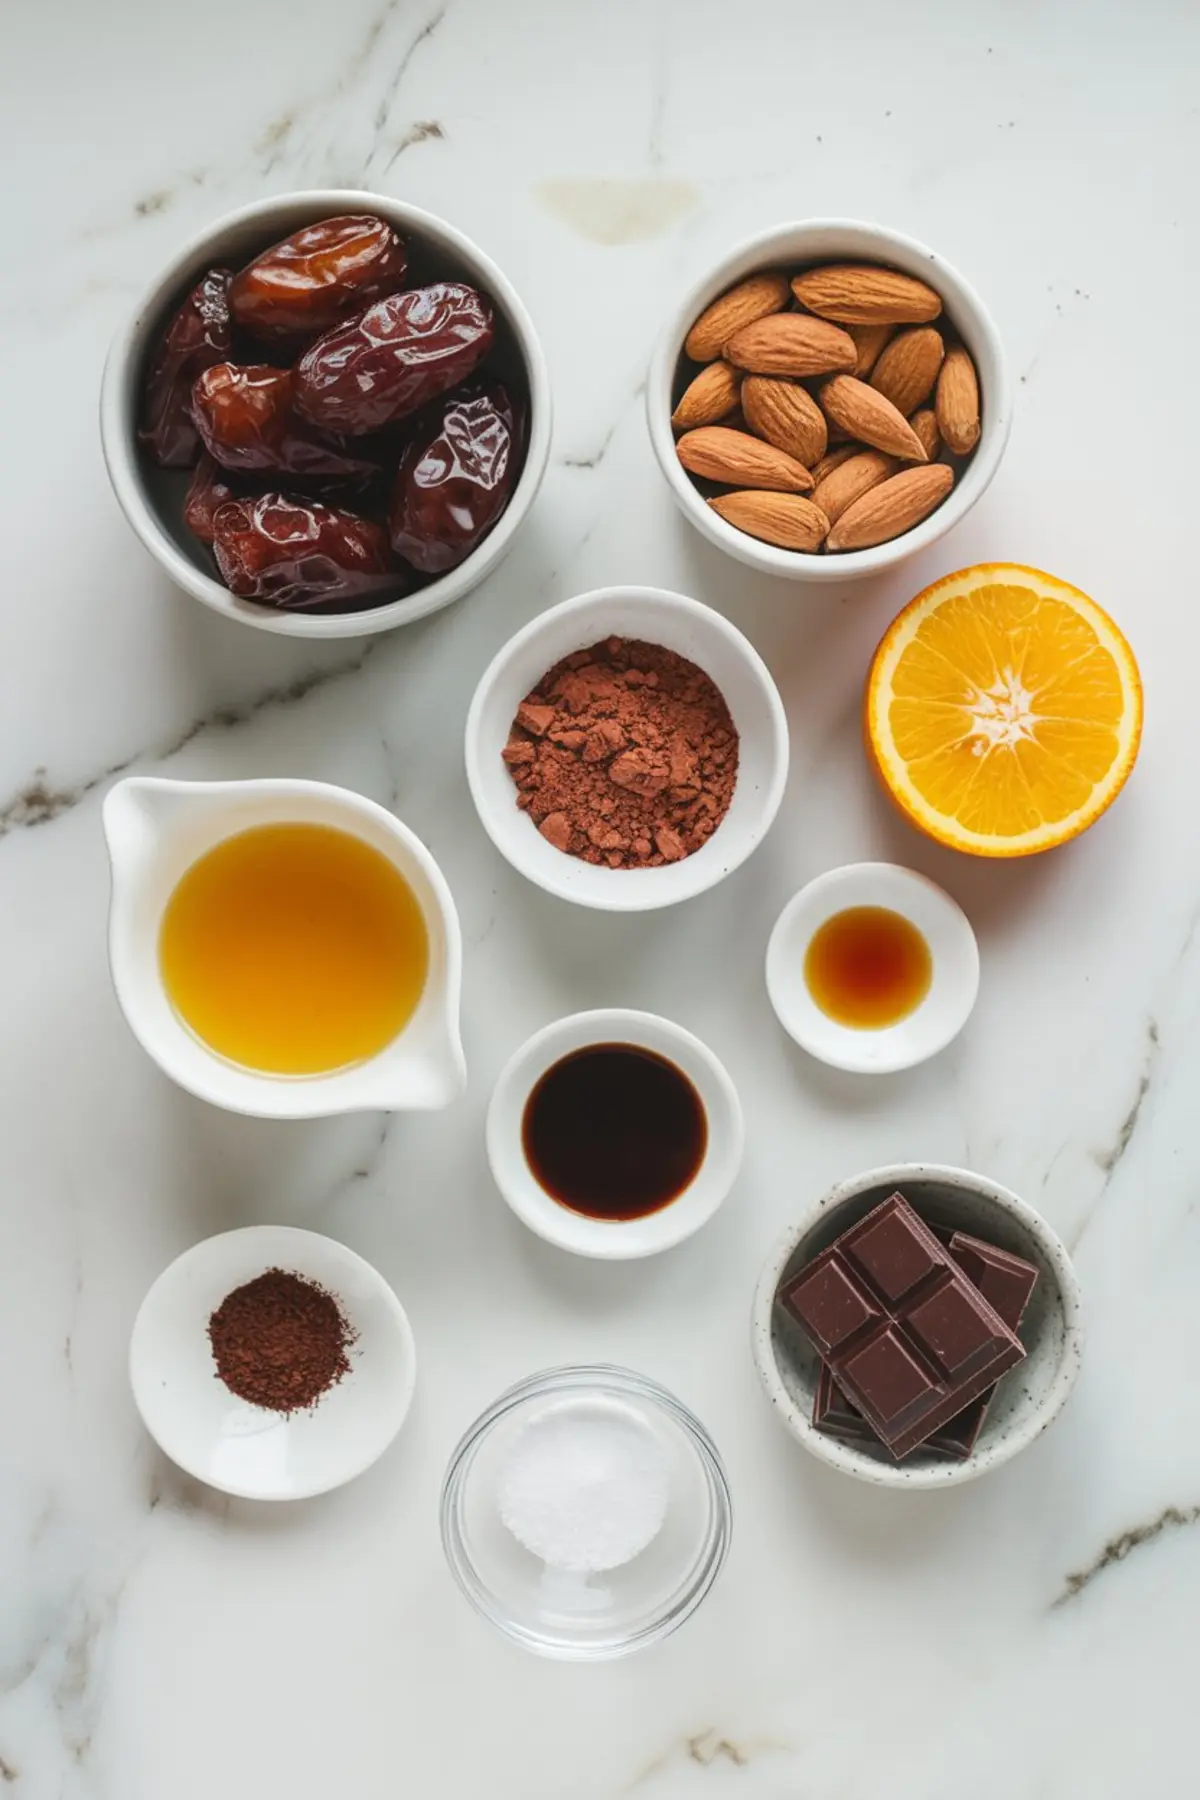
Next come the raw almonds. They grind down into a gritty, almost sandy texture—not smooth like nut butter, not chunky like trail mix. You want that middle ground. If you prefer softer bites, cashews melt in more easily and leave no edge. I’ve swapped them in when I’m running low on almonds, and the texture becomes creamier, almost truffle-like.
Then there’s the cocoa. Choose one without added sugar. Let the orange zest and juice bring the brightness. I always zest the orange before juicing, and I use a microplane to get the finest bits. That way, every bite carries citrus oils right into the dough.
The maple syrup? Optional. Try the mix first. Some dates are already sweet enough. Others need a bit of help. I keep a bottle nearby but rarely use more than a drizzle.
How to Get the Texture Right
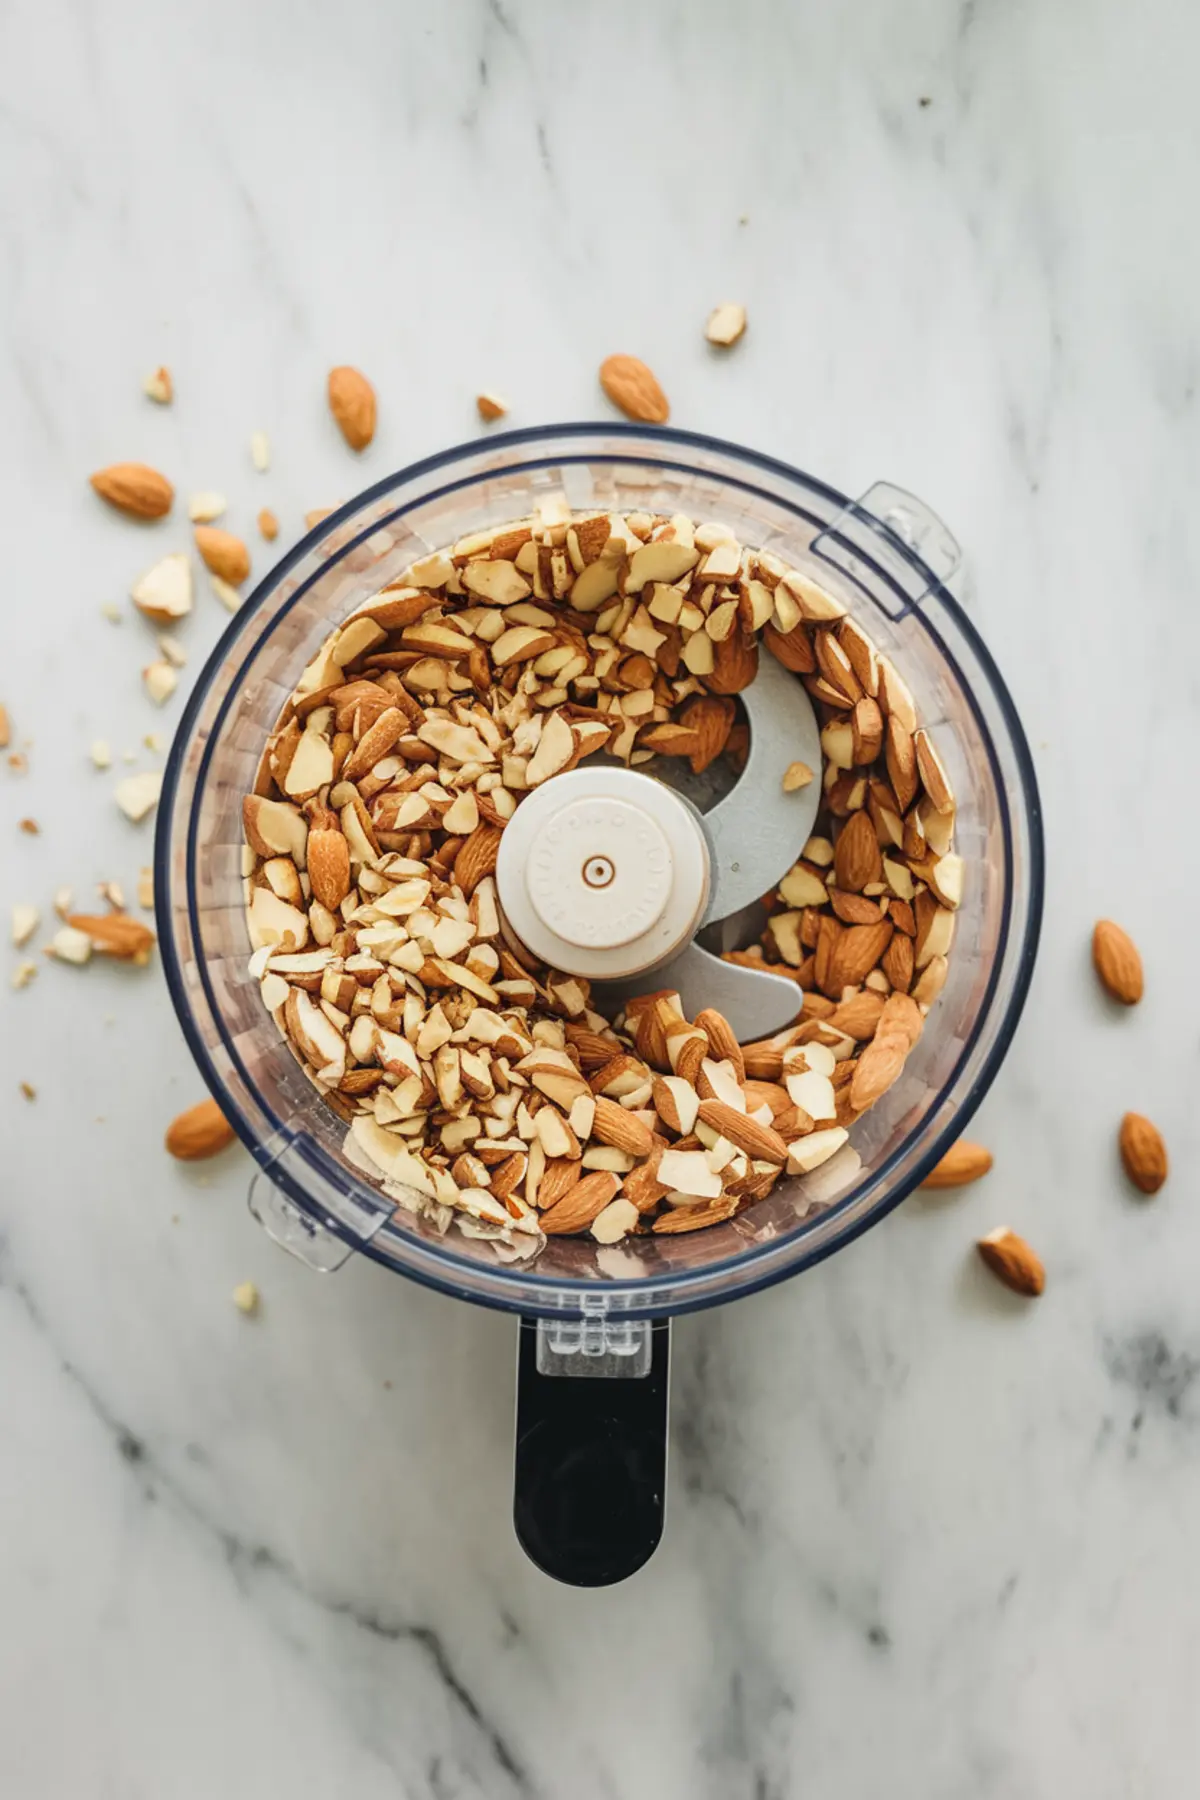
Once everything is blended, pause and touch the dough. It should be sticky but not wet. The food processor brings the dates and nuts together, but don’t overdo it. You want to see specks of almond, not a paste.
When it looks clumpy and dark and smells like orange peels soaked in hot chocolate, you’re ready to add the chopped dark chocolate. Do it by hand. Don’t process it. That way, the chunks keep their shape, and the bite stays interesting. Sometimes I use a bar and chop it unevenly for surprise pockets. Mini chips work fine too, but feel a little… neat.
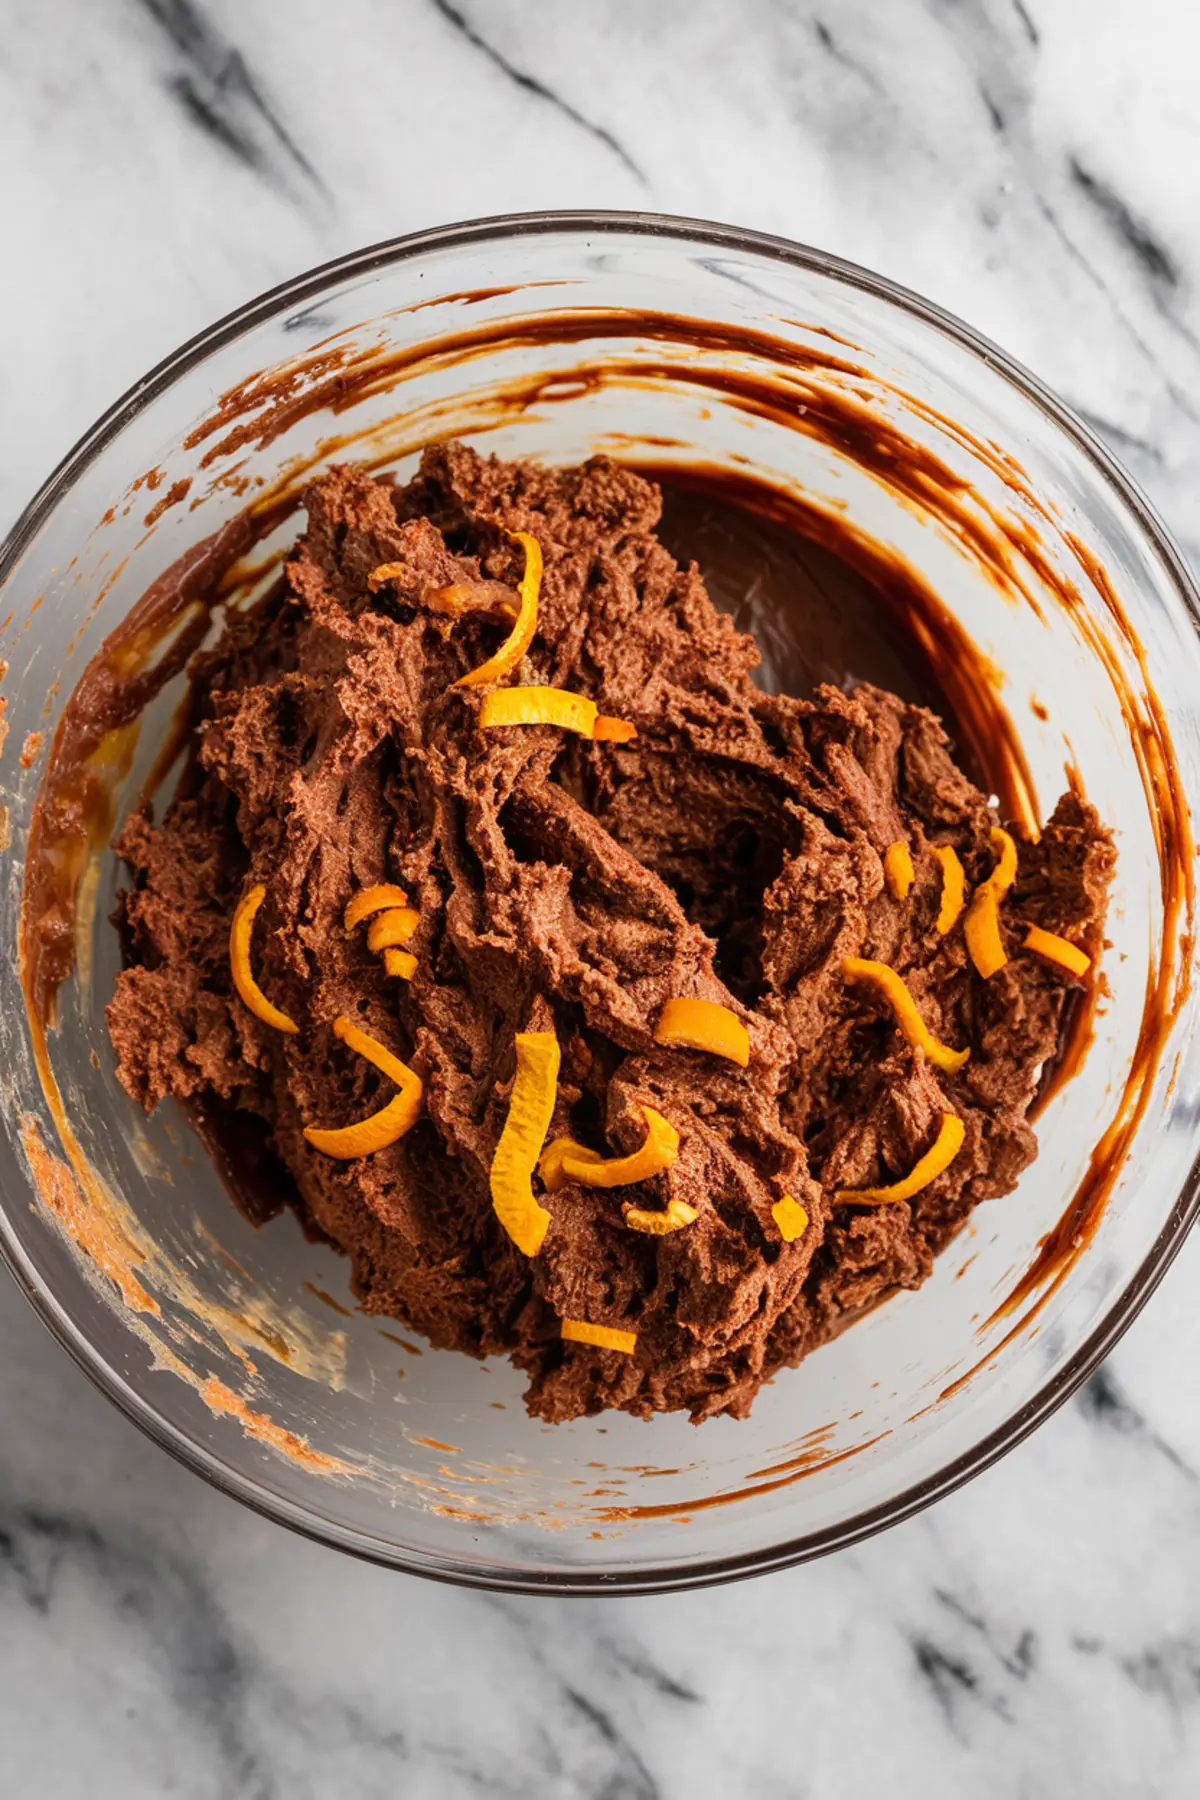
Scoop, roll, and press. If the dough sticks to your hands, a little water or oil on your palms helps. I prefer rolling them small—bite-size, not boulder-size. These aren’t meal replacements. They’re meant to be satisfying, not heavy.
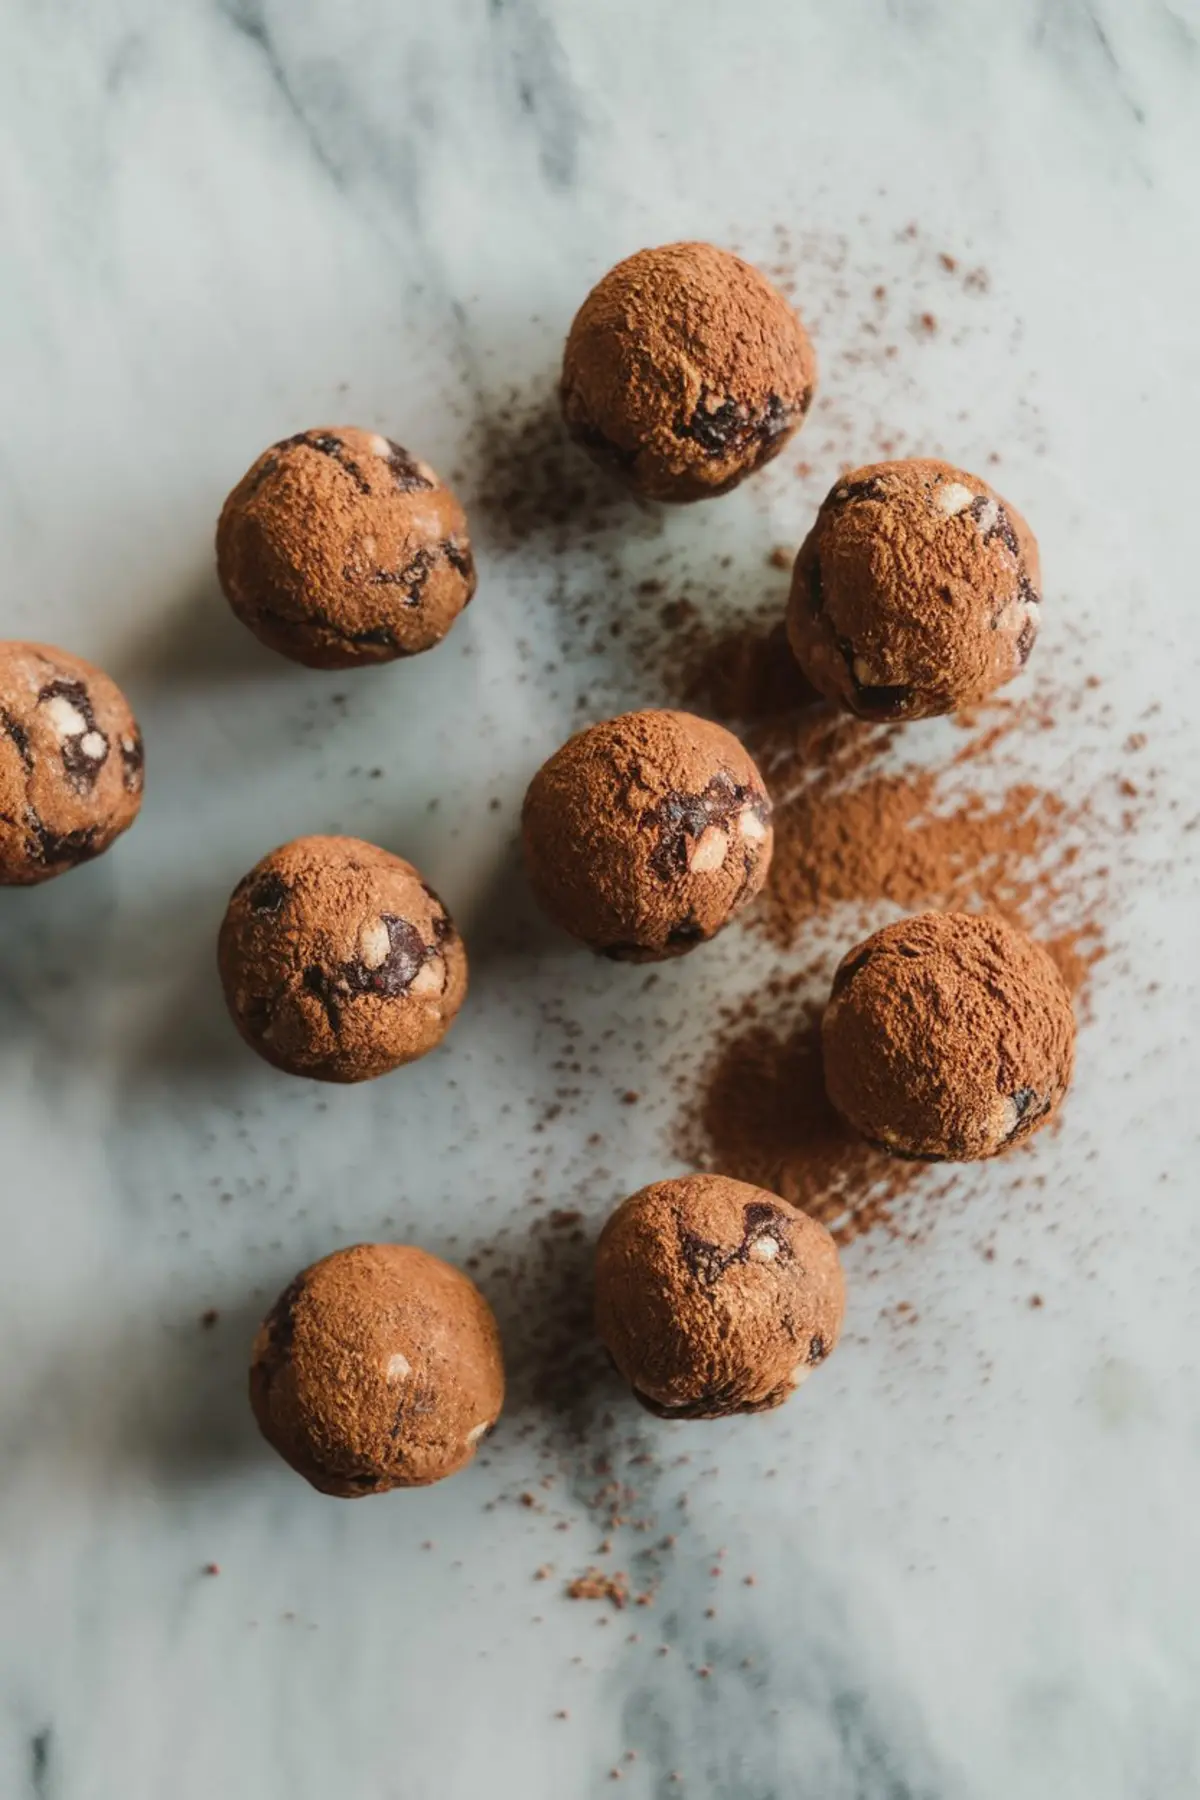
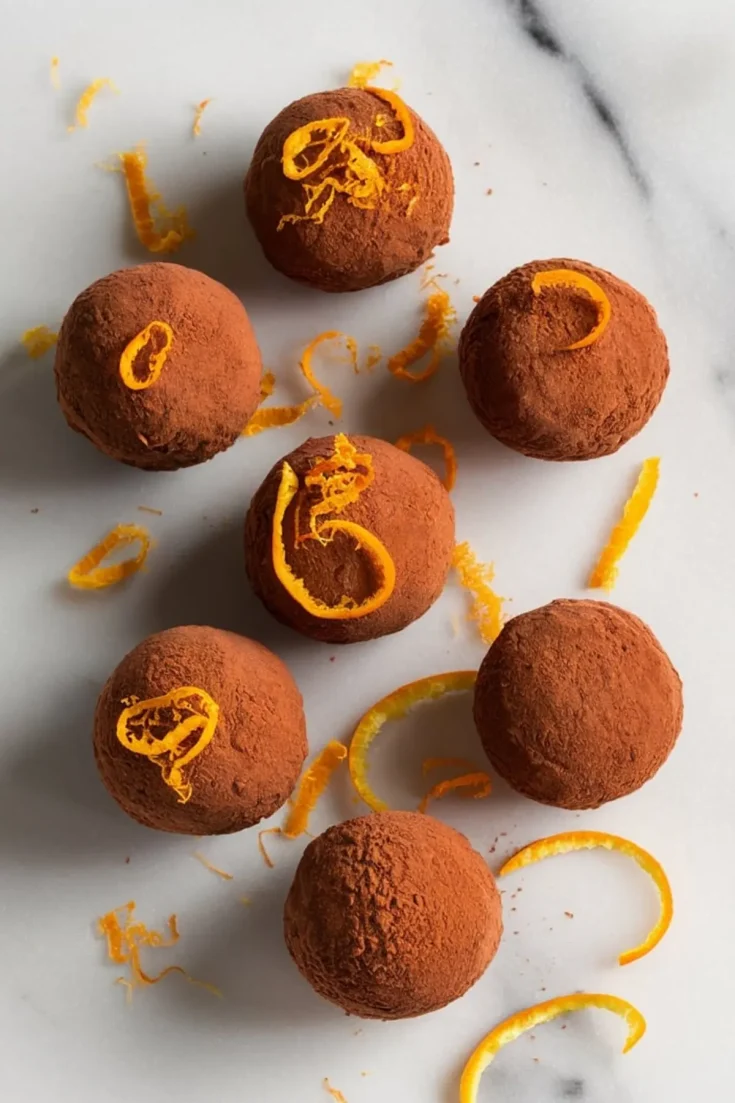
Roll them in extra cocoa for a dusty finish, or shave a bit more orange zest over the top. That visual contrast gets people curious. If you’re feeling experimental, try a dusting of shredded coconut or finely chopped pistachios instead.
Serving Ideas That Make Them Feel Special
You don’t need a reason to serve bliss balls, but presentation always changes the story. Set them out in a shallow bowl lined with parchment and let people grab their own. For guests, stack them pyramid-style on a slate board beside a few squares of dark chocolate or orange slices.
They also hold up well at room temperature for a few hours, which makes them perfect for packing into lunchboxes or storing in desk drawers. I’ve even taken them to a picnic wrapped in wax paper and passed them around like candy.
They taste better cold, though. That fridge time isn’t just for firmness—it rounds out the flavor. The citrus deepens, the cocoa becomes less raw, and the chocolate bits settle into the mix.
Storage Tips That Actually Work
Keep these in an airtight container in the fridge. They’ll stay chewy and balanced for up to a week. If you want to stock up, freeze them in a single layer first, then move them to a sealed container or freezer bag.
I thaw a few in the fridge the night before I want them. But if you’re like me and forget, leave one out on the counter for twenty minutes. By the time you make coffee, it’s ready.
They also travel well. I’ve taken them on long flights, and they’ve survived just fine in my backpack. Just keep them away from direct sunlight or heat, especially if they’re rolled in cocoa.
What Else to Try Next
If you liked this recipe and want something equally easy, try my Chocolate Covered Pretzels for a sweet-salty twist, or my Chocolate Zucchini Bread for a moist bake that feels like a treat but sneaks in vegetables. Or bake a classic Chocolate Pie that people always ask seconds of. Each one brings a different mood, but they all lean on pantry staples and don’t take hours to make.
Save This for Later and Join the Conversation
If this recipe fits your snack style, save it to your board on Pinterest so it’s there the next time you want something quick, sweet, and chocolatey without turning on the oven. I’d love to hear how yours turn out. Did you use almonds or cashews? Did you try another zest like lemon? Drop a comment below and share your version.
This isn’t just a recipe—it’s a rhythm. Once you try it, you’ll see.
Chocolate Orange Bliss Balls Recipe
Chocolate orange bliss balls combine Medjool dates, almonds, cocoa powder, and fresh orange zest for a chewy, flavorful snack. A handful of chopped dark chocolate adds texture and richness. These no-bake bites come together in minutes and offer a satisfying balance of sweet, citrusy, and chocolatey flavors.
Ingredients
- 1 cup Medjool dates, pitted
- 1 cup raw almonds (or sub with cashews for a softer bite)
- 2 tablespoons unsweetened cocoa powder
- Zest of 1 large orange
- 2 tablespoons fresh orange juice
- 1 tablespoon maple syrup (optional, depending on your dates)
- 1/2 teaspoon vanilla extract
- Pinch of salt
- 1/3 cup chopped dark chocolate (70% or higher, or mini chocolate chips)
- Extra cocoa powder or orange zest, for finishing
Instructions
- PREP THE DATES: If your dates feel dry or stiff, soak them in warm water for 10 minutes to soften. Drain them well before using.
- BLEND THE ALMONDS: Add the almonds to a food processor and pulse until they’re finely chopped but not turned into a paste. The texture should be similar to coarse meal.
- ADD THE FLAVOR: Add the dates, cocoa powder, orange zest, orange juice, maple syrup (if using), vanilla extract, and a pinch of salt to the processor with the chopped almonds.
- BLEND TO COMBINE: Process the mixture until it begins to clump together into a sticky, uniform dough. Stop and scrape down the sides of the bowl as needed to ensure everything blends evenly.
- STIR IN THE CHOCOLATE: Remove the blade from the processor and use a spatula or your hands to gently mix in the chopped dark chocolate chunks. This keeps their texture intact.
- ROLL THE BALLS: Scoop out about 1 tablespoon of the mixture and roll it between your palms to form a ball. Repeat with the remaining mixture.
- FINISH AND CHILL: Roll the finished balls in cocoa powder or sprinkle with additional orange zest for extra flavor. Place them in the fridge for 30 minutes to firm up before serving.
Notes
For best results, use soft, fresh Medjool dates. If your dates feel dry or hard, soaking them in warm water for about 10 minutes will make them easier to blend and help the mixture hold together better. Be sure to drain them thoroughly to avoid excess moisture in the final texture.
Almonds give these bliss balls a hearty, slightly crunchy texture. If you prefer a softer bite, raw cashews make a good substitute and blend more easily into a creamy base. You can also experiment with a mix of nuts if you like a more complex flavor.
The maple syrup is optional and can be adjusted depending on the natural sweetness of your dates. Taste the mixture before adding it—you may not need any added sweetener if your dates are already very rich and caramel-like.
The orange zest and juice are key to the fresh citrus flavor. Make sure to zest the orange before juicing it, and use a fine microplane for the best texture and intensity. If you want a stronger orange flavor, you can add a drop of food-grade orange extract, but it’s not necessary for a balanced taste.
Use high-quality dark chocolate (70% cocoa or higher) for the best flavor and texture. Chopping a bar by hand gives you uneven pieces that melt differently and create more interest in each bite, but mini dark chocolate chips work well too if you prefer a consistent texture.
To roll the balls more easily, dampen your hands slightly or lightly oil your palms. This keeps the mixture from sticking and helps form smooth, compact balls.
Coating the bliss balls in extra cocoa powder adds a rich outer layer, while a sprinkle of orange zest on top gives a bright visual and flavor contrast. You can also roll them in finely chopped nuts or shredded coconut for variation.
Once made, store the bliss balls in an airtight container in the refrigerator. They stay fresh for up to 1 week. For longer storage, freeze them in a single layer, then transfer to a sealed container. They’ll keep well frozen for up to 2 months—just thaw a few at a time in the fridge overnight or at room temperature for 20 minutes before eating.
Nutrition Information
Yield
16Serving Size
1Amount Per Serving Calories 119Total Fat 5gSaturated Fat 1gTrans Fat 0gUnsaturated Fat 4gCholesterol 0mgSodium 10mgCarbohydrates 18gFiber 3gSugar 14gProtein 2g