My millennial soul found comfort in the playful name. I remember giggling with my cousins because the name felt so silly. The taste, though, was serious business, thanks to the creamy center and chewy texture.
I have tried many no-bake treats, but Moose Farts stand out for their mixture of sweetness and convenience. I love recipes that do not require an oven, especially on days when I feel rushed. This recipe rarely fails, and the results remind me of gatherings filled with joy and good humor.
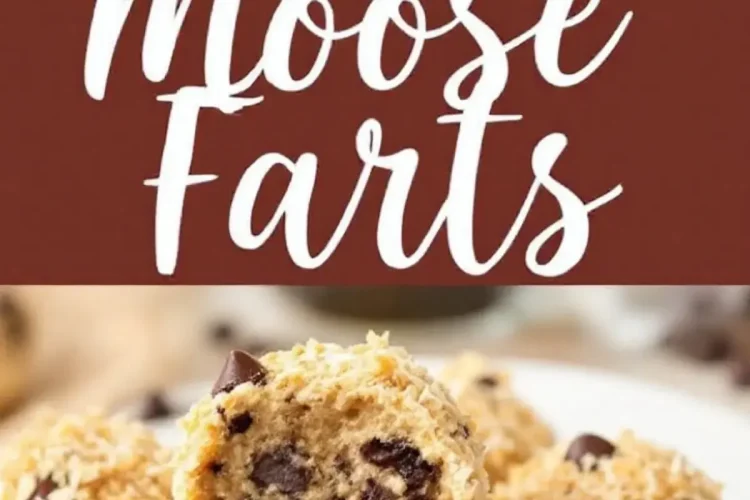
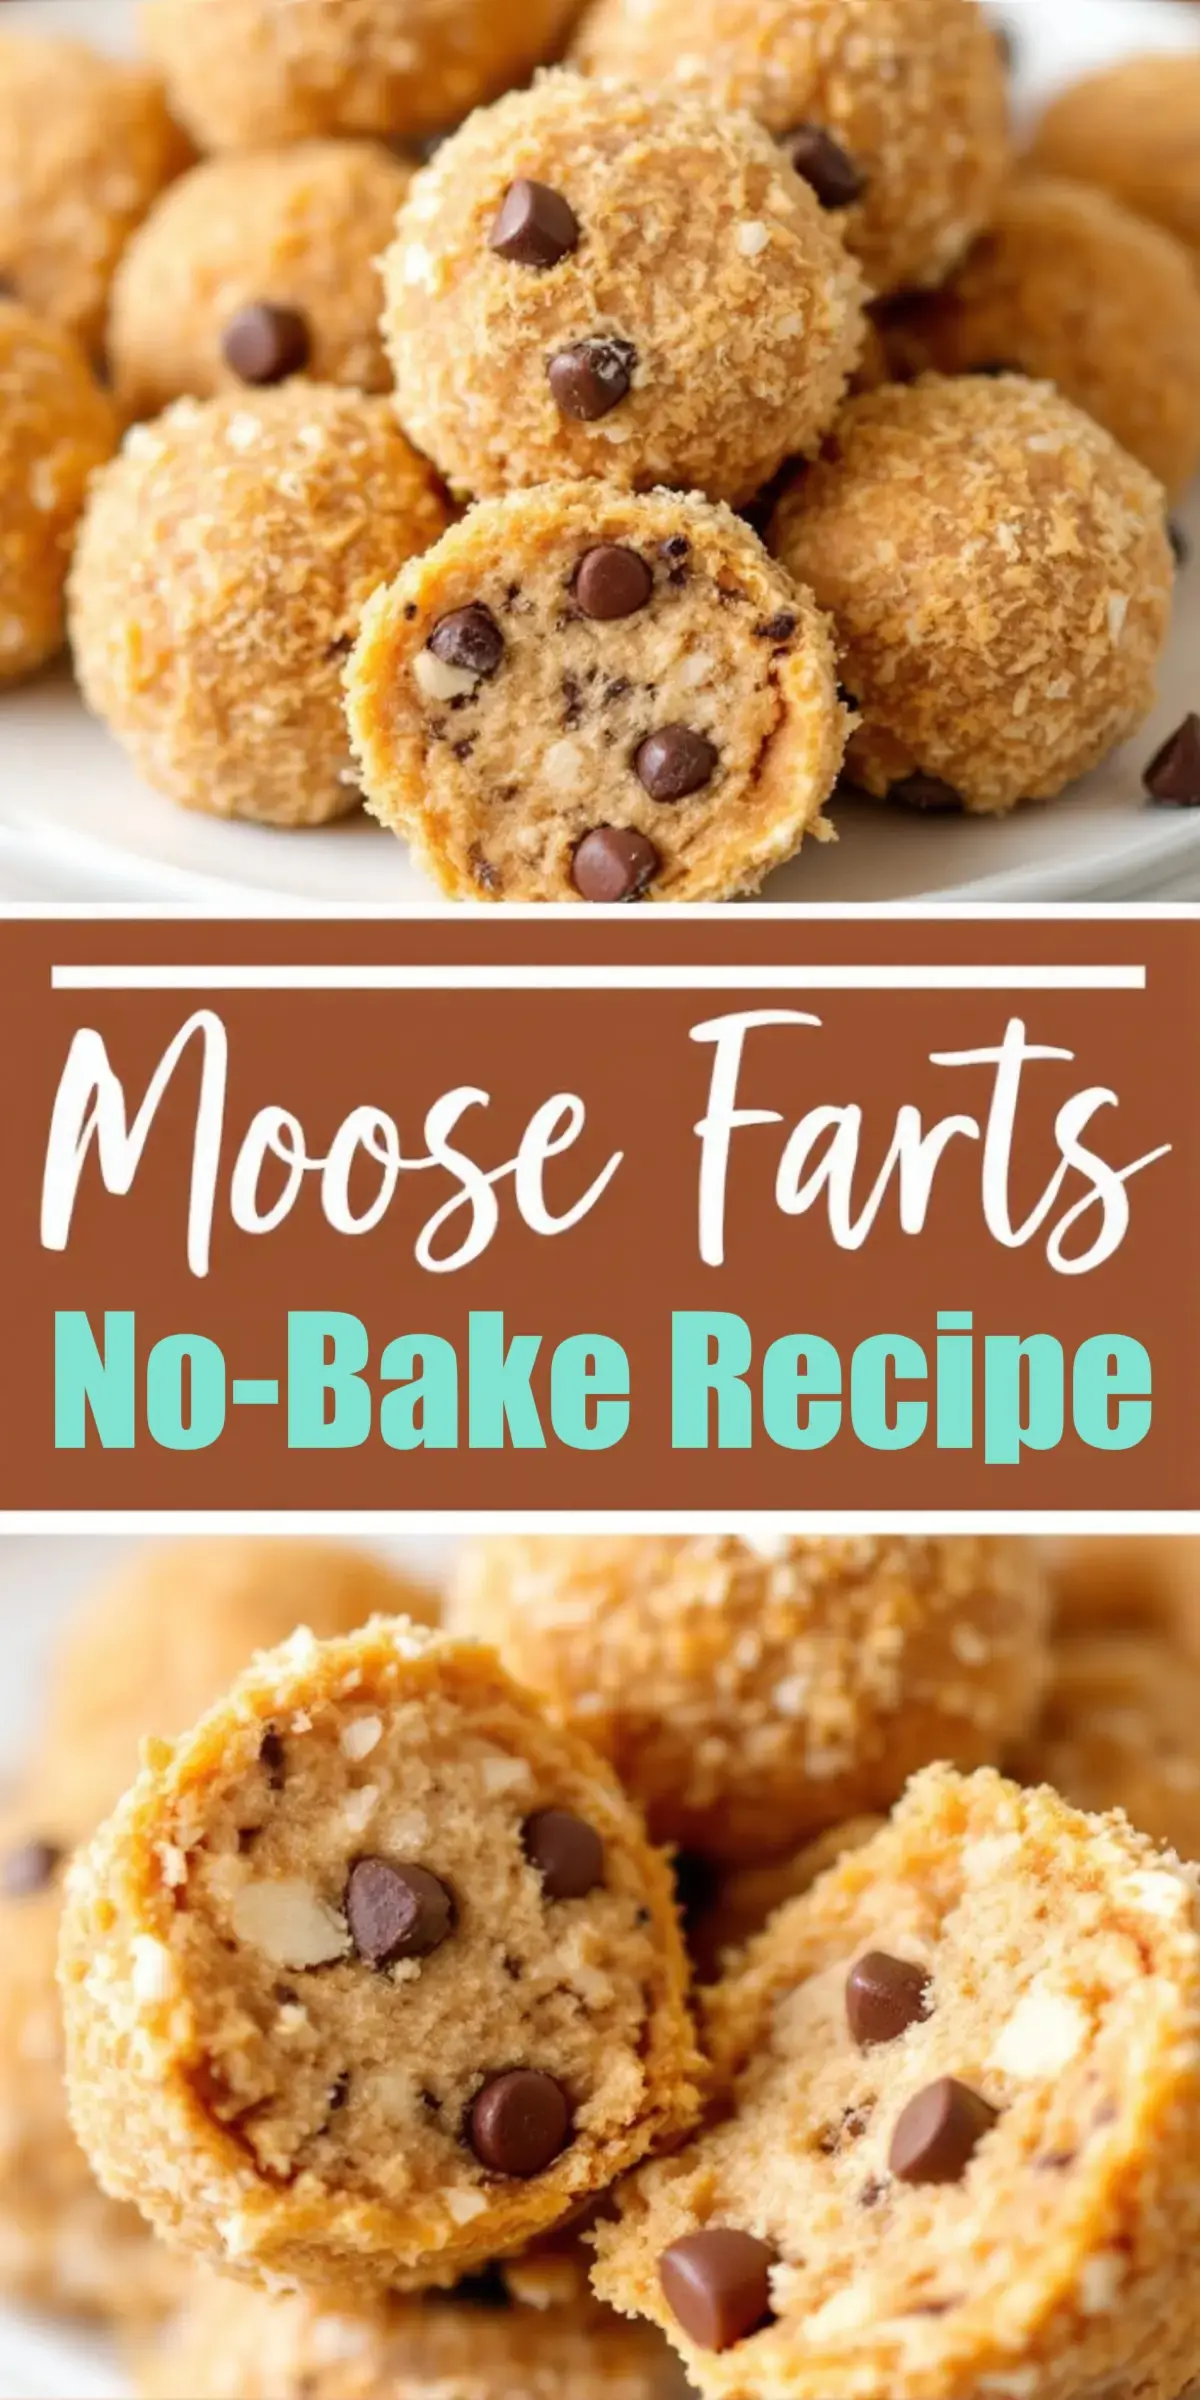
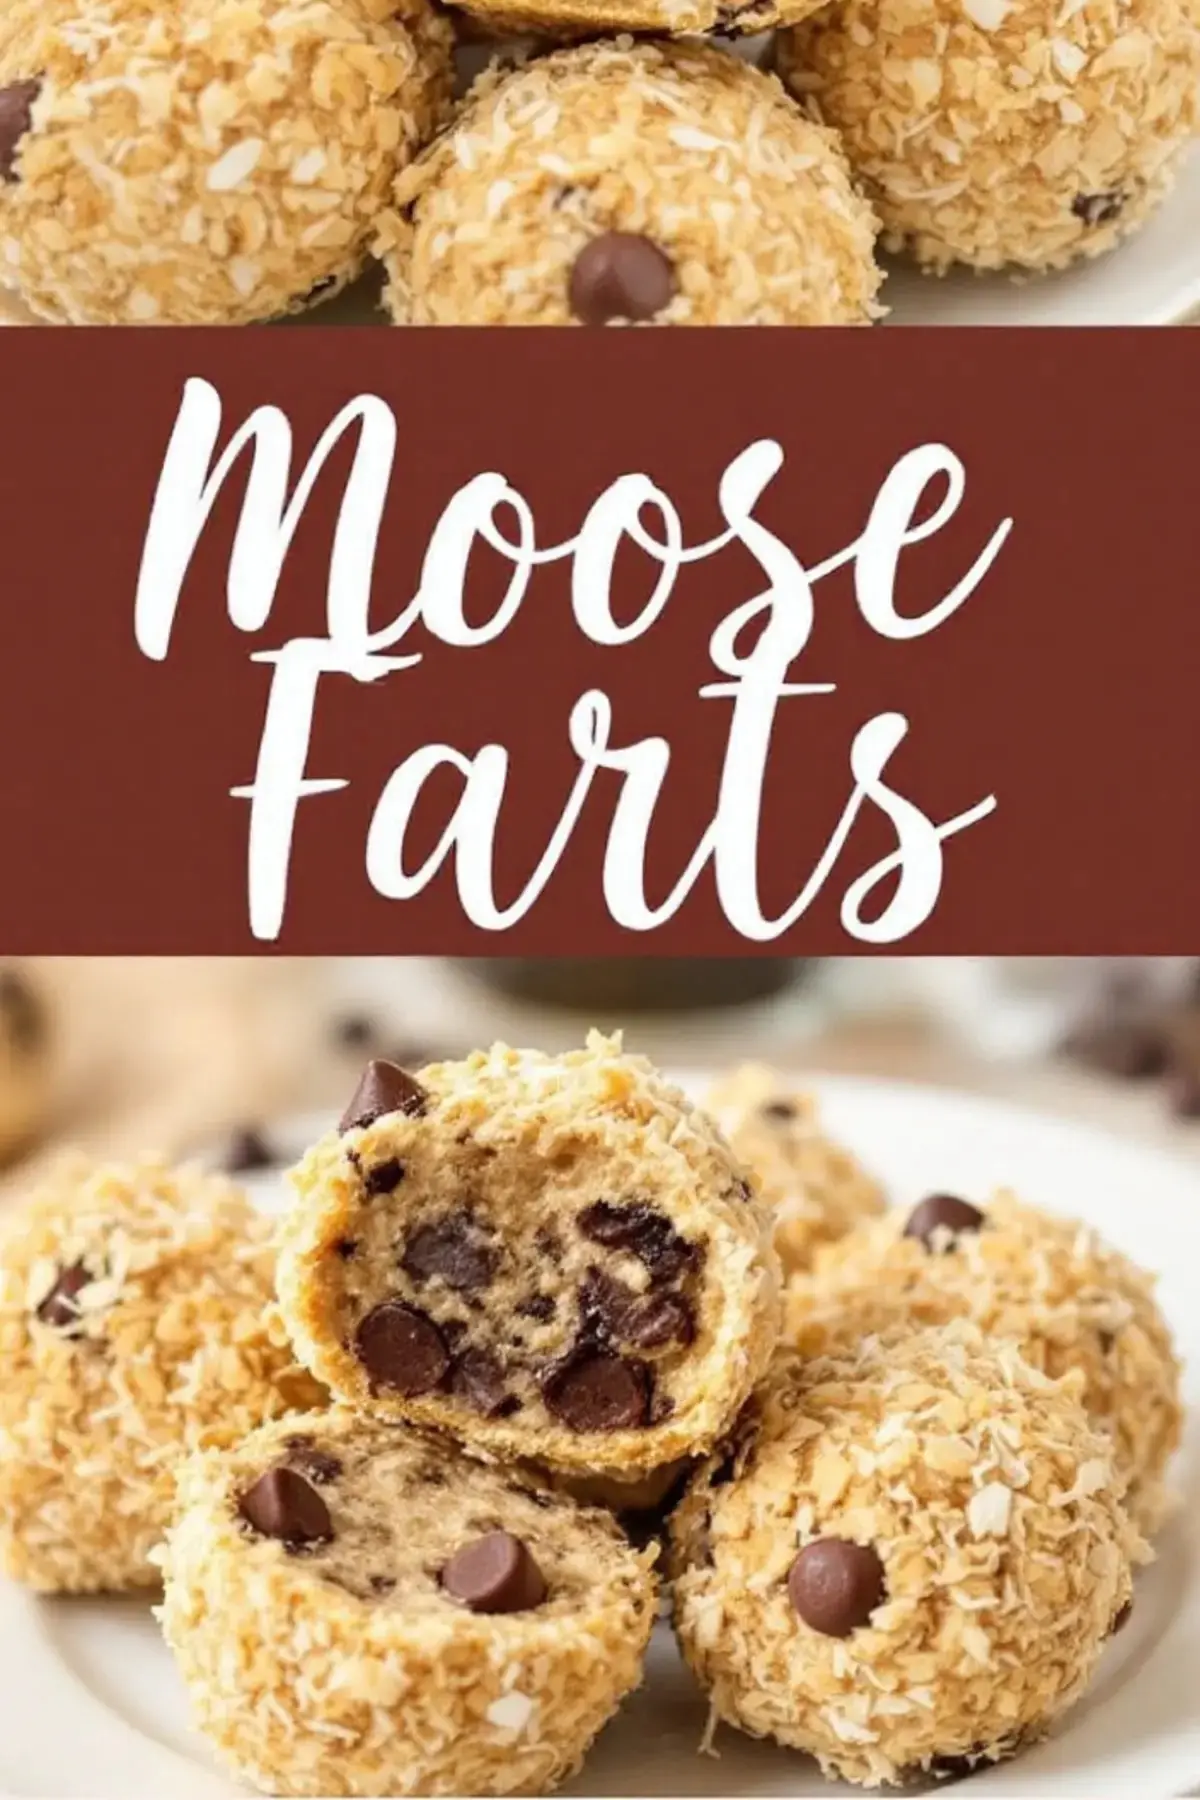
The name alone catches attention, yet the flavor seals the deal. I often serve these treats at potlucks or small get-togethers, and they vanish fast. People ask for the recipe because they crave that mix of coconut, graham, and chocolate in bite-sized pieces.
Moose Farts Ingredients That Work Together
This recipe calls for one can of sweetened condensed milk. The milk adds richness while binding the crumb mixture so it holds a firm shape. Graham cracker crumbs contribute a nutty sweetness that reminds me of classic pie crusts.
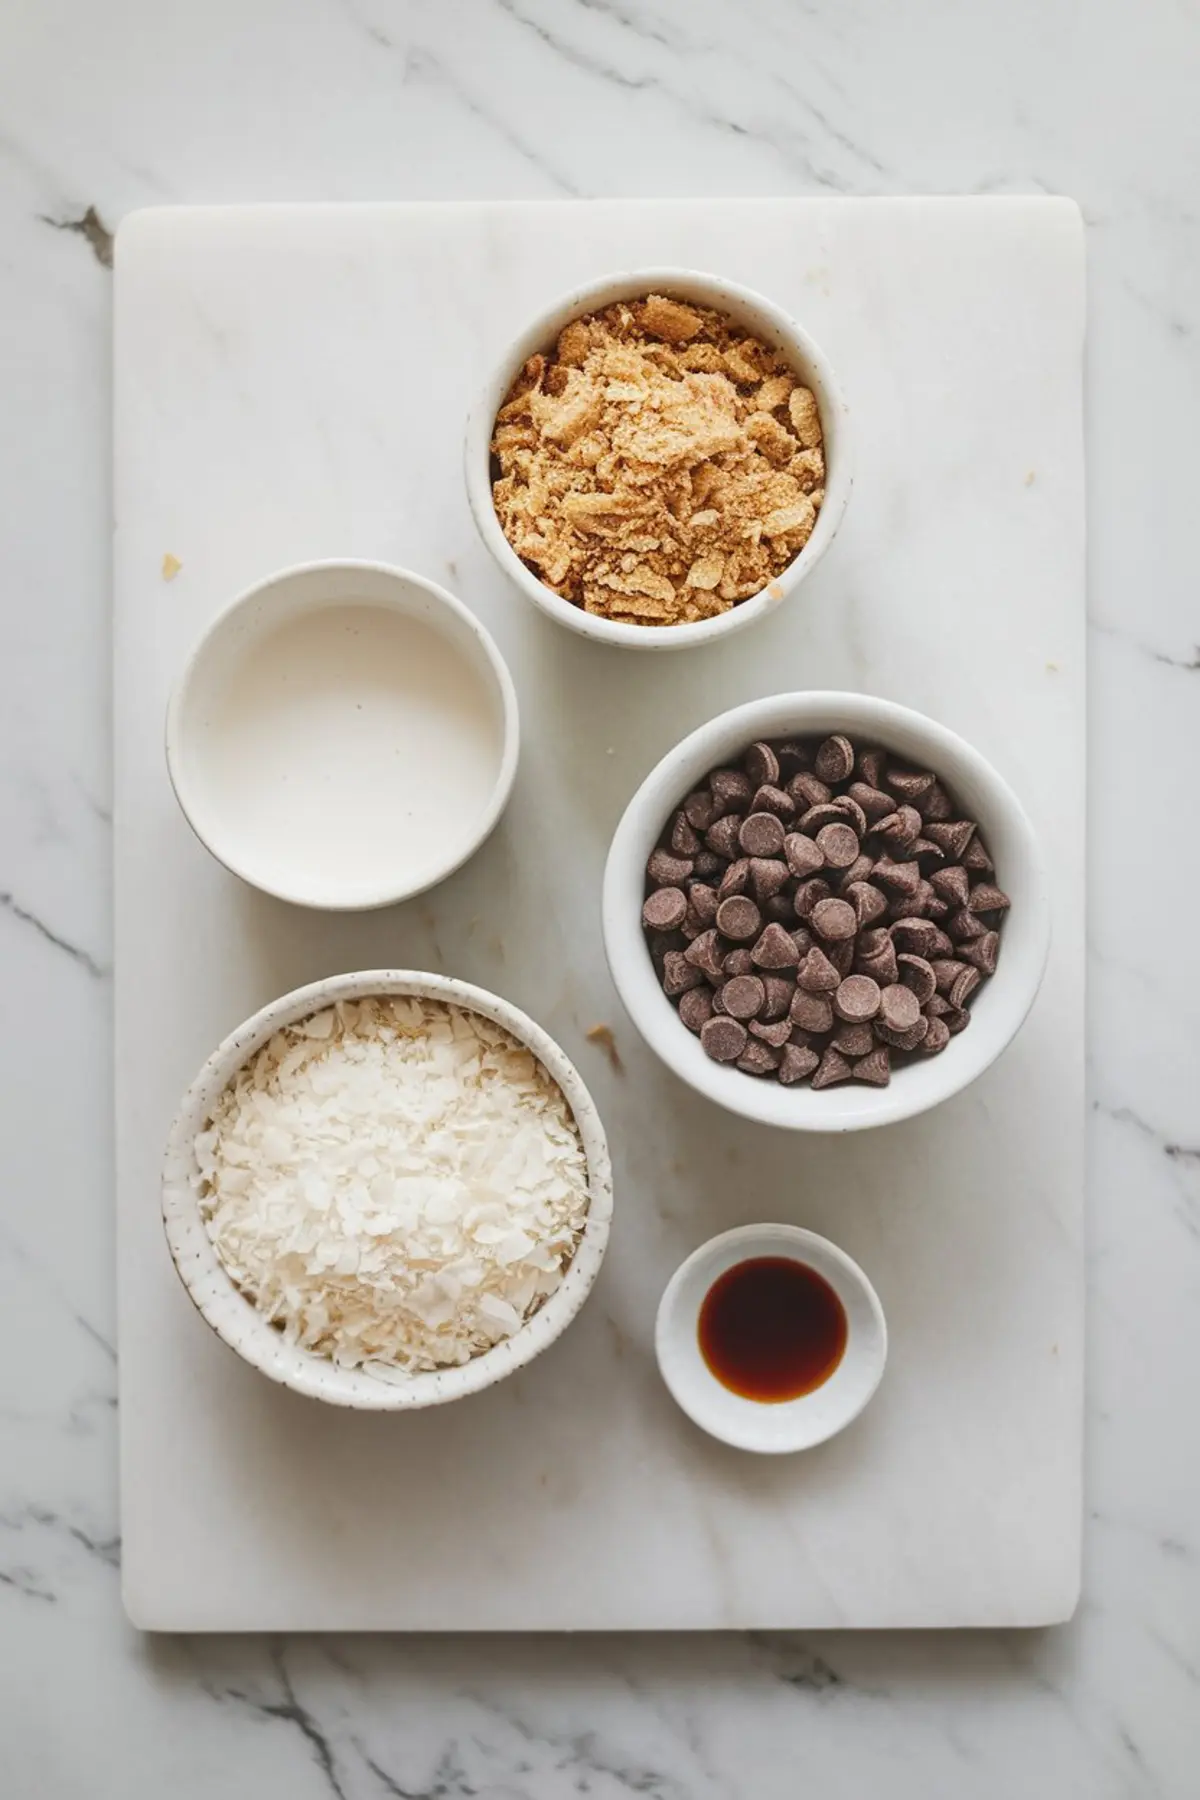
Shredded coconut boosts the flavor with a subtle tropical note. I tend to use unsweetened coconut to balance the condensed milk. Chocolate chips then bring extra sweetness, offering pockets of melting goodness that surprise the palate.
Vanilla extract rounds off the mixture with a subtle aroma. I enjoy how it layers delicate notes under the stronger flavors of graham and coconut. Each ingredient works in harmony to create a quick, fuss-free dough.
Moose Farts Steps For Quick Results
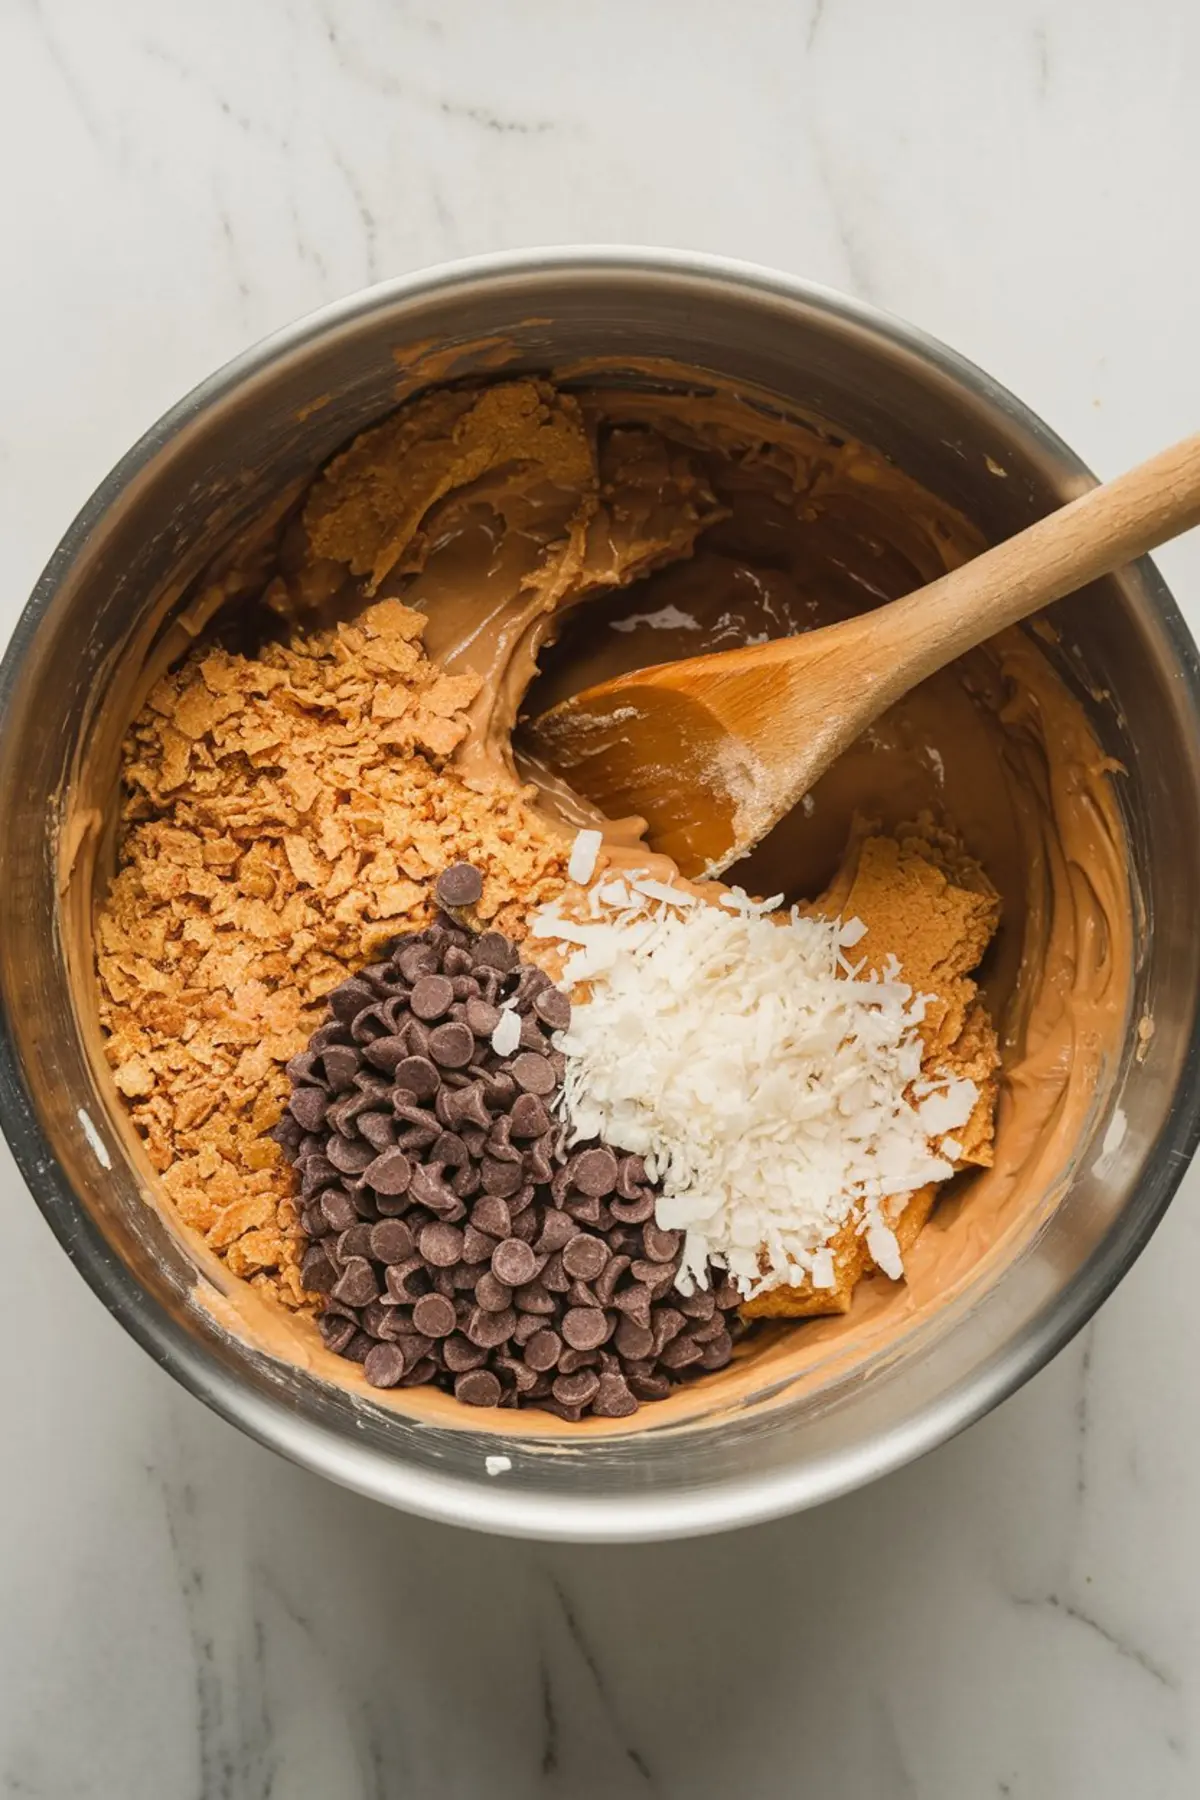
My approach starts by mixing the condensed milk, graham crumbs, coconut, chocolate chips, and vanilla in a large bowl. This brings the mixture together in under five minutes, which is perfect for someone like me who prefers easy preparation. I sometimes chill the mixture briefly if I find it too sticky.
I then shape little balls using a spoon or cookie scoop. My hands get a bit messy, but a light layer of oil or a quick chill resolves that. The final step involves rolling the balls in extra coconut to complete their shaggy, pleasing appearance.
A brief rest in the refrigerator helps these treats hold their shape. I advise at least 30 minutes of chill time, though I have left them overnight when planning ahead. They become firm yet chewy, striking a balance that suits varied preferences.
Serving And Storing Moose Farts
I like to serve these treats on a dessert platter next to fresh fruit or homemade whipped cream. A colorful plate complements their rustic look, and they stand out well beside other confections. My guests usually gravitate to them first because they combine portability and sweetness in each mouthful.
Leftovers stay fresh in an airtight container. A week is the general rule, though I rarely see them last that long in my household. Freezing them extends their shelf life, which helps when I crave a quick snack without any extra fuss.
I sometimes tuck these snacks into lunchboxes or bring them to the office for a sweet break. They also travel well to barbecues, birthday parties, or even casual movie nights. My friends love them because each ball tastes like a mini coconut-chocolate pastry without requiring a plate or utensils.
Tips From My Kitchen Adventures

I discovered that slightly chilled dough is easier to shape, especially if the day is warm. The dough holds together better, and my hands stay cleaner. Using a cookie scoop ensures consistent sizes, but you can use any small spoon if you prefer flexible proportions.
I once experimented with peanut butter chips instead of chocolate chips, and I enjoyed the result. However, classic chocolate still feels right for the iconic Moose Farts experience. Another variation involved toasted coconut on the outside, which delivered a crispier texture and a delightful roasted taste.
Moose Farts remain a great example of a recipe that merges humor with practicality. I have taught my nieces and nephews how to prepare them, which also fosters bonding in the kitchen. You can adjust the ingredients or add a dash of cinnamon if you want a warmer flavor.
Comparing Moose Farts To Other No-Bake Treats
I often crave quick desserts, so I keep a short list of no-bake options at my fingertips. A favorite is No-Bake Creamsicle Cheesecakebecause it brings the bright taste of citrus with a creamy texture. That cheesecake and Moose Farts share a love for sweetened condensed milk, but they differ in form and presentation.
I also enjoy snacking on Peanut Butter Fudge when I want something smooth and nutty. Moose Farts rely on crumbs and shredded coconut, creating a chewier bite that stands apart from fudge’s dense consistency. Both make a solid option for a dessert table, offering variety in shape and taste.
Those who appreciate fruit flavors will probably like Raspberry White Chocolate Cheesecake. White chocolate and berries create a sweet-tart blend that cuts through heavy cream. Moose Farts, by contrast, focus on coconut and chocolate in a compact shape that suits anyone seeking an easy-to-hold dessert.
Troubleshooting Sticky Dough And Other Concerns
I sometimes see dough that sticks to my palms. A quick solution is a short rest in the fridge before shaping. Greasing my hands with a thin oil film also helps maintain the correct level of moisture without compromising the flavor.
If the dough feels too dry, I trickle in a little more condensed milk. A slight adjustment brings the mixture back to a sticky but moldable state. I also keep extra shredded coconut on hand to roll the balls generously if I want a more defined outer layer.
People often worry about the sweetness factor. I find that the coconut balances the sugar well, but you can reduce the chocolate chips if you prefer. Moose Farts should taste sweet, yet they should not overpower your palate.
Personal Tricks For Presentation
I like to plate Moose Farts on a tray lined with parchment paper to prevent any sticking before I serve them. Sometimes I drizzle melted chocolate on top for an eye-catching touch. I learned that folks enjoy seeing the marbled look from a light chocolate drizzle, and it only takes a few minutes to do.
Using different types of coconut adds variety. Fine coconut flakes create a velvety finish, while coarser shreds produce a chunkier texture. The visual effect depends on personal preference, but both versions taste great.
I once dyed coconut flakes pink for a bachelorette party. Everyone laughed at the idea of pink Moose Farts, yet they devoured them in no time. These quick changes make the recipe a fun conversation piece.
Adjusting Flavors To Suit Preferences
My younger cousins sometimes ask for more chocolate chips. I add them, though I remain cautious because too many chips can offset the balance of graham and coconut. You can also try flavored extracts, like almond or coconut essence, for a small twist on the original.
On some weekends, I roll these treats in cocoa powder instead of coconut, but the flavor skews more chocolate-forward. My brother once suggested sprinkling sea salt on top for a salty-sweet bite. I appreciated the contrast, but I still love the plain coconut coating the most.
I also experimented with adding chopped nuts, like almonds or walnuts, for a crunchy element. The result offered a new layer of texture, which some guests enjoyed. The basic recipe, however, stands strong because each component aligns smoothly with the others.
Making Moose Farts A Social Dessert
This dessert works well for group activities, especially if you want everyone involved. I gather my friends or family members around the table with mixing bowls and supplies. Each person takes a role, blending or rolling, and the laughter comes easy.
Children feel proud when they shape the dough and see the final product. Adults appreciate the simplicity and short ingredient list. Conversations often spring up about possible flavor twists, leading to new ideas and cheerful collaboration.
I see this dessert as a reflection of carefree times and warm memories. I recall times when a simple sweet bite united everyone, bridging age gaps and personal tastes. Moose Farts do that by packing big flavor into small, playful balls.
Encouraging Adaptations And Sharing Success
Moose Farts welcome small changes in sweeteners or coatings. You can coat them in colored sprinkles for birthday celebrations or dip them halfway in melted dark chocolate for an elegant look. The recipe’s no-bake nature means you can adapt it without worry about oven temperature or bake times.
I suggest assembling them a day before a big event. That slight wait in the fridge allows the flavors to mingle, and the texture becomes delightfully firm. People often ask me how I came up with the name, which leads to stories of the dessert’s Canadian roots.
Feel free to be creative. I sometimes see new versions pop up on social media, and it brightens my day to watch how everyone personalizes the recipe. The process stays quick, so you gain extra time to focus on decorations or other dishes.
Share And Pin This No-Bake Moose Farts Recipe
I hope you try this lighthearted treat soon, especially if you crave a mix of coconut, chocolate, and a dash of vanilla sweetness. Pin this recipe to your favorite dessert board for easy access and come back later when you want an entertaining snack. Drop a comment if you have questions or want to share how your Moose Farts turned out.
Moose Farts Recipe

Moose Farts are a simple, no-bake treat made with sweetened condensed milk, graham cracker crumbs, shredded coconut, and chocolate chips. These bite-sized sweets come together quickly and require just a short chilling time before they’re ready to enjoy.
Ingredients
- 1 can (14 oz) sweetened condensed milk
- 2 cups graham cracker crumbs
- 1 cup shredded coconut (plus extra for rolling)
- ½ cup chocolate chips
- 1 teaspoon vanilla extract
Instructions
- MIX THE INGREDIENTS: In a large mixing bowl, combine the sweetened condensed milk, graham cracker crumbs, shredded coconut, chocolate chips, and vanilla extract. Stir everything together until it forms a thick, sticky dough.
- SHAPE THE BALLS: Using a spoon or small cookie scoop, take portions of the dough and roll them into bite-sized balls. If the dough is too sticky, lightly grease your hands or chill the mixture for 10–15 minutes before rolling.
- COAT WITH COCONUT: Roll each ball in additional shredded coconut to coat them evenly.
- CHILL AND SERVE: Place the coated balls on a baking sheet lined with parchment paper. Refrigerate for at least 30 minutes to firm up before serving.
Notes
If the dough is too sticky to handle, chilling it for 10–15 minutes makes rolling easier.
Lightly greasing your hands can help prevent the mixture from sticking while shaping the balls.
Store leftovers in an airtight container in the refrigerator for up to a week or freeze for longer storage.
Nutrition Information
Yield
24Serving Size
1Amount Per Serving Calories 69Total Fat 3gSaturated Fat 2gTrans Fat 0gUnsaturated Fat 1gCholesterol 1mgSodium 45mgCarbohydrates 10gFiber 1gSugar 6gProtein 1g
I wish I had seen your recipe first. I made them exactly as described. I noticed that the recipe I made called for rolling the balls in ground graham crackers. Your recipe suggest rolling them in coconut. Mine came out soggy in the middle.
It is not supposed to be that way based on what I researched. Do you think I could put them in the freezer or what? I am not comfortable with having my family eat sticky dough. Next time I am making your recipe! Please advise.
Hi Lizzy, I really appreciate you sharing this. I’ve definitely had a few recipe swaps go sideways before too, it’s frustrating when they don’t set properly. The soggy middle might be from too much moisture or not enough chilling time. My version uses shredded coconut both inside and out, which helps balance the texture and keeps them from getting overly dense.
You’re absolutely on the right track with freezing. A short chill in the freezer (about 20–30 minutes) or a longer rest in the fridge usually firms them up nicely. If the dough still feels too sticky, I sometimes let it sit uncovered in the fridge for a bit before shaping. It helps the outside dry just enough to make them easier to roll.
I’d love to hear how they turn out if you try my version next time! 🧡
Thanx for this amazing recipe. Greetings from sweden.
Thank you so much for the kind message, Anders. It means a lot to hear that you enjoyed the recipe. Sending greetings back to Sweden!
Does this call for sweetened or unsweetened coconut? Sweetened is easiest to find, but it doesn’t say sweetened in the recipe. All the recipes I find just assume you know. Please specify!
Sorry I went back and read the part above the recipe and you said unsweetened. Feel free to delete my comment. However, it would still be helpful to say unsweetened in the ingredients so no one has to search for that information.
Everything is OK 🙂
Can I use cinnamon graham crackers or chocolate graham crackers instead of regular. ???
Yes, Maru Ellen, you can use either one, and it really depends on the flavor you’re going for 😊 I’ve made them with chocolate graham crackers before and they came out extra rich, almost like a no-bake brownie vibe. If you go with cinnamon, it adds a subtle warmth that actually works well with the sweetness from the marshmallows and coconut. Both are solid options if you’re looking to switch things up a little.