
There’s a moment in December when the pace finally slows. For me, it usually arrives after the presents are wrapped and the fridge hums with leftovers. That’s when I reach for my notes and make this eggnog custard pie. It doesn’t shout like frosted cookies or shimmer like a sugared bundt. Instead, it settles on the table quietly—cool, creamy, and calm.
This pie leans into the flavor of holiday eggnog without overwhelming it. It holds a soft spiced custard in a flaky shell, no oven needed beyond the crust. If you’ve ever wondered how to turn store-bought eggnog into a chilled Christmas dessert, this is it. You’ll learn how to build a silky filling without splitting the yolks, why full-fat eggnog makes all the difference, and how to chill the pie just long enough for clean slices.
You won’t need fancy tools or complicated steps. You just need a pan, a whisk, and the right rhythm.

Following a special diet?
Every recipe on this site can be converted to gluten-free, vegan, dairy-free, keto, nut-free or egg-free with adjusted ratios so nothing falls flat.
Try the Recipe Converter →Eggnog Custard Filling: Why Texture Begins with the Right Base

I’ve made this pie with both homemade and store-bought eggnog. My favorite version uses full-fat store-bought, the kind sold in cartons near the milk during the holidays. It gives the custard more body and flavor. Reduced-fat versions tend to break during cooking and set too loosely.

In the saucepan, cornstarch and sugar bind the filling. Nutmeg adds the familiar warmth. Don’t skip the salt—it balances the sweetness and deepens the flavor. The egg yolks, once tempered, give the custard its signature creaminess.
Tempering is a step worth mastering. If the eggnog is added too fast or too hot, the yolks scramble. If you pour slowly, whisk constantly, and keep your eye on the pot, the mixture will thicken gradually and reliably.
The filling finishes with butter and vanilla. I add the butter off-heat, letting it melt into the custard for a smooth, glossy finish. This step softens the texture and rounds the edges of the flavor, making it feel like a true custard rather than a pudding.

If you enjoy custard-style pies, this one shares a similar approach to my buttermilk pie, though the eggnog makes it colder, creamier, and more seasonal.
The Crust: One Decision That Changes Everything
You can use a homemade crust or a frozen deep-dish shell. I’ve tried both. If time allows, I prefer blind-baking a homemade buttery shell. It holds up better under a cold filling, and the flavor is richer.
But when I’m hosting or juggling prep for other dishes, a quality store-bought crust gets the job done. Just make sure it’s fully baked and cooled before pouring in the warm filling. A soft crust makes it harder to slice.
In my notes, I’ve tested the filling in a graham cracker crust as well. It works, but the flavor competes with the custard’s subtle eggnog taste. I always come back to a traditional pastry crust for balance.
You can use this same pre-baked shell technique with chilled pies like this coconut cream pie, which follows a similar make-ahead structure.
The Cooling Process: Setting the Pie without Cracks or Skin
After cooking the custard, I pour it warm into the cooled crust. A small offset spatula helps spread the surface smooth. Don’t skip the step where you tap the pie gently on the counter. That releases air bubbles and prevents pockmarks on top once chilled.
Cover the surface of the pie directly with plastic wrap. This contact prevents a rubbery skin from forming. Let the pie rest in the fridge for at least four hours. I usually make it the night before and serve it the next day.
It sets up sliceably firm but stays soft and custardy. If you’ve struggled with overly gelatinous pies in the past, this one finds that in-between texture: not stiff, not loose, just creamy enough to hold shape.
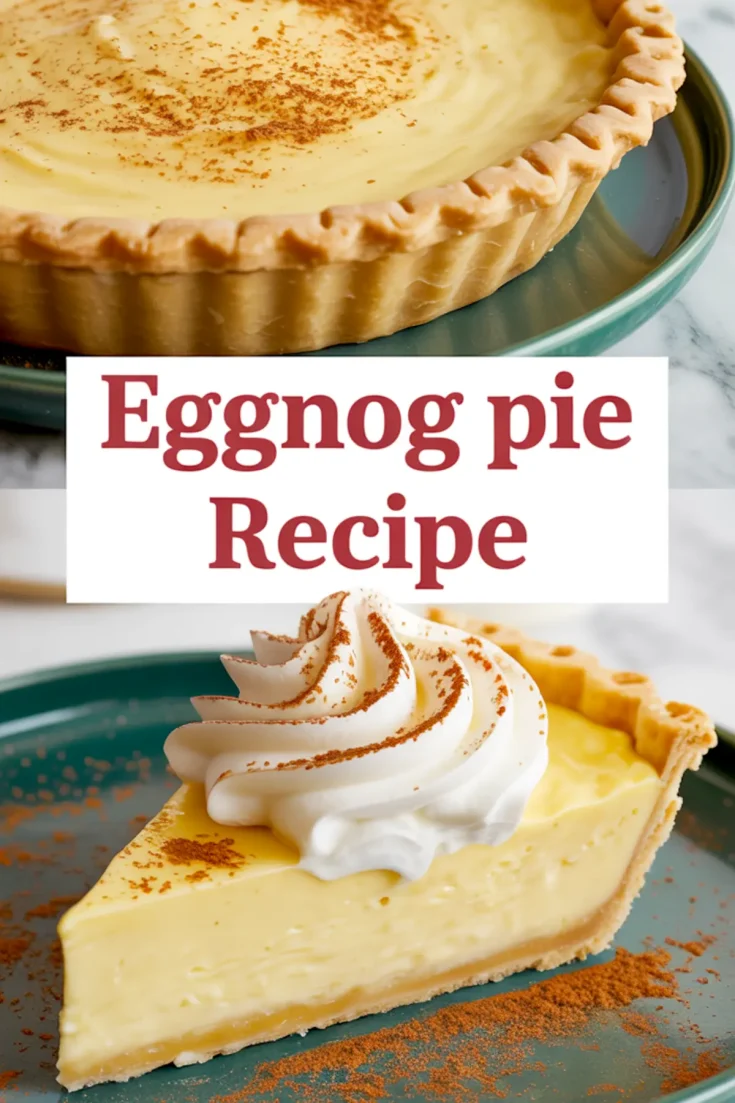
Garnish and Serving Notes: Subtle Touches Make It Festive

Just before serving, I dust the surface with nutmeg. Sometimes cinnamon, depending on the day. A swirl of whipped cream on top adds height and contrast.
Slice it with a clean knife, wiping between cuts for neat servings. This pie holds well on a dessert table and always gets noticed once it’s plated. It stands quietly between the banoffee pie and the cookies but often disappears first.
For a simple December gathering, serve it with hot coffee or chai. For a larger table, place it alongside a tray of Christmas pies recipes so each guest can try something different.
How to Store and Make Ahead Without Compromising Texture
This eggnog pie holds beautifully in the fridge for up to 2 days. Keep it covered with plastic wrap pressed to the surface. Avoid adding whipped cream until just before serving.
I don’t recommend freezing. The custard can separate slightly, and the texture loses its creaminess once thawed.
You can prepare the crust and filling separately, then assemble a few hours before serving. That’s helpful if you’re working through several holiday recipes at once. It’s the same make-ahead method I use with other chilled pies like banana cream or my coconut version.
Final Notes and Pin Reminder

Eggnog Pie sits in a quiet category of holiday desserts. It doesn’t rely on decoration or drama. It just tastes the way December feels—cool, spiced, and calm.
Save this recipe to your Pinterest board so you can find it again next season.
And if you make it, I’d love to hear how it turned out. Drop a note in the comments and let me know if you made any tweaks or added your own holiday touch.
Eggnog Pie Recipe
Creamy eggnog pie blends the nostalgic flavor of traditional holiday eggnog with a smooth, spiced custard filling inside a buttery, flaky crust. This chilled pie is simple to prepare and perfect for making ahead. The cool custard sets beautifully in the refrigerator, and a dusting of nutmeg on top adds a festive touch.
Ingredients
- FOR THE CRUST
- 1 9-inch deep-dish pie crust (homemade or store-bought, pre-baked)
- FOR THE FILLING
- 2 cups eggnog (store-bought or homemade, full-fat for best results)
- 1/2 cup granulated sugar
- 1/4 cup cornstarch
- 1/4 teaspoon salt
- 1/4 teaspoon ground nutmeg (plus extra for garnish)
- 4 large egg yolks
- 1/2 cup heavy cream
- 1 teaspoon vanilla extract
- 2 tablespoons unsalted butter
- OPTIONAL TOPPING
- Whipped cream (store-bought or homemade)
- Extra ground nutmeg or cinnamon for dusting
Instructions
STEP 1: PREPARE THE EGG MIXTURE (NO HEAT YET)
In a medium mixing bowl, whisk together the egg yolks, granulated sugar, and cornstarch until the mixture becomes pale in color, thick in texture, and completely smooth. Keep this bowl off the heat and set it aside. Do not add the eggnog at this stage.
STEP 2: WARM THE EGGNOG MIXTURE
In a medium saucepan, combine the eggnog, heavy cream, nutmeg, cinnamon, and salt. Place the saucepan over medium heat and stir constantly. Heat until the mixture is warm and steaming but not boiling. No bubbles should break the surface. This process usually takes 5 to 7 minutes. If the mixture boils, remove it from the heat immediately to prevent egg curdling.
STEP 3: TEMPER THE EGGS
Remove the saucepan from the heat. While whisking the egg yolk mixture continuously, slowly pour in ½ cup of the warm eggnog mixture using a thin, steady stream. Keep whisking the entire time to gently raise the temperature of the eggs. The mixture should feel warm and remain smooth.
STEP 4: THICKEN THE CUSTARD
Pour the tempered egg mixture back into the saucepan with the remaining eggnog mixture. Whisk until fully combined. Return the saucepan to medium-low heat and cook while whisking constantly for 5 to 8 minutes. The custard is ready when it thickens and coats the back of a spoon with a smooth, pudding-like consistency. Remove from heat and whisk in the vanilla extract.
STEP 5: FILL AND BAKE THE PIE
Preheat the oven to 350°F (175°C). Pour the custard into the unbaked pie crust and gently smooth the surface. Bake for 40 to 45 minutes, until the center is set but still slightly jiggly. Allow the pie to cool completely at room temperature, then refrigerate for at least 4 hours before slicing.
Notes
Use full-fat eggnog for the best creamy texture. The pie can be made a day in advance and stored covered in the refrigerator. Avoid overcooking the filling, as it can curdle if left on the heat too long.
Nutrition Information
Yield
8Serving Size
1Amount Per Serving Calories 325Total Fat 17gSaturated Fat 7gTrans Fat 0gUnsaturated Fat 9gCholesterol 162mgSodium 237mgCarbohydrates 35gFiber 1gSugar 18gProtein 8g
I’m so annoyed . I printed your recipie . It doesn’t tell how to temper eggs . Just says to do it . Doesn’t say warm up eggnog. Do you mix the dry with it then warm. It’s not clear so I’m trying to follow YOU . I should have went with my gut . . Go adjust that . I’m in pissed . Im following your directions and your missing that step .
Hi Kim! Thanks for pointing that out. I’ve gone ahead and updated the recipe to include the full tempering step with clearer instructions. You were absolutely right—it needed to be explained better. I really appreciate you taking the time to call it out.
How much heavy cream are we supposed to add to the filling? I cannot find anywhere where it says how much. It’s not on the ingredient list, but it is on the directions? HELP!!
You’re right—that step needs to be clearer. The filling should have ½ cup of heavy cream added. I’ve updated the recipe to include it in the ingredient list. Thanks for catching that and letting me know.
How much heavy cream
1/2 cup
Hi, there are discrepancies between your ingredients and directions in the actual recipe—such as saying to add heavy cream in the directions, but it’s not in the ingredients. You don’t say to add the butter in the recipe directives, but it’s in the ingredients and in your introductory blurb. It’s further a bit more confusing as the directions are for baking, but the blurb indicates pre-baking the crust and just cooling the mixture in the fridge—which I see is an alternative option, but it isn’t super clear if that’s just for the alternative or if that’s the actual method. And the photo you have of the ingredients doesn’t look like it’s for this recipe—I was trying to use that to reference ingredients with the heavy cream issue, and realized that it doesn’t fully match the ingredients regardless (something that looks like brown sugar, no corn starch).
I cross referenced with a similar recipe and I think it’ll turn out fine, but in definitely had some panic with the discrepancies. I think it’s a good recipe likely, just since things need to be cheated with directions and what not.
Hi Paige, I really appreciate you pointing this out. You’re right about the inconsistencies, and it’s my fault for not catching them before posting. The heavy cream is supposed to be there and used when warming the eggnog. The butter should be stirred in at the end with the vanilla, and I missed adding that to the steps.
The confusion around baking vs. chilling is also valid. The recipe originally started as a chilled version, but after more testing, I went with the baked method because it holds up better. I didn’t clarify that shift well at all.
And you’re totally right about the ingredient photo not matching. That was from an earlier version and should have been updated.
Thanks again for catching all of that. I’ll be cleaning it up so others don’t run into the same issues. I hope your pie still turned out alright in the end
The amount of heavy cream is not in the ingredients
1/2 cup