
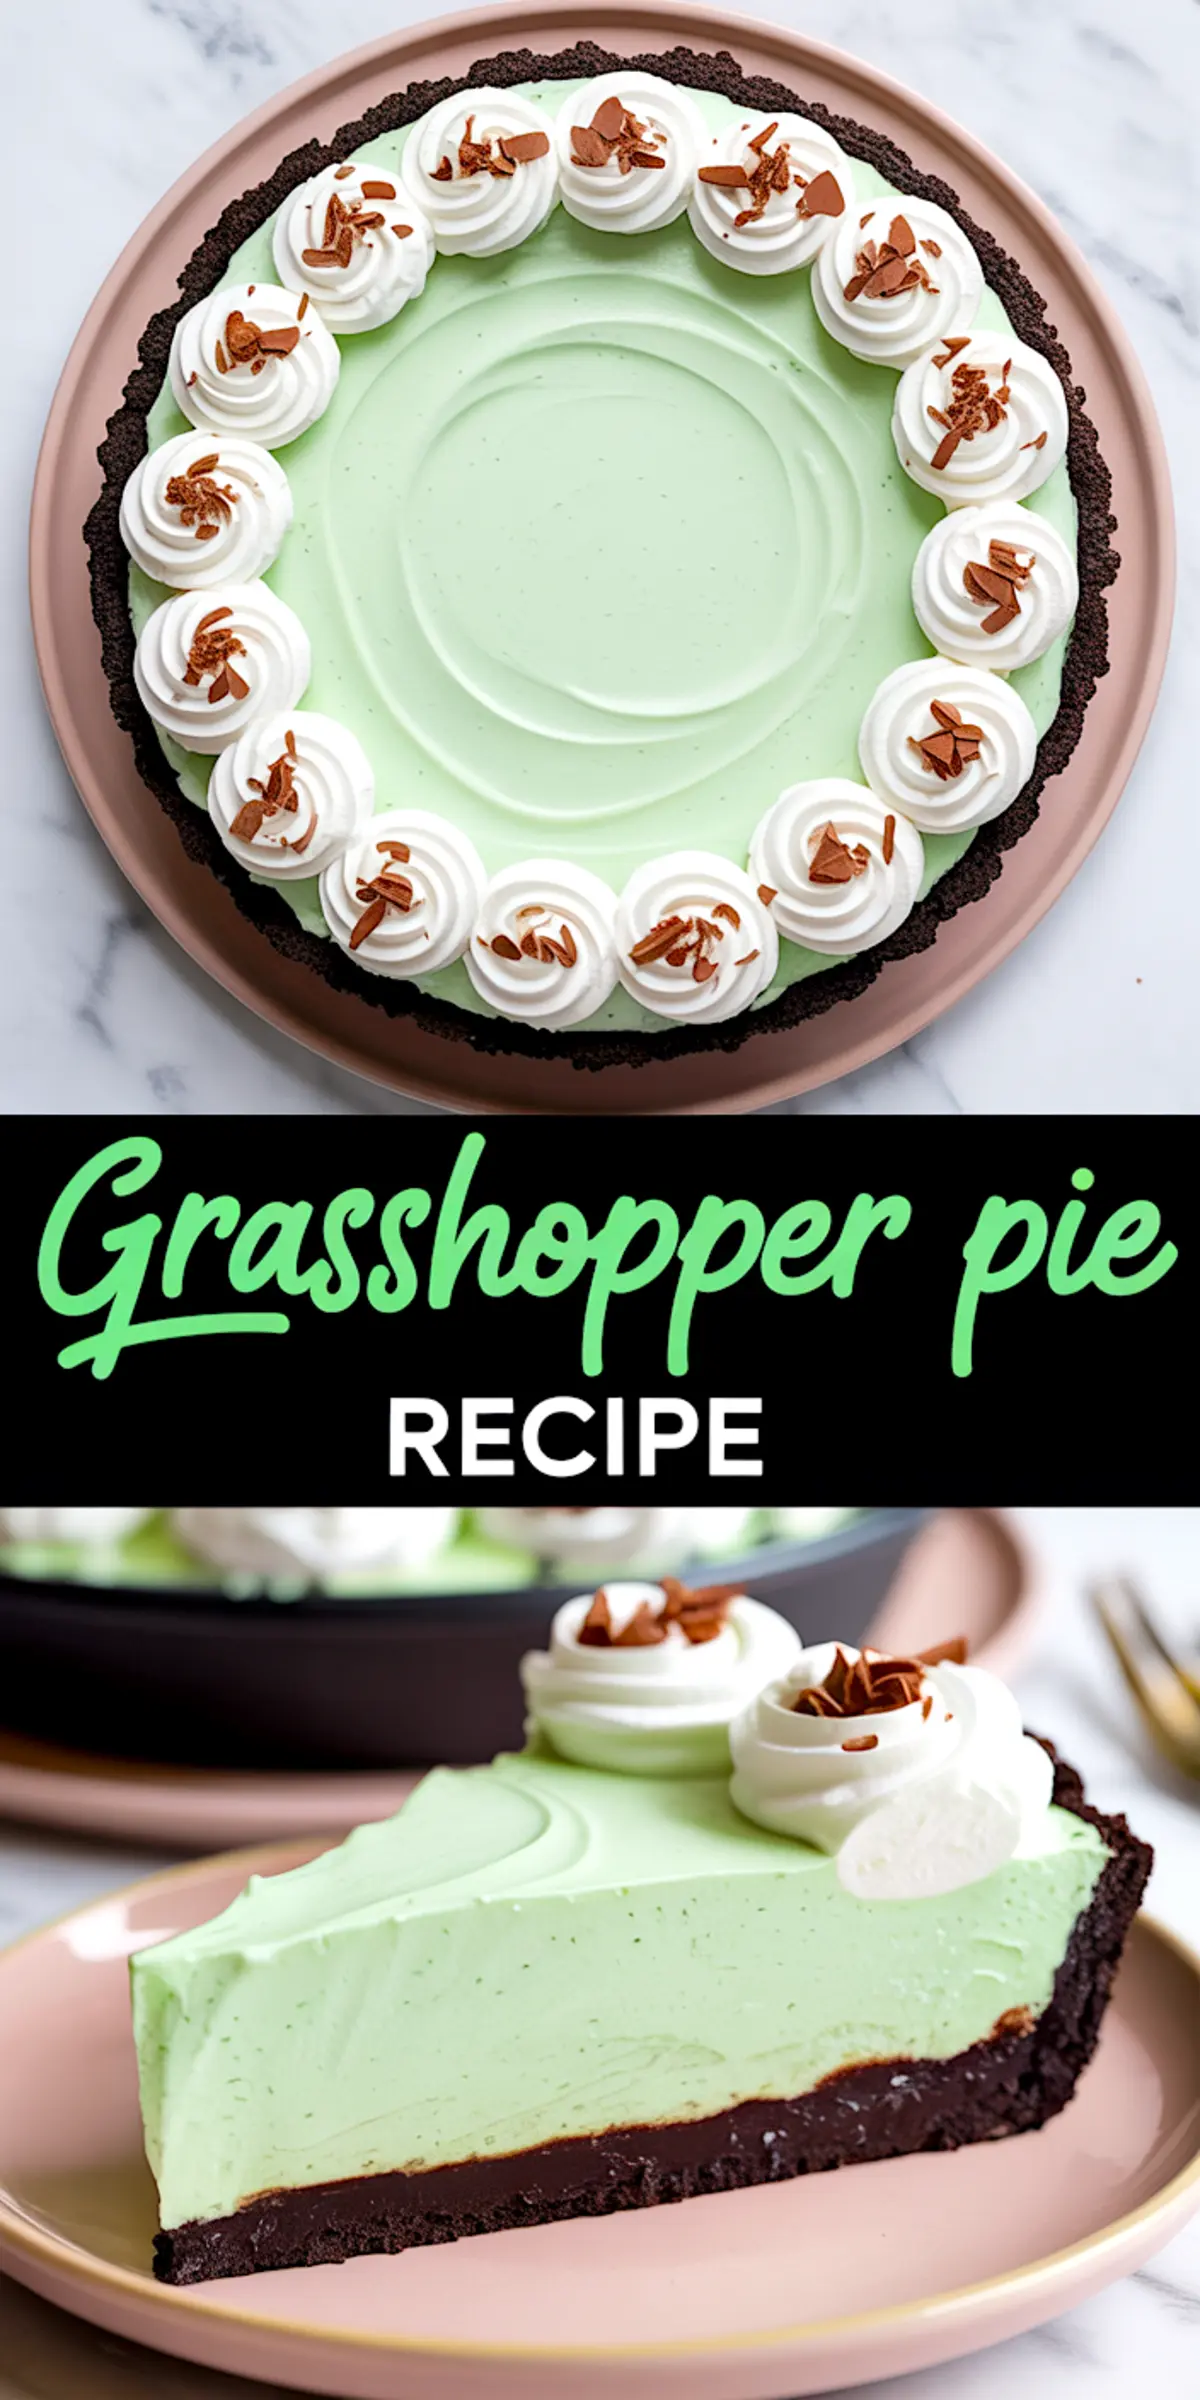
There’s a reason Grasshopper Pie has stayed in my recipe notebook all these years. This no bake mint pie balances lightness and richness in a way that feels both nostalgic and fresh.
You get a cool, mousse-like filling with a soft chocolate crust that slices like a dream. It’s one of those quick easy desserts that you can assemble without stress, chill overnight, and bring to the table with confidence.
This version includes a chocolate ganache layer under the filling. It adds a slight bitterness that helps the mint filling shine, especially after a long chill. You’ll get step-by-step guidance, a smart substitution if you’re skipping the liqueurs, and a practical comparison that might just change how you build your pie base next time.
By the end of this post, you’ll know how to create the cleanest slices, how to store it for surprise guests, and how to choose between two popular crust options I’ve tested more times than I can count.
Following a special diet?
Every recipe on this site can be converted to gluten-free, vegan, dairy-free, keto, nut-free or egg-free with adjusted ratios so nothing falls flat.
Try the Recipe Converter →Why This Grasshopper Pie Recipe Works So Well
This isn’t a frozen brick.
The texture stays soft, even straight from the fridge. That’s the combination of whipped cream folded into a stabilized cream cheese mixture, flavored with crème de menthe and white crème de cacao. The gelatin helps it hold shape without turning rubbery.
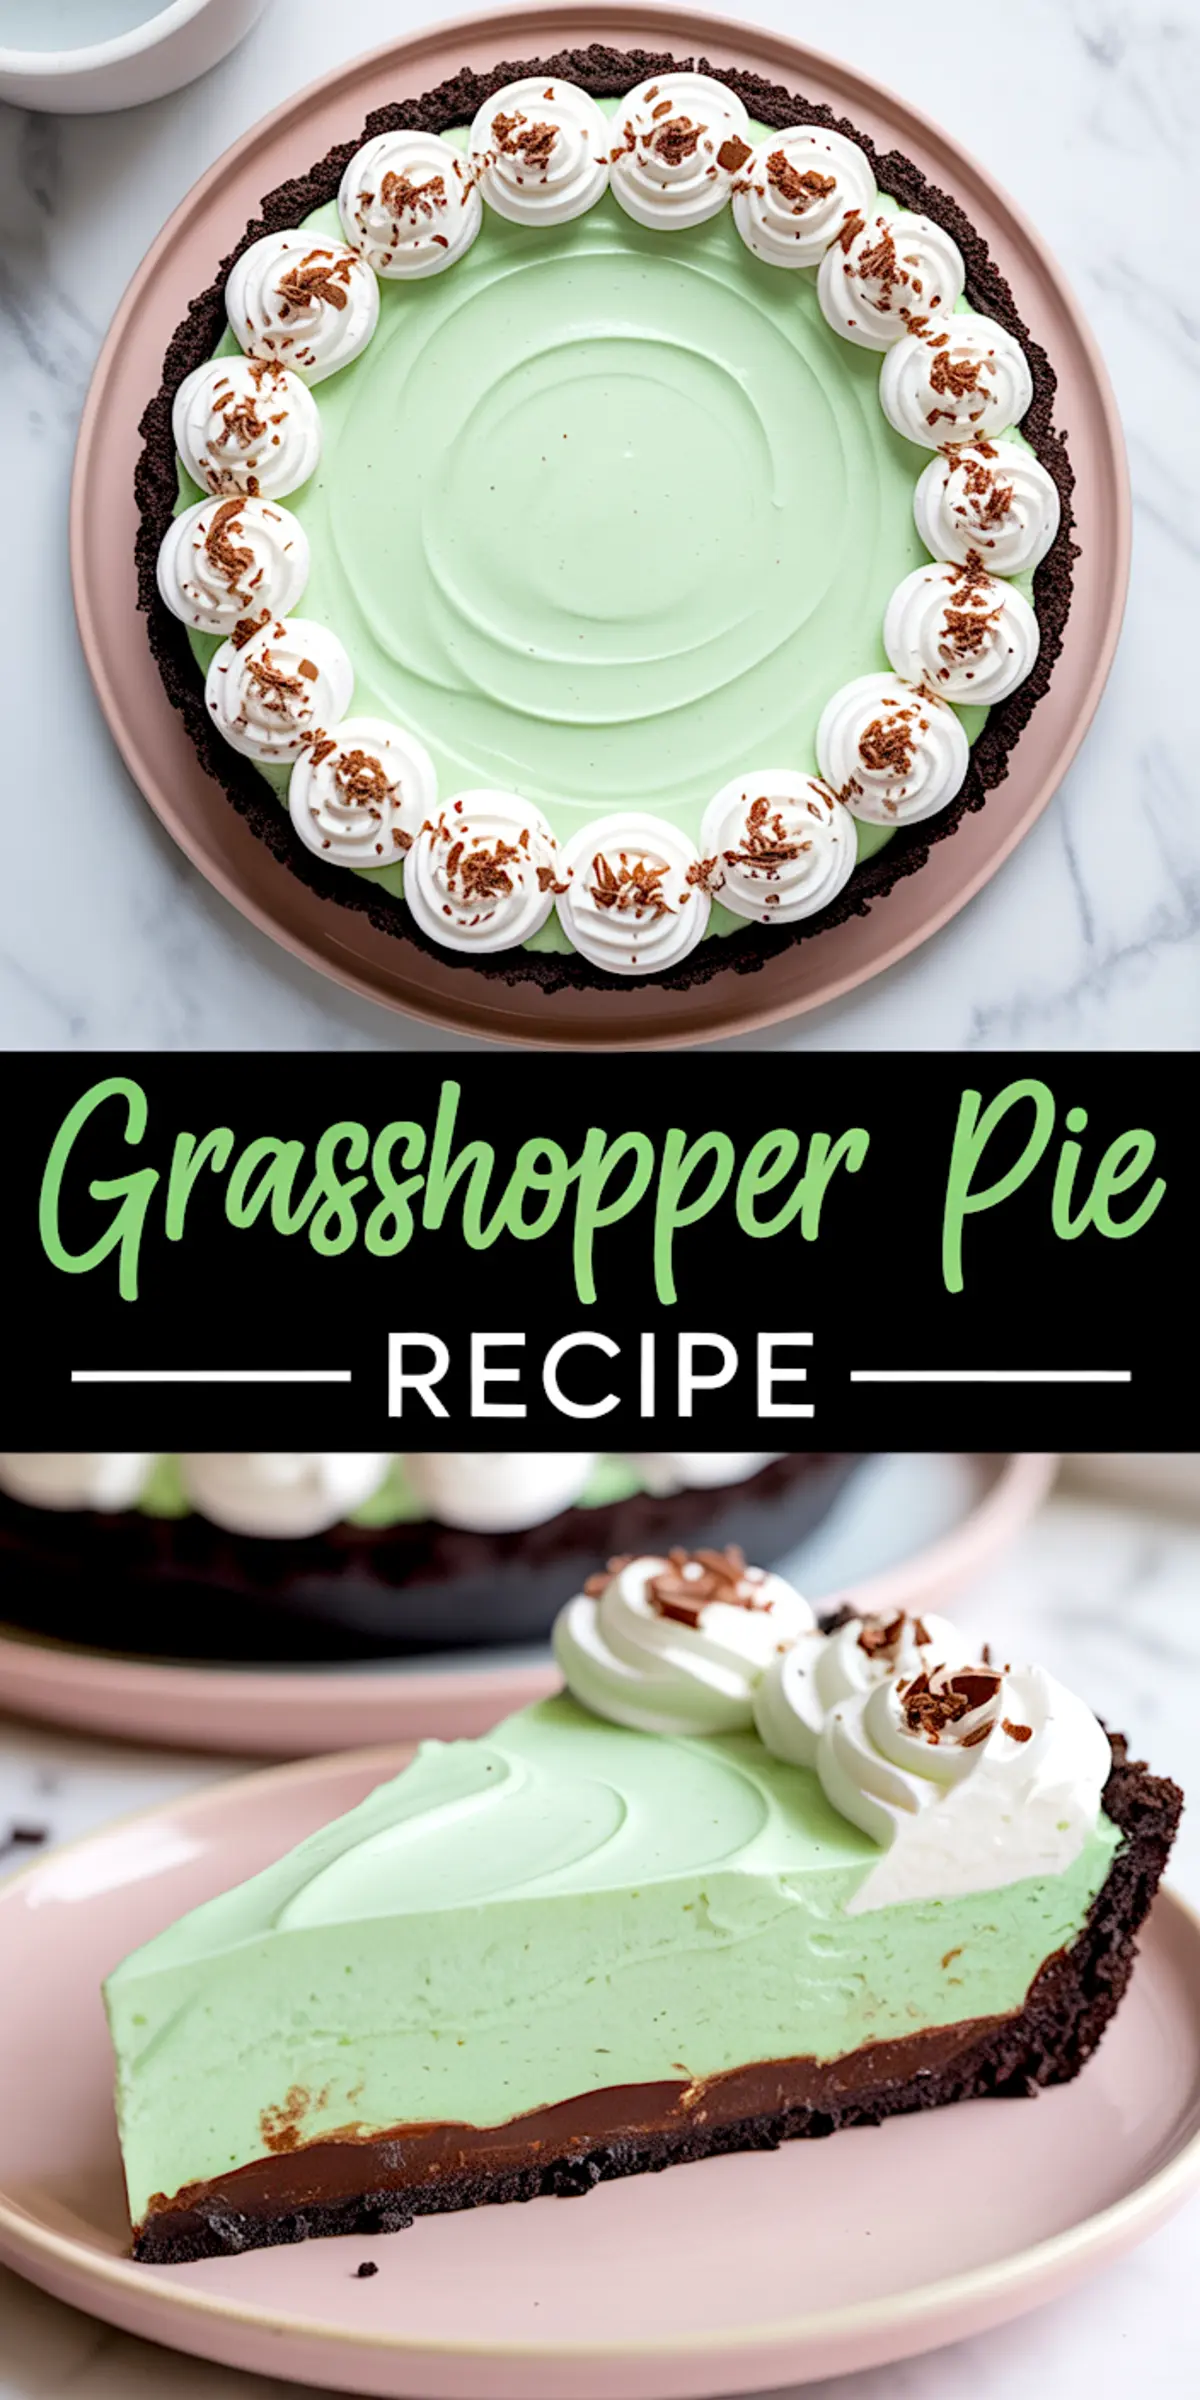
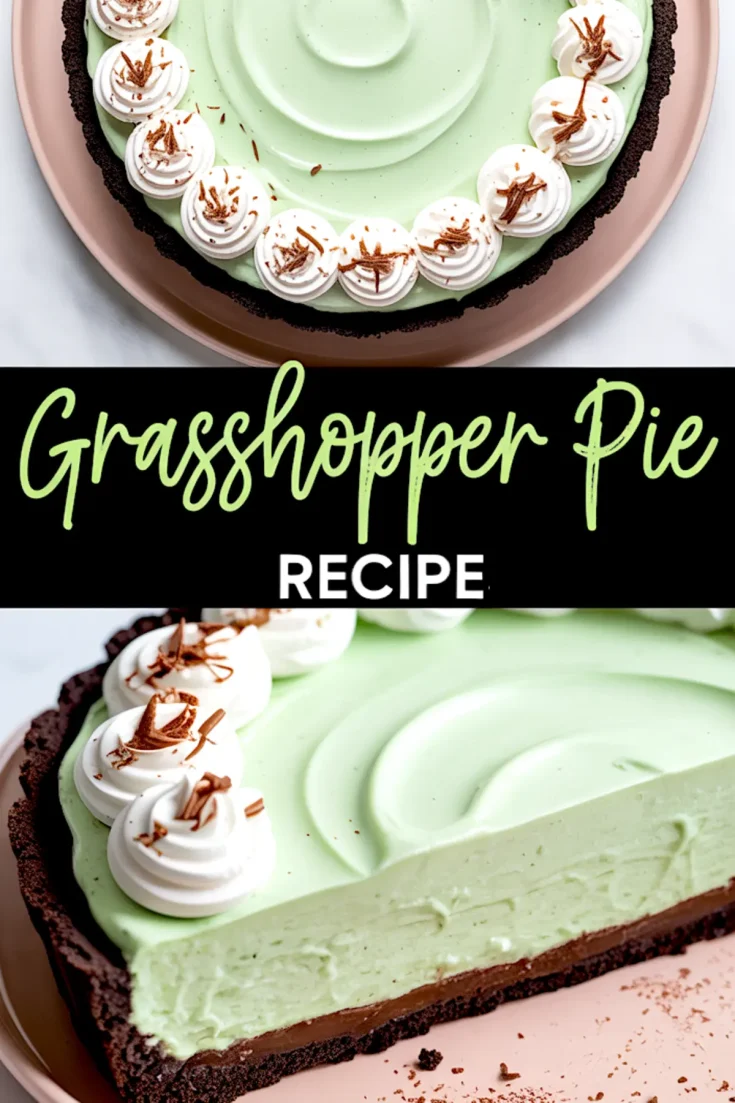
If you’ve been searching for a no bake grasshopper pie that doesn’t get icy or collapse in heat, this one has the structure to hold its own on the table. The chocolate crust stays firm but not too hard, and the filling cuts clean with the right knife trick I’ll show you below.
Mint chocolate desserts can sometimes feel overpowering or artificially sweet. This one doesn’t. The mint flavor here is balanced, mellowed by cream and offset with just enough dark chocolate in the crust and ganache.
This pie stores beautifully. I’ve kept slices chilled for two days without any weeping or soggy base. That makes it ideal for planning ahead for gatherings or mint desserts during the holidays. It’s also one of the few pies I trust enough to freeze and thaw again for personal cravings.
How the Chocolate Crust Affects the Texture
The base of this grasshopper dessert uses crushed chocolate sandwich cookies and melted butter. Pressed into the pan, it firms up without baking and holds the pie cleanly through slicing.
Now, I’ve tried both Oreo-style sandwich cookies and chocolate graham crackers for the crust. Here’s what I found:
Graham cracker crusts give a slightly crumblier base with a more toasted chocolate note.
Oreo-style cookies bring in more structure and a creamier flavor that complements the ganache layer.
In my notes, the sandwich cookies win for presentation and taste. If you want to see how this style holds up in a bar form, try my Mint Chocolate Brownies next.
Why the Ganache Matters in a Mint Pie
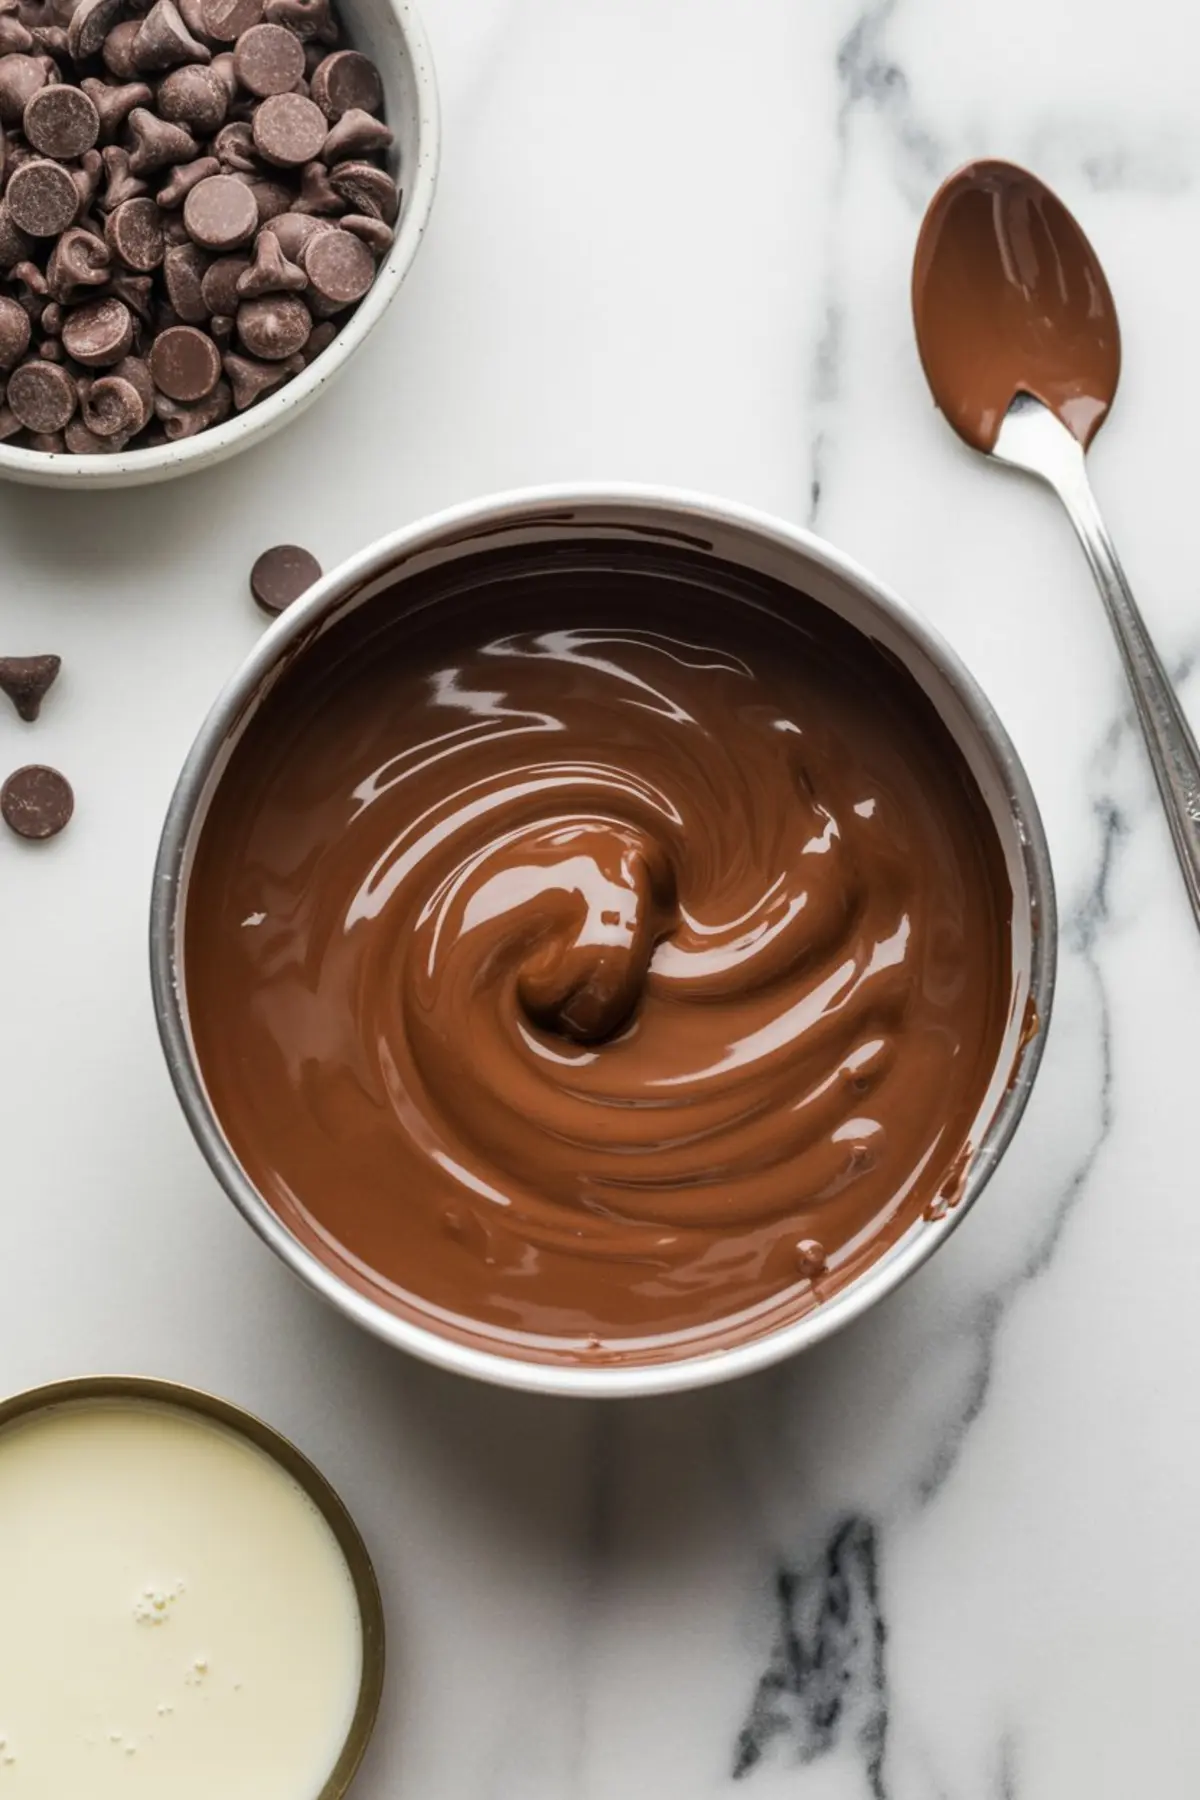
You could skip the ganache. But I wouldn’t.
The thin layer of semi-sweet chocolate under the mint filling adds depth. It separates the filling from the crust just enough to keep the textures distinct. And it creates a slight snap that contrasts the mousse-like softness above it.
The trick is letting the ganache chill before pouring in the filling. If it’s still warm, it’ll blend into the cream and soften the crust underneath. Give it 10 to 15 minutes in the fridge before moving to the next step.
If you prefer something without that chocolate snap, you might enjoy a softer option like my Chocolate Cream Pie which skips the ganache and goes straight to the filling.
Tips for Getting the Mint Filling Just Right
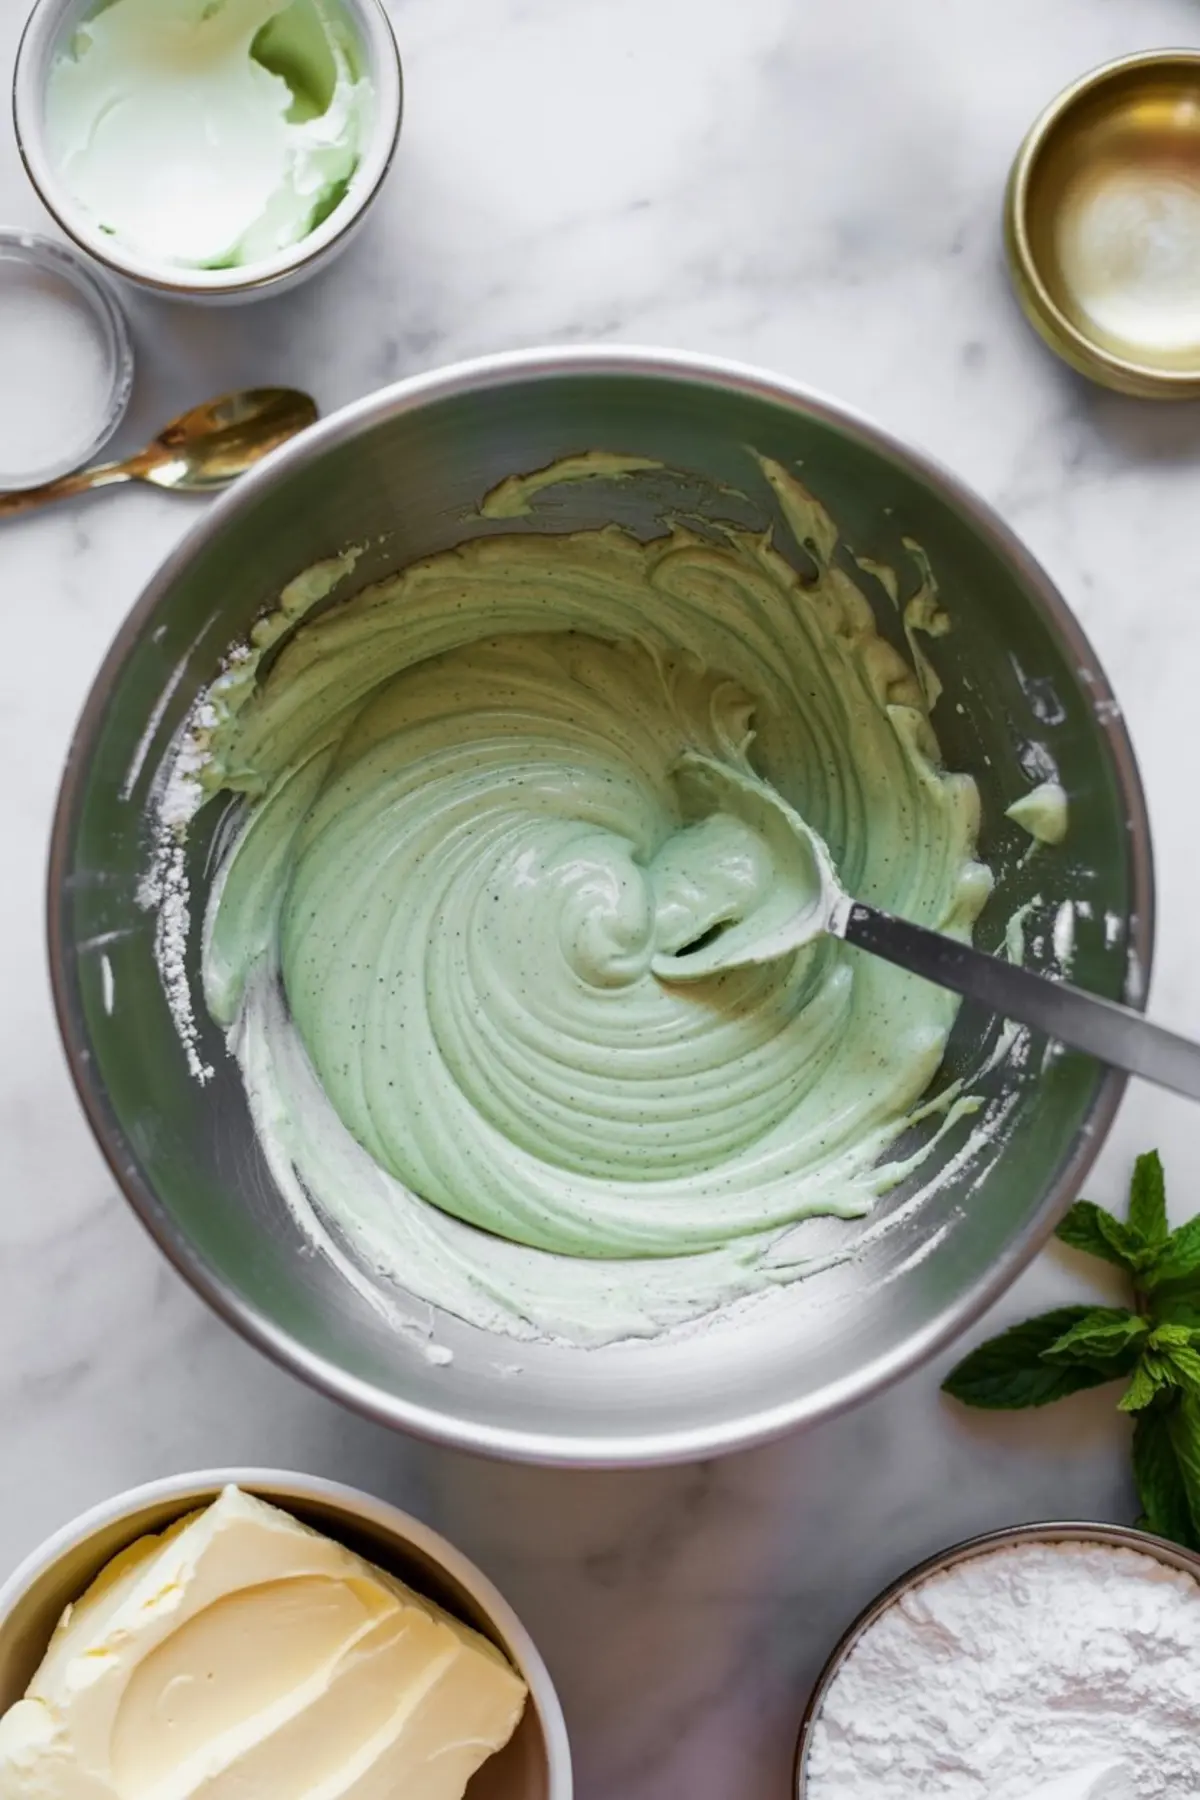
Crème de menthe and crème de cacao deliver both flavor and color here. Together, they bring that soft pastel green and mellow mint profile that’s hard to recreate with extract alone.
Still, if you’re making a non-alcoholic version, you can swap in mint extract and a splash of white chocolate syrup. The texture will stay the same. The flavor will be sharper, more direct. Not bad, just different.
You can add green food coloring if you want a stronger hue. I usually do, especially for holidays or spring events. It helps the mint stand out without changing the taste. A few drops go a long way.
The gelatin helps the filling set without becoming stiff. That means clean slices without losing that soft bite. I bloom it in milk and warm it gently so the texture stays creamy after chilling.
Assembly, Storage, and Serving Notes
Once the whipped cream is folded in, the filling becomes light and airy. Spread it evenly into the chilled crust and smooth the top.
I always let this chill for at least 6 hours. Overnight is better.
Decorate just before serving. Whipped cream piped around the edges adds height and softness. Chocolate shavings or curls give a visual cue to the chocolate underneath. And a few mint leaves bring it all together visually.
Use a sharp knife dipped in hot water to slice. Wipe it clean between each cut. That gives you those clean cross-sections that show off the ganache and green filling clearly.
Store the pie covered in the fridge for up to 3 days. For longer storage, wrap slices individually and freeze. Thaw in the refrigerator, not on the counter, to keep the texture intact.
For a different chocolate mint experience, compare this to my Oreo Pie which uses a chilled whipped filling without gelatin.
Related Recipes You’ll Like
Save and Share Your Grasshopper Dessert
This no bake grasshopper pie brings together nostalgic flavor, a cool texture, and a grown-up balance of chocolate and mint.
It’s one of those desserts I like to keep in my back pocket. I’ve made it for holiday dinners, spring brunches, and quiet Friday nights with just a single fork. It always holds up.
Save this recipe to your favorite board so you can find it again before your next gathering or baking break.
Share in the comments how yours turned out or if you’ve tried the non-alcoholic version. I’d love to hear what you swapped or if you have a new topping idea.
Let’s make something worth slicing.
Grasshopper Pie Recipe
Grasshopper pie recipe means no bake and wildly simple. I use a chocolate crust made from crushed cookies and butter, then fill it with a light mint pie mixture that sets up soft and sliceable. The filling gets its flavor from crème de menthe and whipped cream folded into melted marshmallows. It tastes like a chocolate mint pie you’d eat straight from the freezer in the ‘80s, and I say that lovingly. The texture feels like a frozen mousse, and it works as one of those quick easy desserts that somehow still impresses. I bring it out for summer dinners, mint desserts at the holidays, or just to stash in the back of the freezer for grasshopper dessert emergencies.
Ingredients
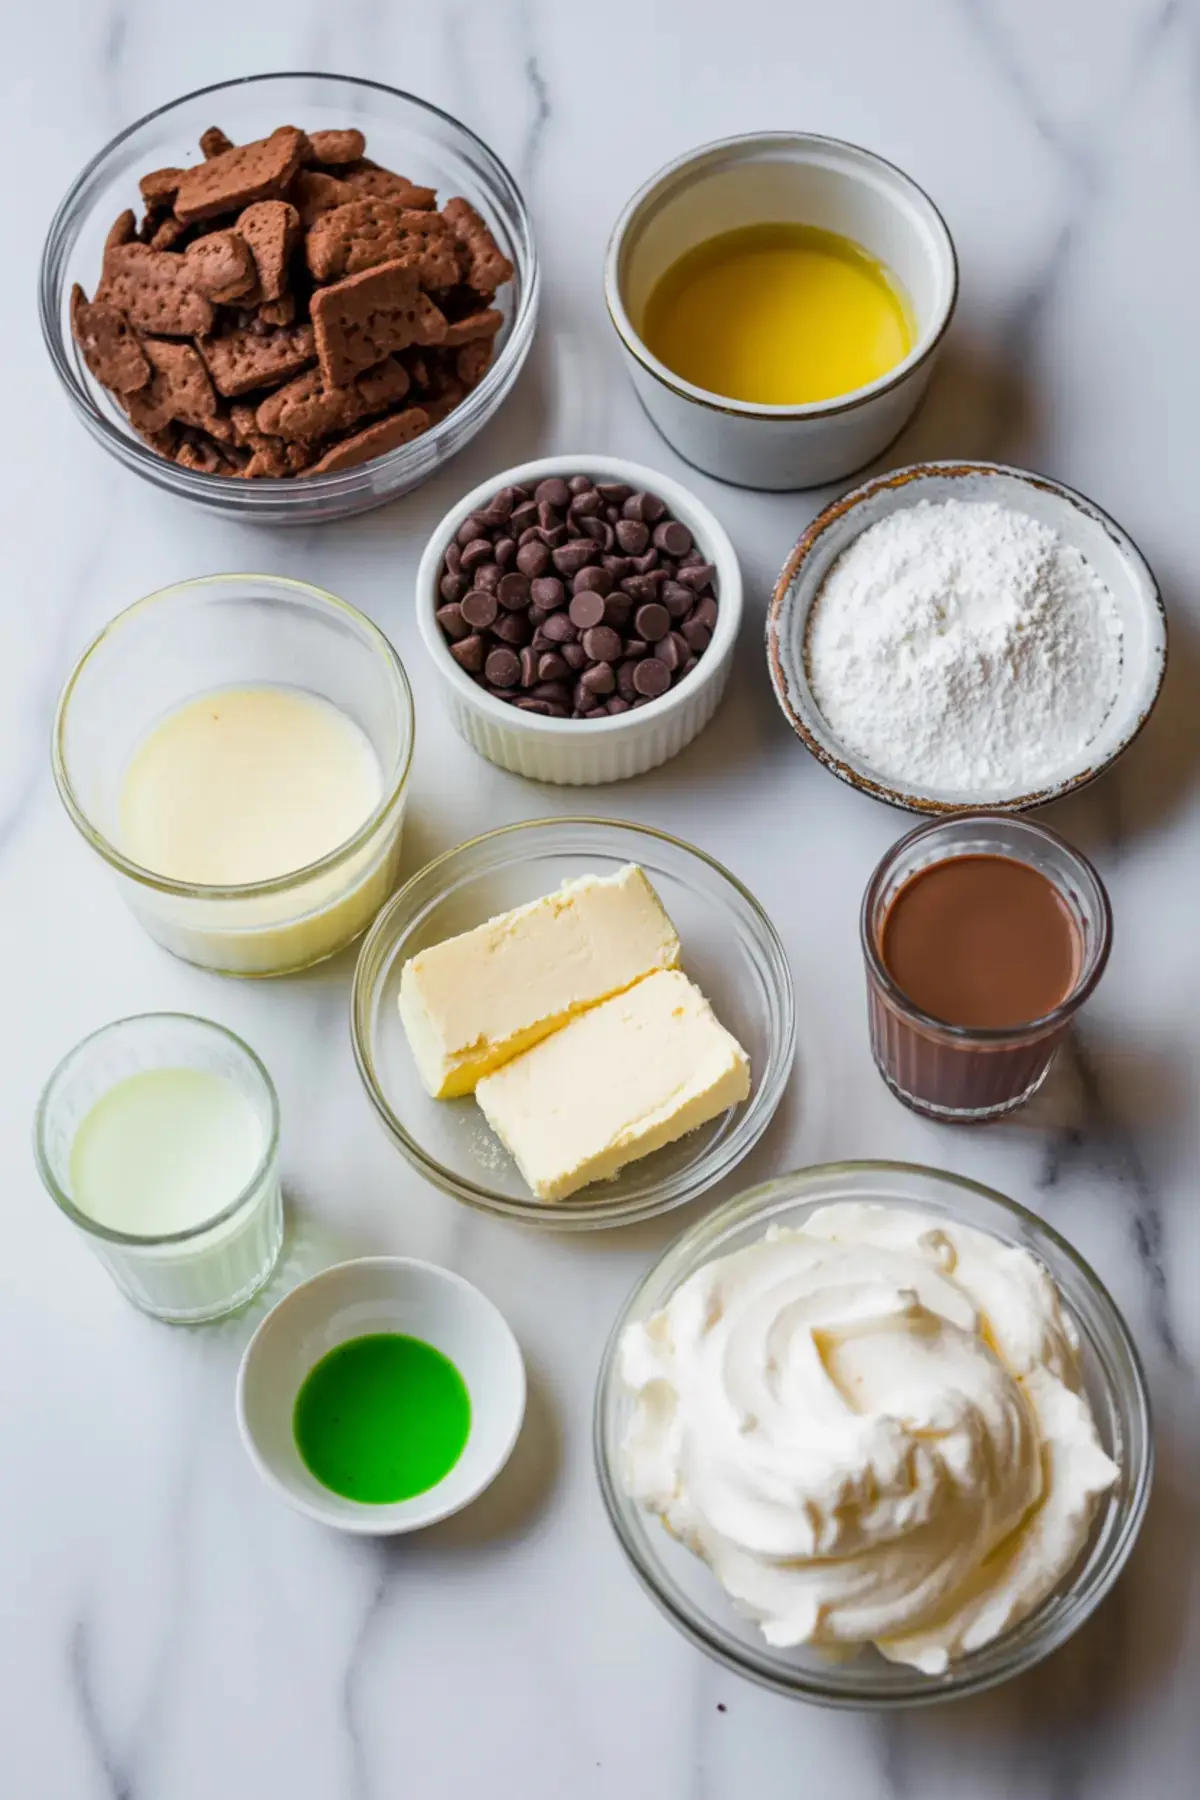
- FOR THE CHOCOLATE COOKIE CRUST
- 24 chocolate sandwich cookies (like Oreos), finely crushed
- 5 tablespoons unsalted butter, melted
- FOR THE CHOCOLATE GANACHE LAYER
- 1/2 cup semi-sweet chocolate chips
- 1/4 cup heavy cream
- FOR THE MINT FILLING
- 1/4 cup whole milk
- 1 tablespoon unflavored gelatin
- 1 1/2 cups heavy whipping cream, cold
- 8 oz cream cheese, softened
- 1/2 cup powdered sugar
- 1/4 cup crème de menthe liqueur
- 2 tablespoons white crème de cacao liqueur
- A few drops green food coloring, optional
- FOR GARNISH
- Whipped cream, homemade or store-bought
- Chocolate shavings or curls
- Mint leaves, optional
Instructions
- MAKE THE COOKIE CRUST: Combine the crushed chocolate sandwich cookies and melted butter in a mixing bowl until the mixture resembles wet sand. Press the mixture firmly into the bottom and up the sides of a 9-inch pie pan. Chill in the refrigerator for at least 20 minutes while preparing the filling.
- PREPARE THE GANACHE (OPTIONAL): Heat the heavy cream in a small saucepan or microwave until hot but not boiling. Pour the hot cream over the chocolate chips in a heatproof bowl. Let sit for 1 minute, then stir until smooth and glossy. Pour the ganache over the chilled crust and return to the fridge while you make the filling.
- BLOOM THE GELATIN: In a small saucepan, stir together the milk and unflavored gelatin. Let the mixture sit for 5 minutes to allow the gelatin to bloom. Warm gently over low heat until the gelatin is fully dissolved, then remove from heat and let cool slightly.
- WHIP THE CREAM: In a cold mixing bowl, whip the heavy whipping cream to soft peaks using a hand mixer or stand mixer. Refrigerate the whipped cream while preparing the rest of the filling.
- MAKE THE MINT FILLING: In a large bowl, beat the softened cream cheese until completely smooth and lump-free. Add powdered sugar, crème de menthe, crème de cacao, and the cooled gelatin mixture. Mix until fully combined and smooth. If desired, add a few drops of green food coloring to enhance the minty hue. Gently fold in the whipped cream until the filling is light and fluffy.
- ASSEMBLE THE PIE: Pour the mint filling into the chilled pie crust (on top of the ganache layer if using). Spread the top evenly with a spatula. Chill the pie in the refrigerator for at least 6 hours or overnight until completely set.
- DECORATE AND SERVE: Once the pie is set, pipe or spoon whipped cream around the edges. Garnish with chocolate shavings or curls, and add fresh mint leaves if desired. Slice using a sharp knife and serve chilled.
Notes
Crème de menthe and crème de cacao are alcoholic; for a non-alcoholic version, mint extract and white chocolate syrup may be substituted, though flavor will vary.
For clean slices, dip a sharp knife in hot water and wipe between cuts.
Pie can be made 1 day ahead and stored covered in the refrigerator.
Nutrition Information
Yield
10Serving Size
1Amount Per Serving Calories 541Total Fat 39gSaturated Fat 24gTrans Fat 1gUnsaturated Fat 12gCholesterol 93mgSodium 153mgCarbohydrates 38gFiber 1gSugar 31gProtein 6g