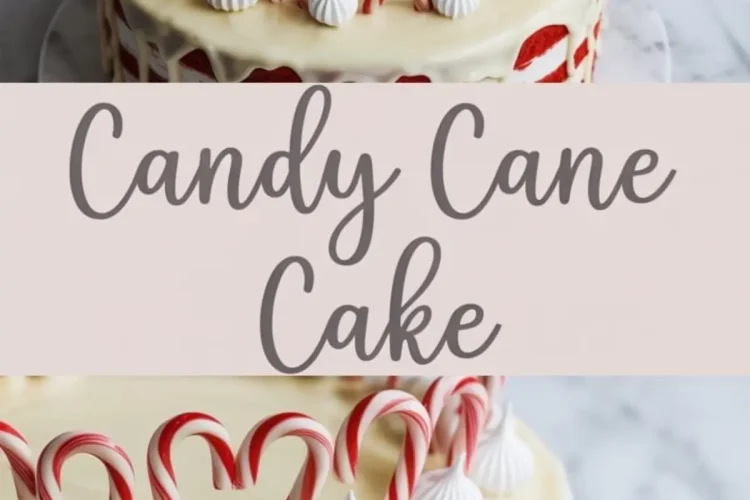
This candy cane cake brings together a rich red velvet base, cool peppermint frosting, and a glossy white chocolate ganache. It captures the flavor of a peppermint stick, layered into a cake that draws every eye at the table.
You’ll learn how to build a bakery-style centerpiece using accessible ingredients, without complicated decorating tools. This is one of those easy Christmas cakes that still looks impressive and feels joyful from start to finish.
If you’re searching for Christmas cake decorations that make a real impact, or simply want a peppermint cake that stands out among holiday cakes, this one belongs in your December lineup.

Following a special diet?
Every recipe on this site can be converted to gluten-free, vegan, dairy-free, keto, nut-free or egg-free with adjusted ratios so nothing falls flat.
Try the Recipe Converter →Why I Chose This Cake Base Over Others
The red velvet base isn’t just for the color. I’ve tested chocolate sponge and vanilla cake here, but both lacked the depth this needs.
Red velvet gives softness, structure, and a gentle cocoa note that supports the peppermint without competing. The oil keeps it moist for days. The buttermilk adds a slight tang, which stops the frosting from feeling too sweet.
Gel food coloring provides the rich red without disturbing the texture. Liquid coloring thins the batter and throws off the balance. I’ve tried both. The gel works better every time.
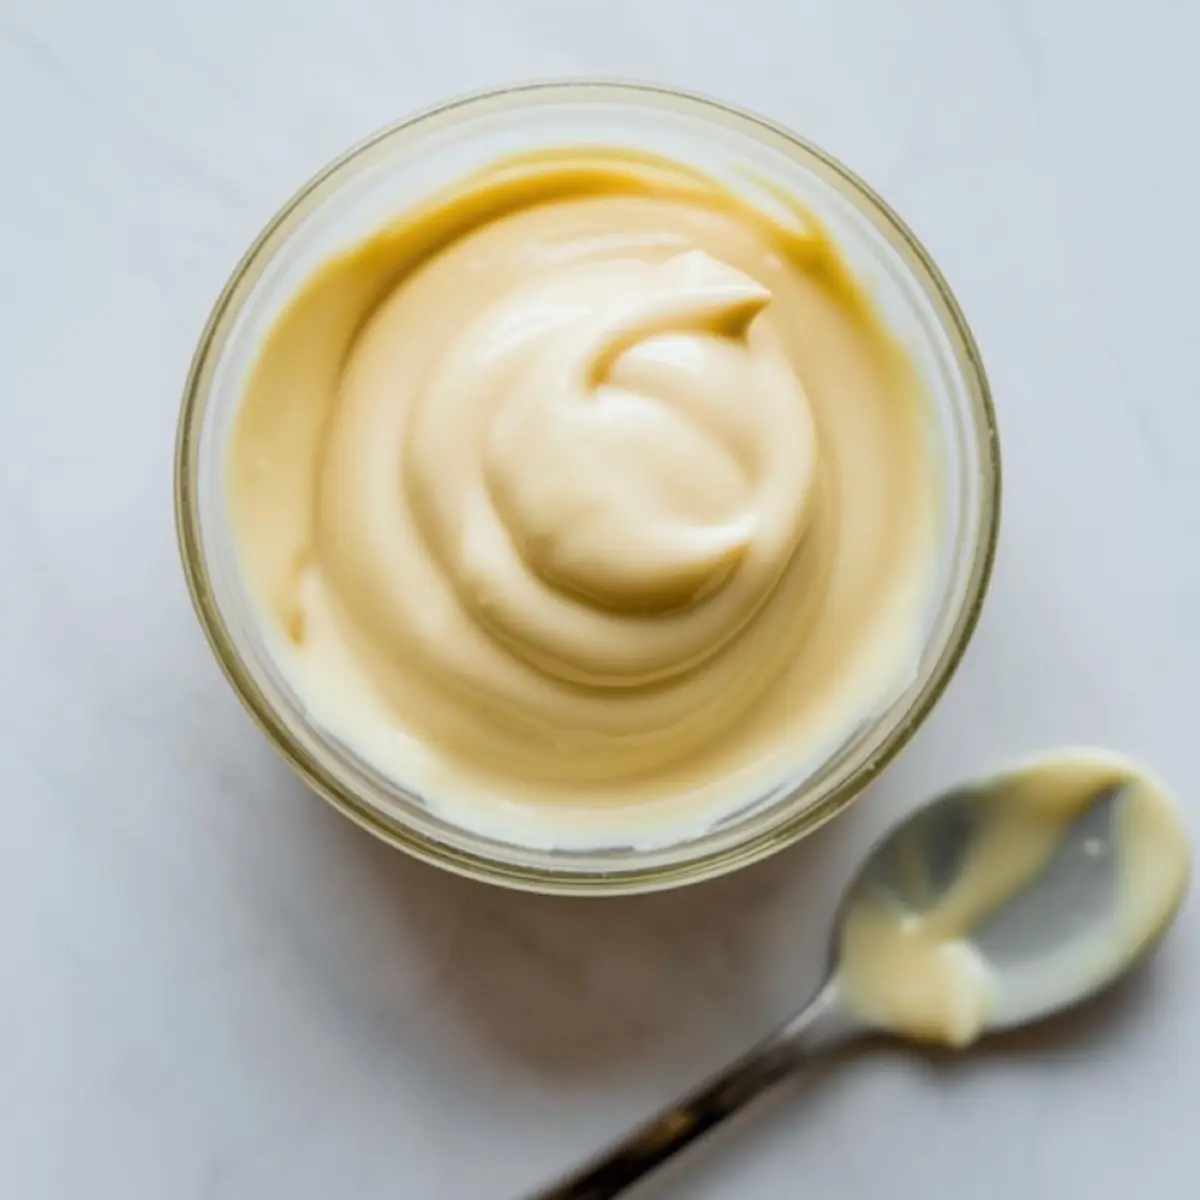
This Frosting Works Well
Peppermint buttercream can turn harsh if the extract is too strong. I go with just one teaspoon, then taste before adding more. A pinch of salt rounds out the flavor.
Butter whipped until pale creates a fluffy texture that carries the peppermint evenly. Powdered sugar, sifted ahead, keeps it from turning gritty.
The heavy cream softens it. Start with two tablespoons, then adjust as needed. That extra cream helps the frosting spread without dragging the cake layers.
Let’s Talk About the White Chocolate Drip
White chocolate ganache should be smooth and pourable but thick enough to hold its shape.
I use a 2:1 ratio of cream to chocolate here, because the drip needs to flow without running. If you use baking chips, check they contain real cocoa butter. Some brands don’t melt well.
Once poured, the drip sets fast. You’ll want the cake chilled and the ganache slightly thickened before applying. Too hot, and it slides off. Too cold, and it won’t spread.
Comparing Peppermint vs. Vanilla Frosting for Holiday Cakes
I’ve made this cake with vanilla frosting before. It looks the same, but the flavor falls flat.
Peppermint gives this cake its identity. Without it, you get a red velvet cake in a Santa suit, but the Christmas flavor is missing. The peppermint brings in the candy cane spirit.
That said, for younger kids or peppermint-shy guests, you could mix vanilla and peppermint extracts to soften the bite. In my notes, a 3:1 vanilla to peppermint ratio still gives that festive lift without being too bold.
Assembling This Cake Like a Pro
Once the cake layers are cool, level them with a serrated knife. A flat surface keeps the final cake sturdy and easy to frost.
After stacking with a generous swirl of peppermint frosting between each layer, apply a crumb coat. This thin layer seals in loose crumbs so your final frosting layer goes on smooth.
For this style, I leave the sides semi-naked. The red velvet peeks through, adding contrast under the white chocolate drip. It’s a clean, modern finish that looks more complex than it is.
How to Get a Clean White Chocolate Drip
The secret to a neat drip is temperature. Chill the frosted cake before starting. Let the ganache cool to room temperature, so it clings instead of running.
Use a spoon or a squeeze bottle to control the drips. Apply it around the top edge first, letting it fall naturally, then fill in the center and smooth gently with an offset spatula.
If the drip sets before you finish, warm the ganache slightly in 5-second bursts. Stir after each one. I’ve made that mistake in a rush, and had to scrape and start again. Patience helps here.
Christmas Cake Decorations That Spark Joy
This is where the cake transforms.
Mini candy canes, paired into hearts, create a charming border. White meringue kisses in between bring height and texture.
I often finish with a dusting of crushed peppermint. Some years I’ve swapped in edible glitter or gold leaf. One time I even pressed in soft sugar pearls. But the candy canes always stay. They give the clearest signal that this is a holiday cake.
Try these Candy Cane Christmas Hearts if you want a matching treat on the dessert table.
Serving Notes and Storage Tips
I usually serve this cake chilled. It holds its shape better and the flavors are more balanced cold.
Let slices sit at room temperature for 10 minutes before serving. The frosting softens slightly, which helps it melt into the cake as you eat.
Store leftovers in a cake dome or box in the fridge for up to 4 days. You can also make the cake layers a day ahead. Wrap tightly in cling film and store at room temperature.
For another festive idea, try these Candy Cane Cupcakes if you need single-serve options for a holiday party.
Other Holiday Cakes You’ll Love
These other recipes bring the same cheer with a different twist:
Share and Save: Let’s Keep This Tradition Going

I’ve made this cake for six Decembers in a row. It’s become part of my rhythm, like decorating the tree or making cinnamon rolls on Christmas morning.
I hope it brings the same sparkle to your home.
Save this pin to your Holiday Cakes or Christmas Cake Ideas board, and come back to it when the season calls.
Leave a comment if you make it. Or ask a question if you need help before baking. Let’s keep this corner of the kitchen filled with good stories and better cake.
Candy Cane Cake Recipe

This candy cane cake is a festive red velvet layer cake topped with creamy vanilla frosting and a smooth white chocolate drip. Whole candy canes are placed decoratively on top, giving it a bold holiday look without the need for complicated Christmas cake decorations. It’s one of those easy Christmas cakes that looks bakery-level but is simple to put together. The rich red velvet base adds color and flavor, while the peppermint element comes through in the garnish. Perfect for those looking for Christmas cakes ideas that are both beautiful and delicious, this peppermint-inspired Xmas cake is ideal for any holiday celebration.
Ingredients
- FOR THE RED VELVET CAKE
- 2 ½ cups all-purpose flour
- 1 ½ cups granulated sugar
- 1 tsp baking soda
- 1 tsp salt
- 1 tsp cocoa powder
- 1 ½ cups vegetable oil
- 1 cup buttermilk, room temperature
- 2 large eggs
- 2 tbsp red gel food coloring
- 1 tsp vanilla extract
- 1 tsp white vinegar
- FOR THE PEPPERMINT BUTTERCREAM
- 1 cup unsalted butter, softened
- 4 cups powdered sugar, sifted
- 2–3 tbsp heavy cream or milk
- 1 tsp peppermint extract
- Pinch of salt
- FOR THE WHITE CHOCOLATE GANACHE DRIP
- 1 cup high-quality white chocolate chips or chopped white chocolate
- ½ cup heavy cream
- FOR DECORATING
- Mini candy canes
- White meringue kisses or piped meringue
- Crushed peppermint candy (optional)
Instructions
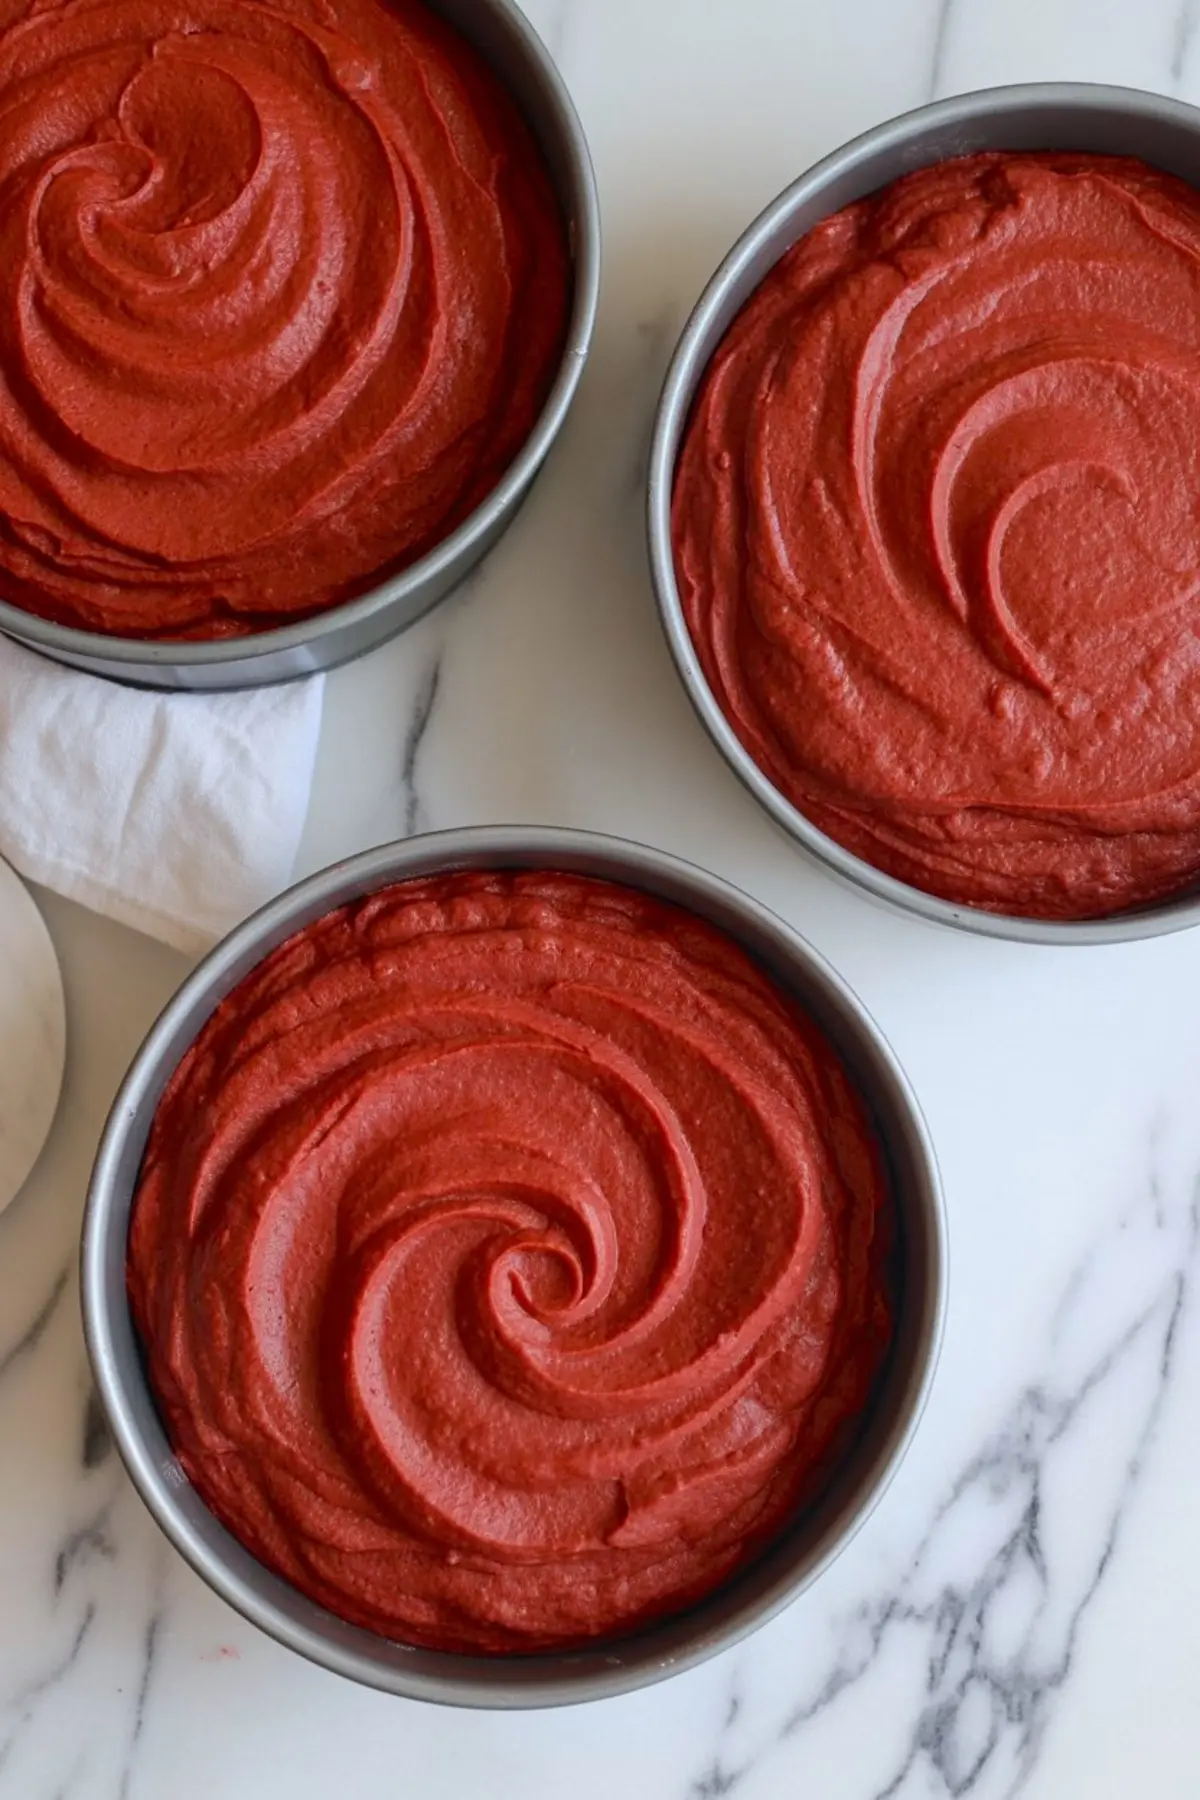
- PREPARE THE CAKE PANS: Preheat the oven to 350°F (175°C). Grease and line three 8-inch round cake pans with parchment paper to ensure easy release.
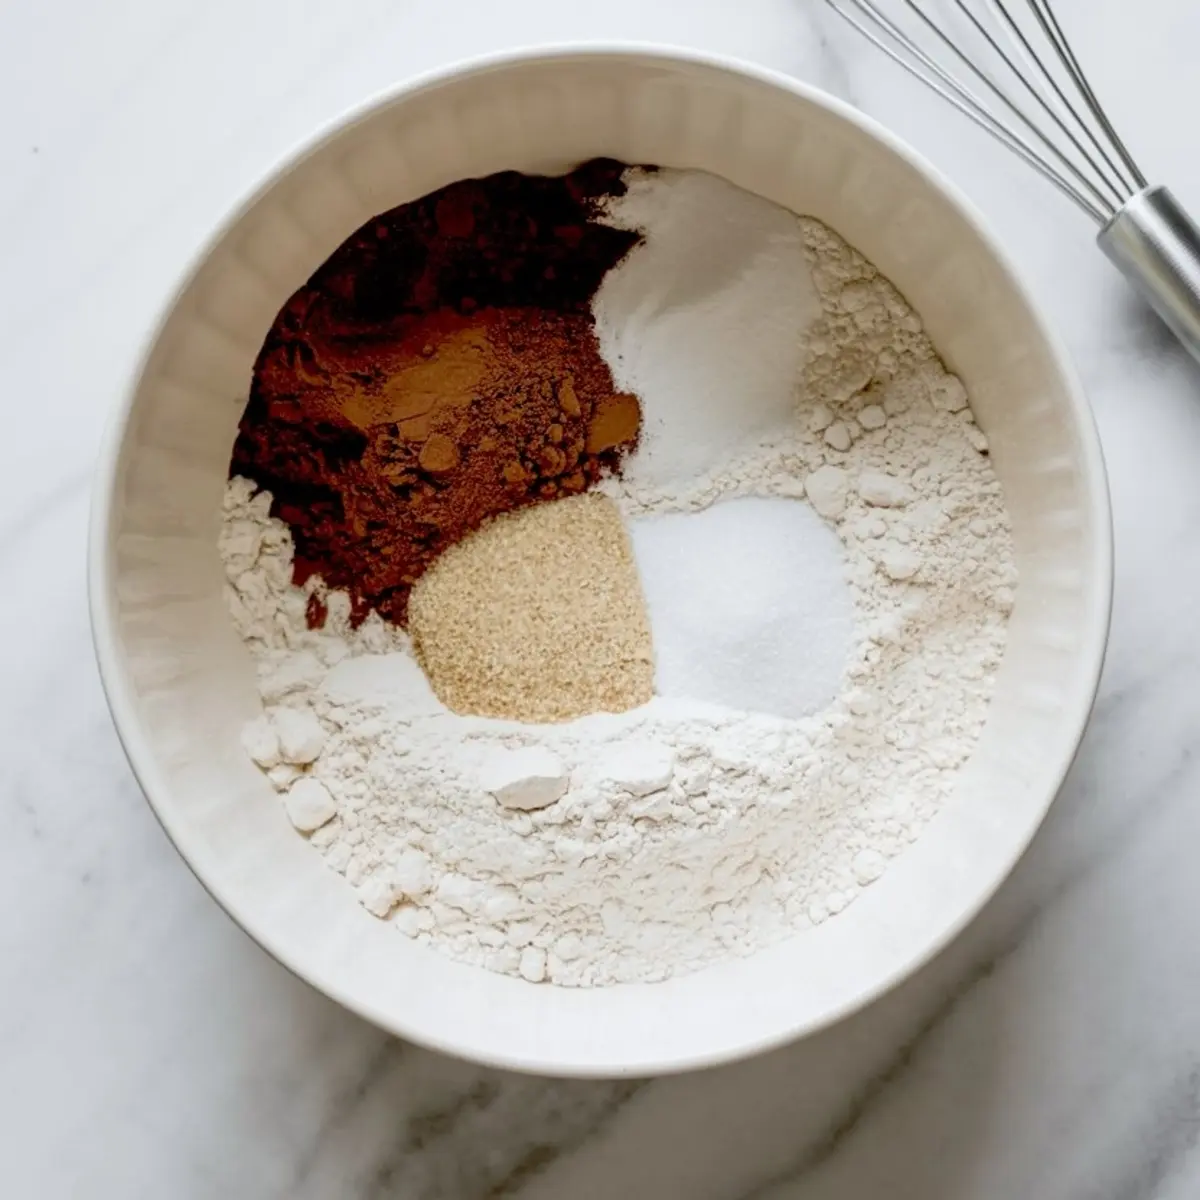
- MIX THE DRY INGREDIENTS: In a large bowl, whisk together the flour, granulated sugar, cocoa powder, baking soda, and salt until well combined and evenly distributed.
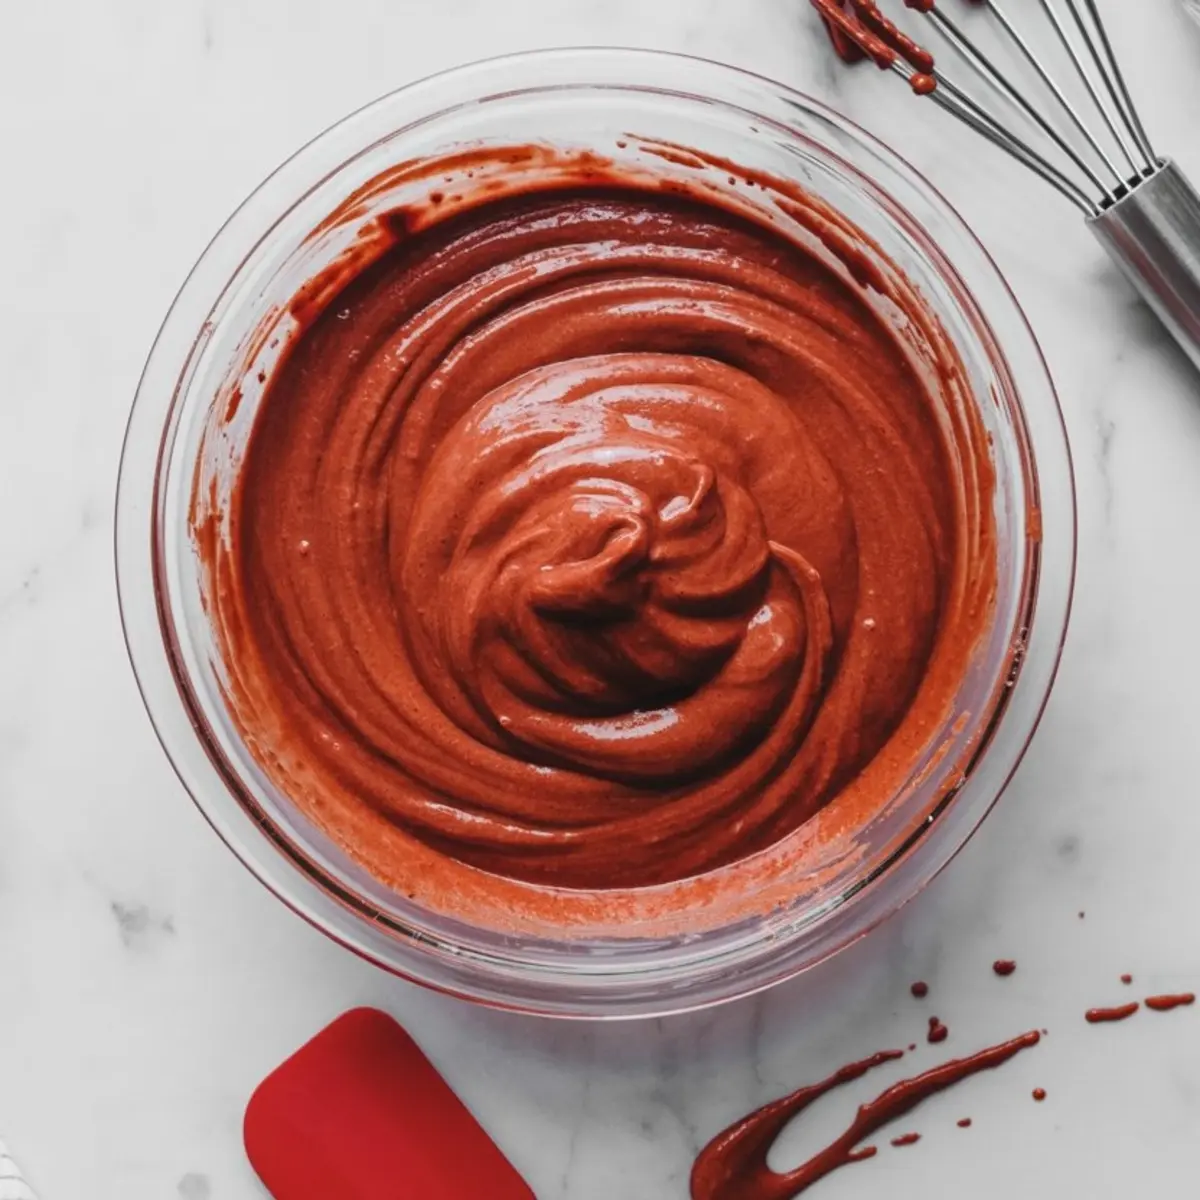
- COMBINE THE WET INGREDIENTS: In a separate large bowl, whisk together the vegetable oil, buttermilk, eggs, red gel food coloring, vanilla extract, and white vinegar until the mixture is fully blended and smooth.
- MAKE THE BATTER: Pour the wet ingredients into the bowl of dry ingredients. Mix gently with a spatula or whisk just until the batter is smooth and no dry streaks remain. Avoid overmixing.
- BAKE THE CAKE LAYERS: Divide the batter evenly between the prepared pans. Bake for 25–30 minutes, or until a toothpick inserted in the center comes out clean with only a few moist crumbs attached.
- COOL THE CAKES: Let the cakes cool in their pans for 10 minutes before turning them out onto wire racks. Allow them to cool completely before frosting.
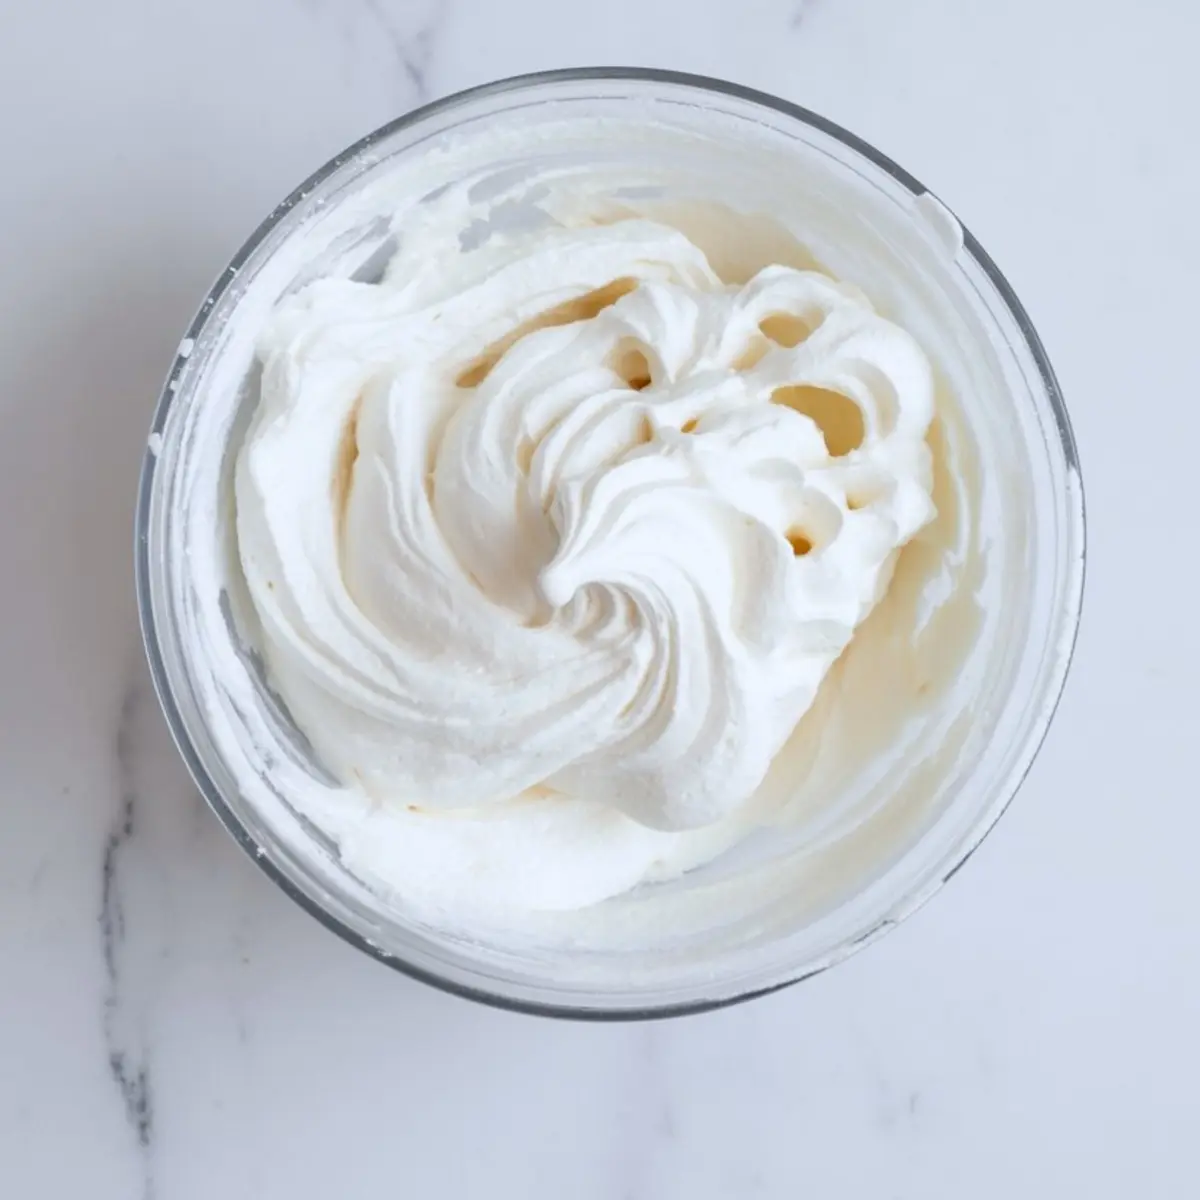
- MAKE THE BUTTERCREAM: In a stand mixer fitted with the paddle attachment, beat the softened butter on medium speed for about 3 minutes until pale and fluffy. Gradually add the sifted powdered sugar, mixing on low speed to prevent a sugar cloud.
- FLAVOR AND FINISH THE FROSTING: Add the peppermint extract, a pinch of salt, and 2 tablespoons of cream or milk. Mix until the frosting is smooth and spreadable. Add more cream if needed to reach the desired consistency. Adjust peppermint flavor to taste.
- MAKE THE GANACHE: Heat the heavy cream in a small saucepan or microwave until just beginning to simmer. Immediately pour the hot cream over the white chocolate in a heatproof bowl. Let sit for 1–2 minutes, then stir until smooth and glossy.
- THICKEN THE GANACHE: Allow the ganache to cool at room temperature until it thickens slightly. It should still be pourable but not too runny, so it forms controlled drips.
- LEVEL AND FILL THE CAKE: If needed, level the cake layers using a serrated knife. Place one layer on a cake stand and spread a generous amount of peppermint buttercream evenly over the top. Repeat with the second and third layers.
- CRUMB COAT AND CHILL: Apply a thin crumb coat of frosting around the sides of the cake to trap any loose crumbs. Chill the cake for 30 minutes to set the crumb coat before applying the final layer of frosting.
- FINAL FROSTING LAYER: Spread a smooth final coat of frosting over the entire cake or leave the sides semi-naked depending on your desired finish. Chill again for at least 15 minutes before adding the ganache drip.
- ADD THE WHITE CHOCOLATE DRIP: Using a spoon or squeeze bottle, gently add the cooled ganache around the top edge of the chilled cake, allowing it to drip naturally down the sides. Fill in the center of the top with remaining ganache and smooth it out gently.
- DECORATE THE CAKE: Press mini candy canes into the top of the cake in pairs to form heart shapes. Place meringue kisses in between for texture and height. Sprinkle with crushed peppermint or edible glitter if desired.
Notes
Cake layers can be made a day ahead and stored tightly wrapped at room temperature. For best drip consistency, ensure the ganache is not too hot when applied. Use gel food coloring for a vibrant red hue without thinning the batter.
Nutrition Information
Yield
12Serving Size
1Amount Per Serving Calories 1087Total Fat 70gSaturated Fat 30gTrans Fat 1gUnsaturated Fat 35gCholesterol 133mgSodium 439mgCarbohydrates 110gFiber 1gSugar 88gProtein 9g