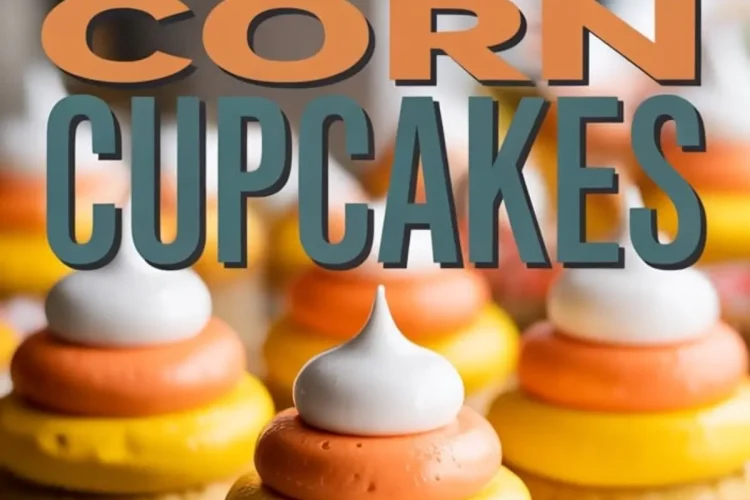
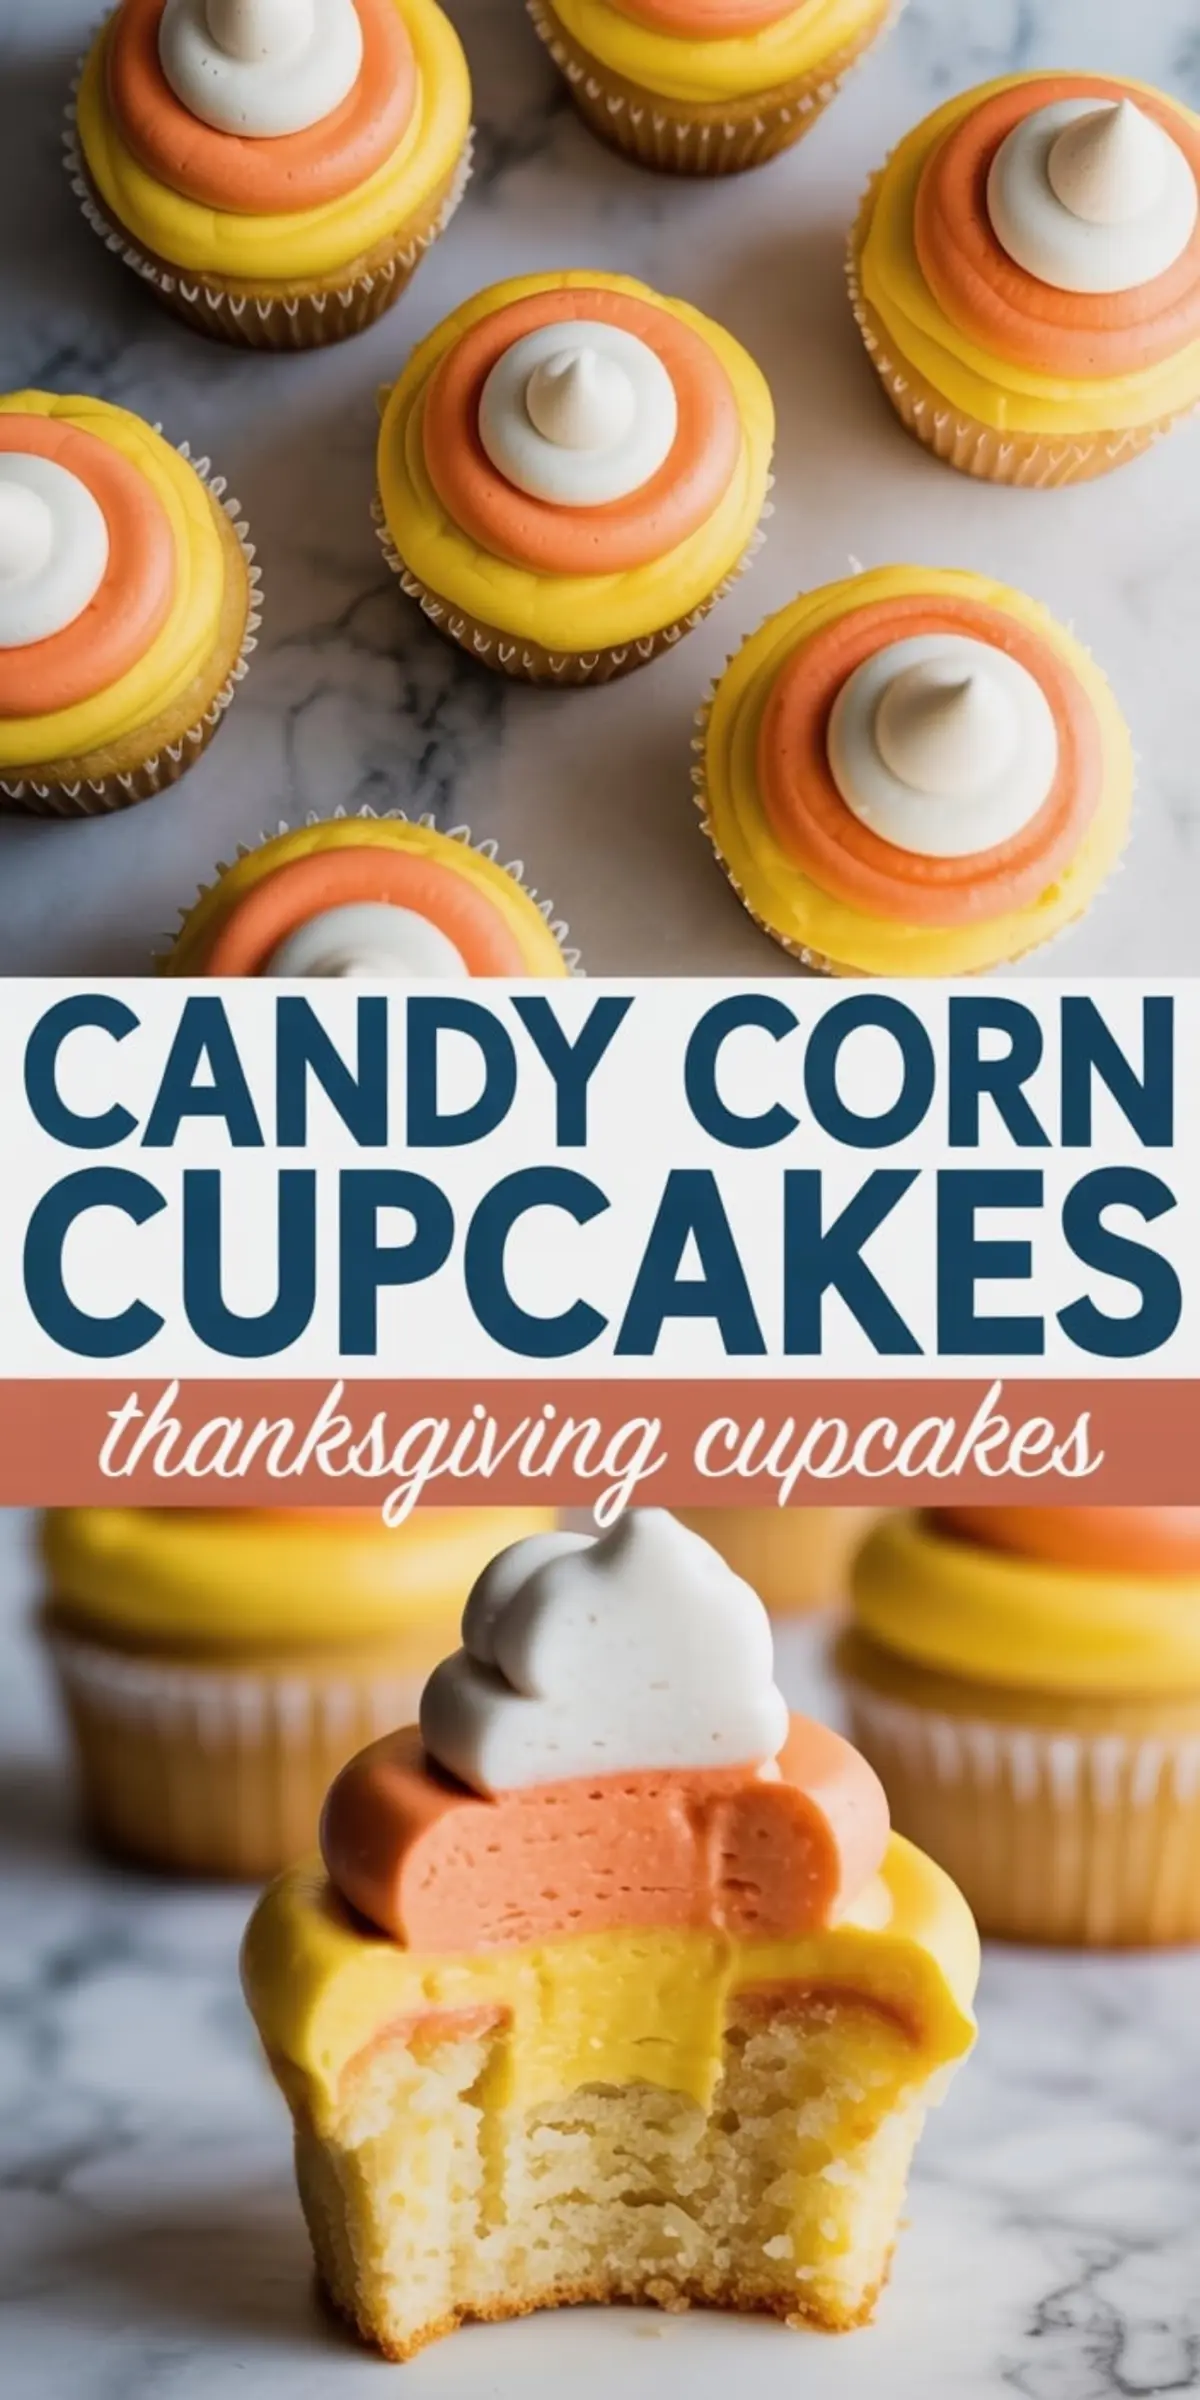
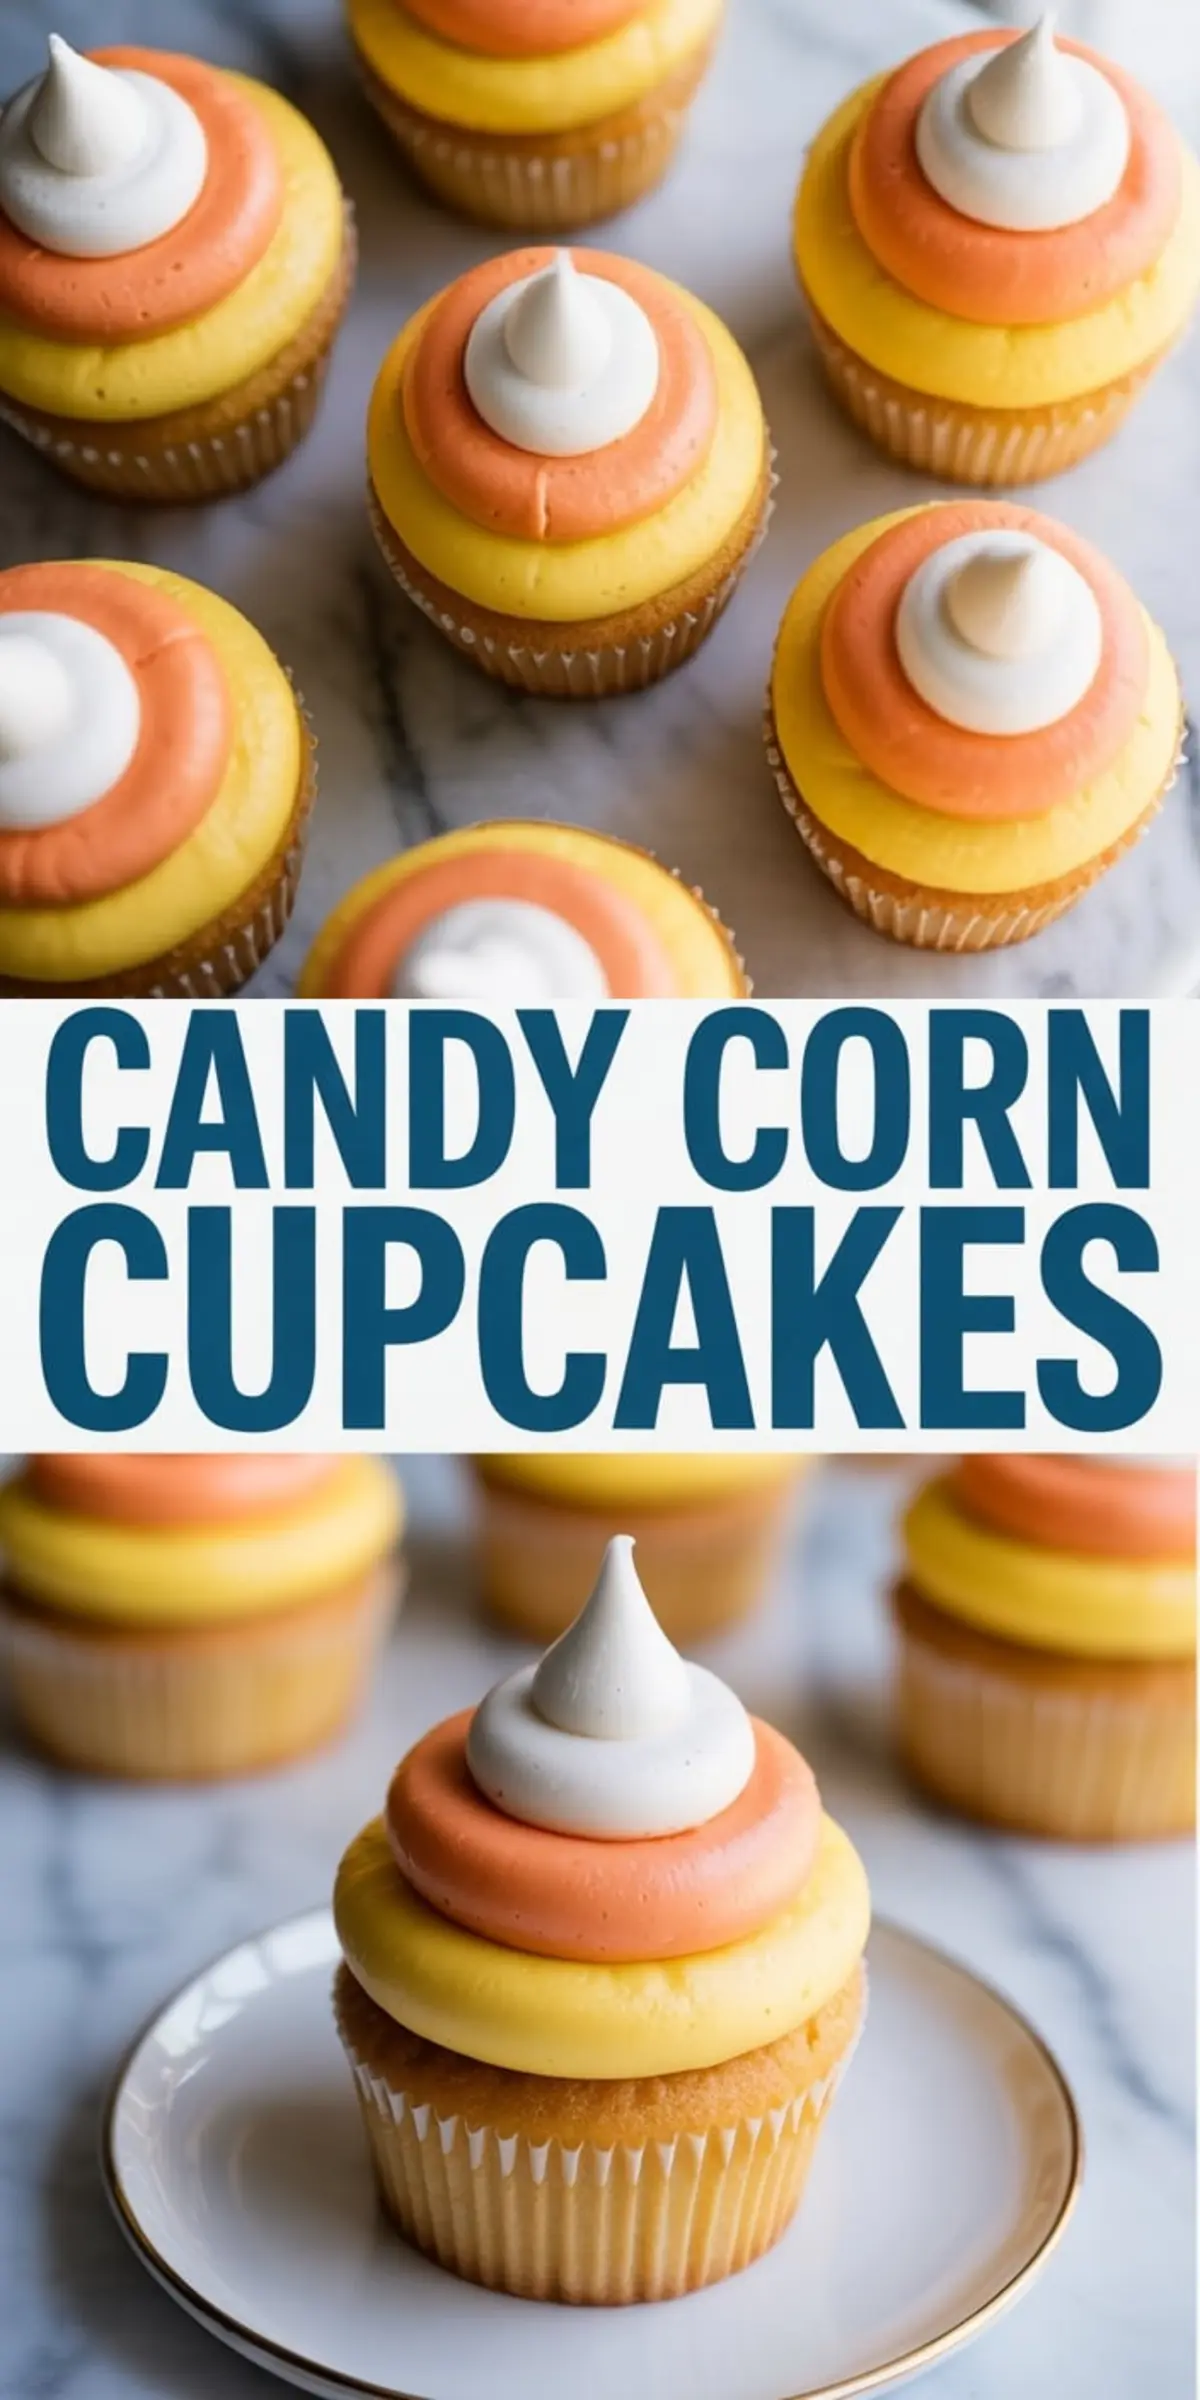
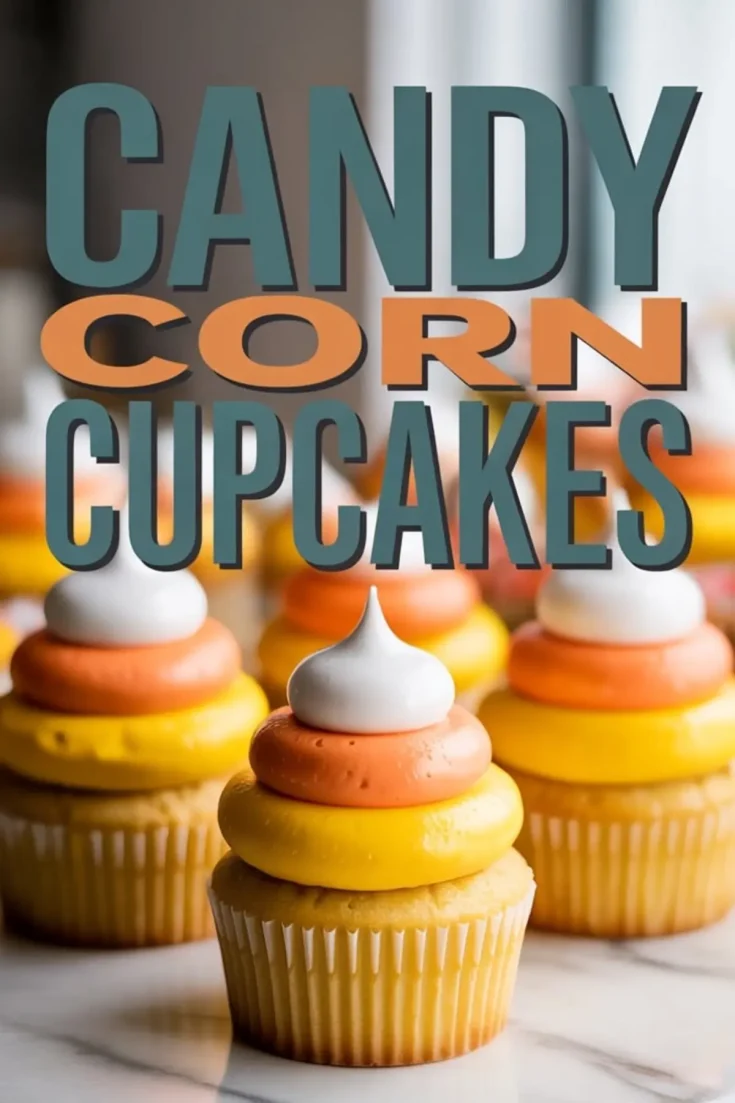
Candy corn cupcakes brighten a fall dessert tray. These Halloween themed cupcakes start with a soft vanilla base, divided into layers of yellow and orange to match the iconic candy corn design. The frosting mimics the candy’s stripes too, with a three-color swirl of buttercream: yellow around the edge, orange in the middle, and a final white peak at the top.
This article shows you exactly how to layer your batter, get vibrant colors without clashing tones, and swirl frosting that holds its shape. You’ll also learn how far ahead to bake, how to store them without smudging the buttercream, and one method I rely on to keep the swirl sharp.
I trust these cupcakes because they always look festive, and more importantly, they taste like something you’d want a second helping of. When I first made them, I had a full batch gone in under an hour at a school bake sale. Someone asked where I bought them. I smiled and told them I piped the frosting myself, right after dinner the night before.
For a full lineup of seasonal flavors, you can explore my 15 Fall Cupcake Ideas to Savor the Season.
Following a special diet?
Every recipe on this site can be converted to gluten-free, vegan, dairy-free, keto, nut-free or egg-free with adjusted ratios so nothing falls flat.
Try the Recipe Converter →What Makes These Candy Corn Cupcakes Stand Out
These cupcakes combine visual appeal and classic flavor. That’s the combination that makes people come back for more. Unlike many fall cupcake decorating ideas that lean heavily into spices, these stay vanilla-forward. The color carries the theme.
The batter is moist but structured, thanks to sour cream and whole milk. This pairing creates cupcakes that stay tender but don’t collapse under frosting. I always recommend full-fat dairy for this reason. If you swap in low-fat yogurt or skim milk, you risk a looser crumb that might peel away from the liners.
These also frost beautifully the next day, which helps if you’re making a few types. I’ve served them on a platter beside pumpkin cupcakes and the color contrast worked well for a harvest-themed dessert spread.
Ingredients That Shape the Flavor and Finish
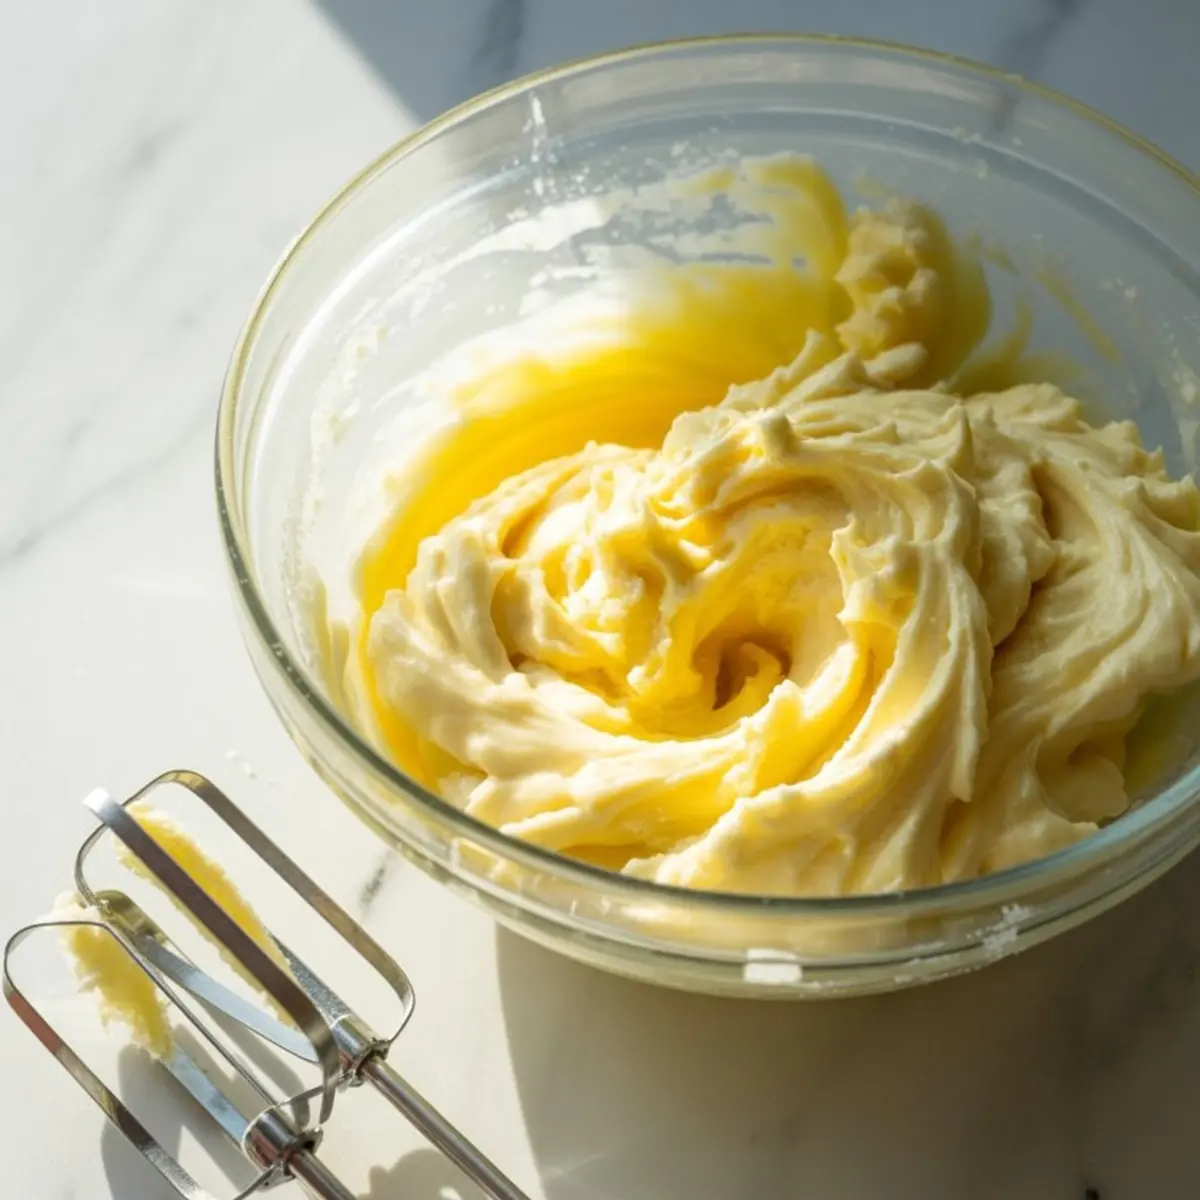
For the batter, you’ll use all-purpose flour, baking powder, and a touch of baking soda for balance. I keep the salt low because the frosting will add enough contrast. The butter and sugar cream together first, followed by eggs and vanilla. Then comes the sour cream, which helps smooth out the mix before alternating with flour and milk.

Here’s where your attention helps. Mix only until combined. Overmixing knocks out the air you built in with creaming, and that makes a flat, dense cupcake.
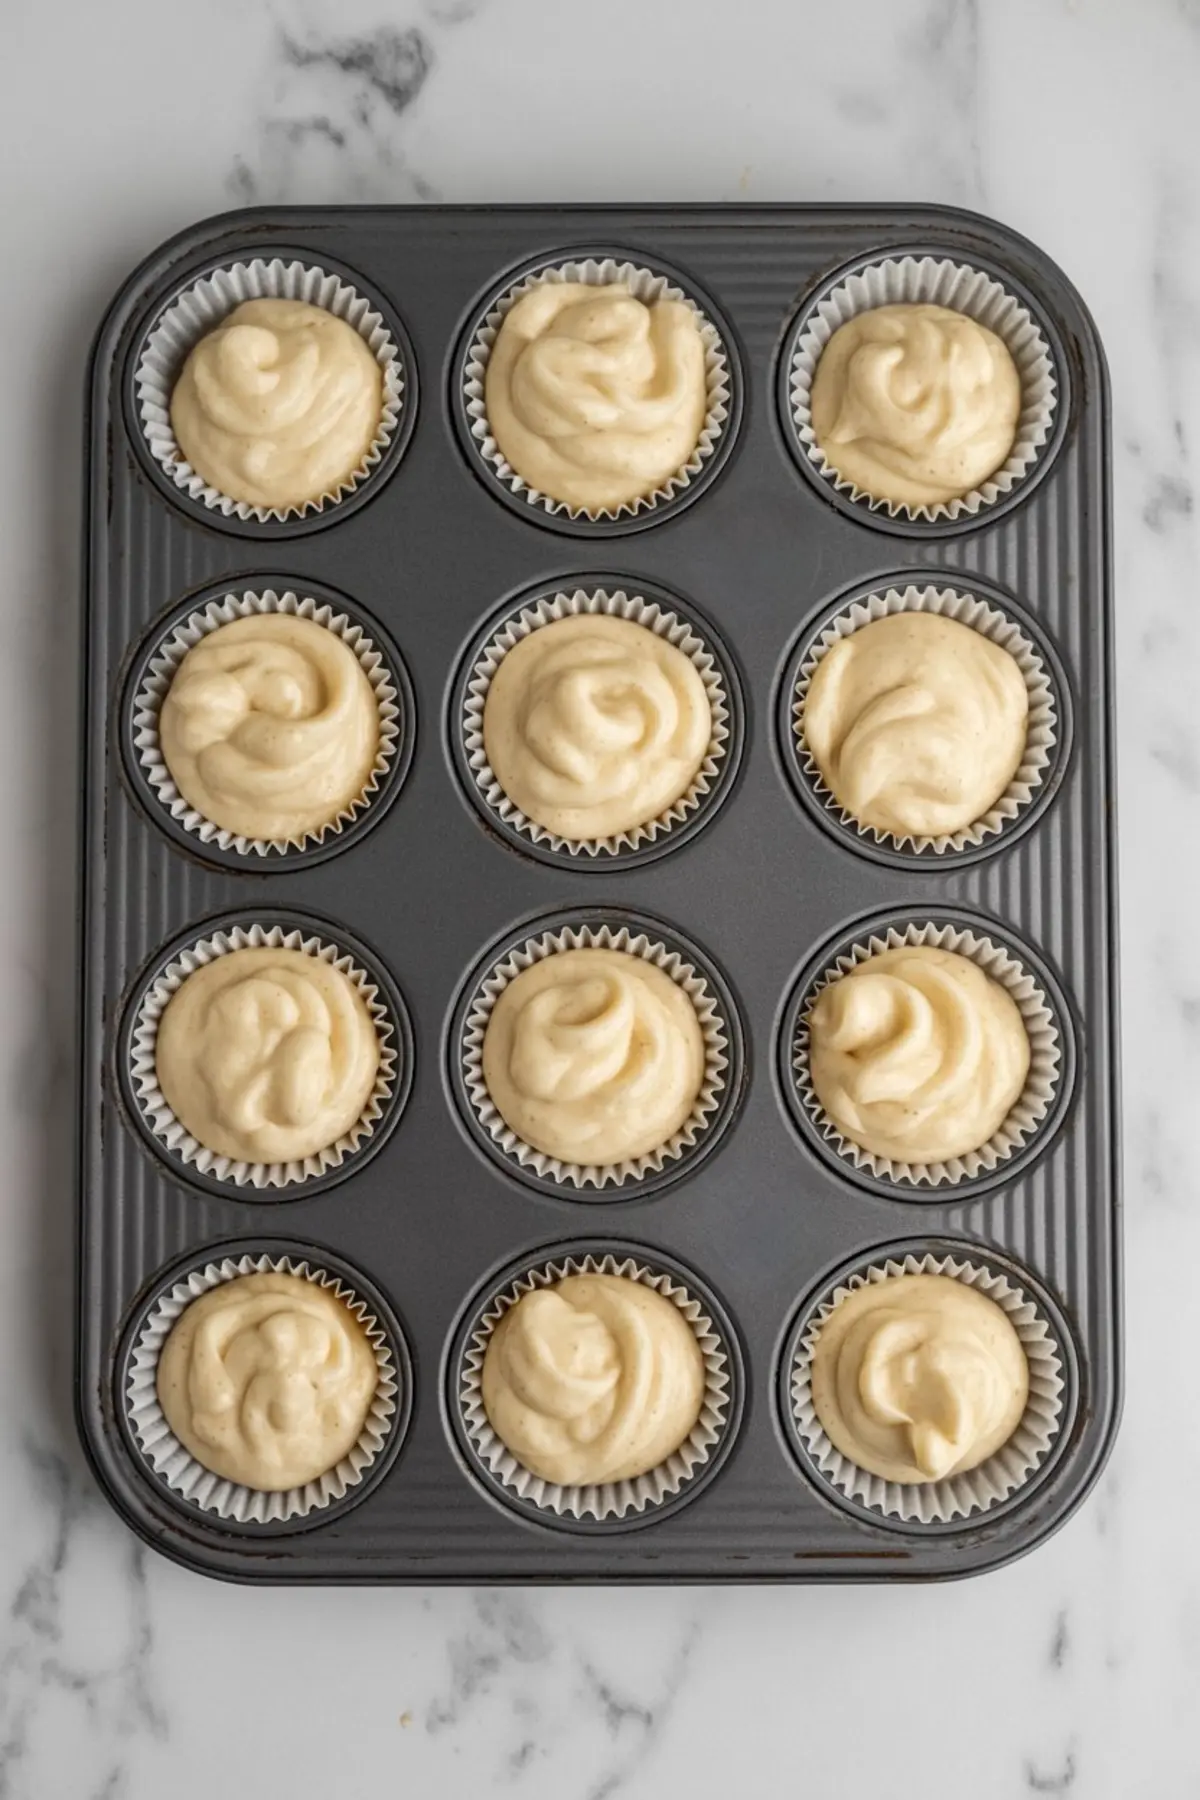
Once the batter is ready, divide it into two bowls and tint one yellow, one orange. You’ll spoon these into the liners in layers. For clean stripes, use two spoons and gently smooth the surface of each before adding the next. The top layer should sit level before baking.
Buttercream That Swirls Like a Pro
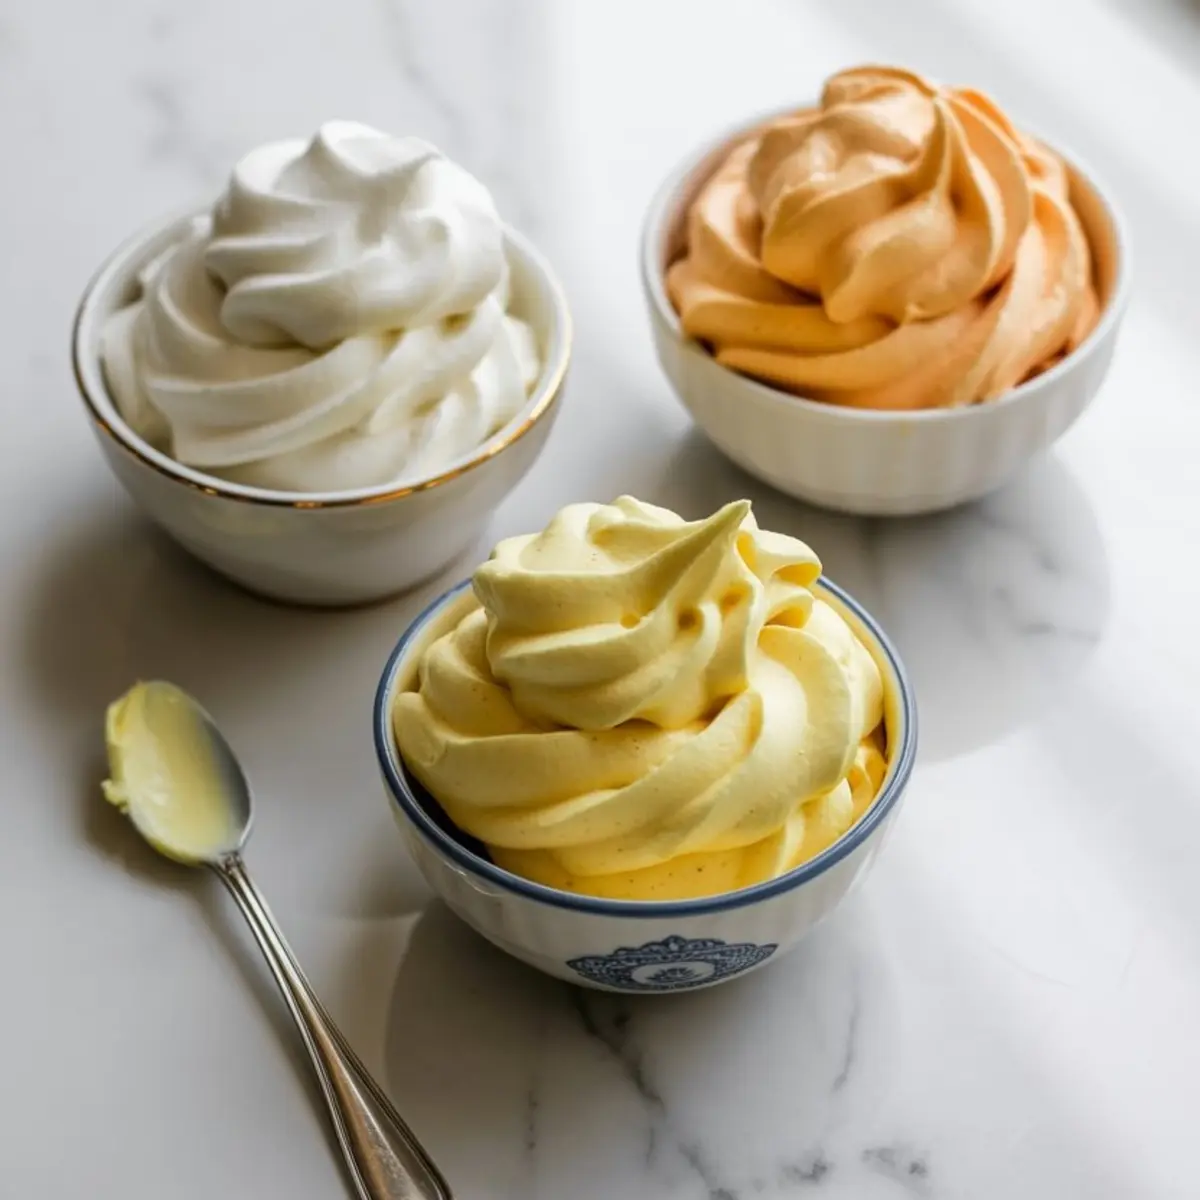
Start by beating your butter until it’s smooth. Then slowly work in the powdered sugar. I do this in stages so the sugar doesn’t fly everywhere. Once combined, add vanilla, a pinch of salt, and a bit of heavy cream. I’ve tested both milk and cream here. Cream gives a firmer hold, especially if you’re doing tri-color piping.
Divide the frosting into three bowls. Leave one white. Color one with yellow gel food coloring and the other with orange. Always use gel. Liquid food coloring can thin the frosting too much, and your piping will lose shape.
If you’re new to piping, I suggest practicing the tri-color swirl on parchment first. Place each frosting color in a separate small piping bag, then insert them all into a larger one fitted with a round tip. Squeeze gently. The swirl will reveal itself as the colors blend.
Color Piping Tips and a Quick Comparison
I’ve used both Wilton and AmeriColor gel tints. For yellow foods, Wilton’s “Golden Yellow” looks more natural, while AmeriColor’s “Egg Yellow” runs a bit too bright for my taste. For orange food coloring, AmeriColor wins. It gives a deeper shade that holds up under frosting.
One more thing. These cupcakes make great company with chocolate peanut butter cupcakes. The warm tones from both cupcakes play off each other well in photos and at parties.
Serving and Storing Candy Corn Cupcakes
Once frosted, these hold their shape at room temperature for up to two days. If your kitchen runs warm, place them in a cake box with the lid slightly ajar. For longer storage, refrigerate them. Just bring them to room temperature before serving so the frosting softens again.
Unfrosted cupcakes store well in an airtight container. You can make them a day ahead and frost them just before your event. I’ve done this for Halloween birthday parties, and it helped with timing. The frosting sets quickly, so you don’t need hours of prep right before guests arrive.
You can also decorate with sprinkles or small candy corn pieces if you want more detail. For party tables, that extra touch can help them stand out next to Halloween cupcakes with decoration ideas.
Final Notes Before You Bake
These cupcakes land in the sweet spot of festive and familiar. The flavor stays simple, which gives you room to play with color and styling. If you plan a full dessert board, they pair well with fall spiced desserts and chocolate-based options. I once grouped them with mini pecan pies and German chocolate cupcakes for a Thanksgiving buffet.
One last suggestion. If you’re piping a large batch, refill your bag halfway. This keeps pressure even and avoids color streaks from frosting shifting. It sounds small, but it helps the last few cupcakes look as polished as the first.
Save This Fall Cupcake Idea for Later
These candy corn cupcakes bring seasonal color without extra complication. The process gives satisfying results, and the flavor keeps things grounded.
Pin this post to your Halloween or fall dessert board so it’s easy to find again.
And if you bake them, share how they turned out in the comments. Let me know what gel colors you used or if you added your own twist. I’d love to hear how you made them yours.
Candy Corn Cupcakes Recipe
Candy corn cupcakes are a festive way to bring the colors of fall to your dessert table. I layer yellow and orange food coloring into the batter for a candy corn cupcake design, then finish with fluffy white frosting to mimic the classic candy. Some decorate them as Halloween candy corn cupcakes with sprinkles, while others style them as DIY candy corn cupcakes for parties. I’ve tried versions with candy corn cupcake frosting, simple Halloween cupcakes, and even Thanksgiving cupcakes, and they always look bright and cheerful. Among candy corn desserts, these cupcakes stand out as colorful, fun, and easy to make. Perfect for fall themed cupcakes, Halloween themed cupcakes, or just fall cupcake decorating ideas that bring a little seasonal charm.
Ingredients
- FOR THE CUPCAKES
- 1 ¾ cups all-purpose flour
- 1 ½ teaspoons baking powder
- ½ teaspoon baking soda
- ¼ teaspoon salt
- ½ cup unsalted butter, softened
- 1 cup granulated sugar
- 2 large eggs
- 2 teaspoons vanilla extract
- ½ cup sour cream
- ½ cup whole milk
- FOR THE BUTTERCREAM
- 1 cup unsalted butter, softened
- 3 ½ cups powdered sugar
- 2 tablespoons heavy cream or milk
- 1 teaspoon vanilla extract
- Pinch of salt
- Yellow gel food coloring
- Orange gel food coloring
Instructions
- PREHEAT AND PREP: Preheat your oven to 350°F (175°C). Line a 12-cup muffin pan with paper liners and set aside.
- COMBINE DRY INGREDIENTS: In a medium mixing bowl, whisk together the all-purpose flour, baking powder, baking soda, and salt until well combined. Set aside.
- CREAM BUTTER AND SUGAR: In a large mixing bowl, use an electric mixer to cream the softened butter and granulated sugar together on medium speed until light and fluffy, about 2–3 minutes.
- ADD EGGS AND VANILLA: Beat in the eggs one at a time, mixing well after each addition. Stir in the vanilla extract.
- MIX IN SOUR CREAM: Add the sour cream and mix until fully incorporated, scraping the bowl as needed.
- ADD FLOUR AND MILK: Alternate adding the dry ingredients and milk to the batter in three additions, starting and ending with the dry. Mix until just combined; do not overmix.
- FILL CUPCAKE LINERS: Divide the batter evenly between the prepared cupcake liners, filling each about ? full.
- BAKE: Bake for 18–22 minutes or until a toothpick inserted into the center comes out clean. Let cupcakes cool in the pan for 5 minutes, then transfer to a wire rack to cool completely.
- MAKE THE BUTTERCREAM: In a large bowl, beat the softened butter on medium-high speed until smooth and creamy. Gradually add the powdered sugar, mixing on low speed until incorporated.
- ADD CREAM AND FLAVORING: Add the vanilla extract, salt, and heavy cream or milk. Beat on high speed for 2–3 minutes until light and fluffy. Adjust consistency with more cream if needed.
- DIVIDE AND COLOR FROSTING: Divide the buttercream evenly into three bowls. Leave one white, tint one with yellow gel food coloring, and tint the third with orange gel food coloring. Mix each color thoroughly.
- PIPE THE FROSTING: Fit a piping bag with a large round tip or snip the end of a large plastic bag. Begin with yellow frosting and pipe a ring around the outer edge of each cupcake. Follow with a smaller ring of orange frosting inside the yellow, then top with a small dollop of white frosting in the center.
- OPTIONAL MULTI-COLOR PIPING: For a tri-color swirl effect, fill three separate piping bags with each color and place them inside a larger bag fitted with a round tip. Pipe gently to reveal all three colors at once. Practice on parchment paper before decorating the cupcakes.
Notes
Use gel food coloring for the most vibrant and accurate colors. Cupcakes can be made one day ahead and stored unfrosted in an airtight container. Frosted cupcakes should be kept at room temperature for up to two days or refrigerated if needed. Allow them to come to room temperature before serving.
Nutrition Information
Yield
12Serving Size
1Amount Per Serving Calories 560Total Fat 29gSaturated Fat 17gTrans Fat 0gUnsaturated Fat 10gCholesterol 106mgSodium 224mgCarbohydrates 71gFiber 1gSugar 55gProtein 5g