I remember standing in my grandmother’s cozy kitchen, inhaling the sweet aroma of chocolate batter as it bubbled in the oven. Those early days sparked my fascination with cupcakes, and I still feel the same excitement each spring.
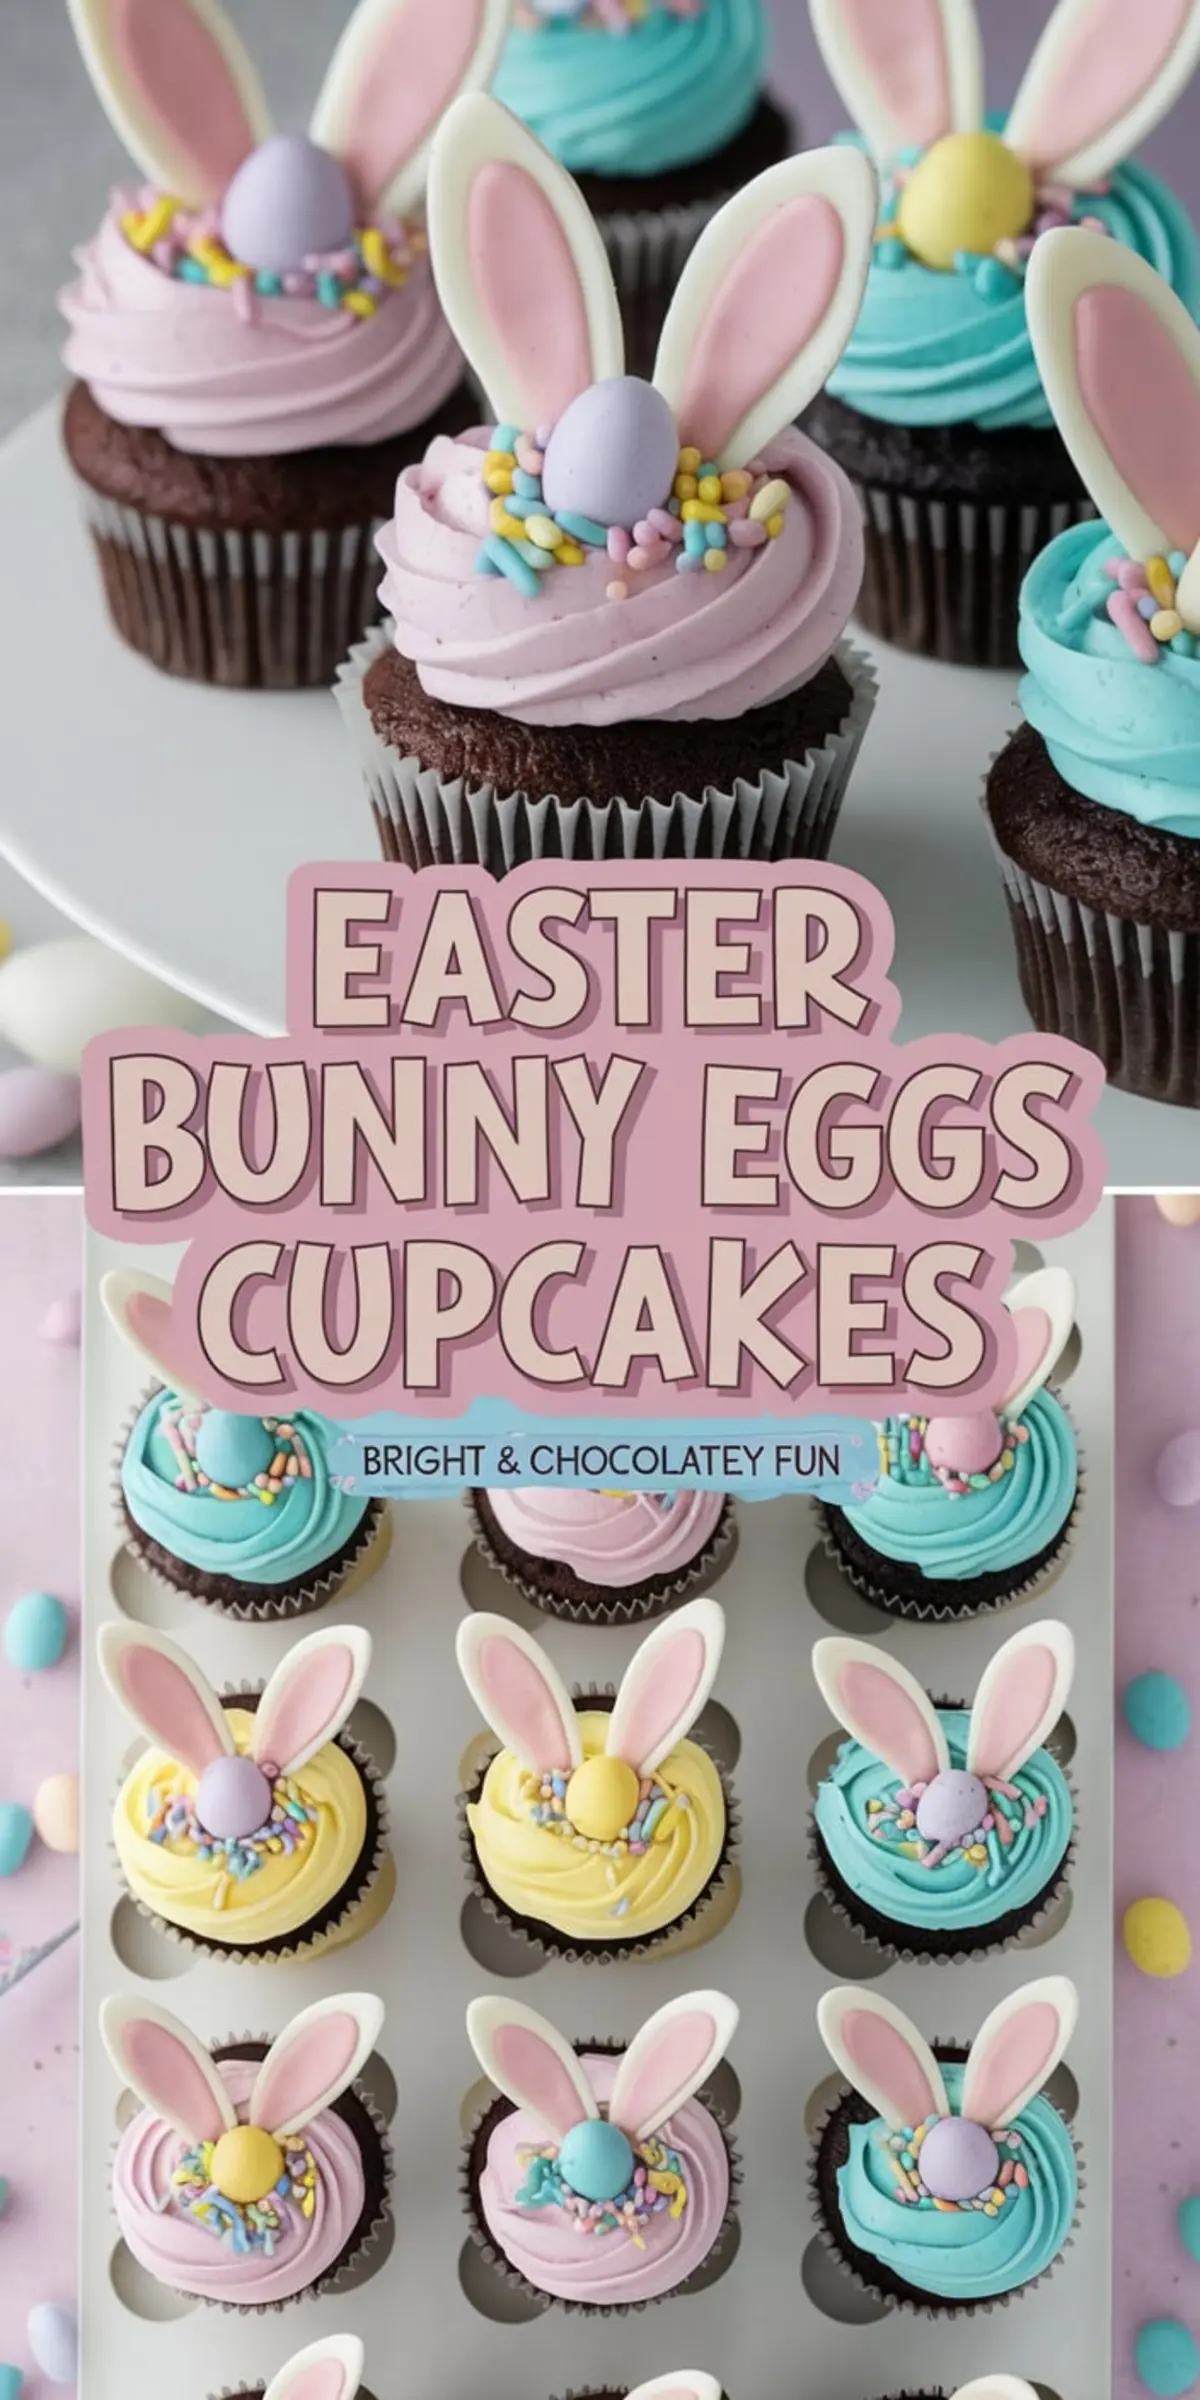
Easter brings bright colors and playful designs, so this recipe blends classic chocolate flavors with pastel frosting and cute fondant ears. My younger cousins once helped me shape whimsical bunny decorations, and I still grin at those memories. This guide walks you through ingredients, steps, and suggestions for a festive celebration.
Following a special diet?
Every recipe on this site can be converted to gluten-free, vegan, dairy-free, keto, nut-free or egg-free with adjusted ratios so nothing falls flat.
Try the Recipe Converter →Gathering Ingredients For Easter Bunny Egg Cupcakes
My approach starts with the basics: flour, cocoa, sugar, and leavening agents. These dry components lay the groundwork for a moist texture. Eggs, milk, and a mild oil create a smooth blend that bakes into soft cupcakes.
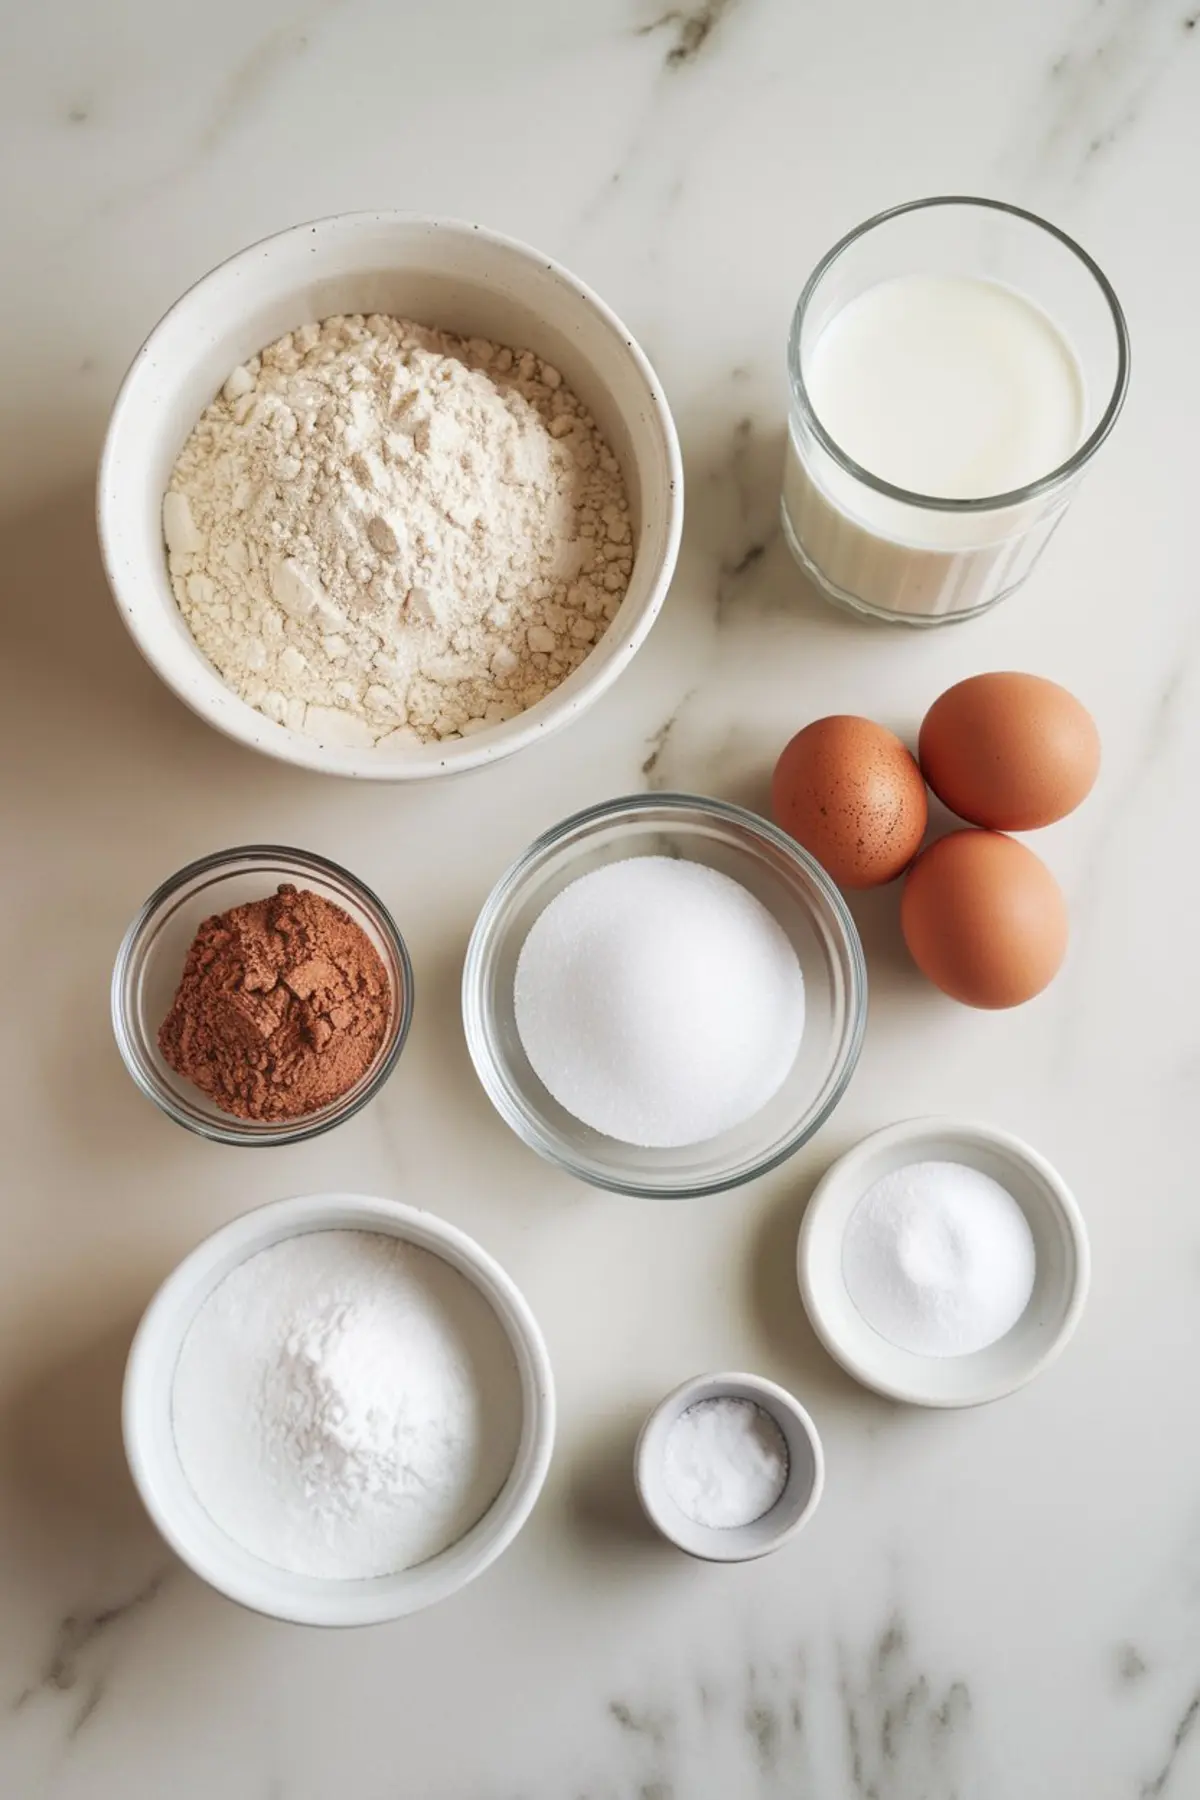
A gentle pour of boiling water sets the batter apart from ordinary chocolate cakes, giving it a lighter crumb that feels heavenly. I reached this combination after countless trials, testing different proportions until I felt satisfied with both taste and consistency. Vanilla extract finishes the base with subtle sweetness.
Crafting Chocolate Cupcakes: My Joyful Baking Routine
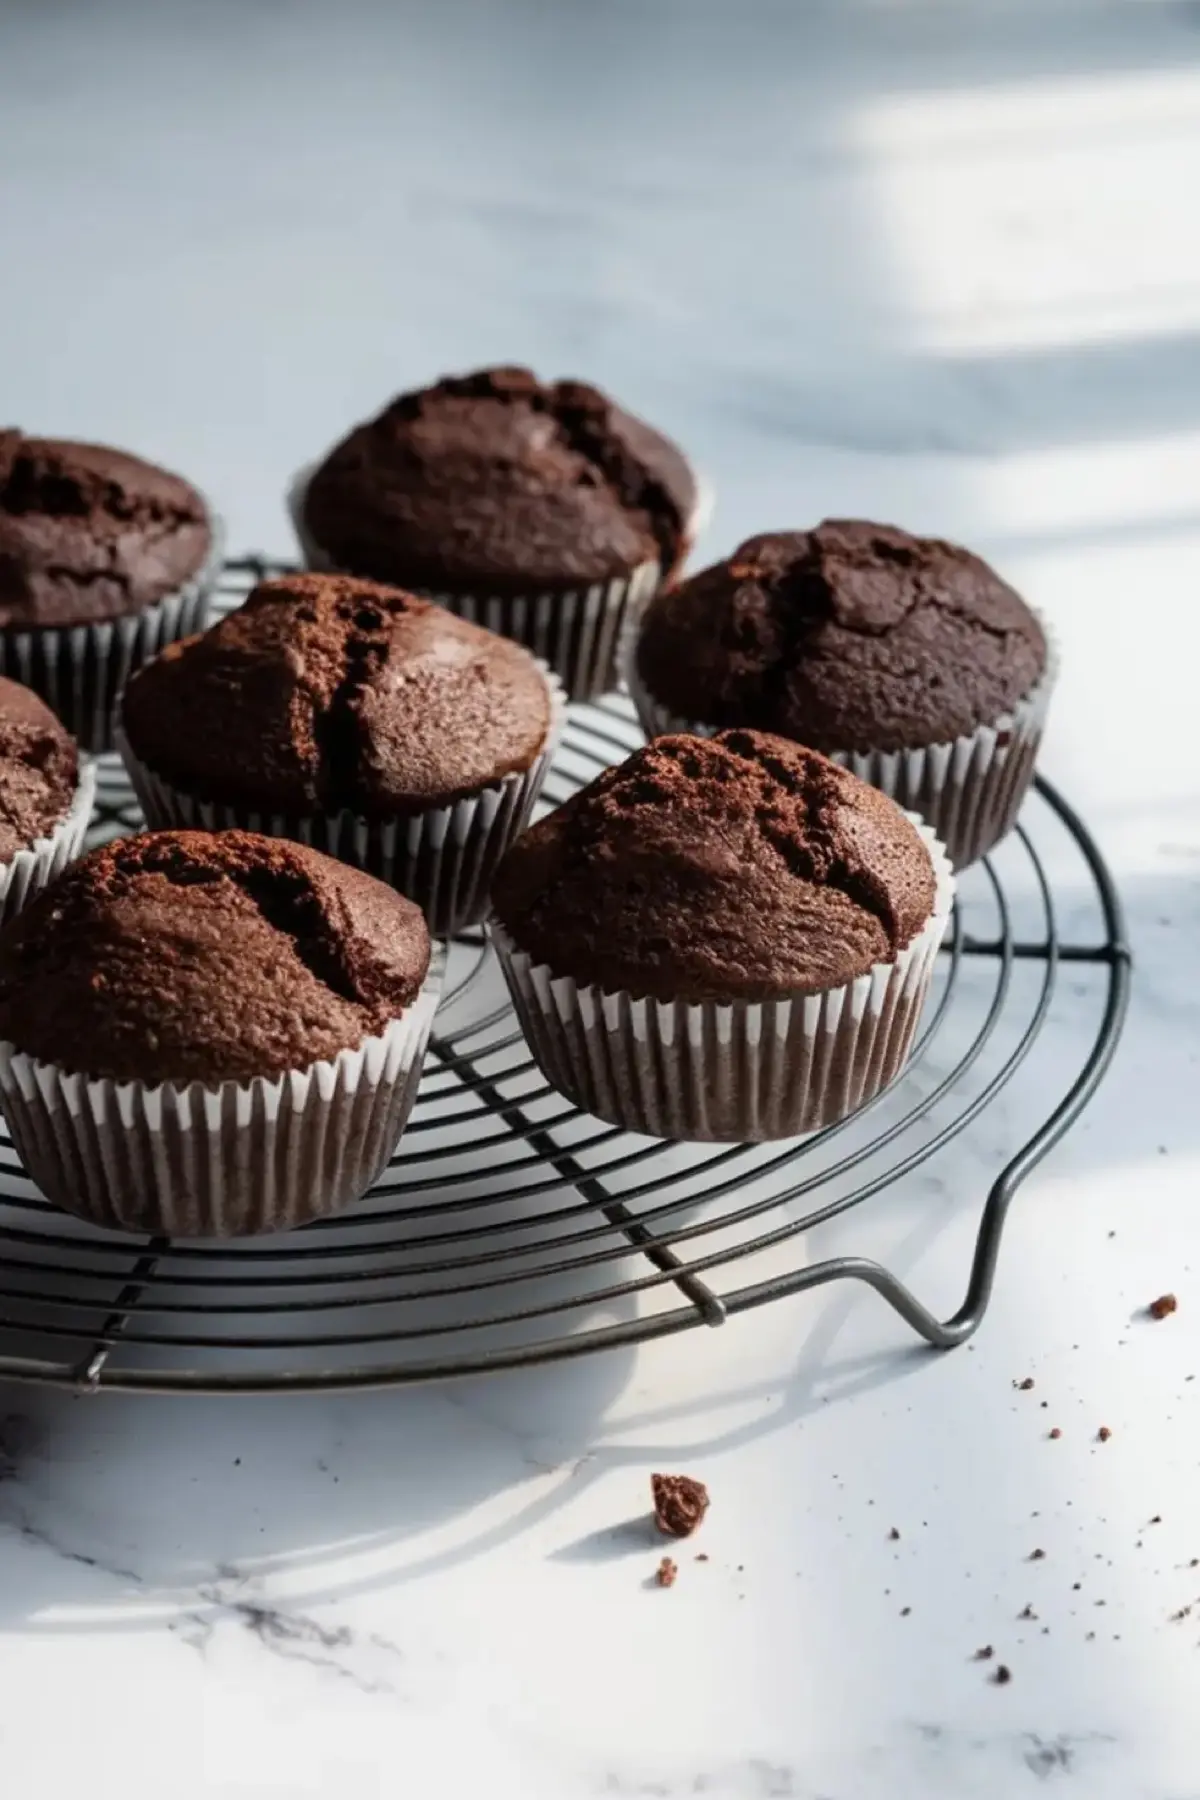
I begin by preheating the oven and setting up a lined muffin tin. Then I sift the dry mix in a roomy bowl, ensuring no lumps hide in the flour or cocoa. In my past attempts, lumps sometimes led to uneven textures.
The eggs, milk, and oil glide in next, and I whisk everything until the batter is uniform. Adding boiling water feels almost magical, as it thins the mixture, but I take care to stir thoroughly. I fill each liner and bake for around 20 minutes. Testing with a toothpick helps me gauge doneness, and I let the cupcakes rest until they cool completely.
Making Pastel Buttercream Frosting
I enjoy a rich frosting that complements the chocolate beneath. Butter, powdered sugar, a splash of cream, and pure vanilla create a creamy swirl. I once tried margarine in a pinch, but it never yielded that light, luxurious mouthfeel. I stick to softened butter for easy blending, then whip it all together. A few drops of gel coloring transform plain frosting into soft pastel shades.
Each color reminds me of spring blossoms on a sunny day, and I usually divide the frosting into small bowls, so each cupcake can wear its own pastel hue.
Shaping Bunny Ears With Fondant
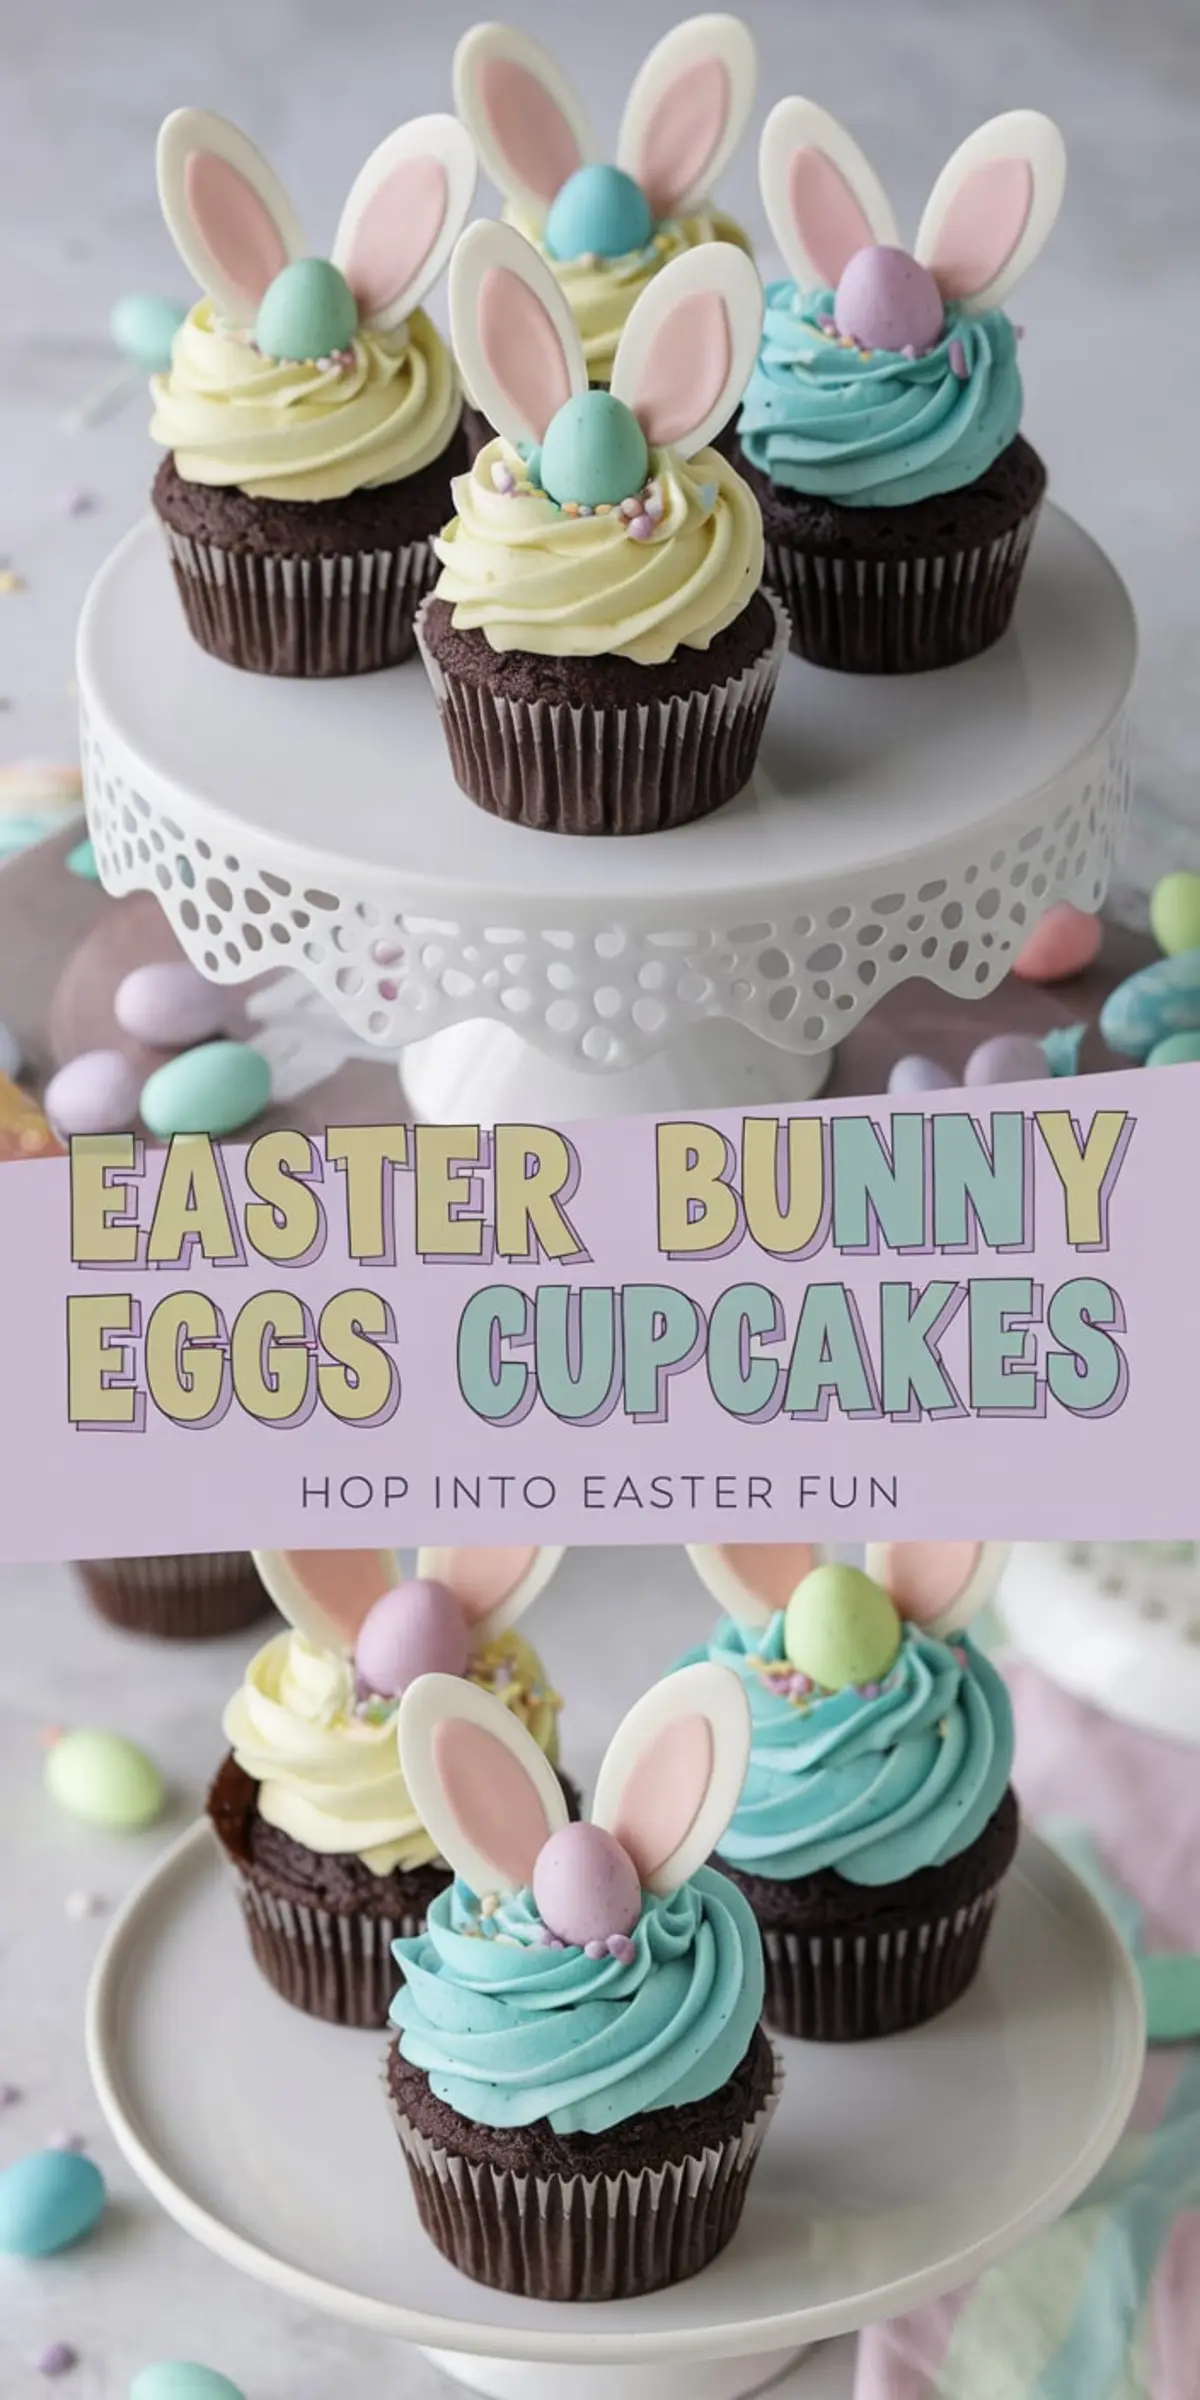
I prefer simple fondant designs for these cupcakes. White fondant handles the outer shape, and pink fondant forms the cute inner detail. I cut oval pieces, press them gently together, and let them dry. My first attempts looked crooked, but practice helped me master a steady hand. If I see any gaps, a dab of water acts like glue. When the ears feel firm, I know they will stand upright on the frosting.
That detail completes the joyful bunny theme, capturing the spirit of springtime and sweet treats.
Creating Festive Cupcake Decorations
I swirl pastel buttercream on each cooled cupcake with a piping tip that suits my mood. A star tip produces ridges, while a round tip creates a smooth dome. Then I add a small candy egg on top as a nose, pressing gently so it stays put. The fondant ears tuck behind that candy, standing at attention like curious rabbits. Sometimes I dust the tops with sprinkles, especially if children are around to watch. I’ve found they love helping with that finishing step. A quick pinch of sparkly bits can make each treat look extra cheerful.
Easter Dessert Inspiration: More Sweet Ideas
I like to expand my Easter dessert table with a variety of colorful bakes. My Carrot Cake Bars taste amazing with a tangy cream cheese layer. My nephews request them every year. I also enjoy whipping up a simple Easter Dirt Cake that features layers of pudding and cookies in a playful presentation. If you crave something layered and moist, my Easter Poke Cake remains a crowd-pleaser, complete with colorful fillings. And for cookie lovers, my Easter Cookie Cake brings a soft, sweet bite that pairs well with afternoon coffee.
Serving And Storing These Cupcakes
I often serve these cupcakes after a late brunch or as an afternoon snack with a hot beverage. The chocolate base remains tender if stored properly, so I keep them in a sealed container to hold in moisture. Buttercream frosting firms up a bit in the fridge, but a brief rest at room temperature softens it. I recommend adding the fondant ears on the day of serving, so they look crisp and maintain their shape. My family usually devours them before I worry about staleness, but leftovers can last a few days.
Why I Enjoy These Special Cupcakes
I savor the contrast of chocolate cake and pastel frosting, and I appreciate how the bunny ears bring a smile to anyone who sees them. My earliest memories involved helping my mother decorate our holiday desserts, so I link these cupcakes to a sense of warmth and shared laughter. The aroma of cocoa still transports me back to that small kitchen, where I first discovered the simple joy of mixing ingredients by hand. That memory guides me each time I bake.
Closing Thoughts: Pin And Share Your Experience
I love passing along recipes that blend visual delight with tempting tastes. You can save this idea on your boards for a future Easter celebration or spring party. You can also let me know in the comments how the cupcakes turned out, or if you have any questions along the way. I look forward to hearing about your results, your own creative twists, and the memories you forge as you bake.
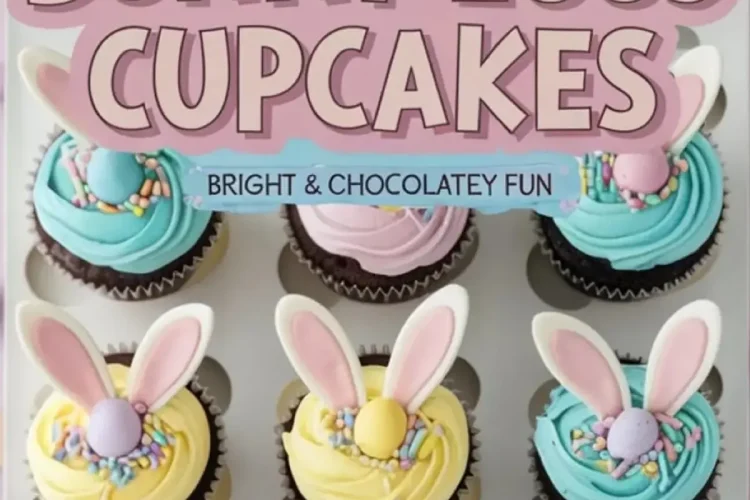
Easter Bunny Egg Cupcakes Recipe

A fun and festive dessert, Easter Bunny Egg Cupcakes bring together moist chocolate cupcakes, pastel-colored buttercream frosting, and adorable fondant bunny ear decorations. These charming treats are perfect for celebrating the season with family and friends.
Ingredients
- FOR THE CHOCOLATE CUPCAKES
- 1 ½ cups all-purpose flour
- 1 cup granulated sugar
- ½ cup unsweetened cocoa powder
- 1 teaspoon baking powder
- ½ teaspoon baking soda
- ½ teaspoon salt
- 2 large eggs
- ¾ cup milk
- ½ cup vegetable oil
- 1 teaspoon vanilla extract
- ¾ cup boiling water
- FOR THE VANILLA BUTTERCREAM FROSTING
- 1 cup unsalted butter, softened
- 4 cups powdered sugar
- 2-3 tablespoons heavy cream (or milk)
- 1 teaspoon vanilla extract
- Gel food coloring (pastel pink, blue, yellow, green, or purple)
- FOR THE BUNNY EAR DECORATIONS
- White fondant
- Pink fondant
- Small candy eggs (like mini chocolate eggs or speckled eggs)
- Edible glue or water
Instructions
- BAKE THE CUPCAKES: Preheat the oven to 350°F (175°C) and line a muffin tin with cupcake liners. In a large bowl, sift together the flour, granulated sugar, cocoa powder, baking powder, baking soda, and salt. Add the eggs, milk, vegetable oil, and vanilla extract to the dry ingredients, then mix until smooth. Gradually stir in the boiling water, mixing until the batter is thin and uniform. Fill each cupcake liner about ⅔ full and bake for 18-22 minutes or until a toothpick inserted into the center comes out clean. Let the cupcakes cool completely before frosting.
- PREPARE THE BUTTERCREAM FROSTING: In a large mixing bowl, beat the softened butter until creamy and smooth. Gradually add the powdered sugar, one cup at a time, mixing on low speed. Add the heavy cream and vanilla extract, then beat on high speed for 2-3 minutes until the frosting is fluffy. Divide the frosting into separate bowls and tint each with gel food coloring to create pastel shades.
- MAKE THE BUNNY EARS: Roll out the white fondant to about ⅛ inch thick and use a small oval cutter (or a knife) to cut out ear shapes. Roll out the pink fondant and cut smaller ovals for the inner parts of the ears. Attach the pink ovals to the white ones using edible glue or a small dab of water. Allow the ears to dry for about 30 minutes to firm up.
- ASSEMBLE THE CUPCAKES: Pipe a generous swirl of pastel-colored frosting onto each cupcake using a star or round tip. Place a small candy egg on top of each cupcake to serve as the bunny's "nose." Gently press the fondant bunny ears into the frosting, positioning them upright. Scatter a few colorful sprinkles or edible pearls around the base of the ears for added decoration.
Notes
Allow enough time for the fondant decorations to dry to ensure they remain upright when added to the cupcakes.
Nutrition Information
Yield
12Serving Size
1Amount Per Serving Calories 593Total Fat 30gSaturated Fat 13gTrans Fat 0gUnsaturated Fat 15gCholesterol 96mgSodium 235mgCarbohydrates 78gFiber 1gSugar 62gProtein 5g
What piping tip was used for these? It’s perfect!
Hi Kayla,
I think I used a Wilton 1M for these. It’s one of my most-used tips for cupcake swirls like this. The open star shape gives that nice soft ripple without looking too fussy, and it works beautifully with a smooth buttercream. If you’re after the same look, that tip is a great starting point 💗 Let me know how it goes if you try it.