There’s something quietly beautiful about baking with pears. Unlike berries or stone fruits, they don’t demand attention. They wait, softening gently, sweetening slowly, holding their shape with grace.
This spiced pear bread recipe isn’t busy. It doesn’t have a swirl or a crumble or even a glaze. Just a soft loaf made from a yogurt-based batter and crowned with pear halves that settle into the surface like they belong there.
It’s simple and structured. And that’s what makes it stand out.
You’ll learn how to create a moist, clean-slicing loaf that highlights the natural sweetness and shape of ripe pears. This isn’t a dessert that tries to do too much. It’s the kind you make when you want the fruit to speak for itself.
Let’s get to it.
Following a special diet?
Every recipe on this site can be converted to gluten-free, vegan, dairy-free, keto, nut-free or egg-free with adjusted ratios so nothing falls flat.
Try the Recipe Converter →This Pear Quick Bread Works So Well
Yogurt brings a soft, tender crumb to this loaf, and eggs provide a light structure that lifts it just enough without becoming airy. There’s no cinnamon or nutmeg here, which may surprise you. I’ve tested those versions, and found that subtle flavors—almond, vanilla, and the floral note of ripe pear create a cleaner finish. The loaf feels fresh rather than heavy.
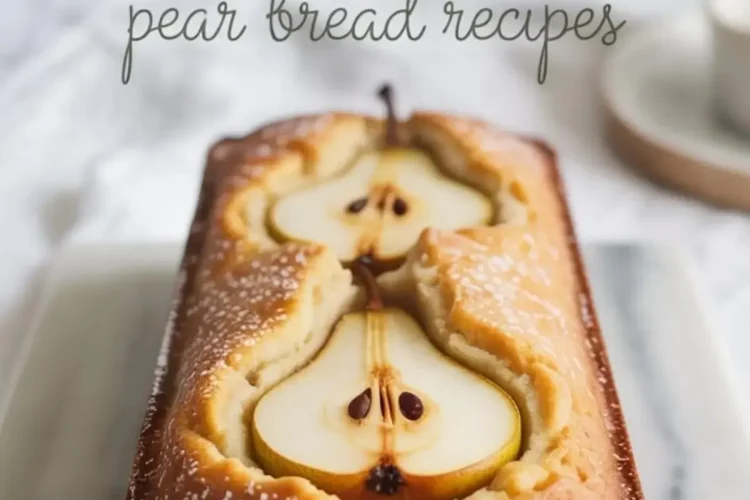
The pears don’t disappear into the batter. They’re halved, cored, and gently pressed into the top before baking. This method protects their shape and keeps the texture distinct from the cake beneath.
In my notes, I’ve found that using Greek yogurt instead of sour cream or milk helps maintain moisture while keeping the texture light. If you’ve baked my Easy Pumpkin Bread Recipe, you’ll recognize the same base here—but this one leans brighter and more delicate.
Choosing and Preparing the Pears
Use pears that are ripe but firm. You want fruit that yields slightly to pressure but hasn’t gone soft. Overripe pears will leak excess juice and may collapse into the cake as it bakes, leaving you with soggy patches.
I prefer Bosc or Anjou pears for this recipe. They hold their shape well and develop a subtle caramel note in the oven. If your pears are small, use two. If you have one large pear, that’s enough. Halve it, core it neatly, and rest the cut sides upward on the batter. Don’t push them all the way down just let them sit on the surface.
For a different fruit-forward bake, you might enjoy this Pear Tart Recipe, which uses thin slices layered like tiles. This loaf takes the opposite approach bolder, cleaner, simpler.
Mixing the Wet and Dry Ingredients
You’ll start by whisking the flour, baking powder, baking soda, and salt. Nothing unusual here, but take the time to blend these well. Uneven leavening leaves tunnels.
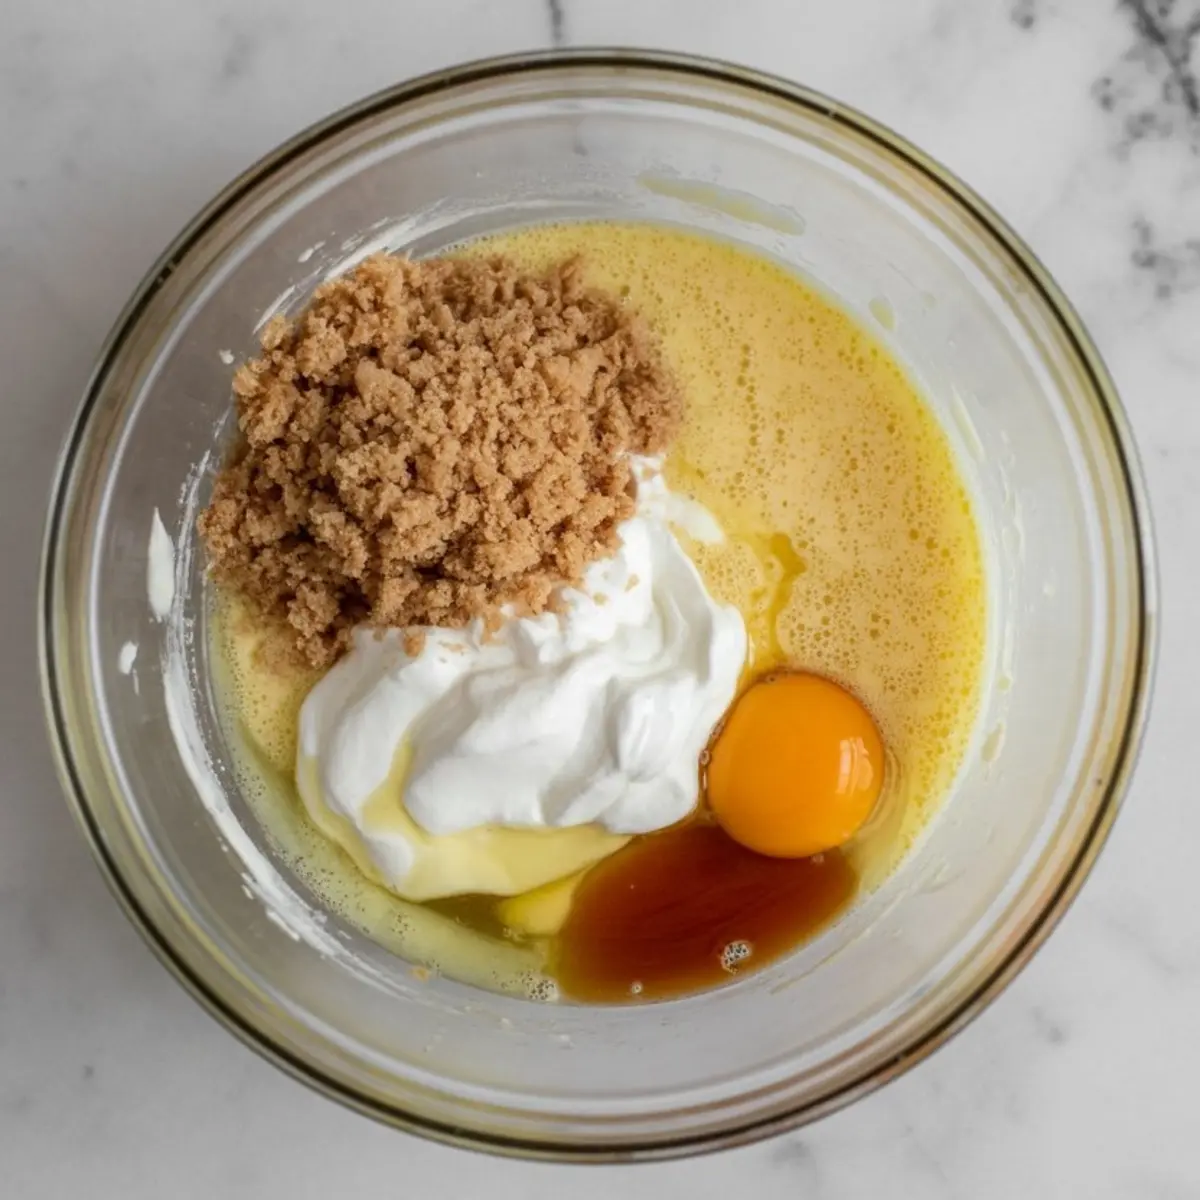
In a separate bowl, the eggs and sugar need attention. Whisk until the mixture becomes pale and slightly thickened. This step adds structure and helps the bread rise evenly.
Add the oil, yogurt, vanilla, and almond extract. The almond is optional, but I recommend it. It supports the flavor of the pear without overpowering it. I’ve tried both butter and oil here. Oil wins. Butter brings flavor, but it can tighten the crumb. For a lighter texture and better moisture retention, I always go with a neutral oil.
Combining and Assembling
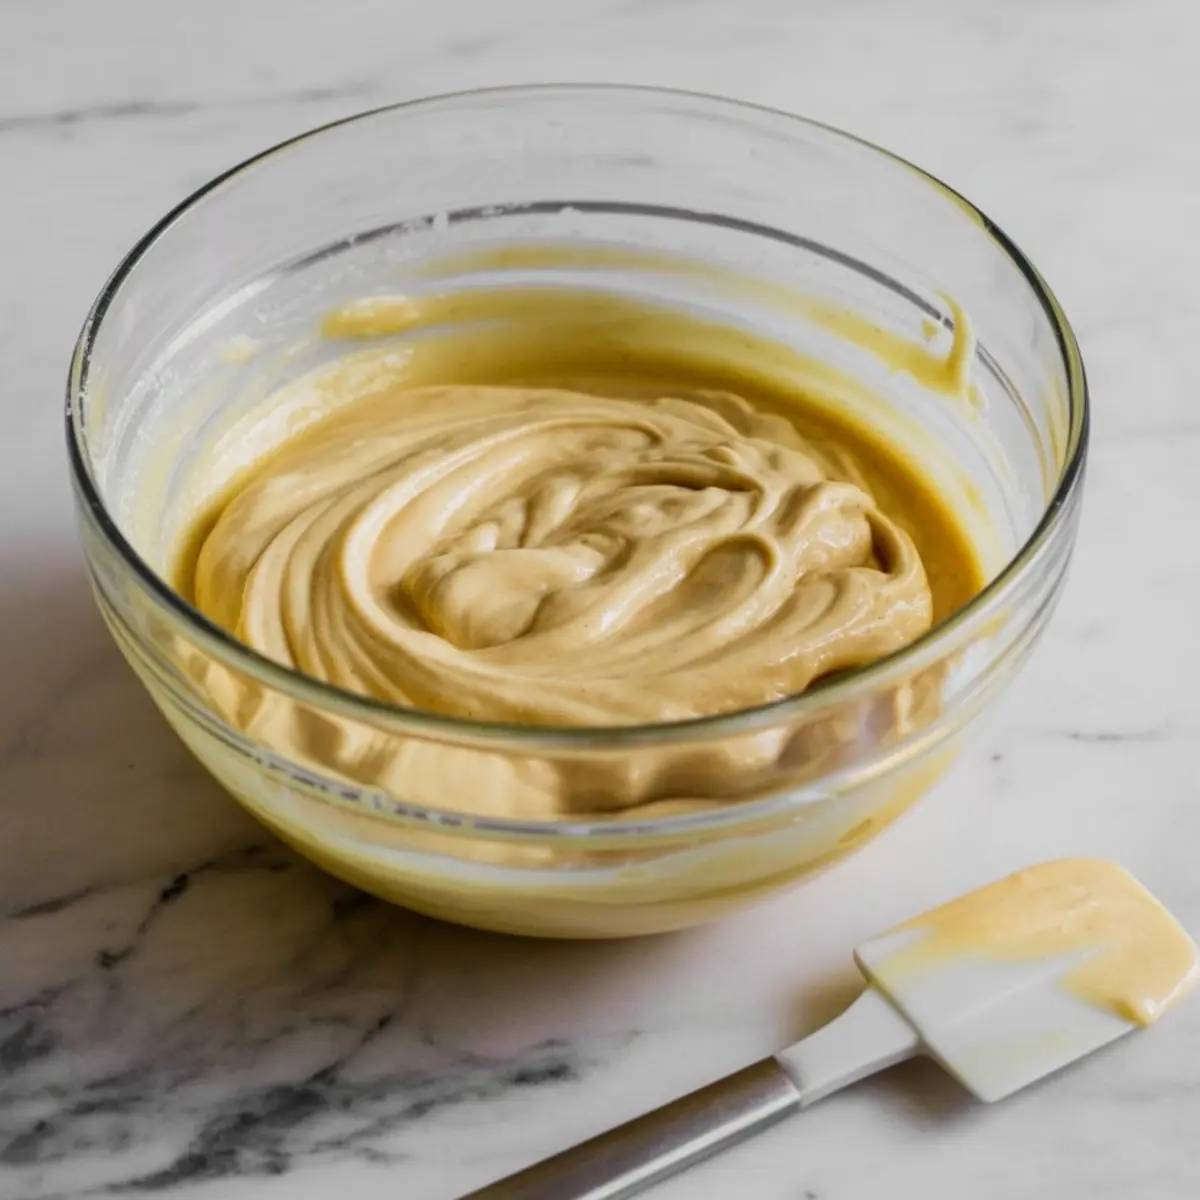
Fold the dry ingredients into the wet mixture gently. This isn’t the place to use a mixer. A spatula does the job without overworking the gluten. You want a smooth batter, not a stiff one.
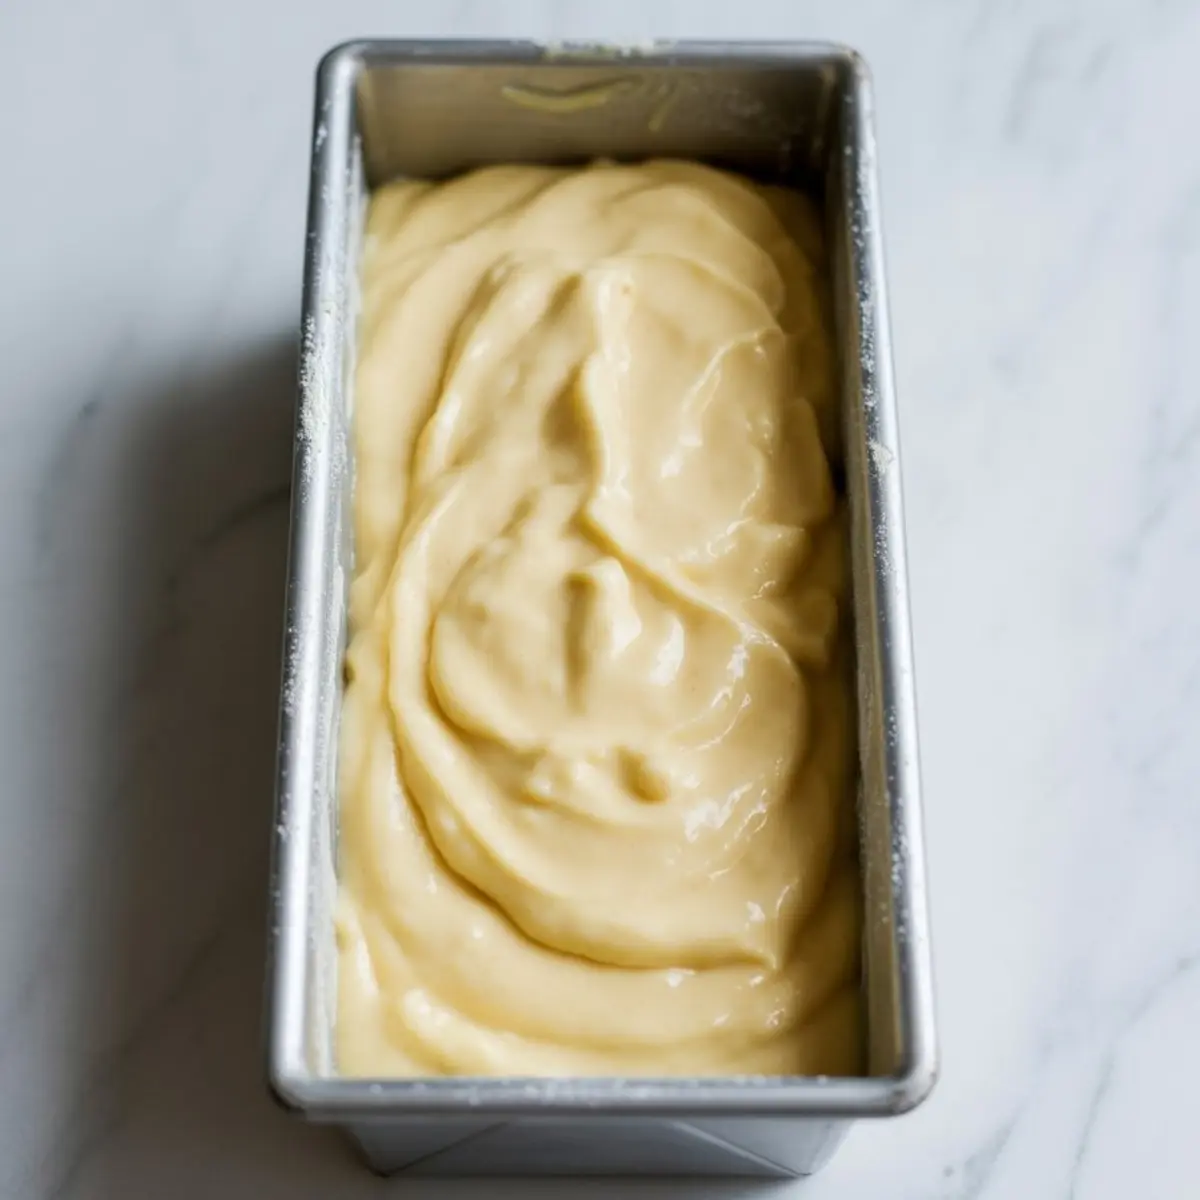
Pour into a lined loaf pan. Smooth the surface. Arrange the pear halves on top, cut side up, and press them slightly so they nestle into the batter. As the cake rises, the pears will stay visible—an understated, elegant finish.
If you love the clean, fruit-on-top look, the Pear Cake uses a similar layout but with a softer sponge base and powdered sugar crust.
Baking Time and Doneness
Bake at 350°F for 45 to 55 minutes. Keep an eye on the edges around the 40-minute mark. The surface should be golden and set. A toothpick inserted into the cake (not the fruit) should come out clean.
If the pears begin to brown too quickly, tent the loaf with foil during the last 10 minutes. Let it cool in the pan for 10 minutes, then transfer to a wire rack. Cooling completely before slicing makes all the difference. This bread needs time to settle and firm up.
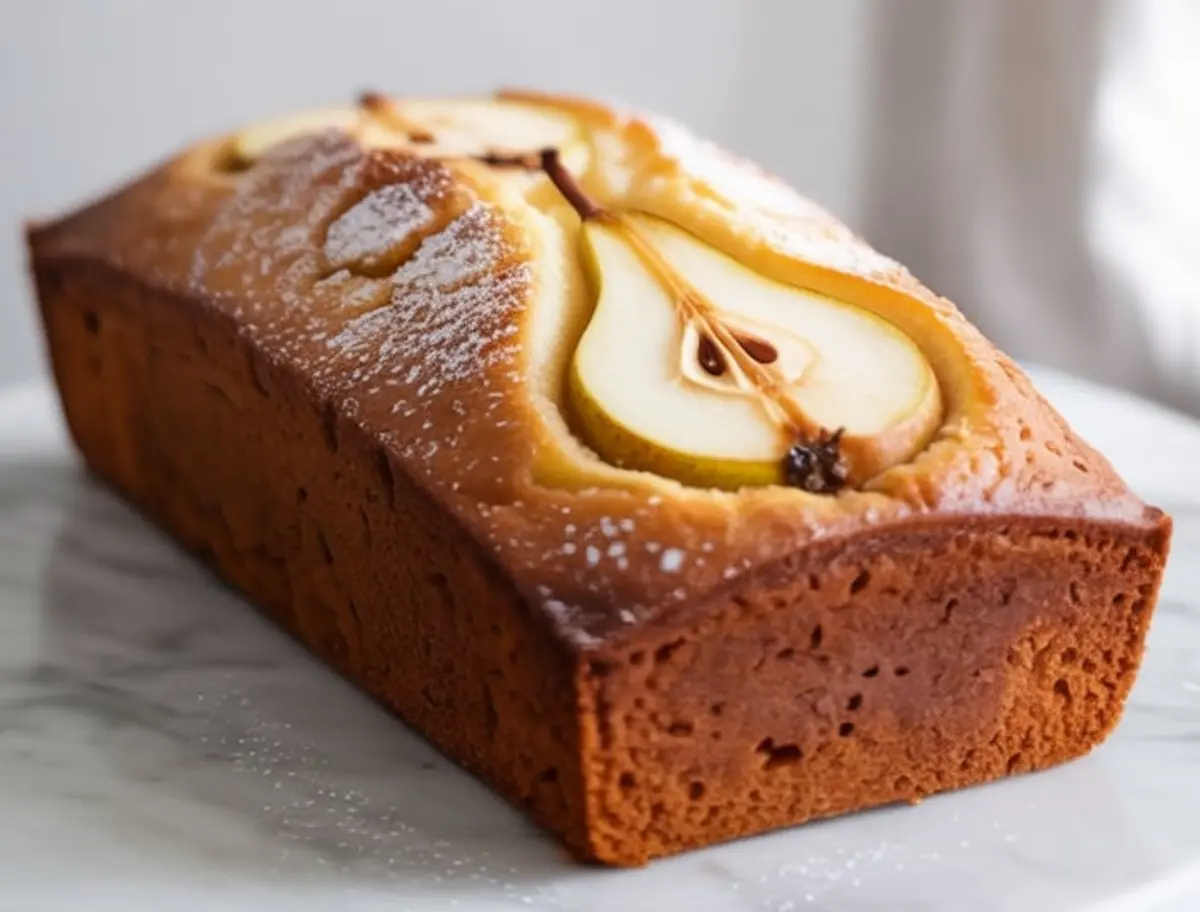
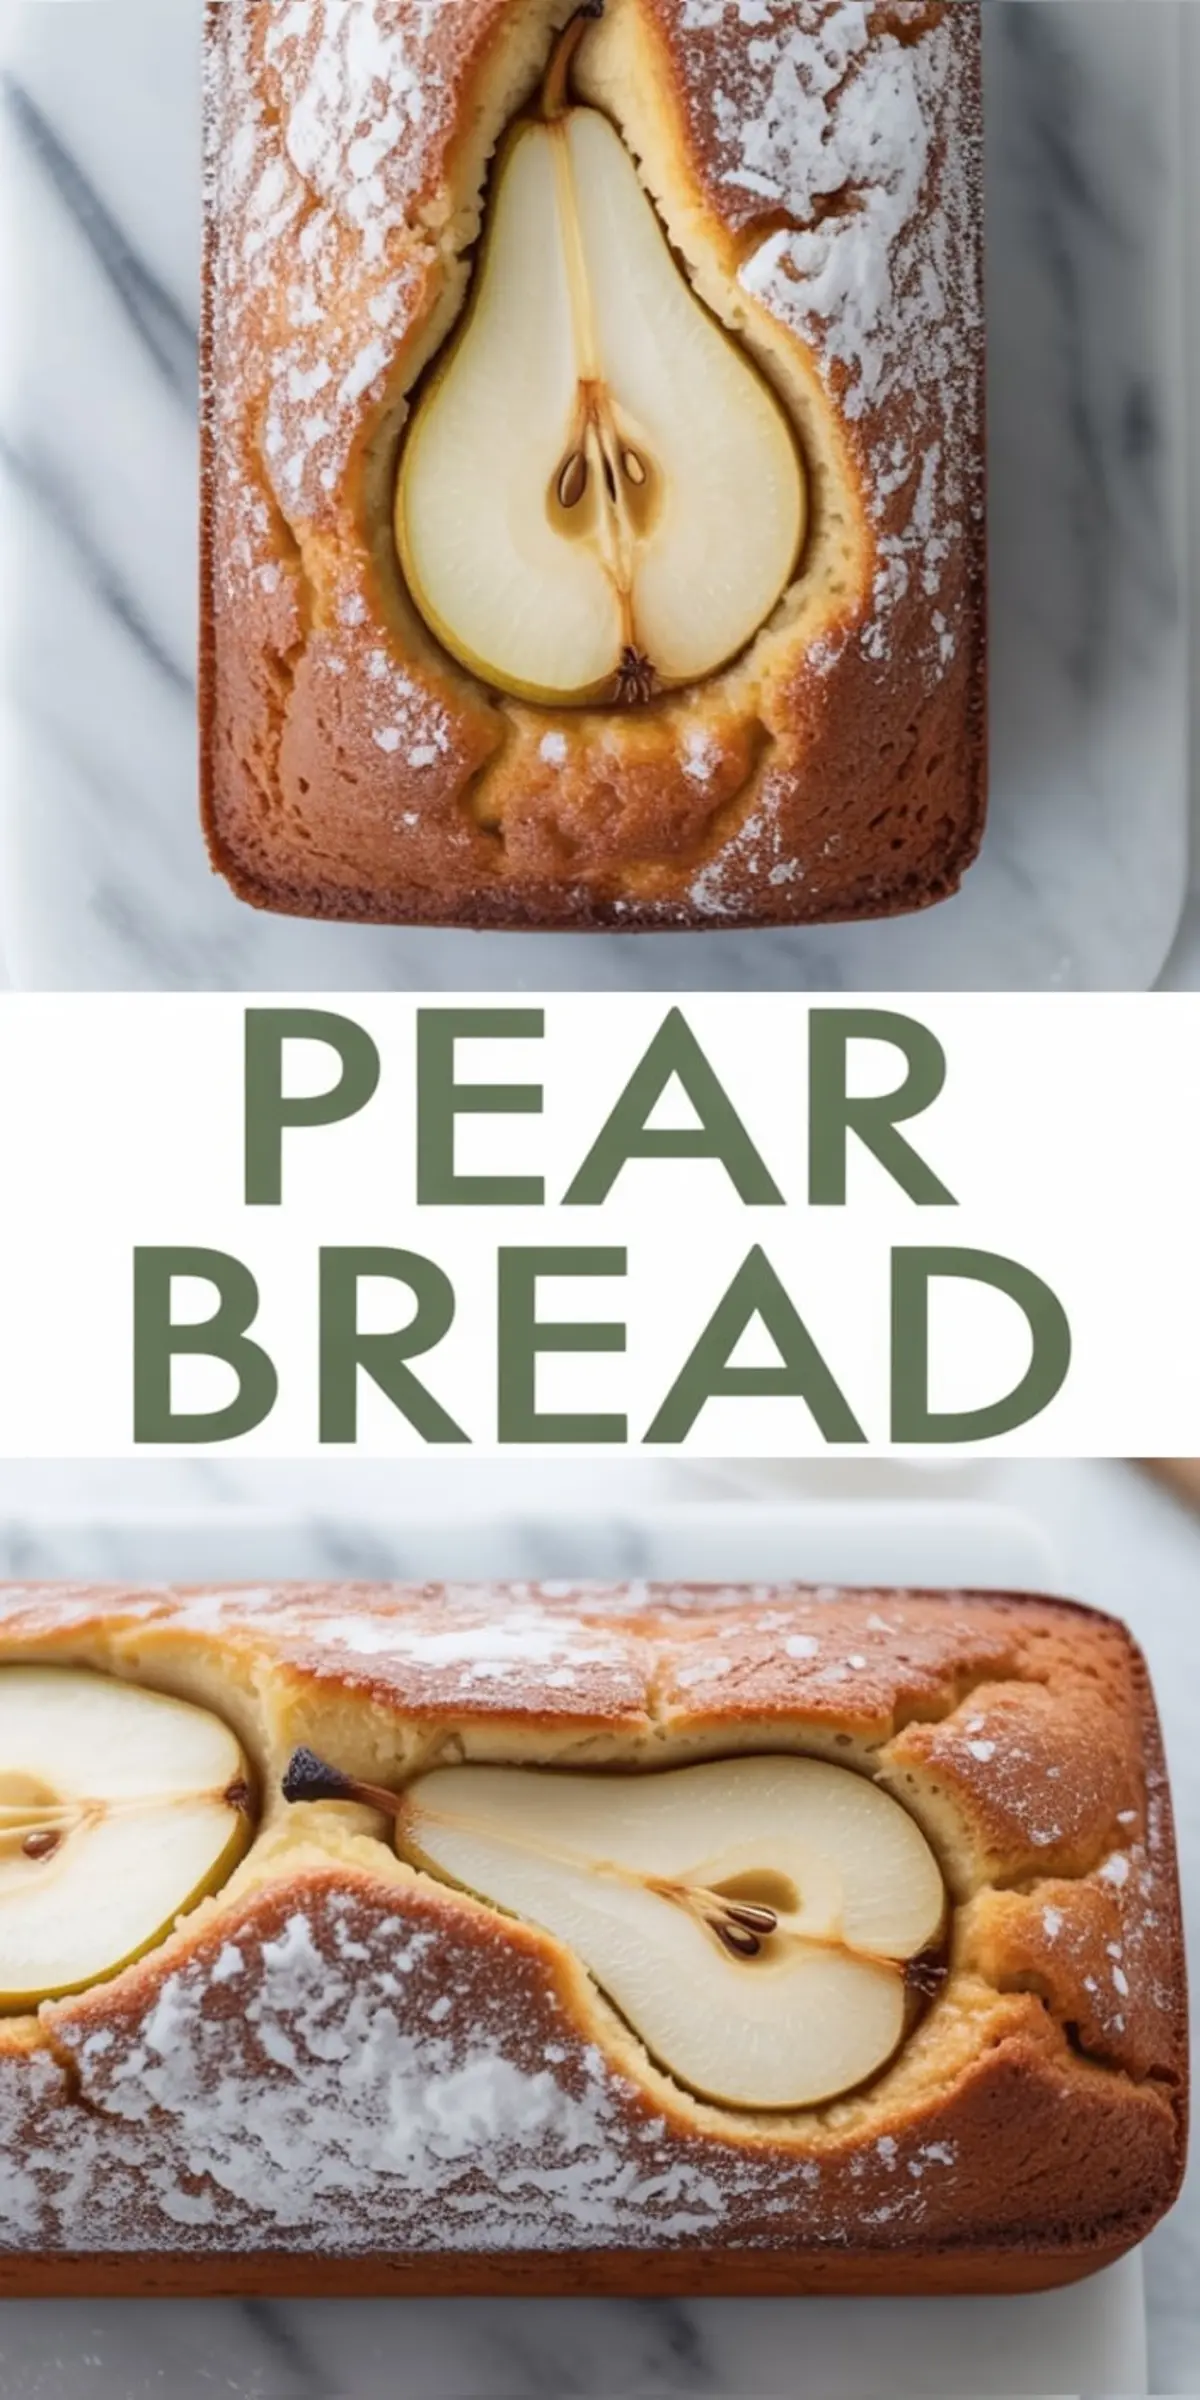
Dust with powdered sugar once cool, if you like a little contrast. It’s not essential, but it adds a soft visual finish.
If you’re drawn to subtle fruit loaves like this one, the Cranberry Orange Bread offers a sharper, brighter flavor profile that complements fall mornings perfectly.
Serving and Storing Pear Dessert Recipes Like This One
Slice this loaf cleanly with a sharp knife. You’ll get even pieces with distinct pear centers that hold their shape. The crumb stays moist, which makes it a good candidate for make-ahead baking.
Store leftovers at room temperature for up to 2 days in an airtight container. For longer storage, keep it in the fridge for up to 4 days. It holds up well, but I prefer serving it at room temperature.
This bread works for breakfast, afternoon coffee, or a light dessert. It doesn’t need anything else—though I’ve served it once with a spoonful of crème fraîche on the side, and that went over well.
If you’re experimenting with spiced loaf variations, the Pistachio Bread Recipe leans nuttier and saltier, offering a completely different balance worth exploring.
Ingredient Comparison: Oil vs. Butter in Pear Bread
I’ve tested this loaf with both oil and melted butter. Butter adds flavor, but in this case, the crumb came out denser. Oil, on the other hand, creates a lighter, more tender structure that works better with the moisture from the pears.
If you value clean slices that hold together without crumbling, oil is the better choice. It also makes the loaf more stable after refrigeration. For this reason, I always stick with oil for fruit-based quick breads.
Save and Share Your Bake

Save this recipe to your Pinterest board so you have it handy next time pears start ripening on the counter. It’s a loaf you’ll come back to more than once.
Have questions or want to share how your pear bread turned out? Drop a comment below. I’d love to hear your variations, swaps, or serving ideas. Let’s make this space a place for sharing good food and thoughtful baking.
Pear Bread Recipe
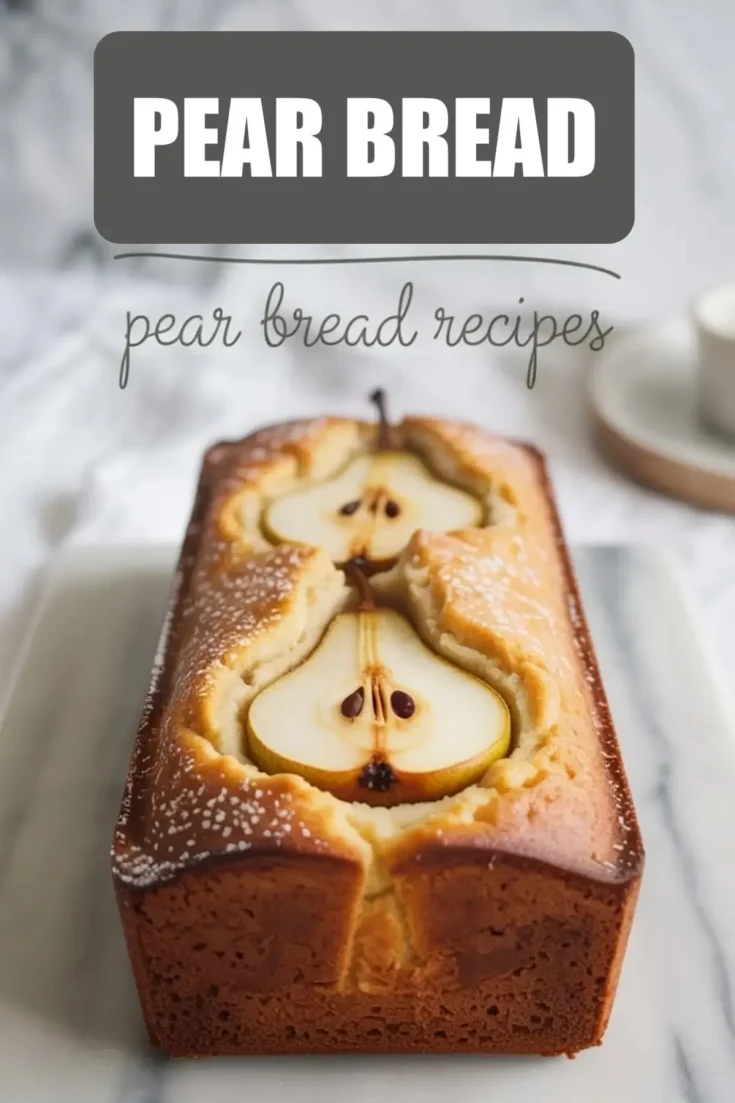
This cake uses a yogurt-based batter to create a soft, tender crumb. Instead of mixing fruit into the batter, ripe pear halves are arranged on top before baking. As the cake bakes, the pears gently settle into the surface, creating a beautiful finish and subtle sweetness. The result is a clean, moist loaf that slices neatly and showcases the fruit’s natural flavor and shape.
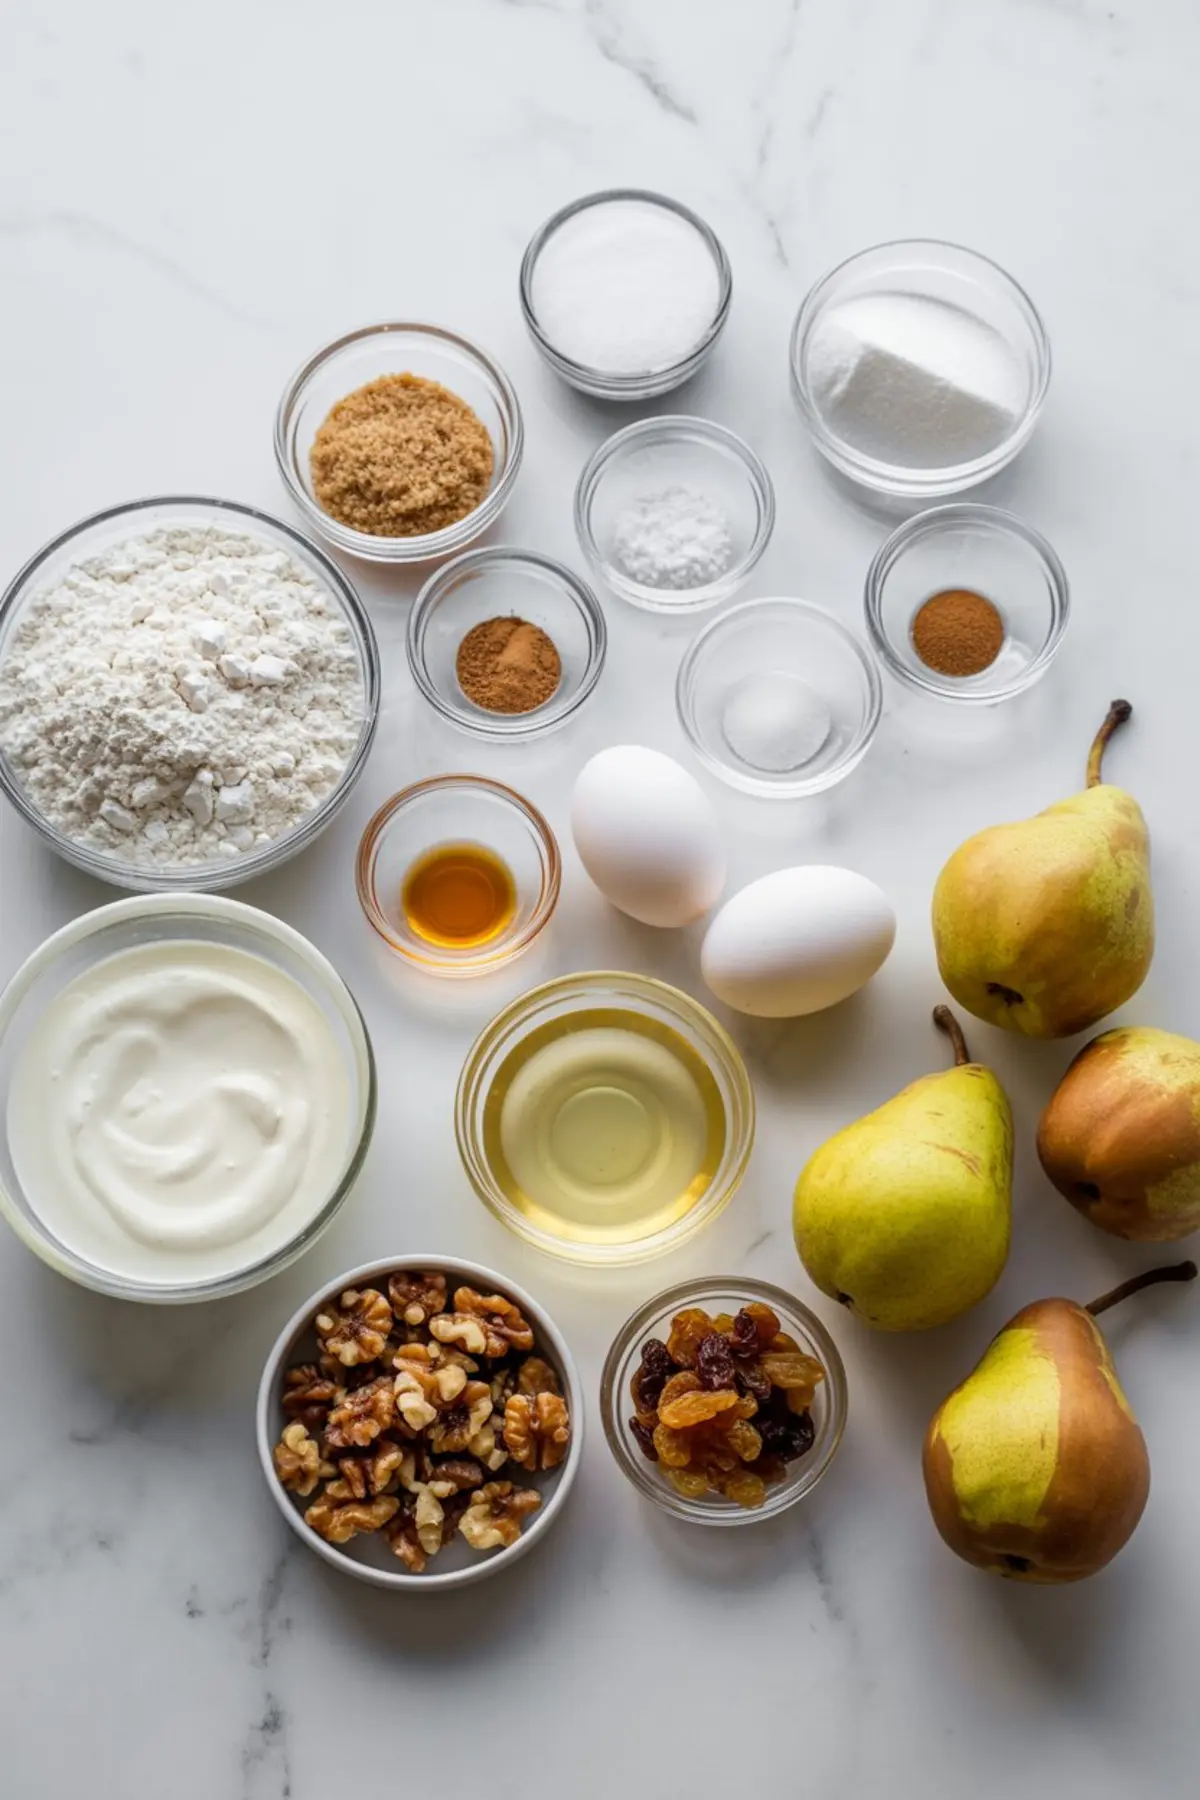
Ingredients
- Dry Ingredients
- 1 ½ cups (190g) all-purpose flour
- 1 tsp baking powder
- ½ tsp baking soda
- ¼ tsp salt
- Wet Ingredients
- 2 large eggs
- ¾ cup (150g) granulated sugar
- ½ cup (120ml) vegetable oil or melted butter
- ½ cup (120g) plain Greek yogurt
- 1 tsp vanilla extract
- ½ tsp almond extract (optional)
- Topping
- 1–2 small ripe but firm pears, halved and cored
- Powdered sugar, for dusting (optional)
Instructions
- PREHEAT AND PREP: Preheat the oven to 350°F (175°C). Line a standard loaf pan with parchment paper and lightly grease the exposed sides to prevent sticking.
- MIX DRY INGREDIENTS: In a medium bowl, whisk together the flour, baking powder, baking soda, and salt until evenly combined. Set aside.
- MIX WET INGREDIENTS: In a large mixing bowl, whisk the eggs and sugar together until the mixture is pale and slightly frothy. Add the oil, yogurt, vanilla extract, and almond extract (if using), and whisk until smooth and fully blended.
- COMBINE: Add the dry ingredients to the wet ingredients and mix gently using a spatula or whisk until just combined. Avoid overmixing to maintain a soft texture.
- POUR AND TOP: Pour the batter into the prepared loaf pan and smooth the top with a spatula. Arrange the pear halves cut side up on top of the batter, pressing them in slightly so they rest on the surface without being fully submerged.
- BAKE: Bake the loaf for 45 to 55 minutes, or until a toothpick inserted in the center (away from the pear) comes out clean. The top should be golden brown, and the cake should spring back when lightly pressed.
- COOL AND DUST: Let the cake cool in the pan for 10 minutes. Carefully transfer it to a wire rack to cool completely. Once fully cooled, dust with powdered sugar if desired before slicing and serving.
Notes
For a cleaner presentation, use pears that are just ripe but still firm enough to hold their shape during baking. Avoid overly ripe pears, which may release too much moisture. Store leftovers in an airtight container at room temperature for up to 2 days or refrigerate for up to 4 days.
Nutrition Information
Yield
10Serving Size
1Amount Per Serving Calories 162Total Fat 3gSaturated Fat 1gTrans Fat 0gUnsaturated Fat 2gCholesterol 41mgSodium 197mgCarbohydrates 29gFiber 1gSugar 14gProtein 4g