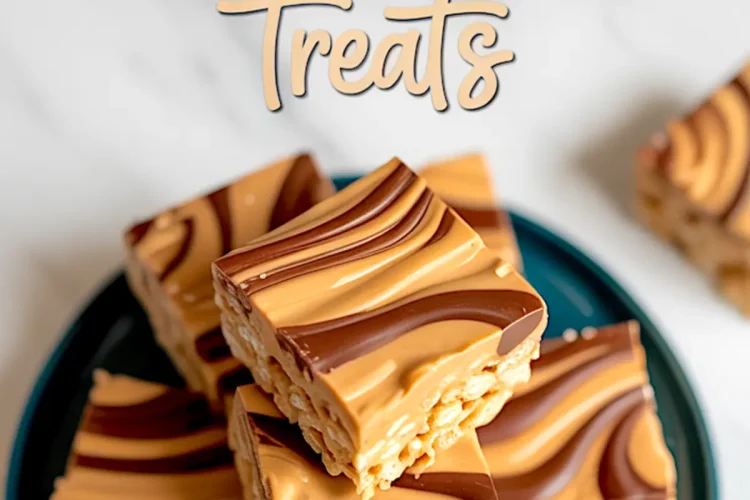
There is a kind of dessert that saves you. It asks for no oven, waits patiently as you melt and stir, and rewards you with chewy, sweet squares that never last long on the plate. These Peanut Butter Rice Krispie Treats with Chocolate Swirl are exactly that kind of dessert.
You will learn how to make them fast, with ingredients you likely have at home. You will get smooth layers, clean swirls, and a chewy texture that holds up beautifully. After years of testing countless no-bake recipes, this one stands out for its balance of ease, flavor, and texture.
Following a special diet?
Every recipe on this site can be converted to gluten-free, vegan, dairy-free, keto, nut-free or egg-free with adjusted ratios so nothing falls flat.
Try the Recipe Converter →The Beauty of No-Bake Rice Krispie Desserts
Many no-bake recipes can feel sticky or too dense. I have adjusted the marshmallow-to-cereal ratio, controlled the peanut butter softness, and perfected the chocolate swirl. My goal has always been to create bars that slice clean, hold their shape, and offer that slight resistance when you bite in.
If you enjoy simple recipes like these, you may also want to check my Peanut Butter No Bake Cookies which follow the same no-bake principle with different textures.
Gathering the Ingredients for Peanut Butter Rice Krispie Squares
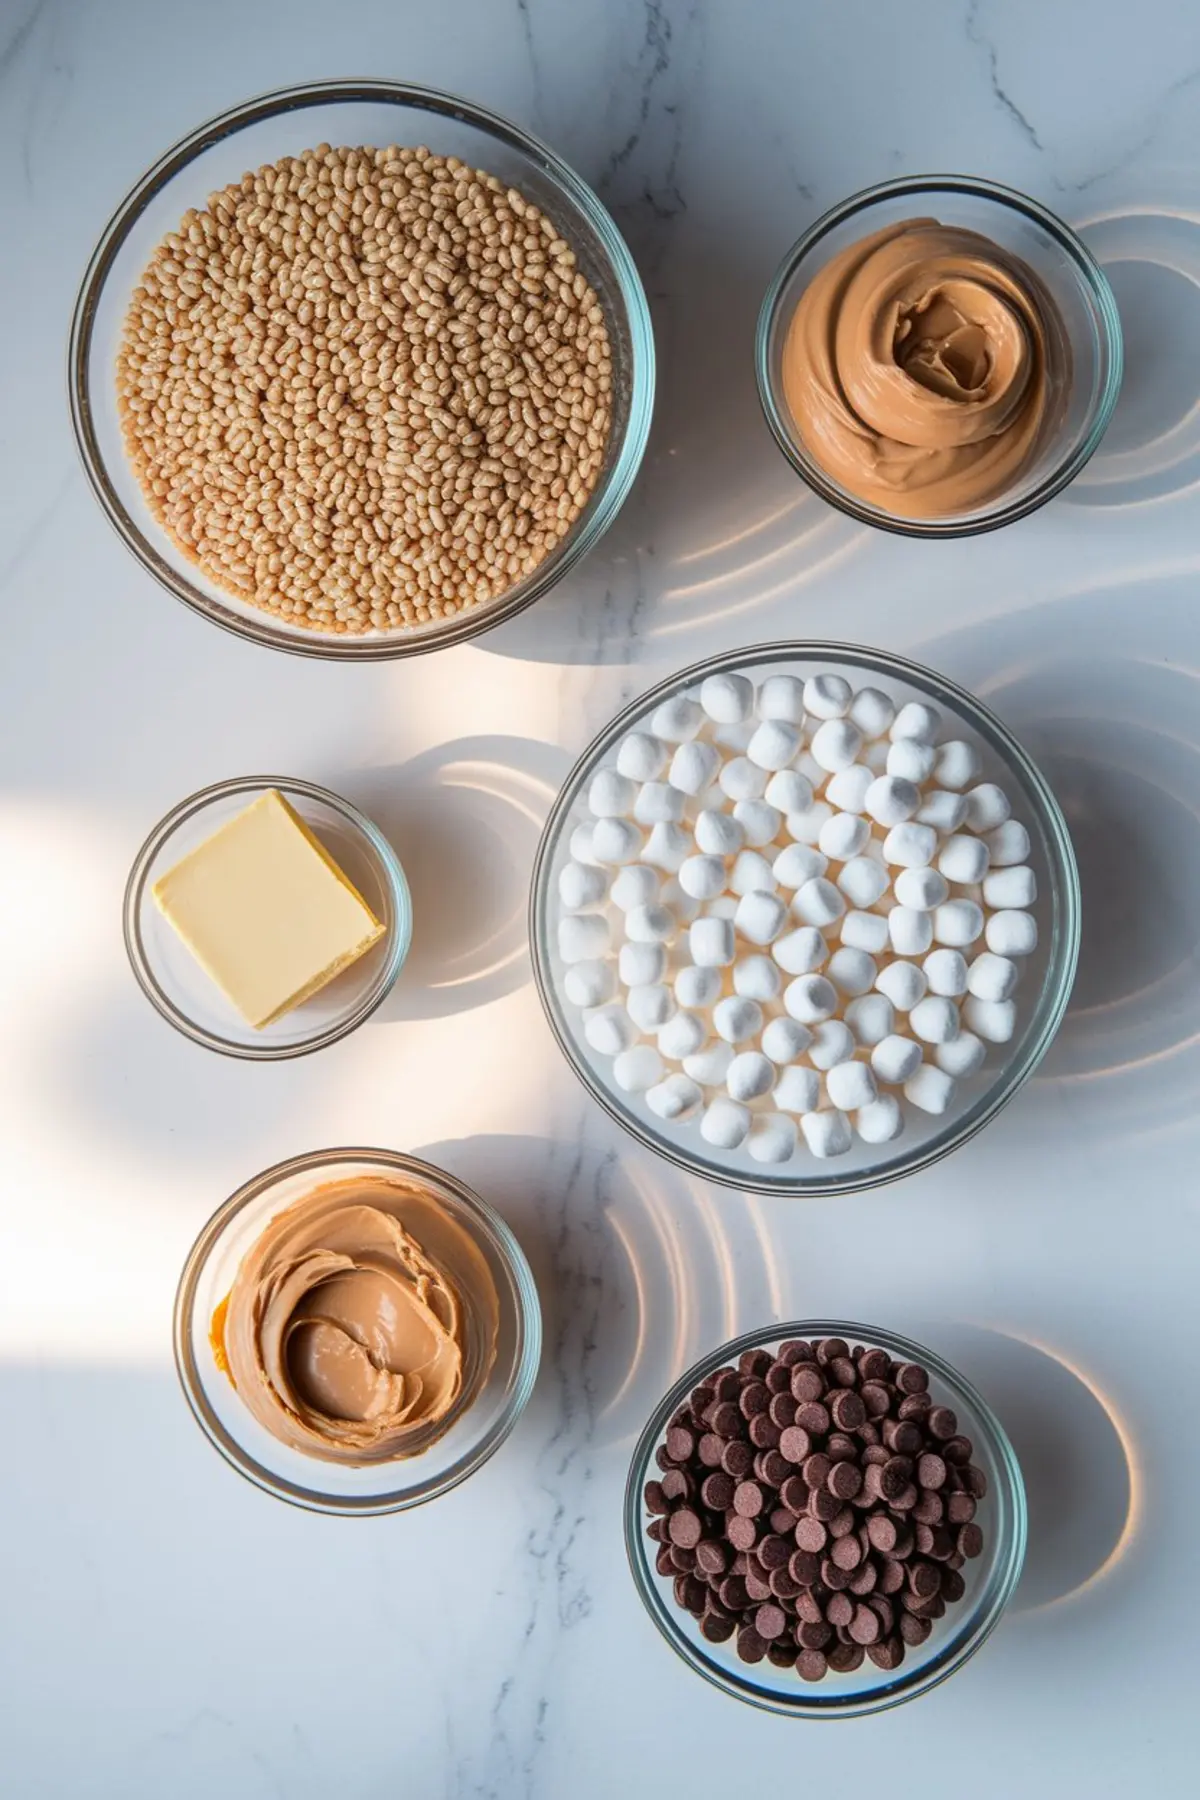
You need Rice Krispies cereal for the base. I always use the original variety because off-brands often go soggy or taste flat. Mini marshmallows melt quickly and evenly, which prevents clumps. Unsalted butter keeps control over the final saltiness.
Peanut butter plays the main role here. I’ve tried both natural and regular creamy peanut butter. Natural brands often separate, making the base unstable. For these bars, I always reach for a creamy shelf-stable peanut butter to guarantee a cohesive mixture.
Melting the Base Smoothly and Evenly
I start with melting butter and peanut butter over medium heat. Keep the heat steady. Rushing this step risks scorching the butter or seizing the peanut butter. Once fully melted, I stir in the mini marshmallows and continue until glossy and unified.
The marshmallow stage requires attention. Stir constantly, making sure every marshmallow melts into the peanut butter mixture. A glossy, homogenous mixture signals you are ready for the cereal.
Folding in Rice Krispies for Even Coating
Remove the saucepan from heat. Immediately pour in the Rice Krispies and stir. Folding quickly is important because the mixture cools fast. I work from the edges inward to ensure even coverage without crushing the cereal.
When transferring to the pan, press gently with a spatula or wax paper. Avoid pressing too hard. Firm packing can make the bars too dense. You want them to stay light, with just enough compression to hold their shape.
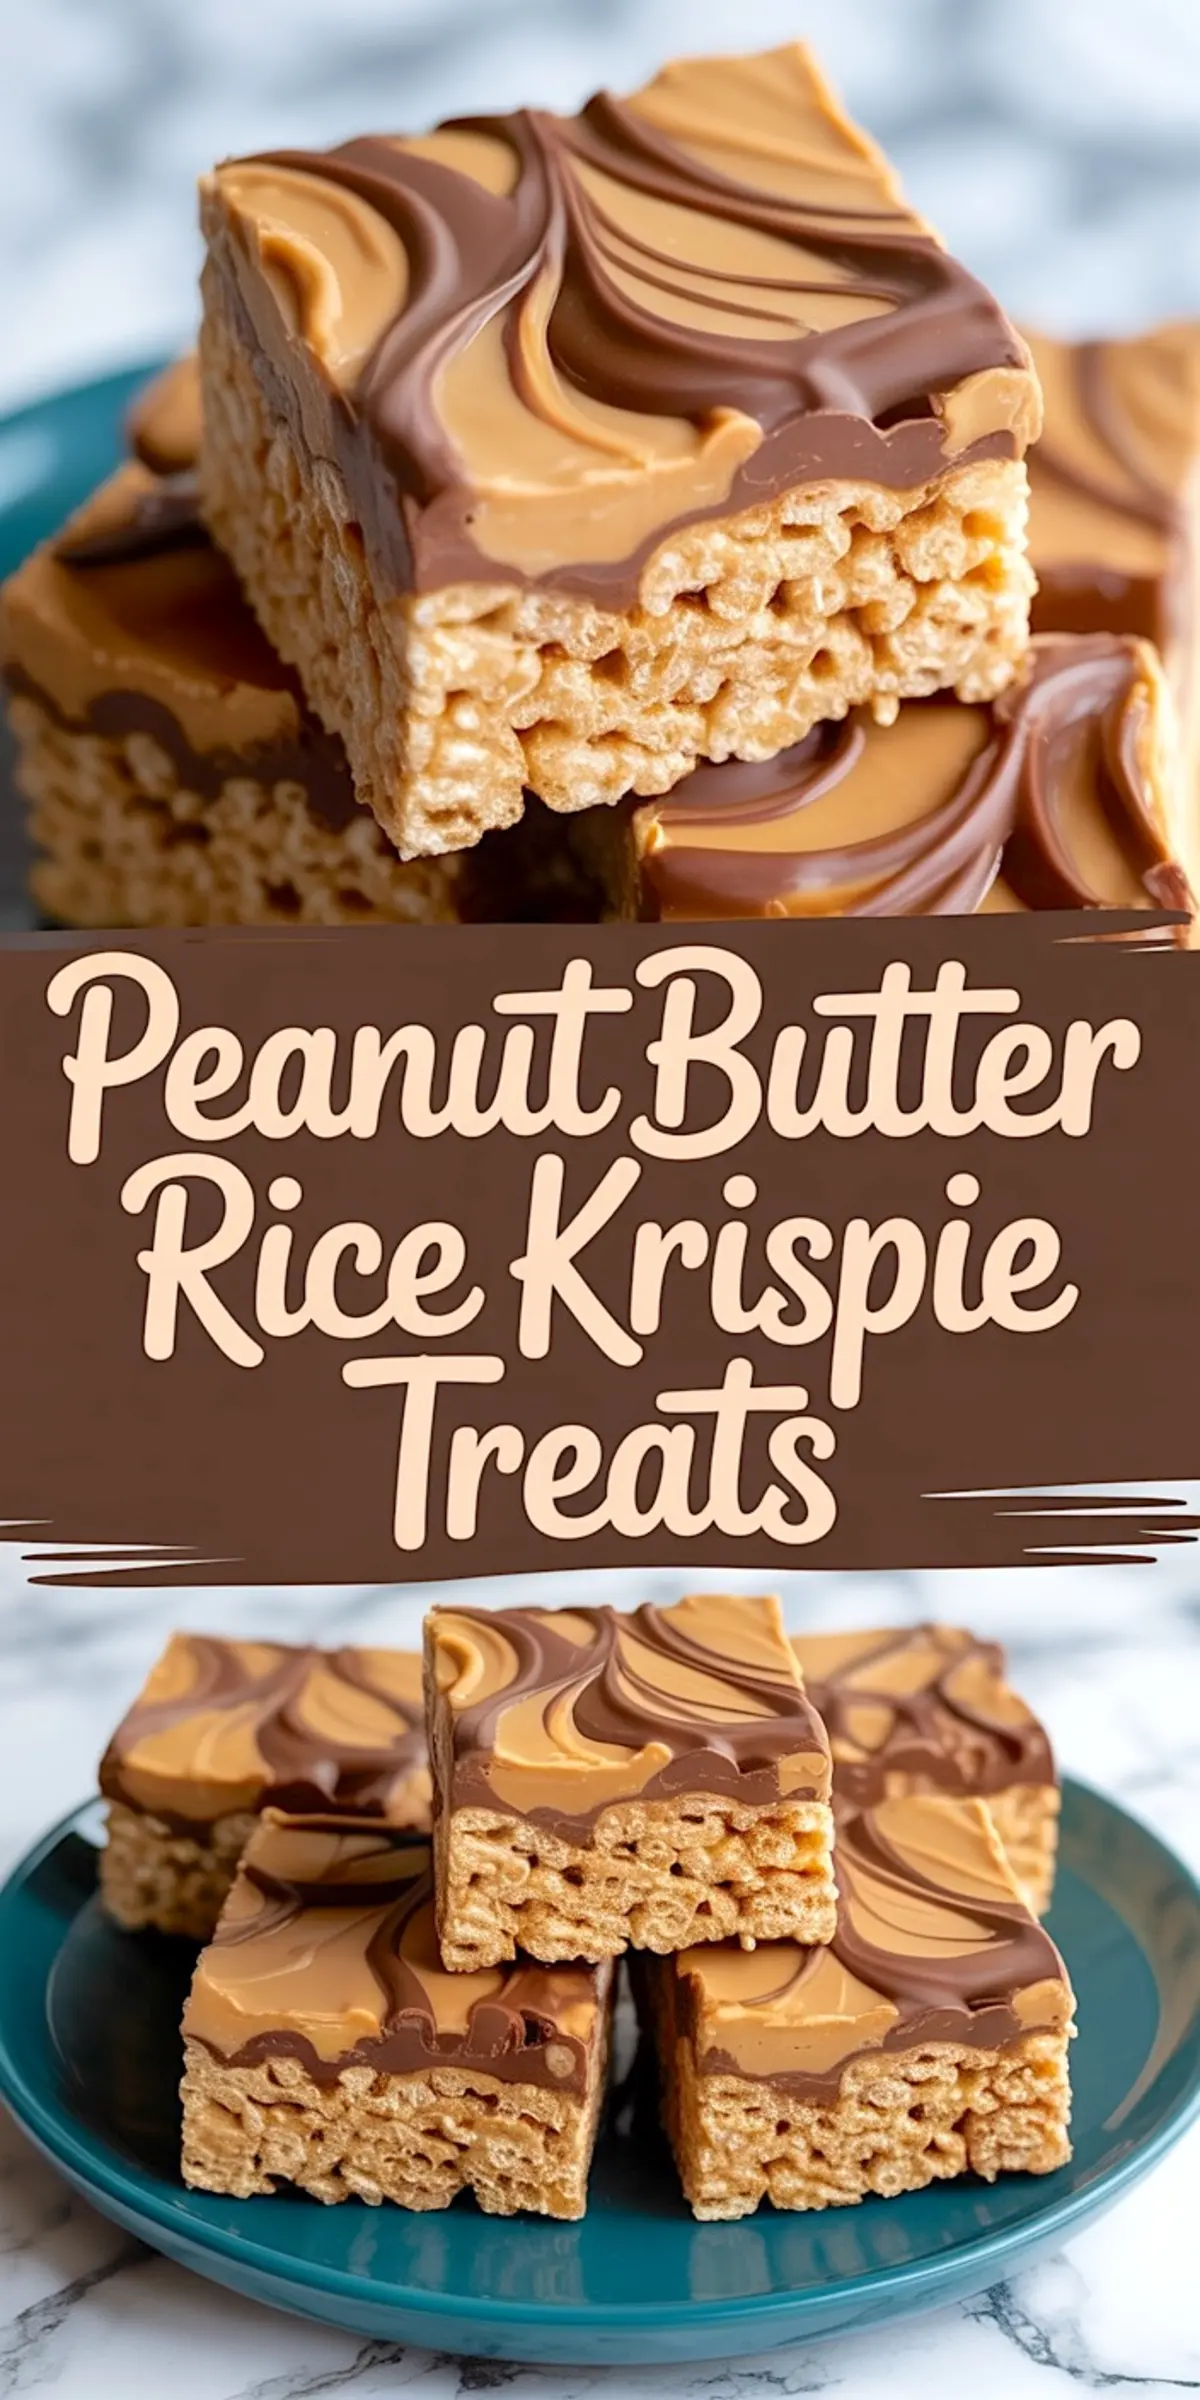
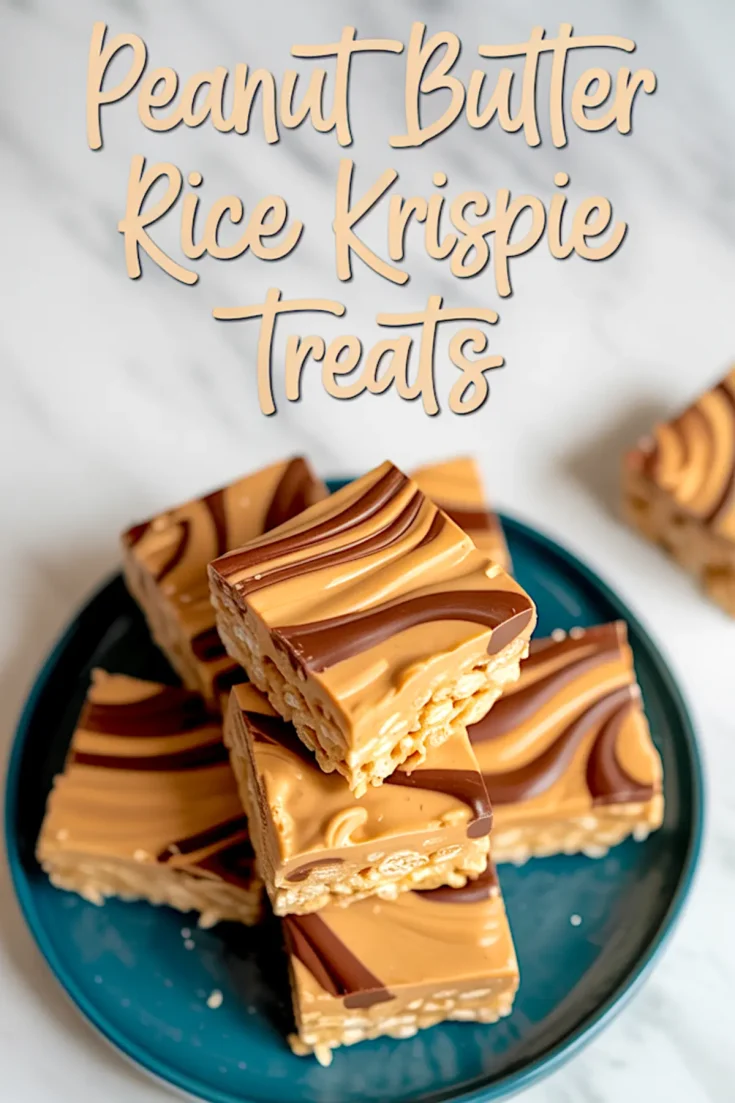
Creating the Chocolate Peanut Butter Swirl Topping
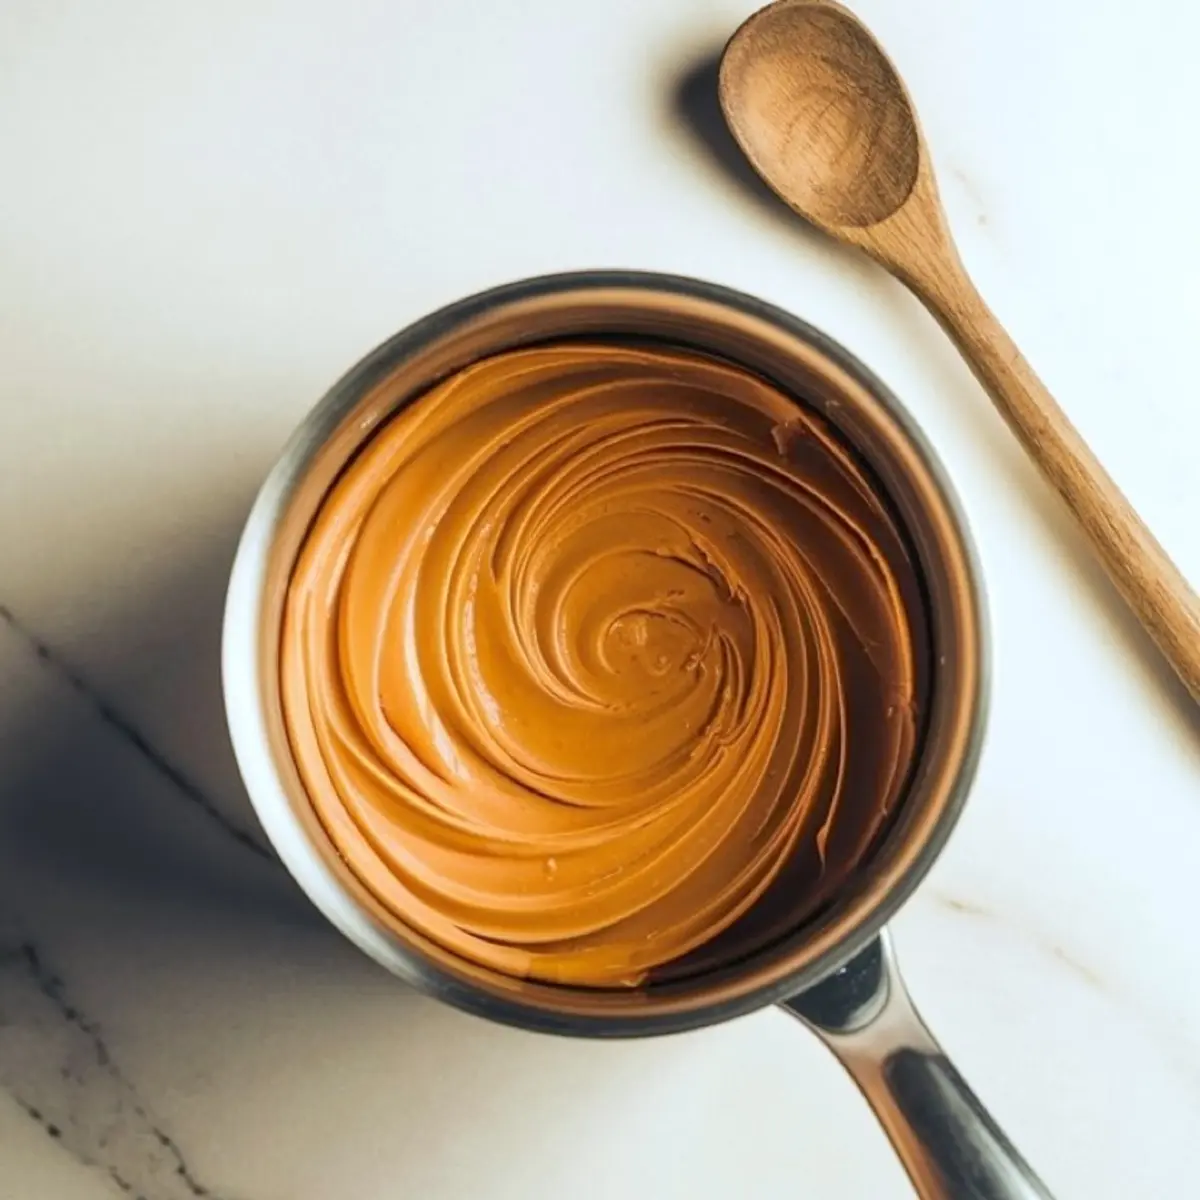
The topping starts with melting another portion of peanut butter until pourable. Microwave in short bursts and stir between rounds. In a separate bowl, melt your chocolate chips the same way.
I use semi-sweet chocolate because it balances the peanut butter’s sweetness. Milk chocolate works too, but produces a milder contrast. From my tests, semi-sweet creates a sharper, more distinct flavor layer that complements the chewy base.
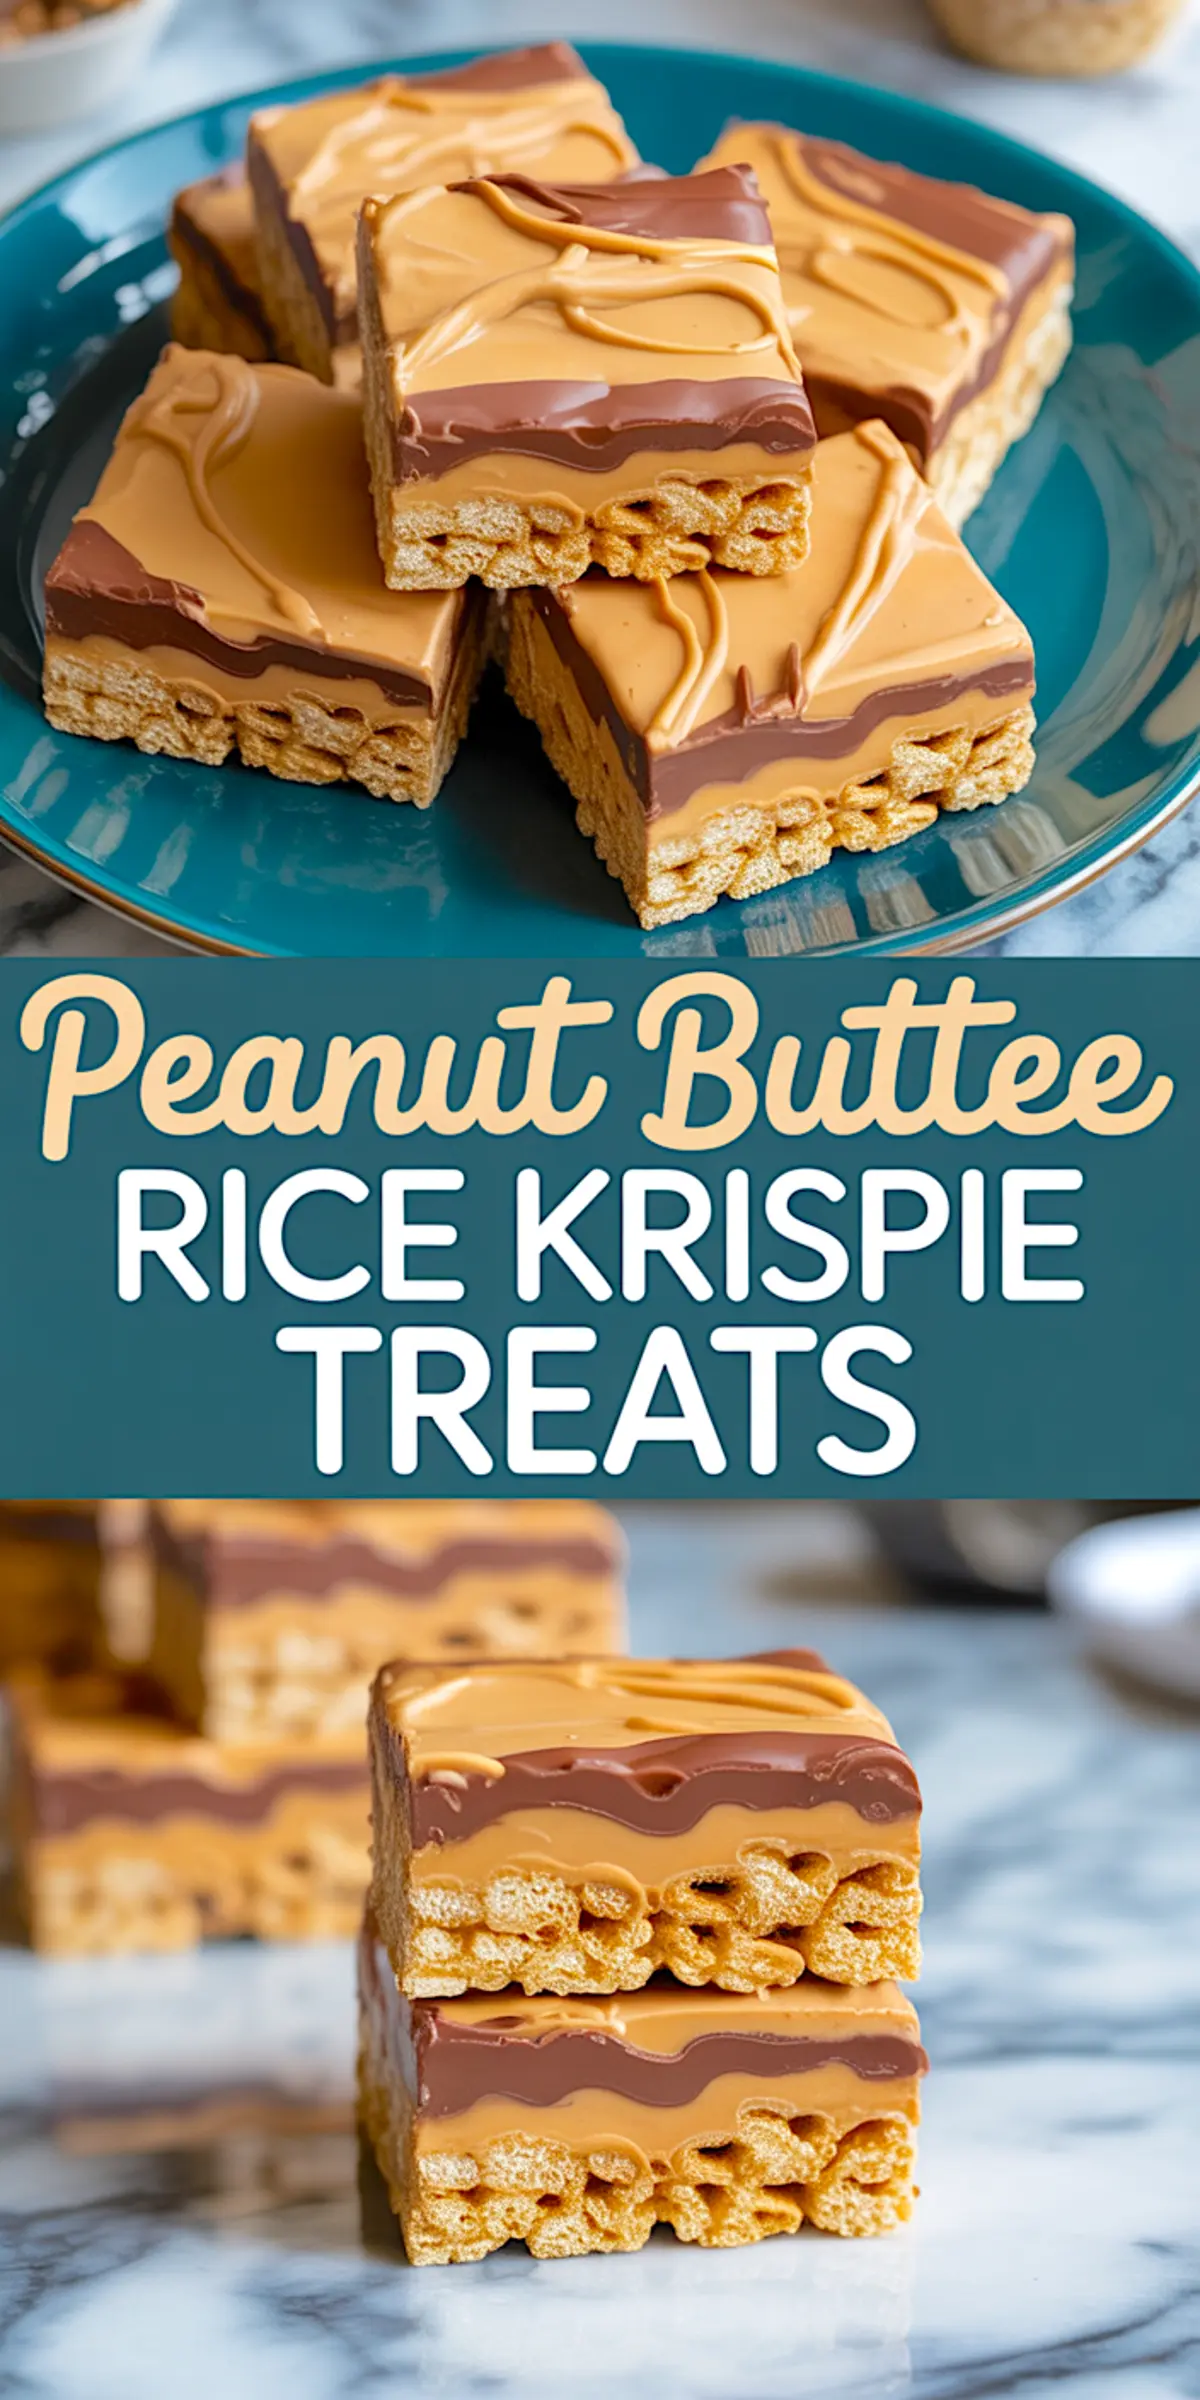
Pour the warm peanut butter over the cereal layer first, spreading evenly. Then drizzle the melted chocolate in lines or dollops. Use a toothpick or knife to create swirling motions across the surface. Do not over-swirl. A few clean figure-eights yield the most attractive marbled design.
Setting, Slicing, and Serving the Bars
Let the pan sit at room temperature for 1 to 2 hours. Refrigeration speeds up the process if you need faster setting. Once firm, slice with a sharp knife. I wipe the blade after each cut for cleaner squares.
Serve these bars as they are, or store them in an airtight container. At room temperature, they stay chewy for about three days. For longer storage, refrigerate them for up to a week. If chilled, allow them to rest at room temperature before serving for the best texture.
Serving Suggestions and Variations
I often prepare these Peanut Butter Rice Crispy Treats for bake sales, school events, or casual gatherings. Their portability and minimal mess make them ideal. You can also dip one end in melted chocolate for Dipped Rice Krispie Treats that feel slightly more elevated.
If you want more peanut butter ideas for every part of your day, you might also enjoy my Peanut Butter Smoothie for mornings, or Peanut Butter Overnight Oats for an easy make-ahead breakfast.
How This Compares to Snickers Rice Krispie Treats
I’ve often been asked how these compare to Snickers Rice Krispie Treats. The main difference lies in the complexity. Snickers versions involve layers of caramel, peanuts, and nougat flavors, requiring extra steps. My peanut butter version keeps the process simple without sacrificing satisfaction. You get the sweet-salty balance, but with a lighter chew and far less work.
Why These Are My Go-To Rice Krispie Desserts
After making countless versions through the years, I always return to this formula. The smooth melt, the glossy swirl, the consistent texture—they deliver every time. You need no thermometer, no oven, and no long prep work. Just simple steps that build confidence in your no-bake skills.
Save and Share Your Peanut Butter Rice Krispie Treats!
I invite you to save this to your Pinterest board for your next quick dessert idea.
And I would love to hear how your bars turn out. Share your results or questions in the comments. Your stories help build this little baking community we share here.
Peanut Butter Rice Krispie Treats Recipe
Peanut Butter Rice Krispie Treats with Chocolate Swirl combine chewy cereal bars with creamy peanut butter and a smooth chocolate topping. These no-bake treats come together quickly using pantry staples. A marbled swirl of peanut butter and chocolate adds a visually striking finish with minimal effort. Great for quick desserts or sharing.
Ingredients
- FOR THE BASE:
- 6 cups Rice Krispies cereal
- 1 cup creamy peanut butter
- 1/2 cup unsalted butter (1 stick)
- 1 (10 oz) bag mini marshmallows (about 5 1/2 cups)
- FOR THE TOPPING:
- 1 cup creamy peanut butter
- 1 1/2 cups semi-sweet chocolate chips (or milk chocolate, if preferred)
Instructions
- PREP THE PAN: Lightly grease a 9x13-inch baking dish or line it with parchment paper for easier removal. Set aside while you prepare the mixture.
- MAKE THE BASE: In a large saucepan over medium heat, melt the butter and peanut butter together, stirring frequently until smooth and fully combined. Add the mini marshmallows and stir until they melt completely and the mixture is cohesive and glossy.
- ADD THE CEREAL: Remove the pan from heat and immediately stir in the Rice Krispies cereal. Fold quickly and thoroughly to coat all the cereal before the mixture cools and sets. Transfer to the prepared pan and press it down gently using a spatula or wax paper to create an even layer without compacting too firmly.
- MELT THE TOPPING: In a microwave-safe bowl, heat the remaining 1 cup of peanut butter in 30-second intervals, stirring in between, until smooth and pourable. In a separate bowl, melt the chocolate chips the same way, stirring until fully melted and silky.
- ADD THE SWIRL: Pour the melted peanut butter over the base and spread it evenly to cover the surface. Drizzle the melted chocolate over the top in lines or dollops, then use a toothpick or butter knife to swirl the two together in a marbled pattern.
- LET SET: Allow the bars to set at room temperature for 1 to 2 hours, or refrigerate for about 45 minutes if you need them to set more quickly. The topping should be firm before slicing.
- SLICE AND SERVE: Once set, use a sharp knife to cut the bars into squares. For cleaner cuts, wipe the knife blade between slices. Serve immediately or store in an airtight container.
Notes
Store bars at room temperature for up to 3 days or refrigerate for up to 1 week. For softer texture, let chilled bars sit at room temperature before serving.
Nutrition Information
Yield
20Serving Size
1Amount Per Serving Calories 273Total Fat 21gSaturated Fat 8gTrans Fat 0gUnsaturated Fat 11gCholesterol 12mgSodium 125mgCarbohydrates 19gFiber 2gSugar 9gProtein 7g
Made these peanut butter rice krispie bars and they are so amazing!! My whole family just loved them.
Karen, I’m glad to hear they went over well with your family. Peanut butter treats seem to disappear quickly in my house too. It sounds like your batch turned out just right. 😊
Easy to make and who doesn’t like chocolate and peanut butter? Next time, though I’m gonna use a pan smaller than 13 x 9. I like a thicker topping. Didn’t look like photo
Thank you for sharing your experience, Nancy. A smaller pan will definitely give you a thicker topping, so your plan makes sense. The 13 x 9 pan creates the thinner layer you saw in the recipe photos, but the texture stays the same in a smaller dish. I’m glad you found it easy to make, and I hope the next batch matches the height you prefer.