Introduction: My Watercolor Cake Roll Story
I first tasted a cake roll during a family reunion, and I remember feeling fascinated by the swirl of colors inside. My aunt showed me how to create soft pastel accents by carefully mixing the batter, and I tried it myself with a dash of excitement. I still recall the sweet scent filling the kitchen and drawing curious glances from everyone.
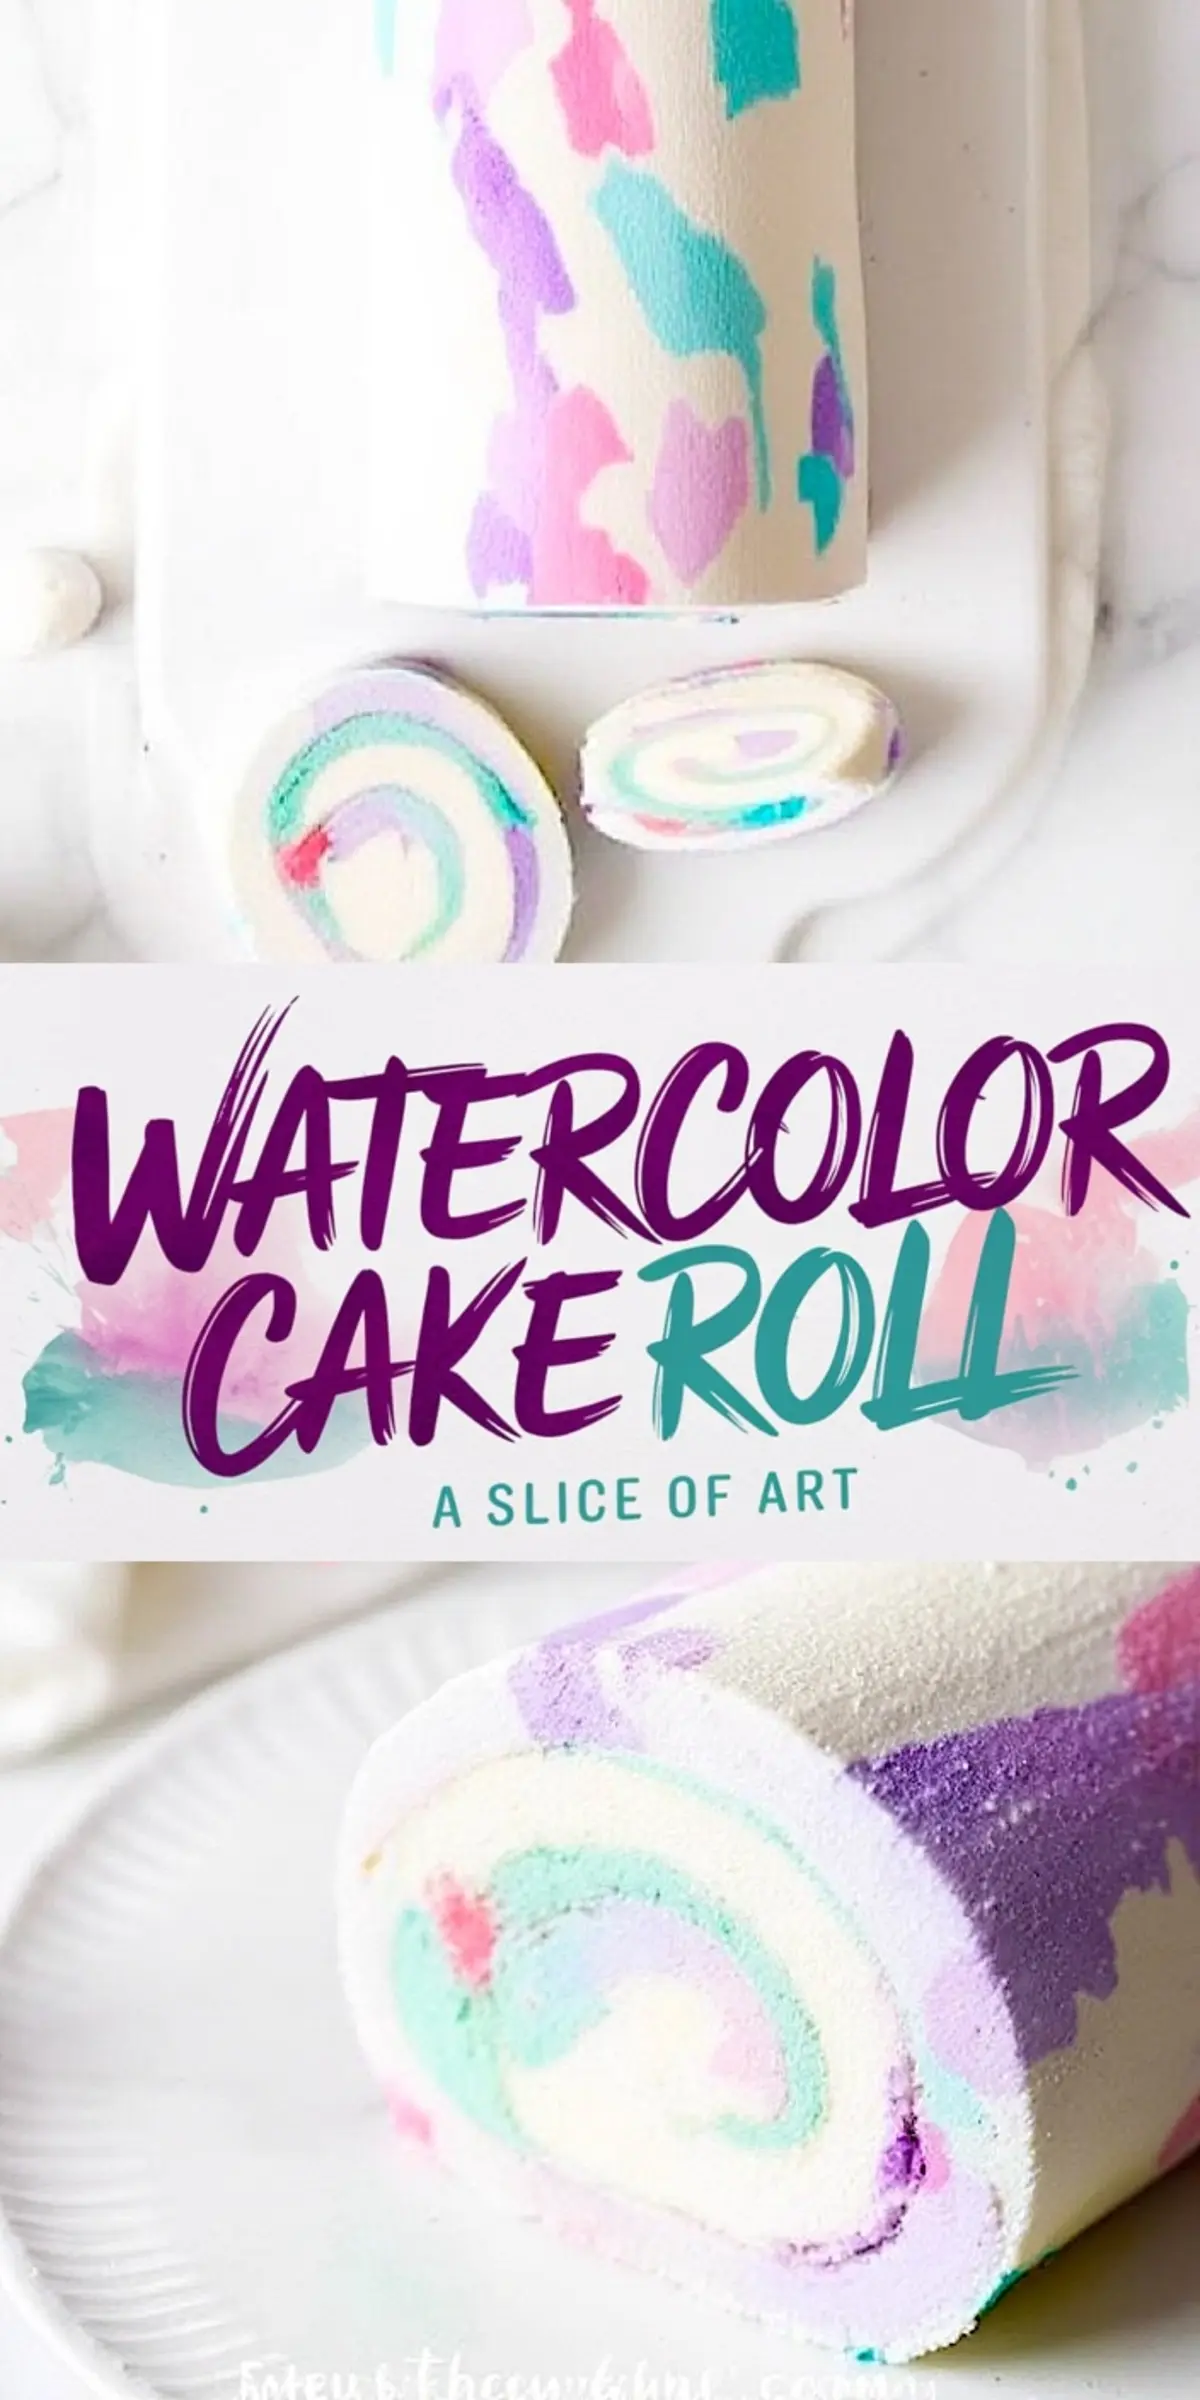
That early experiment led me on a quest to develop my own watercolor cake roll recipe. I found a reliable way to keep the sponge white by separating eggs and folding them with care, which avoids a dull look. I also love the sense of delight guests feel when spotting those pastel swirls gleaming like a miniature work of art.
Following a special diet?
Every recipe on this site can be converted to gluten-free, vegan, dairy-free, keto, nut-free or egg-free with adjusted ratios so nothing falls flat.
Try the Recipe Converter →Understanding The Ingredients For A Soft White Sponge
Eggs play a key role by providing structure and fluffiness, so I separate yolks from whites to produce the airy texture. Granulated sugar sweetens the cake without darkening its shade, and I divide it between the whites and yolks. Vanilla extract adds a warm note, while whole milk and vegetable oil keep the crumb soft without overshadowing its delicate flavor.
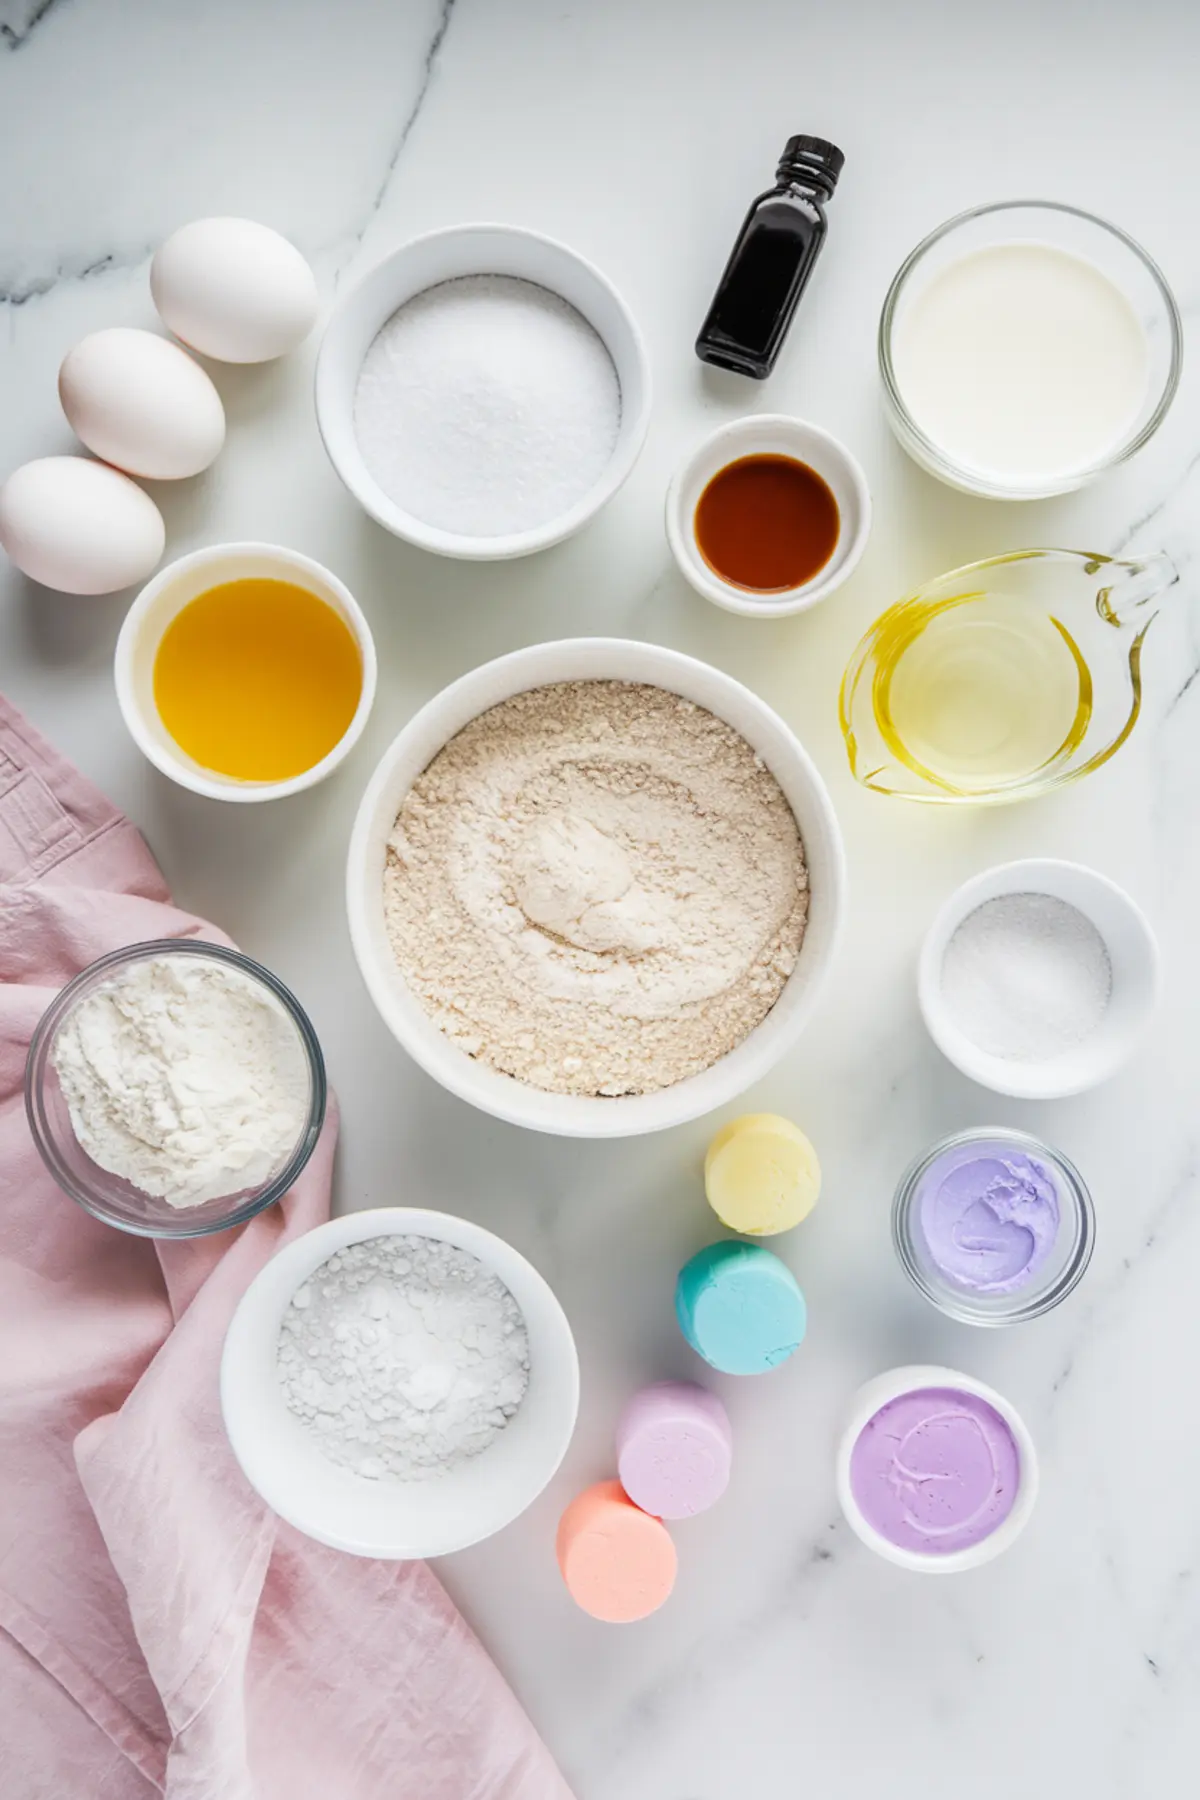
Cake flour, baking powder, and salt round out the dry mix by giving the batter lift and balance. An extra ounce of care goes into the final batter folding, preserving volume and avoiding dryness. Pastel gel food coloring completes the magic by offering gentle hues that reflect a springtime mood or a celebration theme.
Step One: Warm And Ready Baking Sheet
Preheat your oven to 325°F (160°C) and line a 10×15-inch baking sheet with parchment paper, then lightly grease the surface to prevent sticking. The right temperature and a prepared sheet ensure a swift bake that results in a tender sponge. A fast-moving approach keeps the batter from sitting too long and losing its airy qualities.
That first oven whiff signals that the egg whites, now whipped to stiff peaks, will bake into a fluffy base. My grandmother used to say that prepping the sheet is a sign of patience, and I keep that tradition going by making sure it’s neat. This step sets the foundation for a perfect roll later.
Step Two: Whip The Egg Whites Properly
Egg whites whipped to stiff peaks are the backbone of this cake. The initial foamy stage requires a slow and steady whip, followed by gradual sugar addition for stability. This process creates the bright white color that looks amazing once swirled with pastel shades.
I was once too eager and dumped all the sugar too fast. That mistake deflated my whites into a soupy mix, so I learned to add sugar slowly. Patience leads to glossy peaks that stay tall and firm.
Step Three: Combine The Yolk Mixture
Yolks, sugar, vanilla, milk, and oil make a smooth mixture that forms the flavorful heart of the cake. A short whisking session prevents unwanted bubbles and yields a pale base that won’t turn the sponge yellow. Adding sifted cake flour, baking powder, and salt keeps the dry ingredients even, which avoids lumps and uneven rises.
I remember seeing lumps once because I rushed through the mixing. A few seconds of gentle sifting now saves me stress later. That approach maintains a consistent batter that folds well with the egg whites.
Step Four: Fold Gently For Airy Results
The real challenge lies in folding the whipped egg whites into the yolk mixture. Quick or rough mixing knocks out the air, resulting in a dense and unappealing cake. A few light strokes with a spatula bring everything together, forming a pale and cloud-like batter.
I used to fold too aggressively, which made my sponge tough. My cousin suggested gentle scooping motions, and that tip changed my baking life. Now the result is consistently soft and delicate.
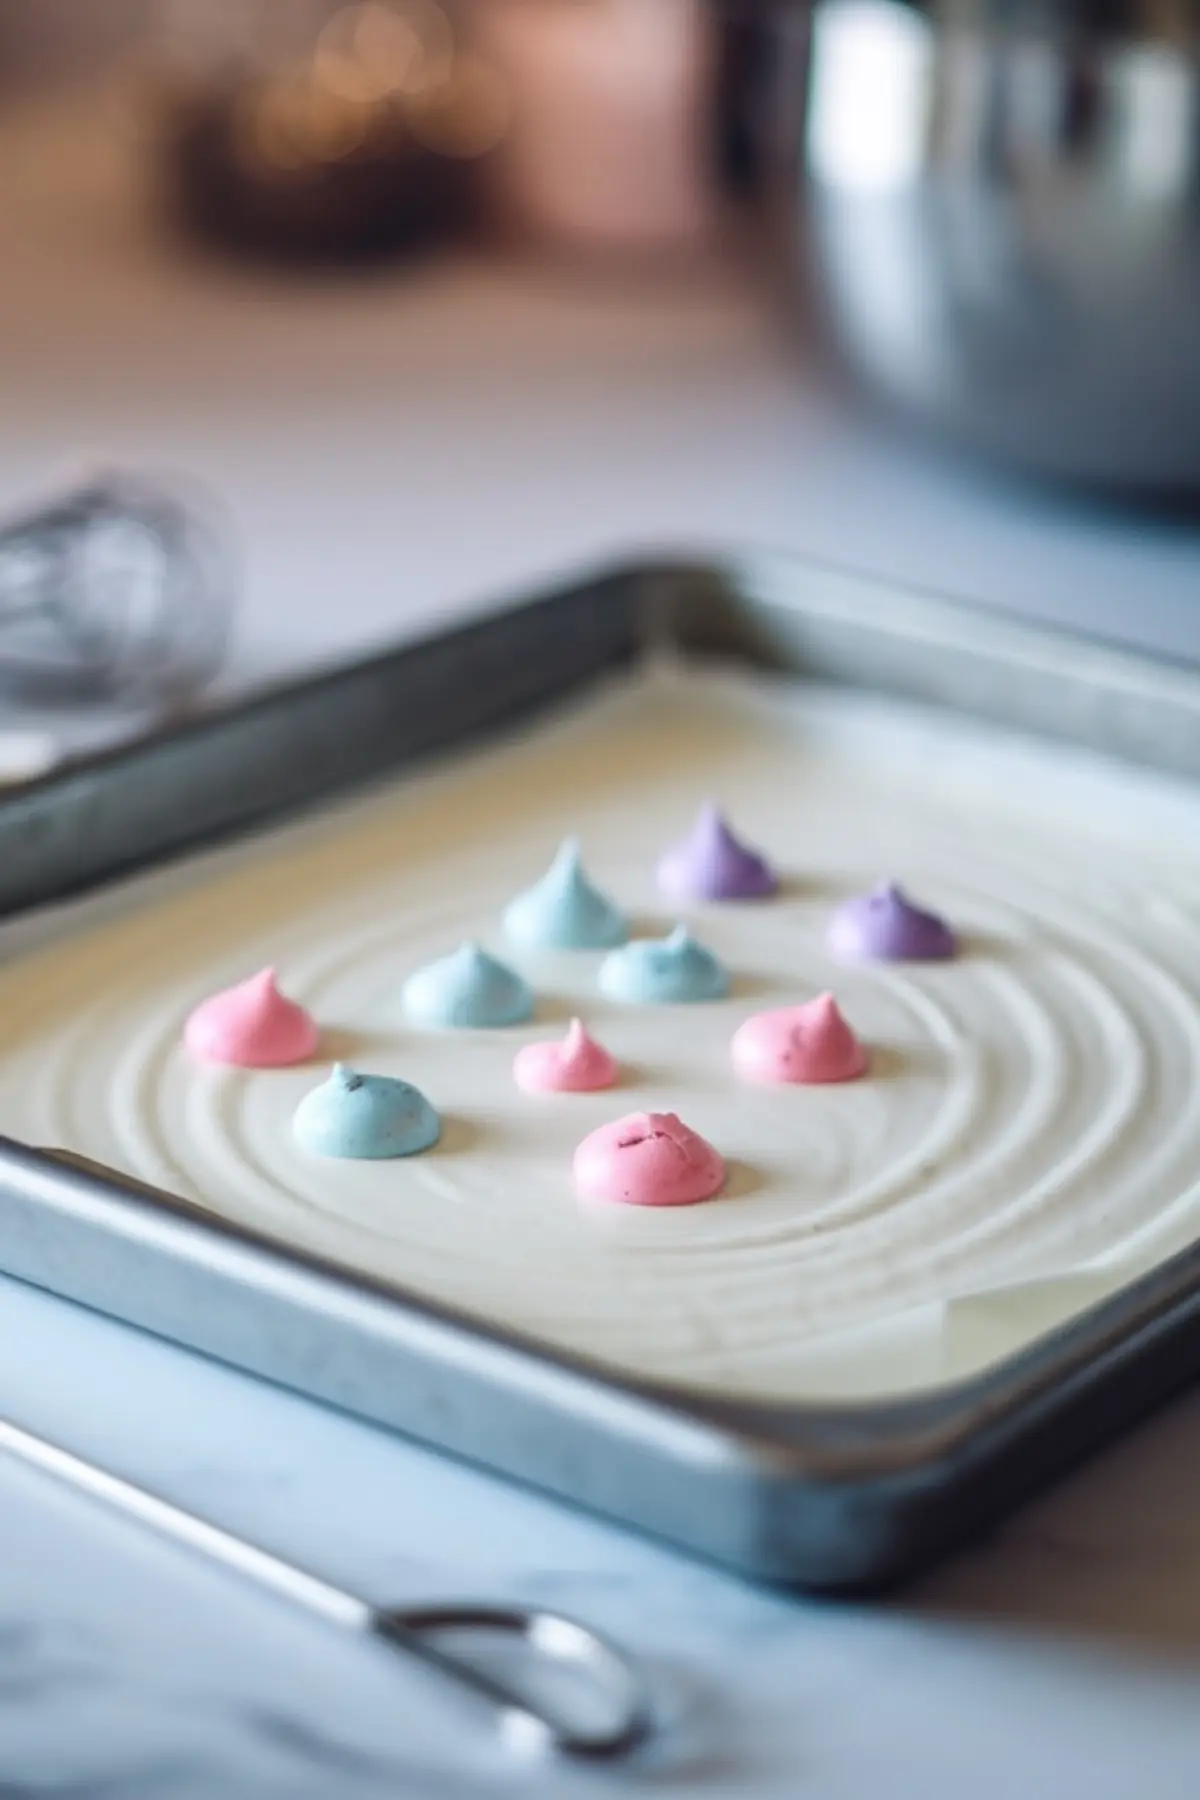
Step Five: Add Pastel Colors
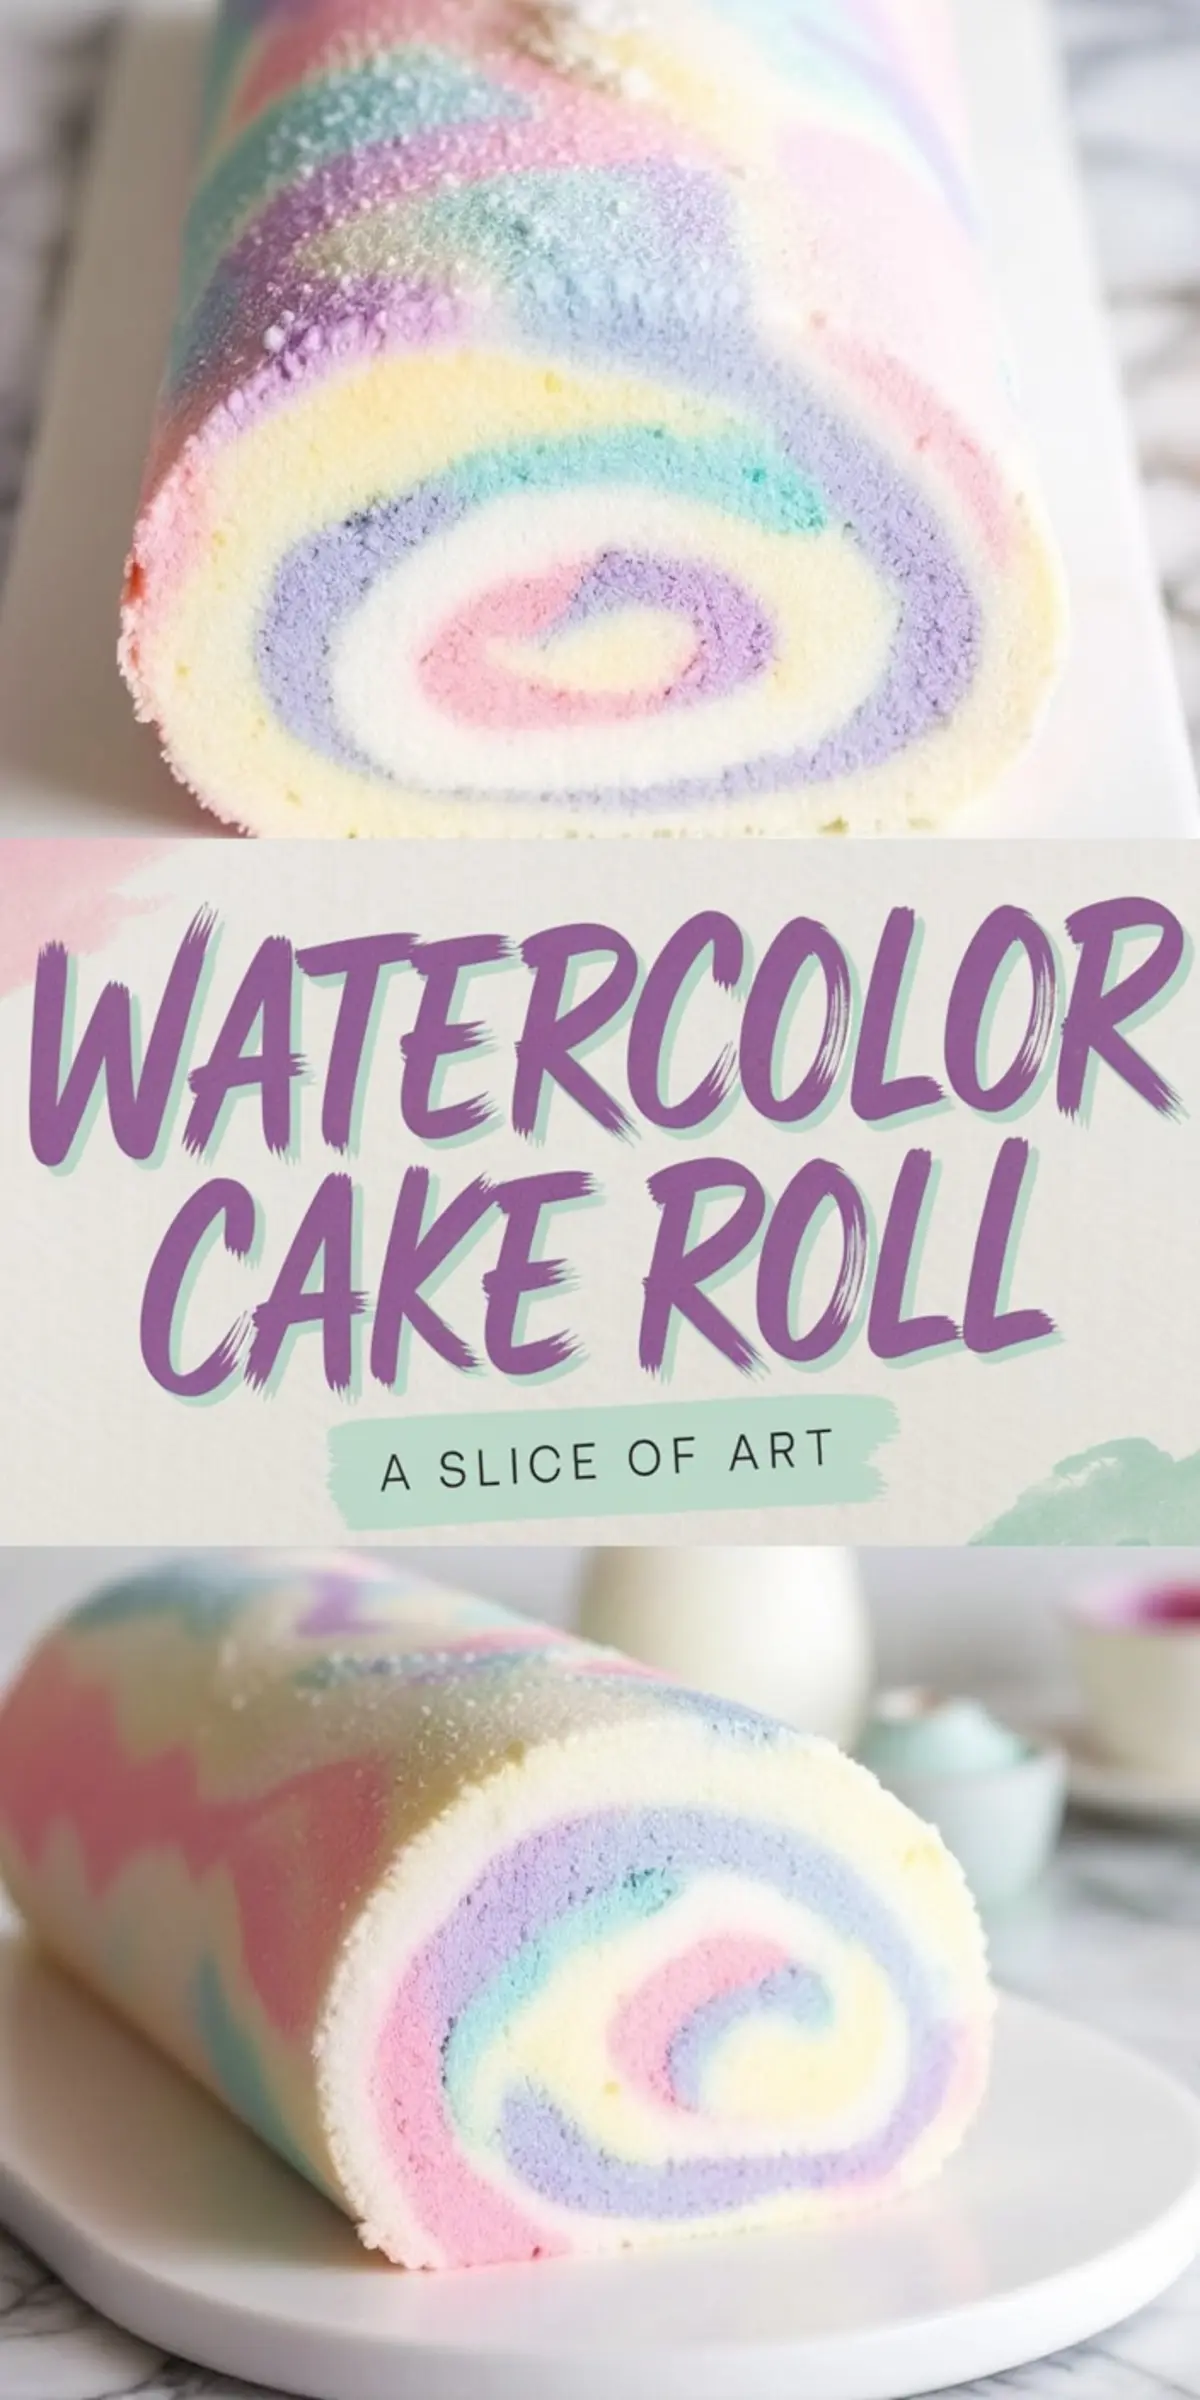
A tiny drop of pink, blue, or purple gel coloring tints small amounts of batter. This step creates the swirl effect by randomly dotting these colors across the main white batter. A toothpick or skewer moves through the colors in soft patterns, giving it a watercolor appearance.
My sister once used too much dye, and her swirl looked more like a paint spill. A minimal drop is enough for soft, charming hues. The goal is a graceful blend, not a harsh marbling.
Step Six: Bake And Roll
A 12–14 minute bake at 325°F sets the cake into a flexible layer that won’t crack easily. The sponge should spring back slightly under your fingertip. Removing it from the oven right at this stage avoids overbaking and dryness.
Flip the warm cake onto a kitchen towel lightly dusted with powdered sugar. Roll the cake with the towel to hold its shape and let it cool. My earlier attempts ended in deep cracks, so I learned that warmth aids a gentle roll.
Step Seven: Create The Whipped Cream Filling
Heavy whipping cream, powdered sugar, and vanilla form the filling that tucks inside this roll. A quick whisk until stiff peaks appear ensures a plush texture that stays intact during the roll. Keep this cream chilled until you’re ready, so it spreads neatly without melting into the sponge.
I enjoy the simple flavor of this filling, though a pinch of fruit puree could add variety if desired. A friend once folded in strawberry chunks for a twist. My preferred version stays classic and subtle.
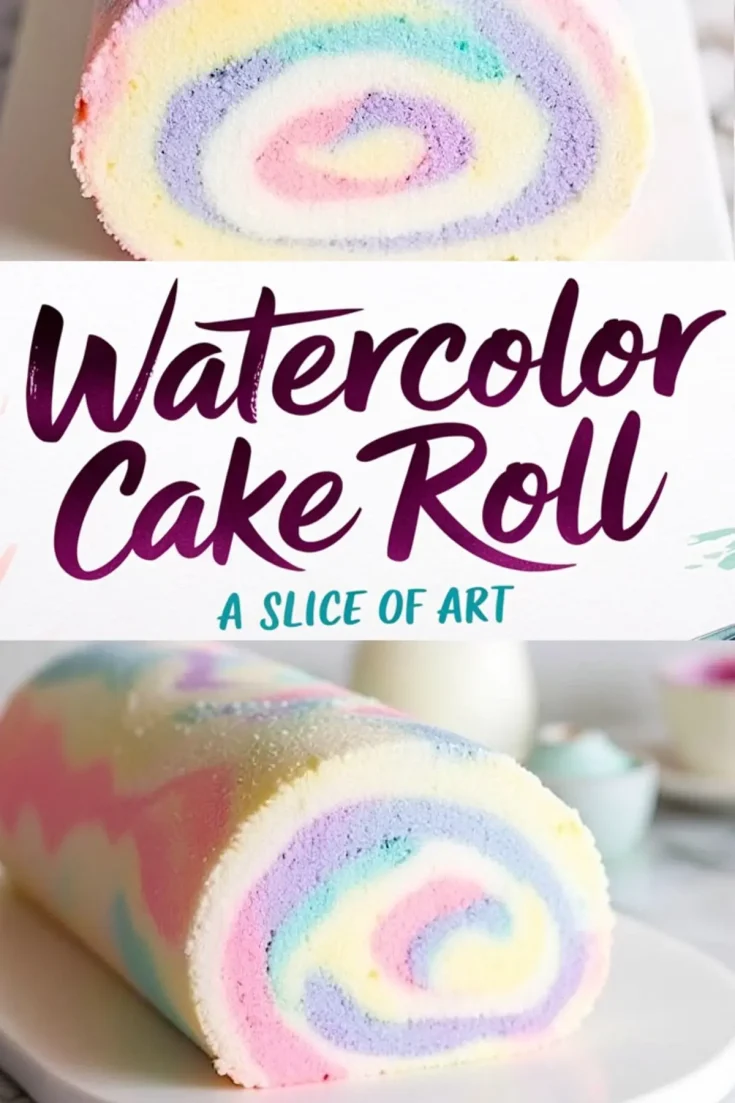
Step Eight: Unroll, Fill, And Chill
Cool the rolled cake, then gently unroll it and spread the chilled cream evenly. Roll it back without squeezing too tightly, then wrap it in plastic to rest in the refrigerator. The final chill helps the cake firm up and slice cleanly.
I usually wait around 30 minutes before slicing to let everything settle. A thorough rest keeps the swirls visible and prevents smears. My family likes peeking at the cross-section once I cut the first slice.
Adding A Personal Spin And More Easter Dessert Ideas
Stencils or powdered sugar shapes can decorate the outside, and a light dusting of edible glitter lifts the pastel look. Some prefer a drizzle of white chocolate, which complements the colors without overpowering the flavor. I find that subtle touches keep the watercolor style in focus.
Easter celebrations often include bright and uplifting treats, so have a glance at these 24 Easter Treats for Kids for extra holiday inspiration. This watercolor cake roll also pairs nicely with a Speckled Egg Cake if you want a colorful dessert table. A fluffy Easter Bundt Cake adds variety to the spread, bringing shape contrast to the party.
Serving Suggestions And Final Thoughts
Slice your cake roll into neat pieces and arrange them on a platter for a soft pastel effect. Offer a small bowl of fresh berries on the side to balance sweetness. Celebrate the gentle texture by letting guests see those sweet swirls inside each slice.
I adore how this dessert sparks conversation at gatherings. People often ask for a peek at the rolling process, which they find surprisingly easy once they get the hang of it. Show them your pride by sharing any tips you’ve learned along the way.
Save This For Later And Join The Conversation
Pin this recipe on your favorite board and feel free to share any creative ideas in the comments. Let me know if you used new colors or added fruit bits to your filling. Your tips might inspire someone else to try a fresh twist on this watercolor cake roll.
I love hearing from you about how your own roll turned out. Drop your thoughts below if you have questions or if you simply want to show off a photo. My hope is that this recipe brings joy to your table, one gentle swirl at a time.
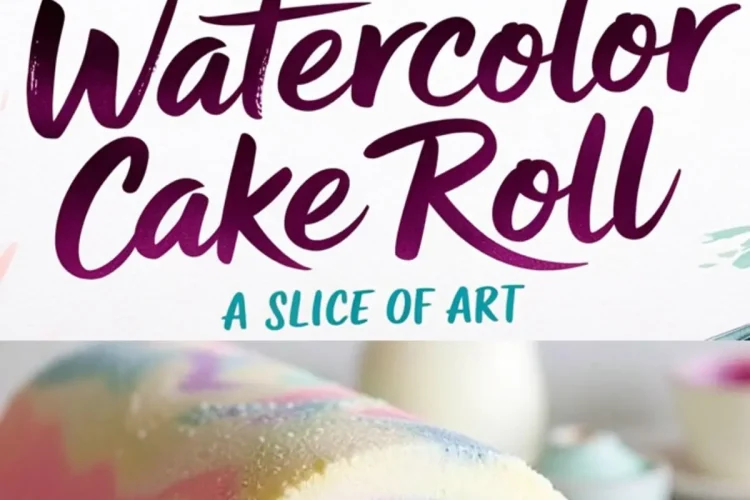
Watercolor Cake Roll Recipe
A white sponge cake with a soft texture and pastel watercolor swirls is filled with lightly sweetened whipped cream. The rolled shape gives it a delicate look, making it a visually appealing and delicious dessert.
Ingredients
- FOR THE WHITE SPONGE CAKE
- 4 large eggs, separated
- ½ cup (100g) granulated sugar, divided
- 1 teaspoon vanilla extract
- ¼ cup (60ml) whole milk
- ¼ cup (60ml) vegetable oil
- ½ cup (65g) cake flour, sifted
- ½ teaspoon baking powder
- ¼ teaspoon salt
- Gel food coloring (pastel pink, blue, purple)
- FOR THE FILLING
- 1 cup (240ml) heavy whipping cream
- 2 tablespoons powdered sugar
- ½ teaspoon vanilla extract
Instructions
- PREPARE THE BAKING SHEET: Preheat the oven to 325°F (160°C). Line a 10x15-inch baking sheet with parchment paper and lightly grease it to prevent sticking.
- WHIP THE EGG WHITES FOR A WHITE BASE: In a clean bowl, whip the egg whites until foamy. Gradually add ¼ cup of sugar and continue whipping until stiff peaks form. This step keeps the batter light and white.
- PREPARE THE EGG YOLK MIXTURE: In a separate bowl, whisk together the egg yolks, remaining ¼ cup sugar, vanilla extract, milk, and oil. Sift in the cake flour, baking powder, and salt, mixing until smooth. To keep the batter from turning yellow, use less egg yolk and avoid overmixing.
- GENTLY COMBINE THE MIXTURES: Carefully fold the whipped egg whites into the yolk mixture in three additions, being gentle to keep the batter airy and white.
- ADD PASTEL SWIRLS: Set aside a small amount of batter into separate bowls (one for each pastel color). Add a tiny drop of gel food coloring (pink, blue, purple) to each bowl and gently mix. Do not overmix, as you want the colors soft and light. Pour the main white batter onto the prepared baking sheet. Use a spoon or piping bag to dot the colored batters randomly over the white base. Swirl gently with a skewer or toothpick for a watercolor effect.
- BAKE THE CAKE: Bake at 325°F (160°C) for 12-14 minutes, or until the cake springs back when lightly touched.
- ROLL THE CAKE WHILE WARM: While the cake is still warm, carefully flip it onto a clean kitchen towel dusted with powdered sugar. Peel off the parchment paper. Roll the cake (with the towel inside) from the short end to prevent cracks. Let it cool completely in the rolled shape.
- MAKE THE FILLING: Whip the heavy cream, powdered sugar, and vanilla extract until stiff peaks form. Keep chilled.
- ASSEMBLE THE CAKE: Unroll the cooled cake and spread the whipped cream evenly over the surface. Gently roll it back up (without the towel). Wrap the cake in plastic wrap and refrigerate for at least 30 minutes to set.
Notes
Keeping the Sponge White: Using only a small amount of egg yolk and incorporating milk instead of butter helps maintain a bright white color. Whipping the egg whites separately also contributes to a lighter texture and keeps the batter from becoming too yellow.
Mixing the Batter: Overmixing the yolk mixture or deflating the whipped egg whites can lead to a dense cake. When folding the egg whites into the batter, use a gentle motion and mix just until combined to maintain the airy structure.
Achieving a Watercolor Effect: Using gel food coloring instead of liquid helps maintain the right batter consistency. Adding only a tiny drop of color ensures the pastels stay soft and delicate. When swirling, avoid overmixing to prevent muddying the colors.
Baking and Cooling: The cake is done when it springs back when lightly touched. Overbaking can cause it to dry out and crack during rolling. Rolling the cake while warm, using a towel to support its shape, helps prevent cracking and makes it easier to roll again after filling.
Filling and Chilling: Whipped cream is best used when cold, so keep it refrigerated until ready to spread. Chilling the rolled cake before serving helps the filling set and enhances the texture, making slicing easier.
Storage: Store the cake roll in the refrigerator for up to 3 days, covered with plastic wrap to prevent it from drying out. For longer storage, wrap tightly and freeze for up to 1 month. Let it thaw in the refrigerator before serving.
Nutrition Information
Yield
10Serving Size
1Amount Per Serving Calories 124Total Fat 4gSaturated Fat 2gTrans Fat 0gUnsaturated Fat 2gCholesterol 83mgSodium 146mgCarbohydrates 16gFiber 0gSugar 5gProtein 4g